Opplæring
Modul
Deploy disaster recovery using VMware Site Recovery Manager and Azure VMware Solution - Training
You can use VMware SRM and vSphere Replication with Azure VMware Solution for disaster recovery of VMware VMs.
Denne nettleseren støttes ikke lenger.
Oppgrader til Microsoft Edge for å dra nytte av de nyeste funksjonene, sikkerhetsoppdateringene og den nyeste tekniske støtten.
This article describes how to back up VMware VMs running on VMware ESXi hosts/vCenter Server to Azure using Azure Backup Server (MABS).
To protect VMware VM using Azure Backup you need to:
This section summarizes the support settings to protect VMware VMs.
MABS provides the following features when backing up VMware virtual machines:
| MABS versions | Supported VMware VM versions for backup |
|---|---|
| MABS v4 | VMware server 8.0, 7.0, 6.7, or 6.5 (Licensed version) |
| MABS v3 UR2 | VMware server 7.0, 6.7, 6.5, or 6.0 (Licensed Version) |
| MABS v3 UR1 | VMware server 6.7, 6.5, 6.0, or 5.5 (Licensed Version) |
Before you start backing up a VMware virtual machine, review the following list of supported scenarios and limitations.
Before you back up VMware VMs using Azure Backup Server, ensure that the following prerequisites are met:
By default, Azure Backup Server communicates with VMware servers over HTTPS. To set up the HTTPS connection, download the VMware Certificate Authority (CA) certificate, and import it on the Azure Backup Server.
Set up a secure channel as follows:
In the browser on Azure Backup Server, enter the vSphere Web Client URL. If the sign-in page doesn't appear, verify the connection and browser proxy settings.
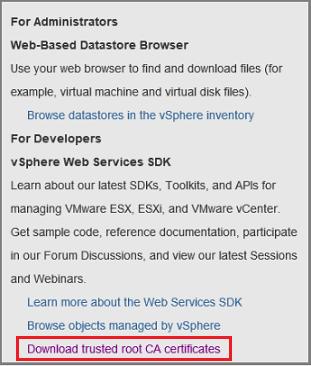
On the vSphere Web Client sign-in page, select Download trusted root CA certificates.
A file named download is downloaded. Depending on your browser, you receive a message that asks whether to open or save the file.

Save the file on the Azure Backup Server machine with a .zip extension.
Right-click download.zip > Extract All. The .zip file extracts its contents to the certs folder, which contains:
.r0 or .r1. The CRL file is associated with a certificate.
In the certs folder, right-click the root certificate file > Rename.

Change the root certificate's extension to .crt, and confirm. The file icon changes to one that represents a root certificate.
Right-click the root certificate and from the pop-up menu, select Install Certificate.
In Certificate Import Wizard, select Local Machine as the destination for the certificate, and then select Next. Confirm if you're asked if you want to allow changes to the computer.

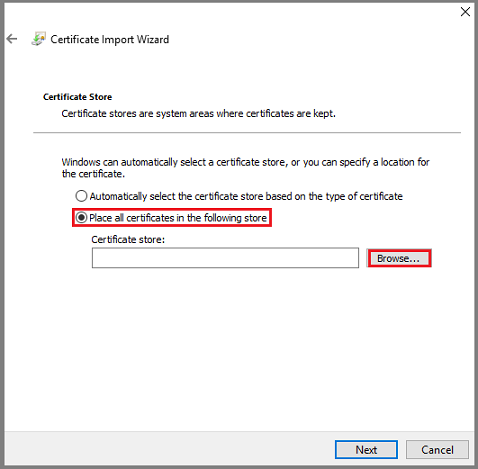
On the Certificate Store page, select Place all certificates in the following store, and then select Browse to choose the certificate store.
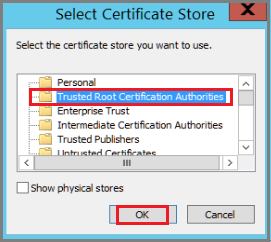
On Select Certificate Store, select Trusted Root Certification Authorities as the destination folder for the certificates, and then select OK.
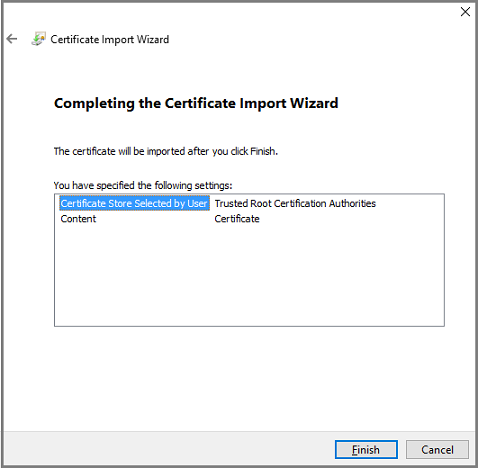
On Completing the Certificate Import Wizard, verify the folder, and then select Finish.
After the certificate import is confirmed, sign in to the vCenter Server to confirm that your connection is secure.
If you have secure boundaries within your organization, and don't want to use the HTTPS protocol between VMware servers and the Azure Backup Server machine, disable HTTPS as follows:
Copy and paste the following text into a .txt file.
Windows Registry Editor Version 5.00
[HKEY_LOCAL_MACHINE\SOFTWARE\Microsoft\Microsoft Data Protection Manager\VMWare]
"IgnoreCertificateValidation"=dword:00000001
Save the file on the Azure Backup Server machine with the name DisableSecureAuthentication.reg.
Double-click the file to activate the registry entry.
The Azure Backup Server needs a user account with permissions to access v-Center Server/ESXi host. Create a VMware role with specific privileges, and then associate a user account with the role.
Sign in to the vCenter Server (or ESXi host if you're not using vCenter Server).
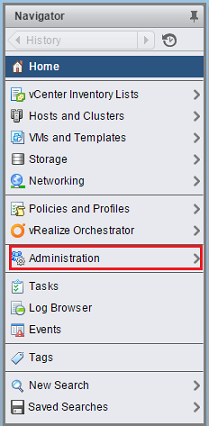
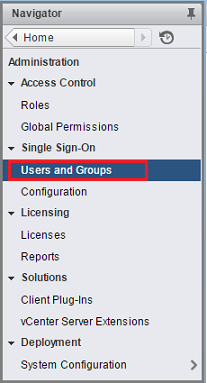
On the Navigator pane, select Administration.
On Administration > Roles, select the add role icon (the + symbol).
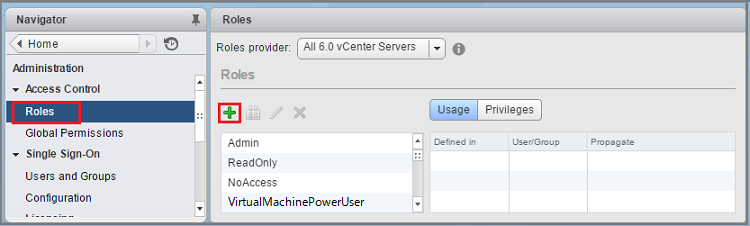
On Create Role > Role name, enter BackupAdminRole. The role name can be whatever you like, but it should be recognizable for the role's purpose.
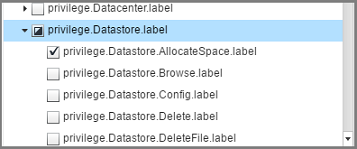
Select the privileges as summarized in the table below, and then select OK. The new role appears on the list in the Roles panel.
The following table captures the privileges that you need to assign to the user account that you create:
| Privileges for vCenter 6.5 user account | Privileges for vCenter 6.7 (and later) user account |
|---|---|
Datastore cluster.Configure a datastore cluster |
Datastore cluster.Configure a datastore cluster |
Datastore.AllocateSpace |
Datastore.AllocateSpace |
Datastore.Browse datastore |
Datastore.Browse datastore |
Datastore.Low-level file operations |
Datastore.Low-level file operations |
Global.Disable methods |
Global.Disable methods |
Global.Enable methods |
Global.Enable methods |
Global.Licenses |
Global.Licenses |
Global.Log event |
Global.Log event |
Global.Manage custom attributes |
Global.Manage custom attributes |
Global.Set custom attribute |
Global.Set custom attribute |
Host.Local operations.Create virtual machine |
Host.Local operations.Create virtual machine |
Network.Assign network |
Network.Assign network |
Resource. Assign virtual machine to resource pool |
Resource. Assign virtual machine to resource pool |
vApp.Add virtual machine |
vApp.Add virtual machine |
vApp.Assign resource pool |
vApp.Assign resource pool |
vApp.Unregister |
vApp.Unregister |
VirtualMachine.Configuration. Add Or Remove Device |
VirtualMachine.Configuration. Add Or Remove Device |
Virtual machine.Configuration.Disk lease |
Virtual machine.Configuration.Acquire disk lease |
Virtual machine.Configuration.Add new disk |
Virtual machine.Configuration.Add new disk |
Virtual machine.Configuration.Advanced |
Virtual machine.Configuration.Advanced configuration |
Virtual machine.Configuration.Disk change tracking |
Virtual machine.Configuration.Toggle disk change tracking |
Virtual machine.Configuration.Host USB device |
Virtual machine.Configuration.Configure Host USB device |
Virtual machine.Configuration.Extend virtual disk |
Virtual machine.Configuration.Extend virtual disk |
Virtual machine.Configuration.Query unowned files |
Virtual machine.Configuration.Query unowned files |
Virtual machine.Configuration.Swapfile placement |
Virtual machine.Configuration.Change Swapfile placement |
Virtual machine.Guest Operations.Guest Operation Program Execution |
Virtual machine.Guest Operations.Guest Operation Program Execution |
Virtual machine.Guest Operations.Guest Operation Modifications |
Virtual machine.Guest Operations.Guest Operation Modifications |
Virtual machine.Guest Operations.Guest Operation Queries |
Virtual machine.Guest Operations.Guest Operation Queries |
Virtual machine .Interaction .Device connection |
Virtual machine .Interaction .Device connection |
Virtual machine .Interaction .Guest operating system management by VIX API |
Virtual machine .Interaction .Guest operating system management by VIX API |
Virtual machine .Interaction .Power Off |
Virtual machine .Interaction .Power Off |
Virtual machine .Inventory.Create new |
Virtual machine .Inventory.Create new |
Virtual machine .Inventory.Remove |
Virtual machine .Inventory.Remove |
Virtual machine .Inventory.Register |
Virtual machine .Inventory.Register |
Virtual machine .Provisioning.Allow disk access |
Virtual machine .Provisioning.Allow disk access |
Virtual machine .Provisioning.Allow file access |
Virtual machine .Provisioning.Allow file access |
Virtual machine .Provisioning.Allow read-only disk access |
Virtual machine .Provisioning.Allow read-only disk access |
Virtual machine .Provisioning.Allow virtual machine download |
Virtual machine .Provisioning.Allow virtual machine download |
Virtual machine .Snapshot management. Create snapshot |
Virtual machine .Snapshot management. Create snapshot |
Virtual machine .Snapshot management.Remove Snapshot |
Virtual machine .Snapshot management.Remove Snapshot |
Virtual machine .Snapshot management.Revert to snapshot |
Virtual machine .Snapshot management.Revert to snapshot |
Obs!
The following table lists the privileges for vCenter 6.0 and vCenter 5.5 user accounts.
| Privileges for vCenter 6.0 user account | Privileges for vCenter 5.5 user account |
|---|---|
Datastore.AllocateSpace |
Network.Assign |
Global.Manage custom attributes |
Datastore.AllocateSpace |
Global.Set custom attribute |
VirtualMachine.Config.ChangeTracking |
Host.Local operations.Create virtual machine |
VirtualMachine.State.RemoveSnapshot |
Network. Assign network |
VirtualMachine.State.CreateSnapshot |
Resource. Assign virtual machine to resource pool |
VirtualMachine.Provisioning.DiskRandomRead |
Virtual machine.Configuration.Add new disk |
VirtualMachine.Interact.PowerOff |
Virtual machine.Configuration.Advanced |
VirtualMachine.Inventory.Create |
Virtual machine.Configuration.Disk change tracking |
VirtualMachine.Config.AddNewDisk |
Virtual machine.Configuration.Host USB device |
VirtualMachine.Config.HostUSBDevice |
Virtual machine.Configuration.Query unowned files |
VirtualMachine.Config.AdvancedConfig |
Virtual machine.Configuration.Swapfile placement |
VirtualMachine.Config.SwapPlacement |
Virtual machine.Interaction.Power Off |
Global.ManageCustomFields |
Virtual machine.Inventory. Create new |
|
Virtual machine.Provisioning.Allow disk access |
|
Virtual machine.Provisioning. Allow read-only disk access |
|
Virtual machine.Snapshot management.Create snapshot |
|
Virtual machine.Snapshot management.Remove Snapshot |
To create a VMware account, follow these steps:
On vCenter Server Navigator pane, select Users and Groups. If you don't use vCenter Server, create the account on the appropriate ESXi host.
The vCenter Users and Groups panel appear.
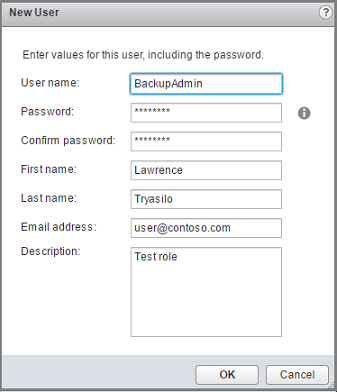
On the vCenter Users and Groups pane, select the Users tab, and then select the add users icon (the + symbol).
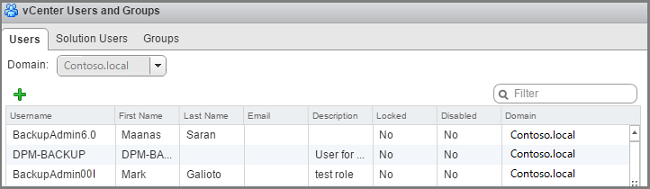
On New User dialog box, add the user information > OK. In this procedure, the username is BackupAdmin.
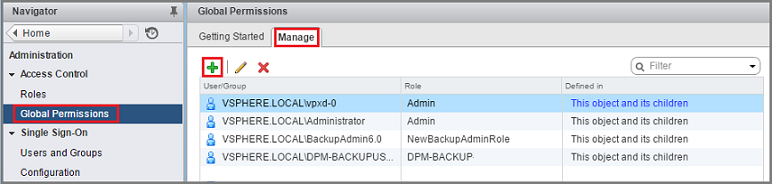
To associate the user account with the role, in the Navigator pane, select Global Permissions.
On the Global Permissions pane, select the Manage tab, and then select the add icon (the + symbol).
On Global Permission Root - Add Permission, select Add to choose the user or group.
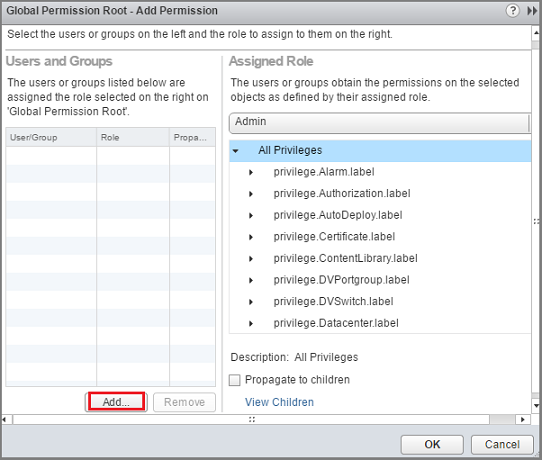
On Select Users/Groups, choose BackupAdmin > Add. In Users, the domain\username format is used for the user account. If you want to use a different domain, choose it from the Domain list. Select OK to add the selected users to the Add Permission dialog box.

On Assigned Role, from the drop-down list, select BackupAdminRole > OK.
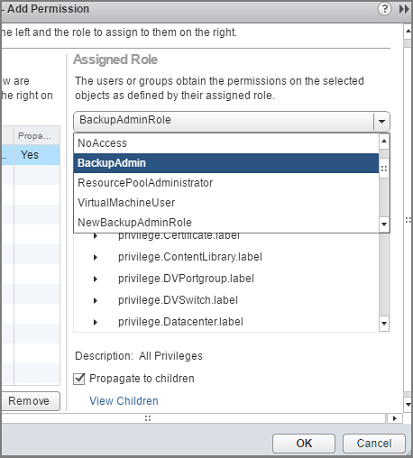
On the Manage tab on the Global Permissions pane, the new user account and the associated role appear in the list.
To add the account on the Azure Backup Server, follow these steps:
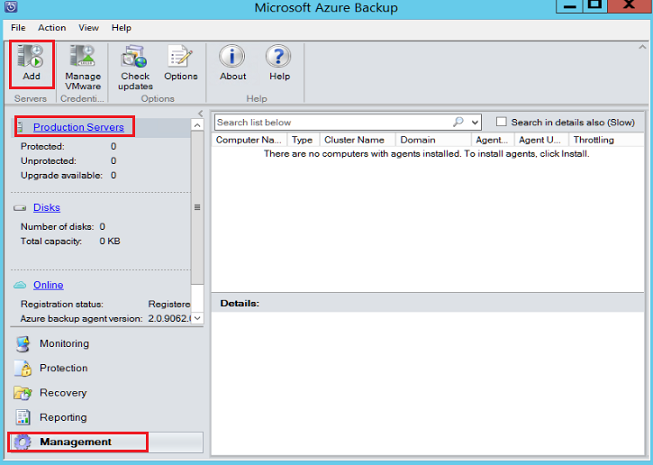
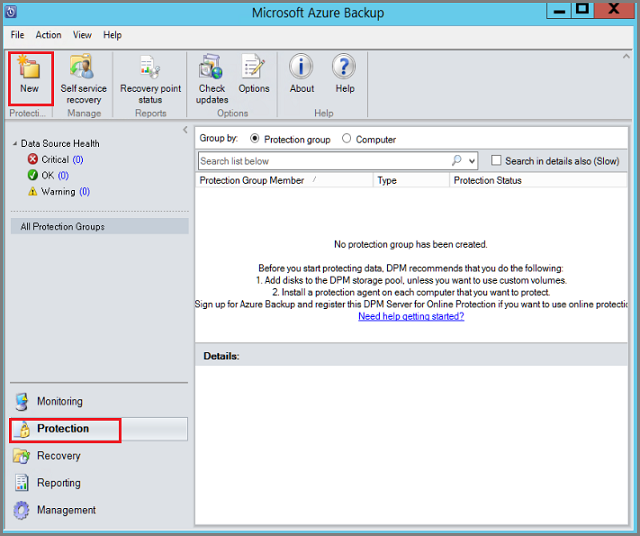
Open Azure Backup Server.
If you can't find the icon on the desktop, open Microsoft Azure Backup from the apps list.
![]()
On the Azure Backup Server console, select Management > Production Servers > Manage VMware.
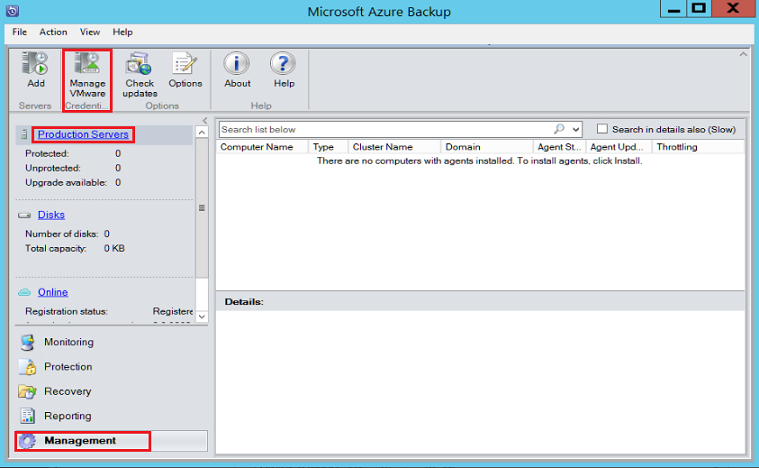
On the Manage Credentials dialog box, select Add.

On Add Credential, enter a name and a description for the new credential, and specify the username and password you defined on the VMware server. The name, Contoso Vcenter credential is used to identify the credential in this procedure. If the VMware server and Azure Backup Server aren't in the same domain, specify the domain in the user name.
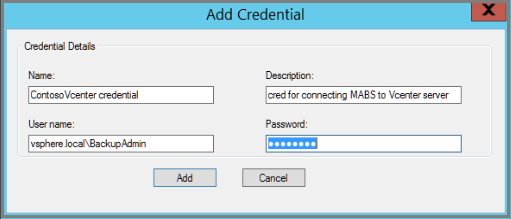
Select Add to add the new credential.

To add the vCenter Server to Azure Backup Server, follow these steps:
On the Azure Backup Server console, select Management > Production Servers > Add.
On Production Server Addition Wizard > Select Production Server type page, select VMware Servers, and then select Next.

On Select Computers, under Server Name/IP Address, specify the FQDN or IP address of the VMware server. If all the ESXi servers are managed by the same vCenter, specify the vCenter name. Otherwise, add the ESXi host.
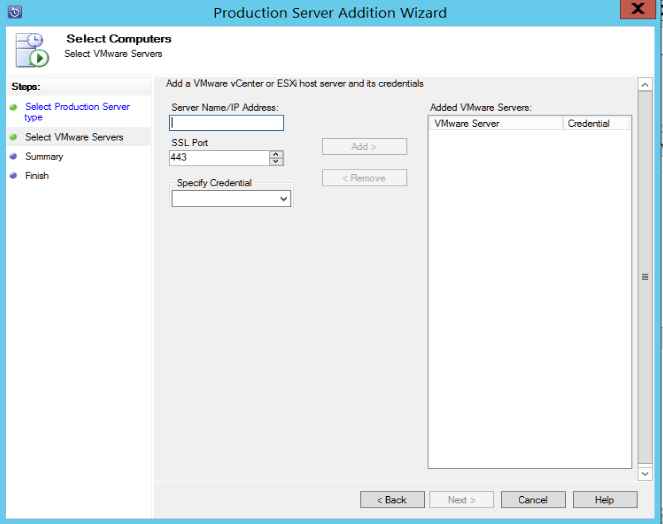
On SSL Port, enter the port that's used to communicate with the VMware server. 443 is the default port, but you can change it if your VMware server listens on a different port.
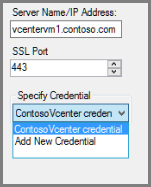
On Specify Credential, select the credential that you created earlier.
Select Add to add the VMware server to the servers list. Then select Next.
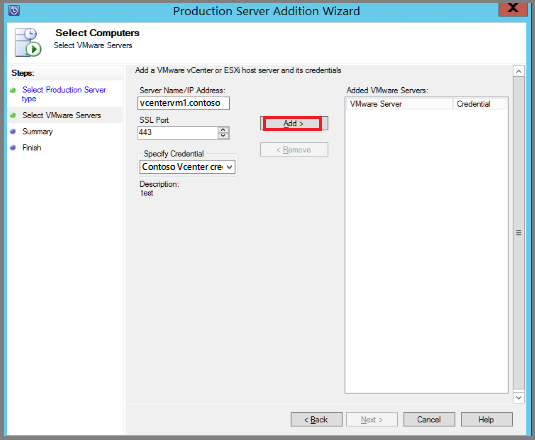
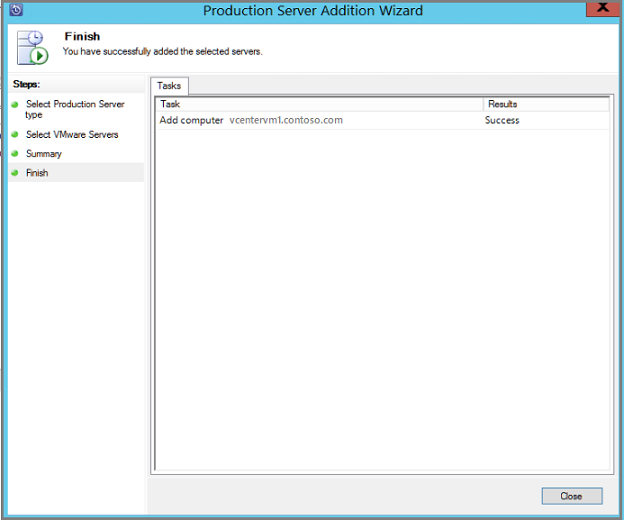
On the Summary page, select Add to add the VMware server to Azure Backup Server. The new server is added immediately, no agent is needed on the VMware server.
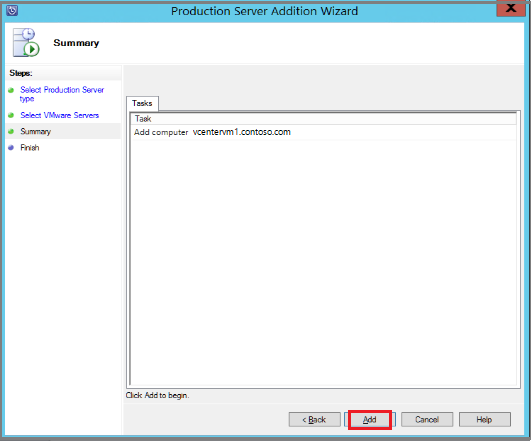
Verify settings on the Finish page.
If you have multiple ESXi hosts that aren't managed by vCenter server, or you have multiple instances of vCenter Server, you need to rerun the wizard to add the servers.
To add VMware VMs for backup. Protection groups gather multiple VMs and apply the same data retention and backup settings to all VMs in the group, follow these steps:
On the Azure Backup Server console, select Protection > New.
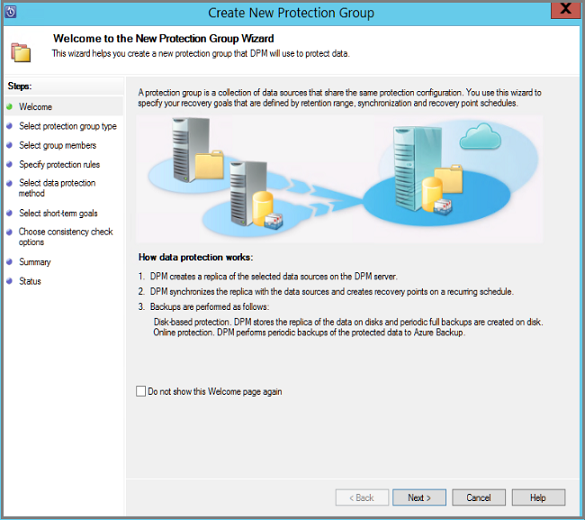
On the Create New Protection Group wizard welcome page, select Next.
On the Select Protection group type page, select Servers and then select Next. The Select group members page appears.
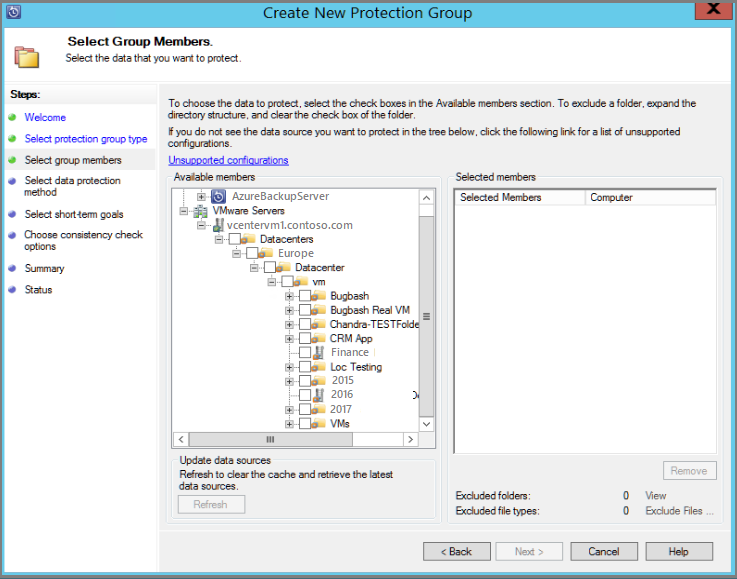
On Select group members, select the VMs (or VM folders) that you want to back up. Then select Next.
If a VM or folder is already being backed up, you can't select it. This ensures that duplicate recovery points aren't created for a VM.
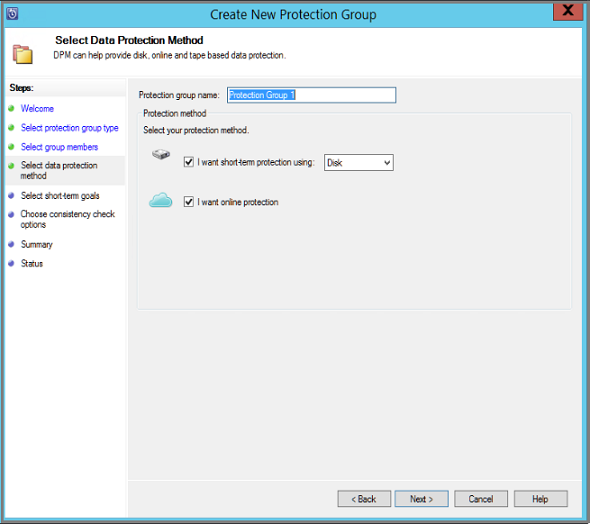
On Select Data Protection Method page, enter a name for the protection group, and protection settings. To back up to Azure, set short-term protection to Disk and enable online protection. Then select Next.
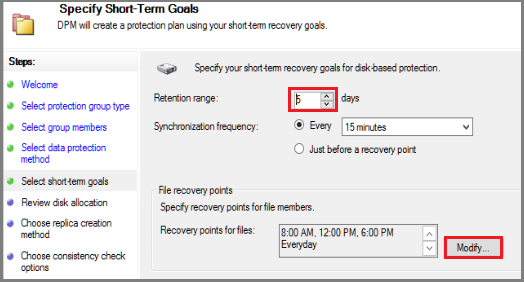
On Specify Short-Term Goals, specify how long you want to keep data backed up to disk.
If you don't want to set a backup interval, you can check Just before a recovery point so that a backup runs just before each recovery point is scheduled.
Short-term backups are full backups and not incremental.
Select Modify to change the times/dates when short-term backups occur.
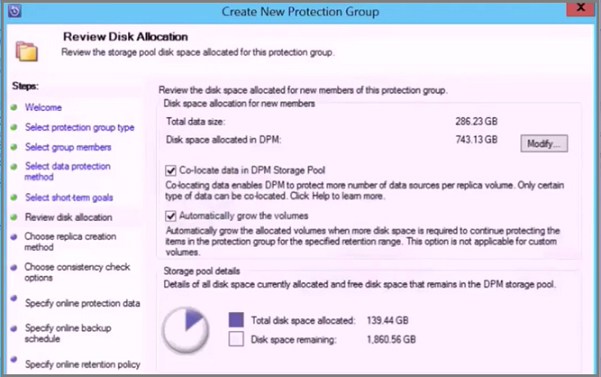
On Review Disk Allocation, review the disk space provided for the VM backups. for the VMs.
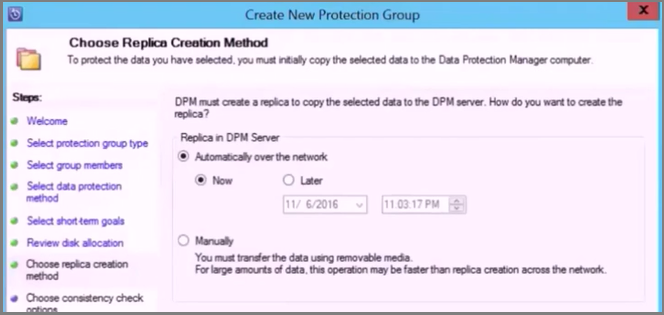
On Choose Replica Creation Method page, specify how you want to take the initial backup, and then select Next.
On Consistency Check Options, select how and when to automate the consistency checks. Then select Next.
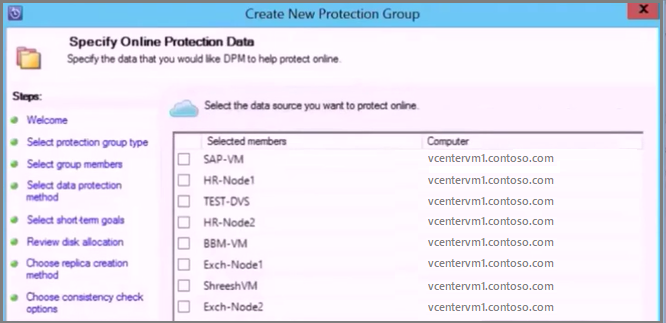
On Specify Online Protection Data page, select the VMs or VM folders that you want to back up. You can select the members individually, or select Select All to choose all members. Then select Next.
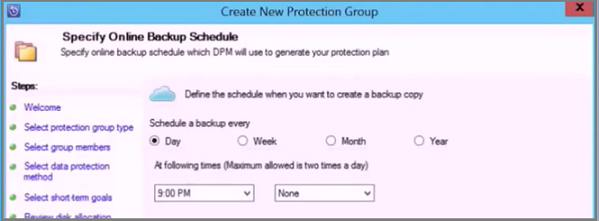
On the Specify Online Backup Schedule page, specify how often you want to back up data from local storage to Azure.
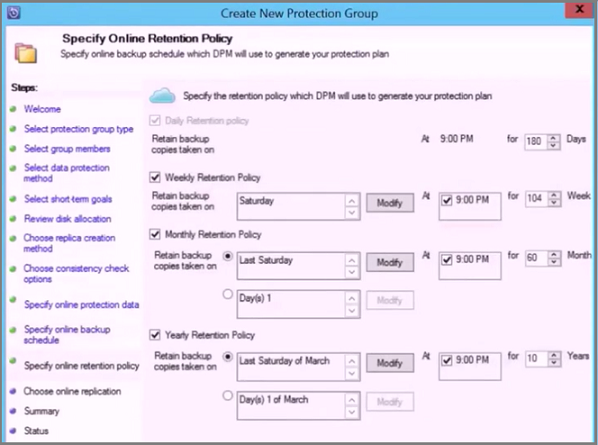
On the Specify Online Retention Policy page, indicate how long you want to keep the recovery points that are created from the daily/weekly/monthly/yearly backups to Azure. then select Next.
On the Summary page, review the settings, and then select Create Group.
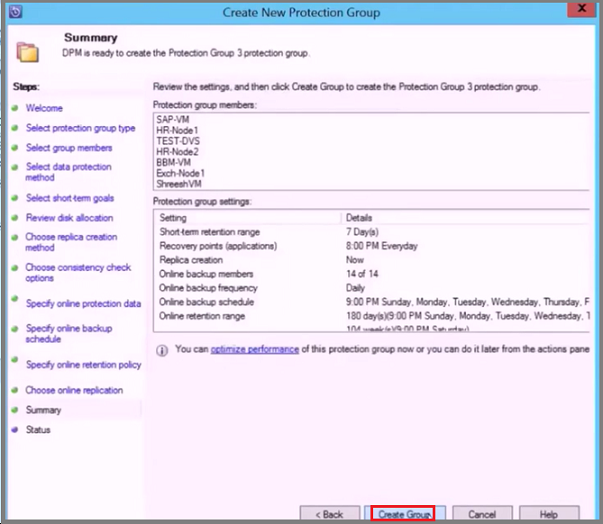
Obs!
This feature is applicable for MABS V3 UR1 (and later).
With earlier versions of MABS, parallel backups were performed only across protection groups. With MABS V3 UR1 (and later), all your VMware VMs backups within a single protection group are parallel, leading to faster VM backups. All VMware delta replication jobs run in parallel. By default, the number of jobs to run in parallel is set to 8.
You can modify the number of jobs by using the registry key as shown below (not present by default, you need to add it):
Key Path: HKLM\Software\Microsoft\Microsoft Data Protection Manager\Configuration\ MaxParallelIncrementalJobs
Key Type: DWORD (32-bit) VMware.
Data: number
The value should be the number (decimal) of virtual machines that you select for parallel backup.
Obs!
You can modify the number of jobs to a higher value. If you set the jobs number to 1, replication jobs run serially. To increase the number to a higher value, you must consider the VMware performance. Consider the number of resources in use and additional usage required on VMWare vSphere Server, and determine the number of delta replication jobs to run in parallel. Also, this change will affect only the newly created protection groups. For existing protection groups you must temporarily add another VM to the protection group. This should update the protection group configuration accordingly. You can remove this VM from the protection group after the procedure is completed.
To back up vSphere 6.7, 7.0, and 8.0, follow these steps:
Obs!
VMware 6.7 onwards had TLS enabled as communication protocol.
Windows Registry Editor Version 5.00

[HKEY_LOCAL_MACHINE\SOFTWARE\WOW6432Node\Microsoft\.NETFramework\v2.0.50727]
"SystemDefaultTlsVersions"=dword:00000001
"SchUseStrongCrypto"=dword:00000001

[HKEY_LOCAL_MACHINE\SOFTWARE\WOW6432Node\Microsoft\.NETFramework\v4.0.30319]
"SystemDefaultTlsVersions"=dword:00000001
"SchUseStrongCrypto"=dword:00000001

[HKEY_LOCAL_MACHINE\SOFTWARE\Microsoft\.NETFramework\v2.0.50727]
"SystemDefaultTlsVersions"=dword:00000001
"SchUseStrongCrypto"=dword:00000001

[HKEY_LOCAL_MACHINE\SOFTWARE\Microsoft\.NETFramework\v4.0.30319]
"SystemDefaultTlsVersions"=dword:00000001
"SchUseStrongCrypto"=dword:00000001
With MABS V3 UR1 (and later), you can exclude the specific disk from VMware VM backup. The configuration script ExcludeDisk.ps1 is located in the C:\Program Files\Microsoft Azure Backup Server\DPM\DPM\bin folder.
To configure the disk exclusion, follow these steps:
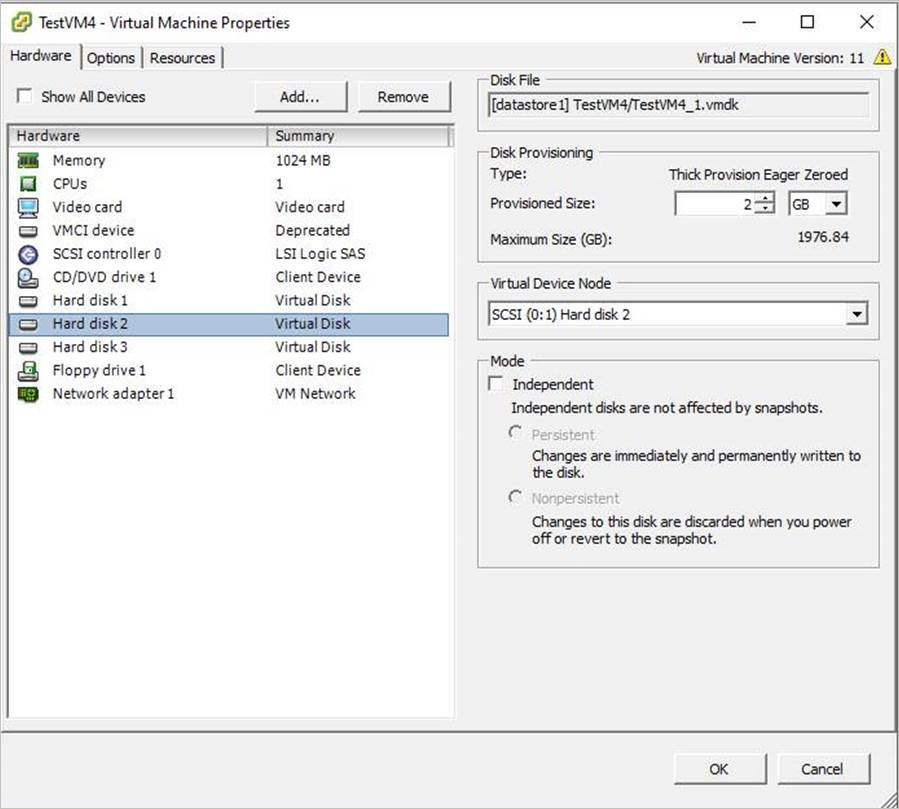
On the VMware console, go to VM settings for which you want to exclude the disk.
Select the disk that you want to exclude and note the path for that disk.
For example, to exclude the Hard Disk 2 from the TestVM4, the path for Hard Disk 2 is [datastore1] TestVM4/TestVM4_1.vmdk.
Navigate to the MABS server where the VMware VM is configured for protection to configure disk exclusion.
Get the details of the VMware host that's protected on the MABS server.
$psInfo = get-DPMProductionServer
$psInfo
ServerName   ClusterName     Domain            ServerProtectionState
----------   -----------     ------            ---------------------
Vcentervm1                   Contoso.COM       NoDatasourcesProtected
Select the VMware host and list the VMs protection for the VMware host.
$vmDsInfo = get-DPMDatasource -ProductionServer $psInfo[0] -Inquire
$vmDsInfo
Computer     Name     ObjectType
--------     ----     ----------
Vcentervm1  TestVM2      VMware
Vcentervm1  TestVM1      VMware
Vcentervm1  TestVM4      VMware
Select the VM for which you want to exclude a disk.
$vmDsInfo[2]
Computer     Name      ObjectType
--------     ----      ----------
Vcentervm1   TestVM4   VMware
To exclude the disk, navigate to the Bin folder and run the ExcludeDisk.ps1 script with the following parameters:
Obs!
Before running this command, stop the DPMRA service on the MABS server. Otherwise, the script returns success, but doesn't update the exclusion list. Ensure there are no jobs in progress before stopping the service.
To add/remove the disk from exclusion, run the following command:
./ExcludeDisk.ps1 -Datasource $vmDsInfo[0] [-Add|Remove] "[Datastore] vmdk/vmdk.vmdk"
Example:
To add the disk exclusion for TestVM4, run the following command:
C:\Program Files\Microsoft Azure Backup Server\DPM\DPM\bin> ./ExcludeDisk.ps1 -Datasource $vmDsInfo[2] -Add "[datastore1] TestVM4/TestVM4\_1.vmdk"
Creating C:\Program Files\Microsoft Azure Backup Server\DPM\DPM\bin\excludedisk.xml
Disk : [datastore1] TestVM4/TestVM4\_1.vmdk, has been added to disk exclusion list.
Verify that the disk has been added for exclusion.
To view the existing exclusion for specific VMs, run the following command:
./ExcludeDisk.ps1 -Datasource $vmDsInfo[0] [-view]
Example
C:\Program Files\Microsoft Azure Backup Server\DPM\DPM\bin> ./ExcludeDisk.ps1 -Datasource $vmDsInfo[2] -view
<VirtualMachine>
  <UUID>52b2b1b6-5a74-1359-a0a5-1c3627c7b96a</UUID>
  <ExcludeDisk>[datastore1] TestVM4/TestVM4\_1.vmdk</ExcludeDisk>
</VirtualMachine>
Once you configure the protection for this VM, the excluded disk won't be listed during protection.
Obs!
If you are performing these steps for an already protected VM, you need to run the consistency check manually after adding the disk for exclusion.
To remove the disk from exclusion, run the following command:
C:\Program Files\Microsoft Azure Backup Server\DPM\DPM\bin> ./ExcludeDisk.ps1 -Datasource $vmDsInfo[2] -Remove "[datastore1] TestVM4/TestVM4\_1.vmdk"
Application consistent backups for VMware VMs running Windows can fail with the ApplicationQuiesceFault error if:
To resolve this quiescing error and retry the failed application consistent backup with a crash consistent backup, use the following registry key on the MABS server running V4 UR1 or above:
Name - FailbackToCrashConsistentBackup DWORD = 1
Path- SOFTWARE\\MICROSOFT\\MICROSOFT DATA PROTECTION MANAGER\\VMWare
Troubleshoot issues about setting up of backups using Azure Backup Server.
Opplæring
Modul
Deploy disaster recovery using VMware Site Recovery Manager and Azure VMware Solution - Training
You can use VMware SRM and vSphere Replication with Azure VMware Solution for disaster recovery of VMware VMs.
Dokumentasjon
Restore VMware virtual machines using Azure Backup Server - Azure Backup
Learn how to use Microsoft Azure Backup Server (MABS) to restore VMware VM recovery points.
Back up the MABS server - Azure Backup
Learn how to back up the Microsoft Azure Backup Server (MABS).
Use Modern Backup Storage with Azure Backup Server - Azure Backup
Learn about the new features in Azure Backup Server. This article describes how to upgrade your Backup Server installation.