Use Store Operations Assist Mobile
Store Operations Assist Mobile app allows the store associate to be more productive in managing their day-to-day tasks. It allows the store manager/HQ district manager and the store associates to interact seamlessly.
By using the Store Operations Assist Mobile app, store associates can use a single device connected to the line-of-business systems and perform the following tasks:
- Identify prioritized in-store actions.
- Access task guidelines (hyperlinks, documents, pictures, etc.)
- Raise requests for urgent actions.
- Assist customers with their shopping experience.
Get started
Open the app from your device and sign-in with your company's Microsoft Entra ID account. You can view all apps shared by your organization after your sign-in. For more information, see Power Apps mobile device sign in and Power Apps web browser sign in.
Store Operations Assist Mobile dashboard
The Store Operations Assist Mobile dashboard gives a quick snapshot of the tasks planned for the store associate that day. It enables the associates to carry out the tasks seamlessly by calling out any urgent or past due tasks, so that the associate can focus on them first.
The dashboard also allows associates to stay updated with the most recent tasks they need to execute in the store. It helps them keep a check on the latest updated statuses for requests and other ad-hoc items.
The following illustration shows the primary navigation elements on the Store Operations Assist Mobile screen:
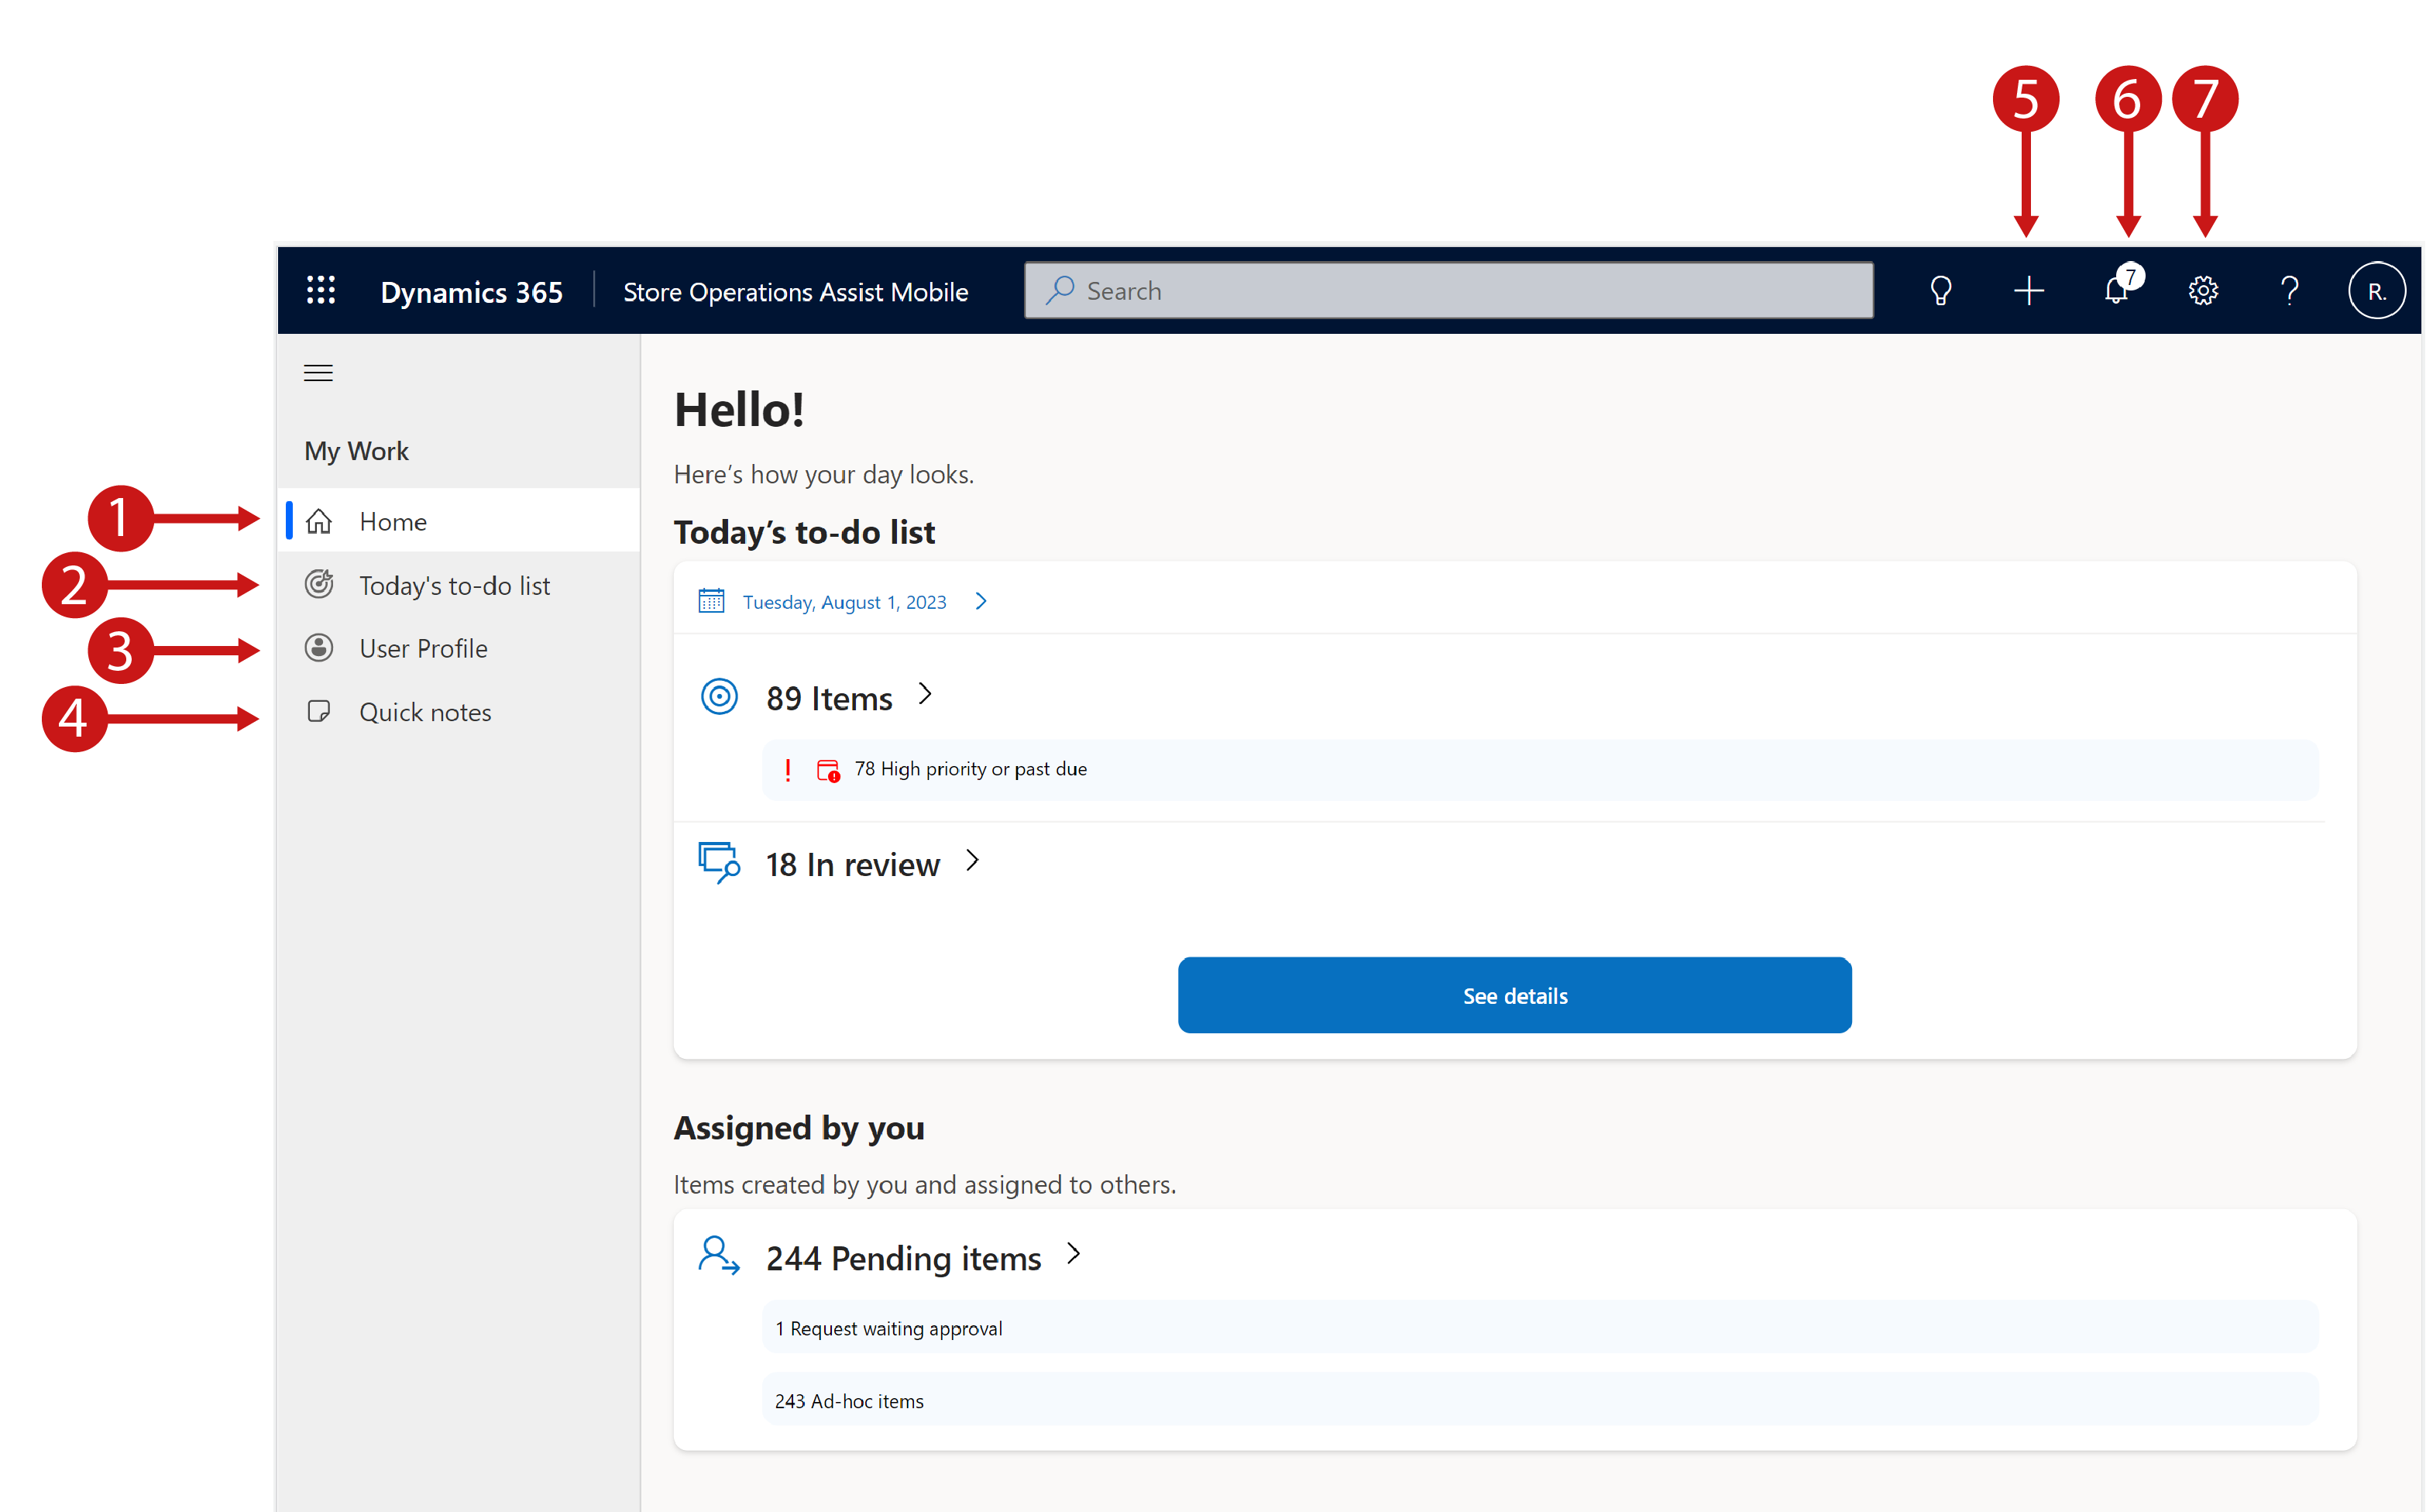
Legend
- Home: Navigate to the Home page of Store Operations Mobile App
- Today’s to-do list: Navigate to Today’s to-do list page, which shows the list of tasks that are due today
- User Profile: View user profile information
- Quick notes: Take quick text-based notes or access previous notes created earlier
- +: Create a task, a request or a quick note
- Bell icon: View task notifications
- Settings icon: View app settings
To enable you to get the most out of the dashboard in a simple and easy to use way, Store Operations Assist Mobile dashboard is divided into two sections:
To-do
The To-do section summarizes all items (planned tasks, ad-hoc tasks, requests) assigned to you by the Store manager or HQ manager at the district level. In this section, you can view:
- Count of items assigned such as planned tasks or ad-hoc tasks.
- Count of tasks that are urgent or past the due date.
- List of previous or future tasks.
- List of assigned tasks.
For an empty state (when no tasks are assigned to you), this section would show ‘no items assigned to the user.’ In this scenario, you can create either an ad-hoc item, or a request for yourself or another associate in the team.
Assigned by You
The Assigned by You section highlights items that you created and assigned to other team members or the store or department manager. In this section, you can view:
- Pending ad-hoc tasks created and assigned to another associate
- Pending requests created and assigned to the store or department manager
Use to-do list
Item card acts as a gateway to the items that you have to complete for the day. By looking at these cards, you can view the following information:
Item name.
Task type such as visual merchandising, promotion set up, etc. that the store manager configures.
Item type such as planned task, ad-hoc task, or request.
Item priority such as urgent, high, medium, or low.
Whether the task is assigned to you or to the team.
Whether the task is past due or not – past due means that the task is past the due date.
Mark as complete button - You can complete the task from the card itself instead of having to open the task details. This step helps you to complete the task faster and save time.
Add photo icon - You can capture photos quickly and add photos to the task using this option.
Due date and time – Due date and time for all tasks that are due today and for all past and future tasks.
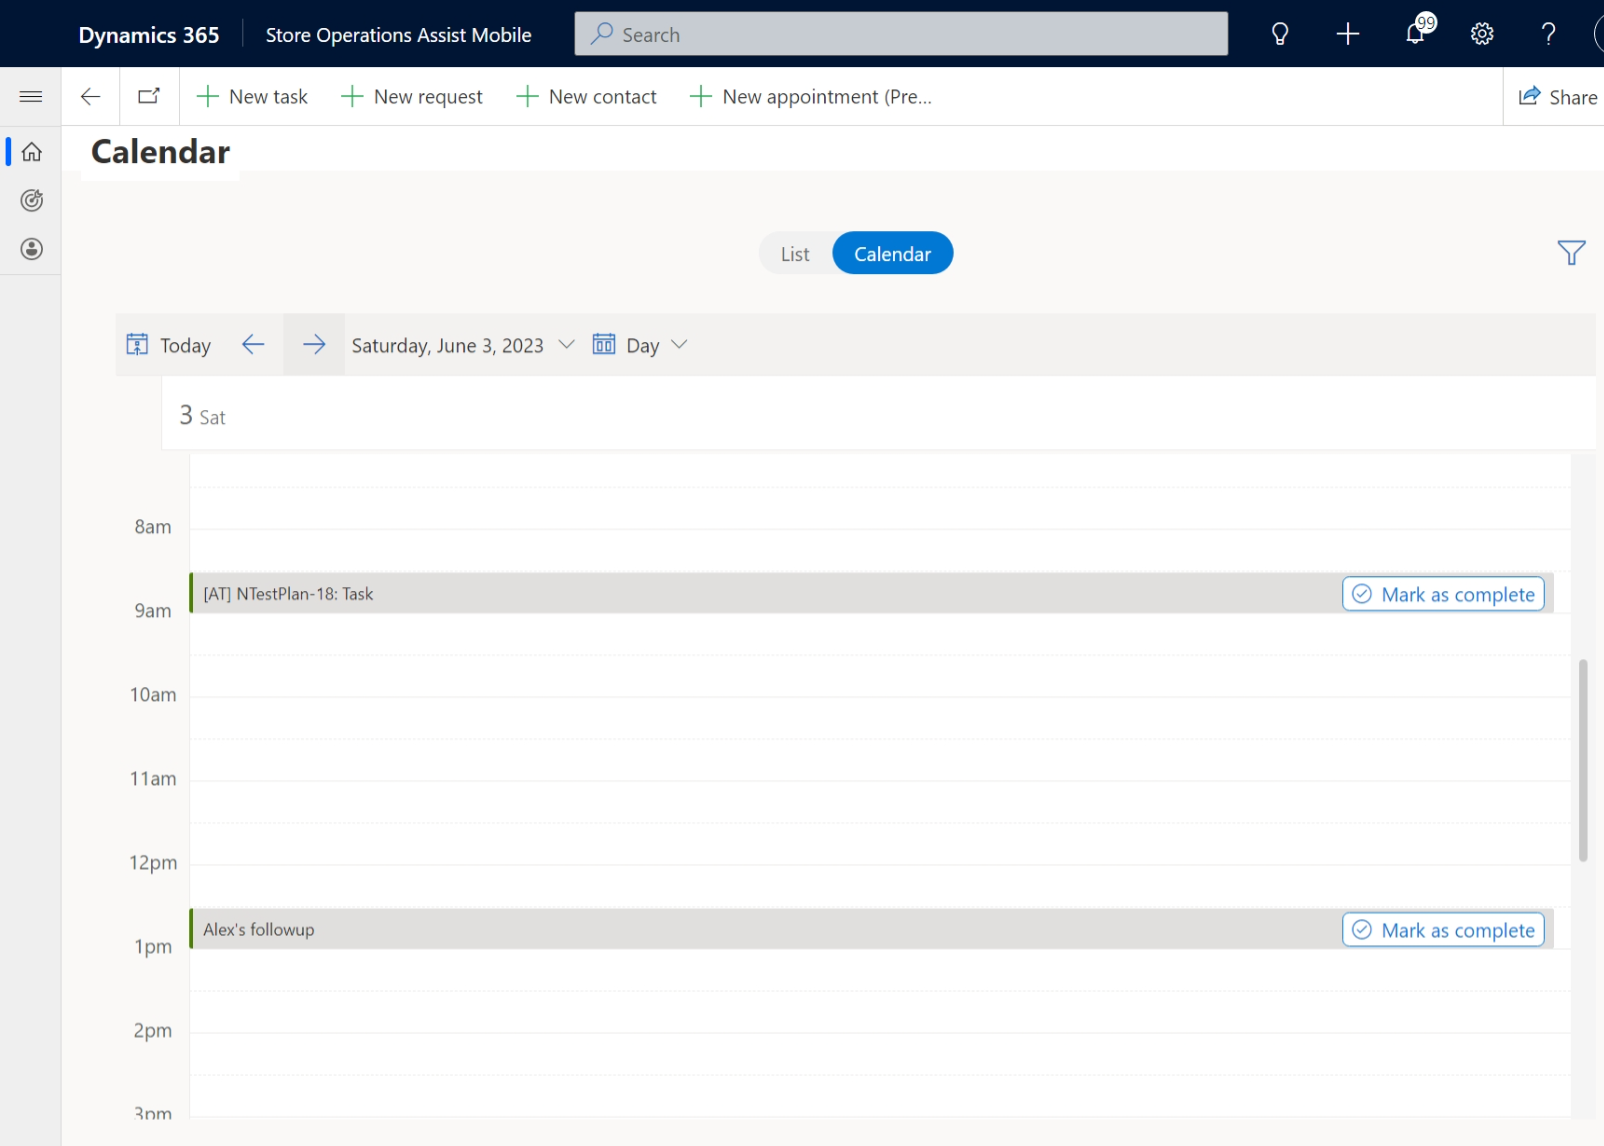
Use calendar view
You can see the tasks assigned to you in a calendar view, with just one tap, for better planning and task completion. The toggle to view tasks in calendar is available in both the homepage and in the today’s to-do list page in Store Operations Assist Mobile. The calendar view provides three views for tasks – daily, weekly, and monthly. You can also view the tasks for a specific date.
Select the task card in the calendar to open the task card and complete the task.
Note
Ensure that the Calendar View setting is enabled to ensure that you can view the tasks in the calendar view. For more information, see Enable Calender View.
Note
Calendar View is available only for tablet devices and not for mobile devices.
Group item cards by status
Item cards are grouped together based on completion status. The item card groupings are as follows:
To-do: The To-do page is the landing page that appears after navigating from the dashboard. All items are grouped under the To-do page at the start of the day, when you haven't completed any items. As the name suggests, the page shows the list of items, or tasks that you have to complete on a specific day, arranged one after the other.
Completed or Canceled: All items completed or canceled by you.
Sent for Review: All items that are sent to the store manager or HQ manager for review.
Group item cards by zones
You can view the items on the to-do list page based on the store zones where the items / tasks are executed. Examples of zones in an apparel store could include athletic wear zone, traditional wear zone, T-shirt section, etc. Similarly, examples of zones in a grocery store could include a home care (detergents) section, personal care section, etc.
You can view the tasks or items based on zones if the tasks are assigned zones during task creation in Store Operations Assist Admin. You can also view the tasks under ‘All’, which lists all item cards irrespective of the zones.
Sort item cards
You can filter the item cards on the to-do list page using the sorting feature. The options for sorting include:
- Status of the tasks such as Open/Progress, In Review, Completed/Cancelled
- Priority such as Low, Normal, High
- Assignment such as assigned to me or assigned to team
- Item type such as tasks or requests
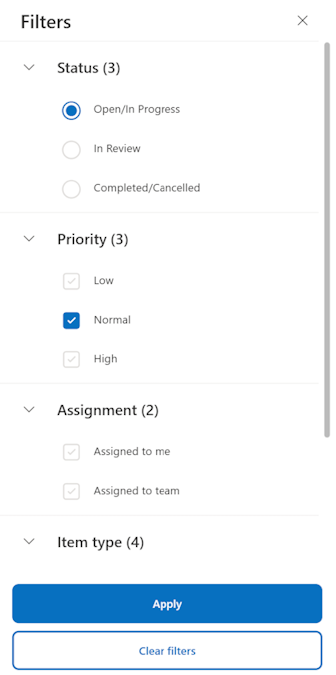
Based on the selection under the options listed, the list is filtered, and you see only those items.
Open task details
You can select the ellipsis (three dots) next to any task card to see different actions performed on that card:
Details
Name: View the name of the item.
Guidelines: View the guidelines you have to follow for task completion. Guidelines can be in the form of text, photos, or hyperlink that opens a new window. Note: Hyperlinks work only when the app is online.
Attached document: View the attached documents to the task at the time of task creation in the back office. You can use this attached document for reference.
Questions: View the questions for certain tasks for which you can submit a response. This detail helps the manager track if you can understand and complete the tasks.
Mark as Complete: Used to mark the task as complete. Task card that requires a store manager / HQ manager’s review doesn't have this option.
Send for review: Used for those tasks that require a review and can’t be marked as complete.
Create a request: Used to create a request in context of the item. You can open a request form and fill in relevant details.
Delete item: Used to delete the items that you created and assigned to yourself.
Cancel item: Used to cancel the items assigned to you by the store manager. A newly added cancel button is also accessible within the task details page, positioned just below the "Mark as Complete" button. In either scenario, when initiating task cancellation, users are prompted to choose a cancellation reason.
Photos
The Photos tab captures and links photos to a selected item / task. You can use the following two methods to add a photo to the task:
Pick Photo: You can select and attach a photo stored in the mobile device.
Take Photo: You can open the device camera, click a photo, and link it to the selected task.
Review
The Review tab shows the reviews from the store manager / District Operations Manager for a specific item, if you requested for a review.
Complete or submit a task for review
The process for each task depends on the status as follows:
If the task requires a review before completion (as per the configuration in Store Operations Assist Admin), you must select the Send for Review button to change the task status to In Review. After you submit a task for review, it's grouped under In Review section in the To-Do list.
During the In Review period, you can't make any changes to the task that is sent for review.
After the HQ manager/store manager provides the review, you can select Mark as Complete for that task. You can't perform this step if it requires a review.
Create an ad-hoc task
An ad-hoc task is one that a store associate or HQ manager hasn't planned, and unlike a planned task, it doesn’t use any task template created in Store Operations Assist Admin. Like store managers, even the store associates can create an ad-hoc task using Store Operations Assist Mobile. Store associates can create the ad-hoc task from the dashboard screen or the to-do list page.
You can create an ad-hoc task either in context of another task or as an independent ad-hoc task.
To create an independent ad-hoc task, select + New Task, either on the Dashboard page or on the to-do list page.
Fill in the appropriate details and select Save to create the ad-hoc task.
The form has two tabs:
Details
You need to fill in the information regarding the new ad-hoc task as follows:
Name: The title of the ad-hoc task
Description: Describes the ad-hoc task in detail
Due Date: The date when you have to complete the ad-hoc task, post, which it would be tagged as past due, if incomplete.
Priority: Assign the priority of the ad-hoc task. You can link a priority as low, medium, high, or urgent.
Assigned to: Assign the ad-hoc task to self or someone else.
Assign to self: By default, you would see your own name filled in here. After you create the ad-hoc item, it will show on the dashboard under the to-do section based on the due date.
Assign to someone else: You can search for and select other team members by name to assign the task. After you create the ad-hoc task, it will show on your dashboard under the ‘assigned by you’ section. Additionally, the team member to whom the ad-hoc task has been assigned, would be able to see it under the to-do list on their dashboard based on the due date.
Store zone: Used to enter the zone where you have to execute the ad-hoc task. This field is nonmandatory. An Example of a zone could be personal care department in a supermarket.
Guidelines: Details out any guidelines, in the form of text, photos or hyperlinks, which can be useful for completing this ad-hoc task.
Photos
You can link photos to the ad-hoc task in the following two ways:
Pick Photo: You can select a photo from the mobile device and link it to the ad-hoc task.
Take Photo: You can open the camera on the device to click a photo and link it to the ad-hoc task.
Create a request
A request is an item, classified as a To-do, that you have to send to the manager for approval or rejection. Store associates can create requests using Store Operations Assist Mobile either in context of a task or independently. In both these scenarios, the request creation form remains the same, just the navigation differs. An example of a request could be you requesting the replacement of a broken refrigerator.
To create a request in the context of a task, you can follow one of the following ways:
Select the ellipses (three dots) on the task / item card in the to-do list and select Create request.
Open the task card and select Related Items.
Both these options open the request form. Fill in the appropriate details and select Save to create the request.
The request form has two tabs:
Details
You must fill in the information regarding the request item, which you're creating:
Name: The title of the request item.
Description: A detailed description of the request item.
Due Date: The date by which the Store Manager has to complete this request item, post, which it would be tagged as past due, if incomplete.
Priority: Used to assign the priority of the request item. You can link a priority as low, medium, high, or urgent.
Assigned to: Used to assign the request item to the manager. You can search and select your manager’s name. After you create the request item, it shows on your dashboard under the ‘Assigned by you’ section. Additionally, the manager to whom you are assigning this request can see the request in Store Operations Assist Admin, under the request section for approval/rejection.
Important
You can create and assign a request to any user, including the store manager in the same business unit. However, you can't assign a request to any district manager since they would be part of another higher-level business unit.
Outlet zone: Enter the zone where you're creating the request. This field is nonmandatory.
Retail activity: Indicates that you're creating the request in context of a task or independently. This field is autofilled with the task name if you linked the request and the task together. If you created the request independently, then the field is blank.
Photos
You can link photos to the request item in the following two ways:
Pick Photo: You can select a photo from the mobile device and link it to the request.
Take Photo: You can open the camera on the device to click a photo and link it to the request.
Search for a customer
You can view a customer baseball card profile and details by searching the customer name, email address, or contact number in Store Operations Assist Mobile.
To search and view a customer baseball card profile:
- Enter a customer-by-customer name or customer email address or contact number.
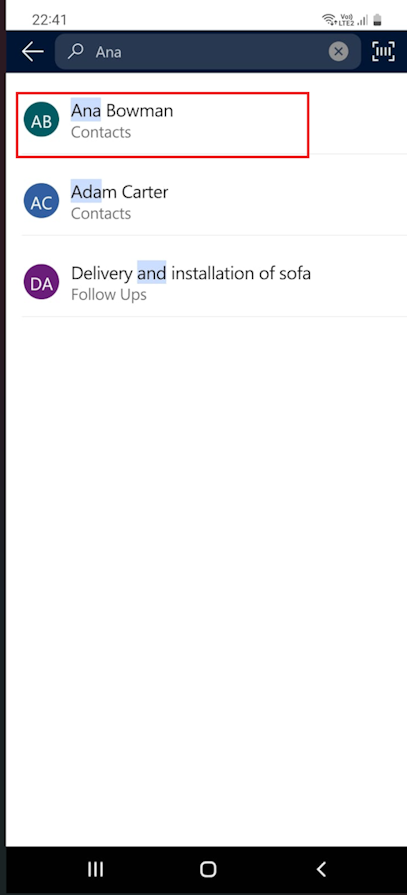
- Select the displayed name from the results
Tip
If there is no name displayed, select Enter to see all search results.
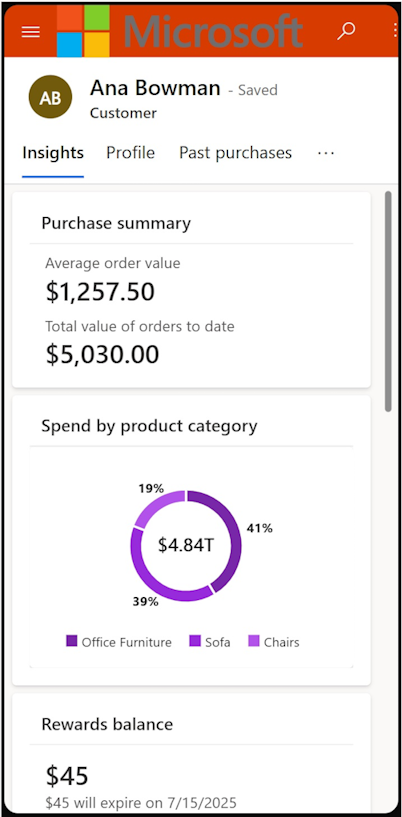
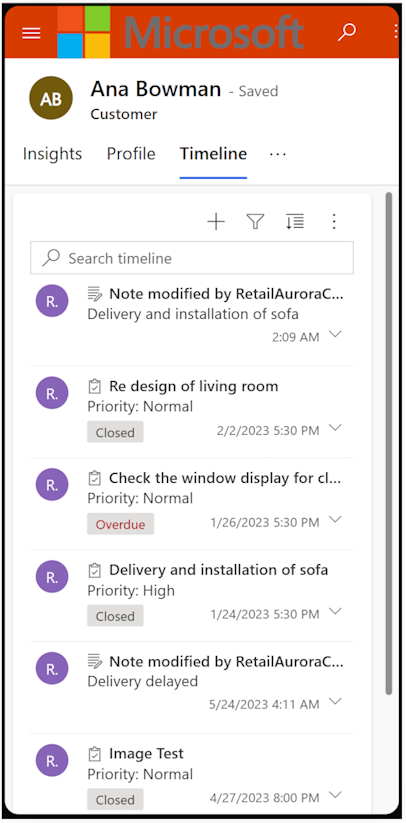
View customer baseball card profile
After searching for a customer baseball card profile, you can view more details about the customer in the following tabs:
Insights : The app displays the Insights tab by default. The Insights tab provides a quick view of customer's preferences, purchases, rewards, and recent engagements. The Insights tab has details such as purchase summary, spend by product category, rewards balance, gifts balance, most purchased brands, recent tasks, and notes about the customer.
Profile : Displays the contact and loyalty details of the customer. It contains:
- Contact and life events of the customer such as email address, contact number, address, birthday and preferred language
- Loyalty information such as tier, membership ID, loyalty points and client since time period.
Activity : Displays customer's purchases in the last three months.
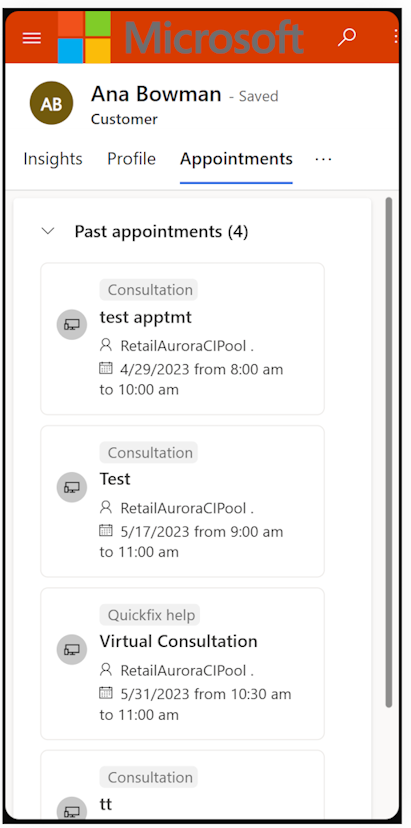
Appointments : Shows the upcoming and past appointments for the customer.
Timeline : Displays the tasks created for customer and notes about the customer in timeline view. You can search for a task or note related to customer by typing in the search button. You can also filter for relevant information such a record or activity type. Select + to create a task and notes by entering relevant details.
Create appointments
You can create either a virtual appointment or an in-store appointment using Store Operations Assist Mobile provided the store manager has already defined the appointment types at the backend.
To create an appointment:
Select the ellipses (three dots) on the dashboard or in the customer baseball card profile page and select New appointment. A new appointment page opens.
Enter the following information in the page:
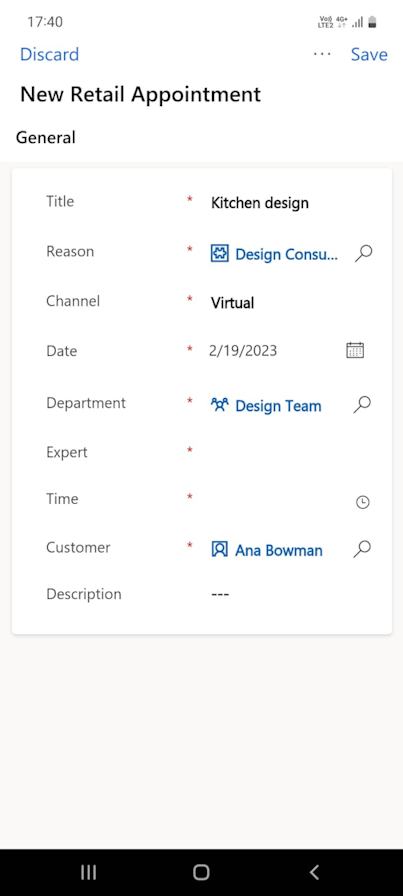
Title: Enter the title of the appointment.
Reason: Select a reason for the appointment from the configured appointment reasons.
Channel: Select virtual or in-store in the drop-down. If you've select in-store, select the store name from the list of configured stores.
Date: Enter the date when you want to schedule this virtual appointment.
Department: Select the relevant department name (experts team).
Expert: Select the available experts within the department for the scheduled date. The list doesn't display the expert name to be added to a virtual appointment if they don't have an Office 365 license.
Time: Select a preferred time and date for the expert.
Customer: Select the name of the customer.
Description: Enter a description of the appointment.
Select Save to save the appointment. A new confirmation page opens with details of the appointment.
Note
Experts and customers can view an email notification of the booked appointment in their configured email addresses.
Take quick notes
In the fast-paced environment of a retail store, store associates often find themselves juggling numerous tasks, managing customer interactions, and handling various administrative duties throughout the day. To alleviate the burden and enhance their efficiency, Store Operations Assist Mobile has introduced the Quick Notes feature.
The Quick Notes feature provides you with a convenient space to jot down important information that you can easily reference later. Whether it's a follow-up with a customer or planning for an upcoming promotion, Quick Notes offer a text-based solution that is independent of tasks. With Quick Notes, store associates can effortlessly stay organized and maintain a seamless workflow, ultimately leading to enhanced productivity and exceptional customer service.
Select + button in Store Operations Assist Mobile screen's upper right corner.
Select Quick Note to start capturing quick notes.
Use inventory visibility
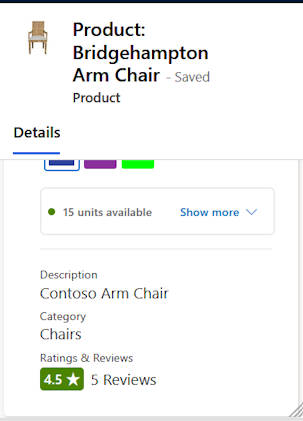
You can view the inventory information for a product by searching the product name in Store Operations Assist Mobile.
Enter a product name or product ID in the search bar at the top navigation.
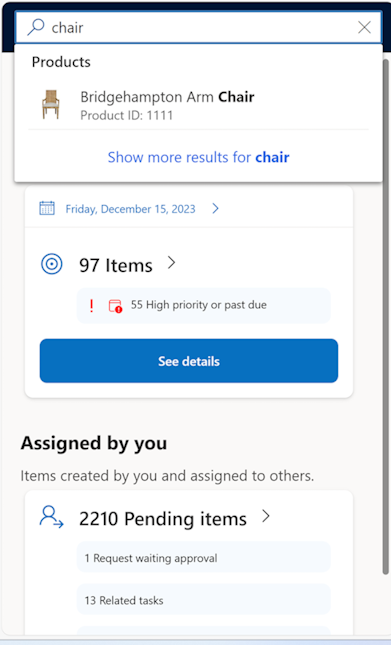
Select relevant product from suggestion shown in search bar or select enter to see the list of products.
The product page loads with product details and inventory information that is fetched from ERP systems based on plug-in implementation.
| Parameters | Options |
|---|---|
| Product name | |
| Product images | |
| Product price | |
| Brand name | |
| Product ID | |
| Product sizes | Multiple sizes can be viewed |
| Product color | Multiple colors can be viewed |
| Product inventory count | |
| Shelf level inventory count | |
| Restocking date | |
| Product description | |
| Product category | |
| Product ratings |