Create a provisioning package (advanced)
You can use Windows Configuration Designer to create a provisioning package (.ppkg) that contains customization settings, and then apply the provisioning package to a device running Windows client.
Tip
We recommend creating a local admin account when you develop and test your provisioning package. We also recommend using a least privileged domain user account to join devices to the Active Directory domain.
Start a new project
Open Windows Configuration Designer: From either the Start menu or Start menu search, type Windows Configuration Designer, and then select the Windows Configuration Designer shortcut.
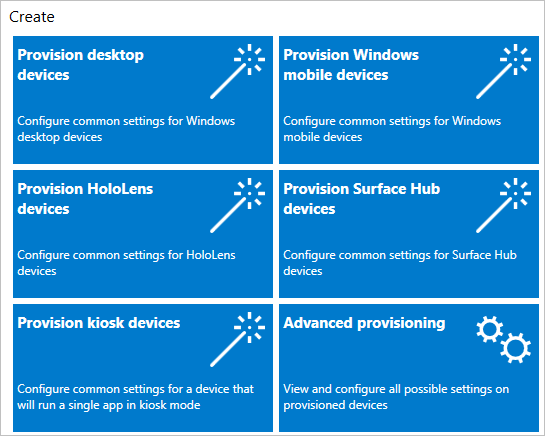
Select Advanced provisioning on the start page, which offers multiple options for creating a provisioning package, as shown in the following image:

Tip
You can start a project in the simple wizard editor and then switch the project to the advanced editor.

Enter a name for your project, and then select Next.
Select the settings you want to configure, based on the type of device, and then select Next. The following table describes the options.
Windows edition Settings available for customization Provisioning package can apply to All Windows editions Common settings All Windows client devices All Windows desktop editions Common settings and settings specific to desktop devices All Windows client desktop editions (Home, Pro, Enterprise, Pro Education, Enterprise Education) Windows 10 IoT Core Common settings and settings specific to Windows 10 IoT Core All Windows 10 IoT Core devices Windows 10 Holographic Common settings and settings specific to Windows 10 Holographic Microsoft HoloLens Common to Windows 10 Team edition Common settings and settings specific to Windows 10 Team Microsoft Surface Hub On the Import a provisioning package (optional) page, you can select Finish to create your project, or browse to and select an existing provisioning package to import to your project, and then select Finish.
Tip
Import a provisioning package can make it easier to create different provisioning packages that all have certain settings in common. For example, you could create a provisioning package that includes the settings for your organization's network. Then, import that package into other packages that you create so you don't have to reconfigure those common settings repeatedly.
In the Available customizations pane, you can now configure settings for the package.
Configure settings
For an advanced provisioning project, Windows Configuration Designer opens the Available customizations pane. The example in the following image is based on All Windows desktop editions settings.

The settings in Windows Configuration Designer are based on Windows client configuration service providers (CSPs). To learn more about CSPs, see Introduction to configuration service providers (CSPs) for IT pros.
Note
To target devices running versions earlier than Windows 10, version 2004, ComputerName customization must be defined from the setting path: Accounts/ComputerAccount/ComputerName from the advanced editor. The default path from the simple editor uses a new CSP that isn't available on older systems.
The process for configuring settings is similar for all settings. The following table shows an example.
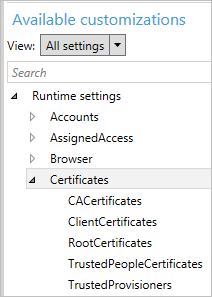
Expand a category:

Select a setting:

Enter a value for the setting. Select Add if the button is displayed:

Some settings, such as this example, require additional information. In Available customizations, select the value you created, and more settings are displayed:

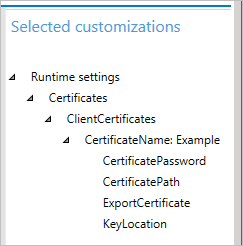
When the setting is configured, it's displayed in the Selected customizations pane:

For details on each specific setting, see Windows Provisioning settings reference. The reference article for a setting is also displayed in Windows Configuration Designer when you select the setting, as shown in the following image.

Build package
After you configure your customizations, select Export, and then select Provisioning Package.

In the Describe the provisioning package window, enter the following information, and then select Next:
- Name - This field is prepopulated with the project name. You can change this value by entering a different name in the Name field.
- Version (in Major.Minor format - Optional. You can change the default package version by specifying a new value in the Version field.
- Owner - Select IT Admin. For more information, see Precedence for provisioning packages.
- Rank (between 0-99) - Optional. You can select a value between 0 and 99, inclusive. The default package rank is 0.
In the Select security details for the provisioning package window, you can select to encrypt and/or sign a provisioning package with a selected certificate, and then select Next. Both selections are optional:
- Encrypt package - If you select this option, an autogenerated password is shown on the screen.
- Sign package - If you select this option, you must select a valid certificate to use for signing the package. You can specify the certificate by selecting Select and choosing the certificate you want to use to sign the package.
Note
You should only configure provisioning package security when the package is used for device provisioning and when the package has content with sensitive security data, such as certificates or credentials that should be prevented from being compromised. When applying an encrypted and/or signed provisioning package, either during OOBE or through the setting UI, the package can be decrypted, and if signed, be trusted without explicit user consent. An IT administrator can set policy on a user device to restrict the removal of required packages from the device, or the provisioning of potentially harmful packages on the device.
If a provisioning package is signed by a trusted provisioner, it can be installed on a device without a prompt for user consent. In order to enable trusted provider certificates, you must set the TrustedProvisioners setting prior to installing the trusted provisioning package. This is the only way to install a package without user consent. To provide additional security, you can also set RequireProvisioningPackageSignature, which prevents users from installing provisioning packages that are not signed by a trusted provisioner.
In the Select where to save the provisioning package window, specify the output location where you want the provisioning package to go once it's built, and then select Next. By default, Windows Configuration Designer uses the project folder as the output location.
In the Build the provisioning package window, select Build. The provisioning package doesn't take long to build. The project information is displayed in the build page and the progress bar indicates the build status.
If you need to cancel the build, select Cancel. This cancels the current build process, closes the wizard, and takes you back to the Customizations page.
If your build fails, an error message appears that includes a link to the project folder. You can scan the logs to determine what caused the error. Once you fix the issue, try building the package again.
If your build is successful, the name of the provisioning package, output directory, and project directory is shown.
If you choose, you can build the provisioning package again and pick a different path for the output package. To do this, select Back to change the output package name and path, and then select Next to start another build.
When you're done, select Finish to close the wizard and go back to the Customizations page.
Next steps
Learn more about applying a provisioning package: