Start retention when an event occurs
When you retain content, the retention period is often based on the age of the content. For example, you might retain documents for seven years after they're created and then delete them. But when you configure retention labels, you can also base a retention period on when a specific type of event occurs. The event triggers the start of the retention period, and all content with a retention label applied for that type of event get the label's retention actions enforced on them.
Examples for using event-based retention:
Employees leaving the organization Suppose that employee records must be retained for 10 years from the time an employee leaves the organization. After 10 years elapse, all documents related to the hiring, performance, and termination of that employee must be disposed. The event that triggers the 10-year retention period is the employee leaving the organization.
Contract expiration Suppose that all records related to contracts must be retained for five years from the time the contract expires. The event that triggers the five-year retention period is the expiration of the contract.
Product lifetime Your organization might have retention requirements related to the last manufacturing date of products for content such as technical specifications. In this case, the last manufacturing date is the event that triggers the retention period.
Event-based retention, sometimes also referred to as "event-driven retention", is typically used with records management processes. This means that:
Retention labels based on events also usually mark items as a record, as a part of a records management solution. For more information, see Learn about records management.
A document that's been declared a record but whose event trigger hasn't yet happened is retained indefinitely. Until an event triggers that document's retention period, which then expires, records can't be permanently deleted.
Retention labels based on events often trigger a disposition review at the end of the retention period, so that a records manager can manually review and dispose of the content. For more information, see Disposition of content.
A retention label based on an event has the same capabilities as any retention label in Microsoft Purview. For more information, see Learn about retention policies and retention labels.
Tip
If you're not an E5 customer, use the 90-day Microsoft Purview solutions trial to explore how additional Purview capabilities can help your organization manage data security and compliance needs. Start now at the Microsoft Purview compliance portal trials hub. Learn details about signing up and trial terms.
Understanding the relationship between event types, labels, events, and asset IDs
To successfully use event-based retention, it's important to understand the relationship between event types, retention labels, events, and asset IDs as illustrated in the diagrams and the explanation that follows:
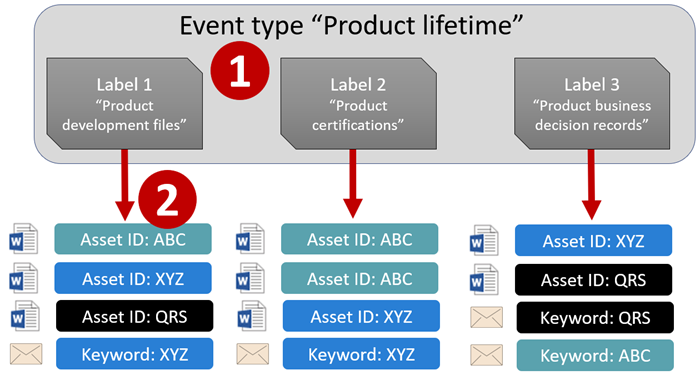
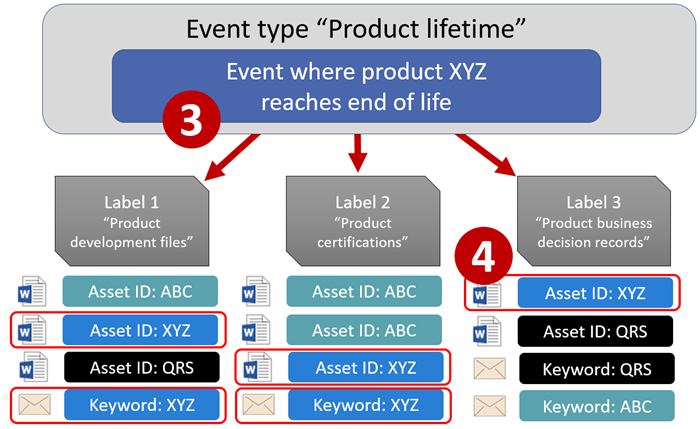
You create retention labels for different types of content and then associate them with a type of event. For example, retention labels for different types of product files and records are associated with an event type named Product Lifetime because those records must be retained for 10 years from the time the product reaches its end of life.
Users that are typically records managers apply those retention labels to content and (for documents in SharePoint and OneDrive) enter an asset ID for each item. In this example, the asset ID is a product name or code used by the organization. Then, each product's records are assigned a retention label, and each record has a property that contains an asset ID. The diagram represents all the content for all product records in an organization, and each item bears the asset ID of the product whose record it is.
Product Lifetime is the event type; a specific product reaching end of life is an event. When an event of that event type occurs—in this case, when a product reaches its end of life—you create an event that specifies:
An asset ID (for SharePoint and OneDrive documents)
Keywords (for Exchange items). In this example, the organization uses a product code in messages containing product records, so the keyword for Exchange items is functionally the same as the asset ID for SharePoint and OneDrive documents.
The date when the event occurred. This date is used as the start of the retention period. This date can be the current, a past, or a future date.
After you create an event, that event date is synchronized to all the content that has a retention label of that event type and that contains the specified asset ID or keyword. Like any retention label, this synchronization can take up to seven days. In the previous diagram, all the items circled in red have their retention period triggered by this event. In other words, when this product reaches its end of life, that event triggers the retention period for that product's records.
It's important to understand that if you don't specify an asset ID or keywords for an event, all content with a retention label of that event type will have its retention period triggered by the event. This means that in the previous diagram, all content would start being retained. It's unlikely this outcome is what you intended.
Finally, remember that each retention label has its own retention settings. In this example, they all specify 10 years, but it's possible for an event to trigger retention labels where each label has a different retention period.
How to set up event-based retention
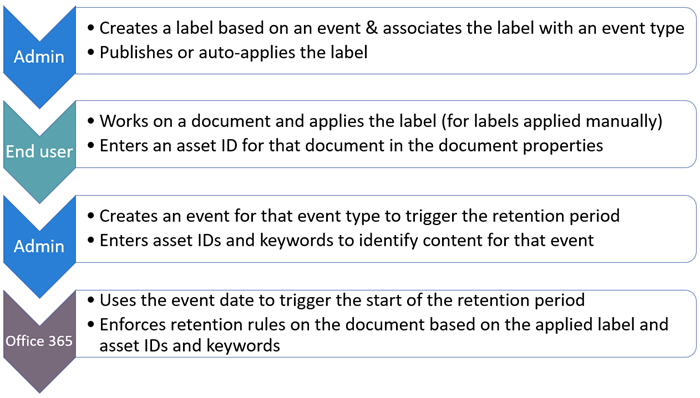
High-level workflow for event-based retention:
Tip
See Use retention labels to manage the lifecycle of documents stored in SharePoint for a detailed scenario about using managed properties in SharePoint to auto-apply retention labels and implement event-based retention.
Step 1: Create a label whose retention period is based on an event
To create and configure your retention label, see the instructions for Create retention labels for records management. But specific to event-based retention:
On the Define label settings page when you create the retention label, make sure you select Retain items forever or for a specific period. Then:
On the Define the period page, after you've set the time period, select one of the default event types from the dropdown list for When should the period begin?. Or, create your own event type by selecting Create new event type and follow the configuration prompts:
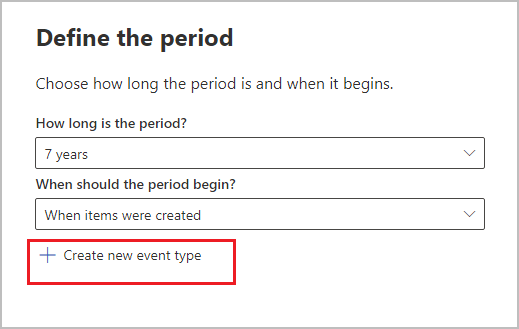
An event type is simply a general description of an event that you want to associate with a retention label.
The default event types have (event type) after their name in the dropdown list for easier identification, and you can also see and create event type from the Records management > Events tab > Manage event types.
Event-based retention requires retention settings that:
Retain the content.
Delete the content automatically or trigger a disposition review at the end of the retention period.
Event-based retention is typically used for content that's declared a record, so now is a good time to check whether you also need to select the option that marks content as a record.
If you're using an existing event type rather than creating a new event type, skip to step 3.
Note
After you choose an event type and save the retention label, the event type can't be changed.
Step 2: Create a new event type for your label
For the retention settings, if you selected Create new event type, enter a name and description for your event type. Then select Next, Submit, and Done.
Back on the Define the period page, for When should the period begin?, use the dropdown list to select the event type that you created.
Step 3: Publish or auto-apply the event-based retention labels
Just like any retention label, you need to publish or auto-apply an event-based label, for it to be manually or automatically applied to content:
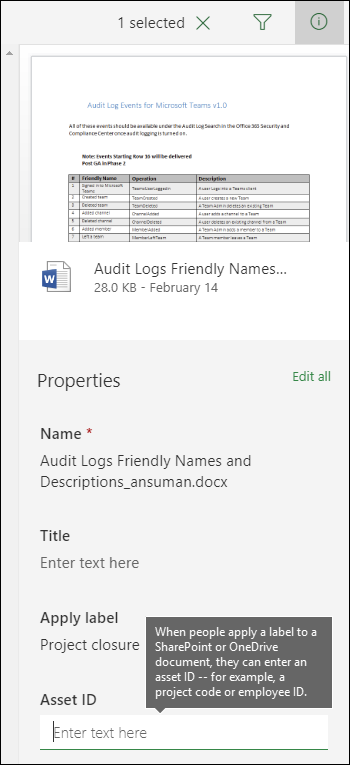
Step 4: Enter an asset ID
After an event-based label is applied to content, you can enter an asset ID for each item. For example, your organization might use:
Product codes that you can use to retain content for only a specific product.
Project codes that you can use to retain content for only a specific project.
Employee IDs that you can use to retain content for only a specific person.
Asset ID is simply another document property that's available in SharePoint and OneDrive. Your organization might already use other document properties and IDs to classify content. If so, you can also use those properties and values when you create an event—see step 6 that follows. The important point is that you must use some property:value combination in the document properties to associate that item with an event type.
Step 5: Create an event
When a particular instance of that event type occurs, such as a product reaches its end of life, create an event in the Microsoft Purview portal or the Microsoft Purview compliance portal. Depending on the portal you're using:
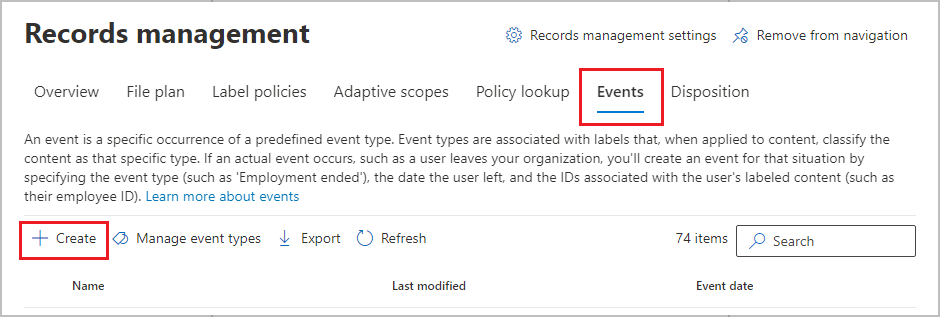
Sign in to the Microsoft Purview portal > Records Management card > Events.
If the Records Management solution card isn't displayed, select View all solutions and then select Records Management from the Risk & Compliance section.
Sign in to the Microsoft Purview compliance portal > Solutions > Records management > Events tab.
Select + Create to create an event. You trigger the event by creating it, here. For example, from the Microsoft Purview portal:
Up to 1,000,000 events are supported per tenant.
Step 6: Choose the same event type used by the label in step 2
When you create the event, choose the same event type specified in the retention label settings in step 2. For example, if you selected Product Lifetime as your event type for the label settings, select Product Lifetime when you create the event. Only content with retention labels applied to it of that event type will have its retention period triggered.
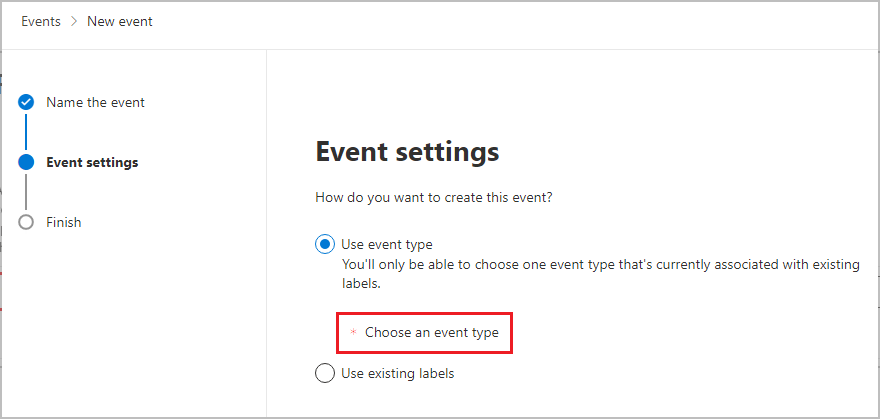
Alternatively, if you need to create an event for multiple retention labels that have different event types, select the Choose Existing Labels option. Then, select the labels that are configured for the event types you want to associate with this event.
Step 7: Enter keywords or a query, or asset ID for SharePoint and OneDrive
Now you narrow the scope of the content. You do this by specifying keywords or a query. For SharePoint and OneDrive content, you can also do this by specifying asset IDs.
Queries use Keyword Query Language (KQL). For more information about the query syntax, see Keyword Query Language (KQL) syntax reference. For more information about the searchable properties that you can use, see Keyword queries and search conditions for Content Search.
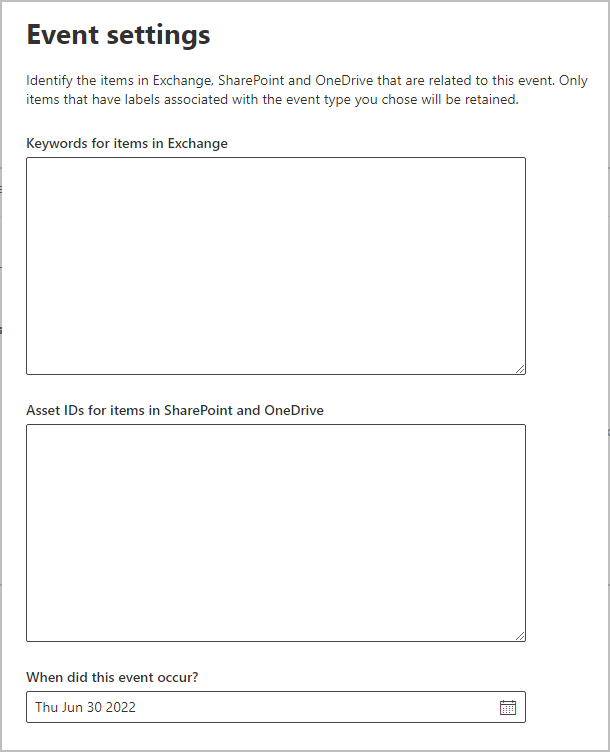
For asset IDs, retention will be enforced only on content with the specified property:value pair. For example, if you're using the Asset ID property, enter ComplianceAssetID:<value> in the box for asset IDs shown in the following picture.
If an asset ID isn't entered, all content with labels of that event type get the same retention date applied to them.
Your organization might have applied other properties and IDs to the documents related to this event type. For example, if you need to detect a specific product's records, the ID might be a combination of your custom property ProductID and the value "XYZ". In this case, you'd enter ProductID:XYZ in the box for asset IDs shown in the following picture.
Finally, choose the date when the event occurred; this date is used as the start of the retention period. After you create an event, that event date is synchronized to all the content with a retention label of that event type, asset ID, and keywords or queries. As with any retention label, this synchronization can take up to seven days.
After creating an event, the retention settings take effect for the content that's already labeled and indexed. If the retention label is added to new content after the event is created, you must create a new event with the same details.
Deleting an event doesn't cancel the retention settings that are now in effect for the content that's already labeled. Currently, you can't cancel events after they're triggered.
Use Content Search to find all content with a specific label or asset ID
After retention labels are assigned to content, you can use content search to find all content that has a specific retention label or that contains a specific asset ID:
To find all content with a specific retention label, choose the Retention label condition, and then enter the complete label name or part of the label name and use a wildcard.
To find all content with a specific asset ID, enter the ComplianceAssetID property and a value, using the format
ComplianceAssetID:<value>.
For more information, see Keyword queries and search conditions for Content Search.
Automate events by using PowerShell
You can use a PowerShell script to automate event-based retention from your business applications. The PowerShell cmdlets available for event-based retention:
to help identify other cmdlets to create retention labels and their policies, see PowerShell cmdlets for retention policies and retention labels.
Automate events by using Graph API
You can use Microsoft Graph Records Management APIs to automatically create the events and event types that trigger the start of the retention time.
Note
In the past, you could use REST APIs to automate the events. This method is now deprecated and no longer works. Instead, use Microsoft Graph API.