Notitie
Voor toegang tot deze pagina is autorisatie vereist. U kunt proberen u aan te melden of mappen te wijzigen.
Voor toegang tot deze pagina is autorisatie vereist. U kunt proberen om mappen te wijzigen.
Van toepassing op:✅ Data-engineer ing en Datawetenschap in Microsoft Fabric
Meer informatie over het verzenden van Spark-sessietaken met behulp van de Livy-API voor Fabric Data Engineering.
Vereisten
Fabric Premium- of proefcapaciteit met een Lakehouse
Een externe client zoals Visual Studio Code met Jupyter Notebooks, PySpark en de Microsoft Authentication Library (MSAL) voor Python
Een Microsoft Entra-app-token. Een toepassing registreren met het Microsoft Identity Platform
Of een Microsoft Entra SPN-token. Toepassingsreferenties toevoegen en beheren in Microsoft Entra
Bepaalde gegevens in uw lakehouse, in dit voorbeeld wordt NYC Taxi & Limousine Commission green_tripdata_2022_08 een parquet-bestand geladen in de lakehouse
De Livy-API definieert een uniform eindpunt voor bewerkingen. Vervang de tijdelijke aanduidingen {Entra_TenantID}, {Entra_ClientID}, {Fabric_WorkspaceID}, {Fabric_LakehouseID} door de juiste waarden wanneer u de voorbeelden in dit artikel volgt.
Visual Studio Code configureren voor uw Livy API-sessie
Selecteer Lakehouse-instellingen in uw Fabric Lakehouse.

Navigeer naar de Livy endpoint-sectie.
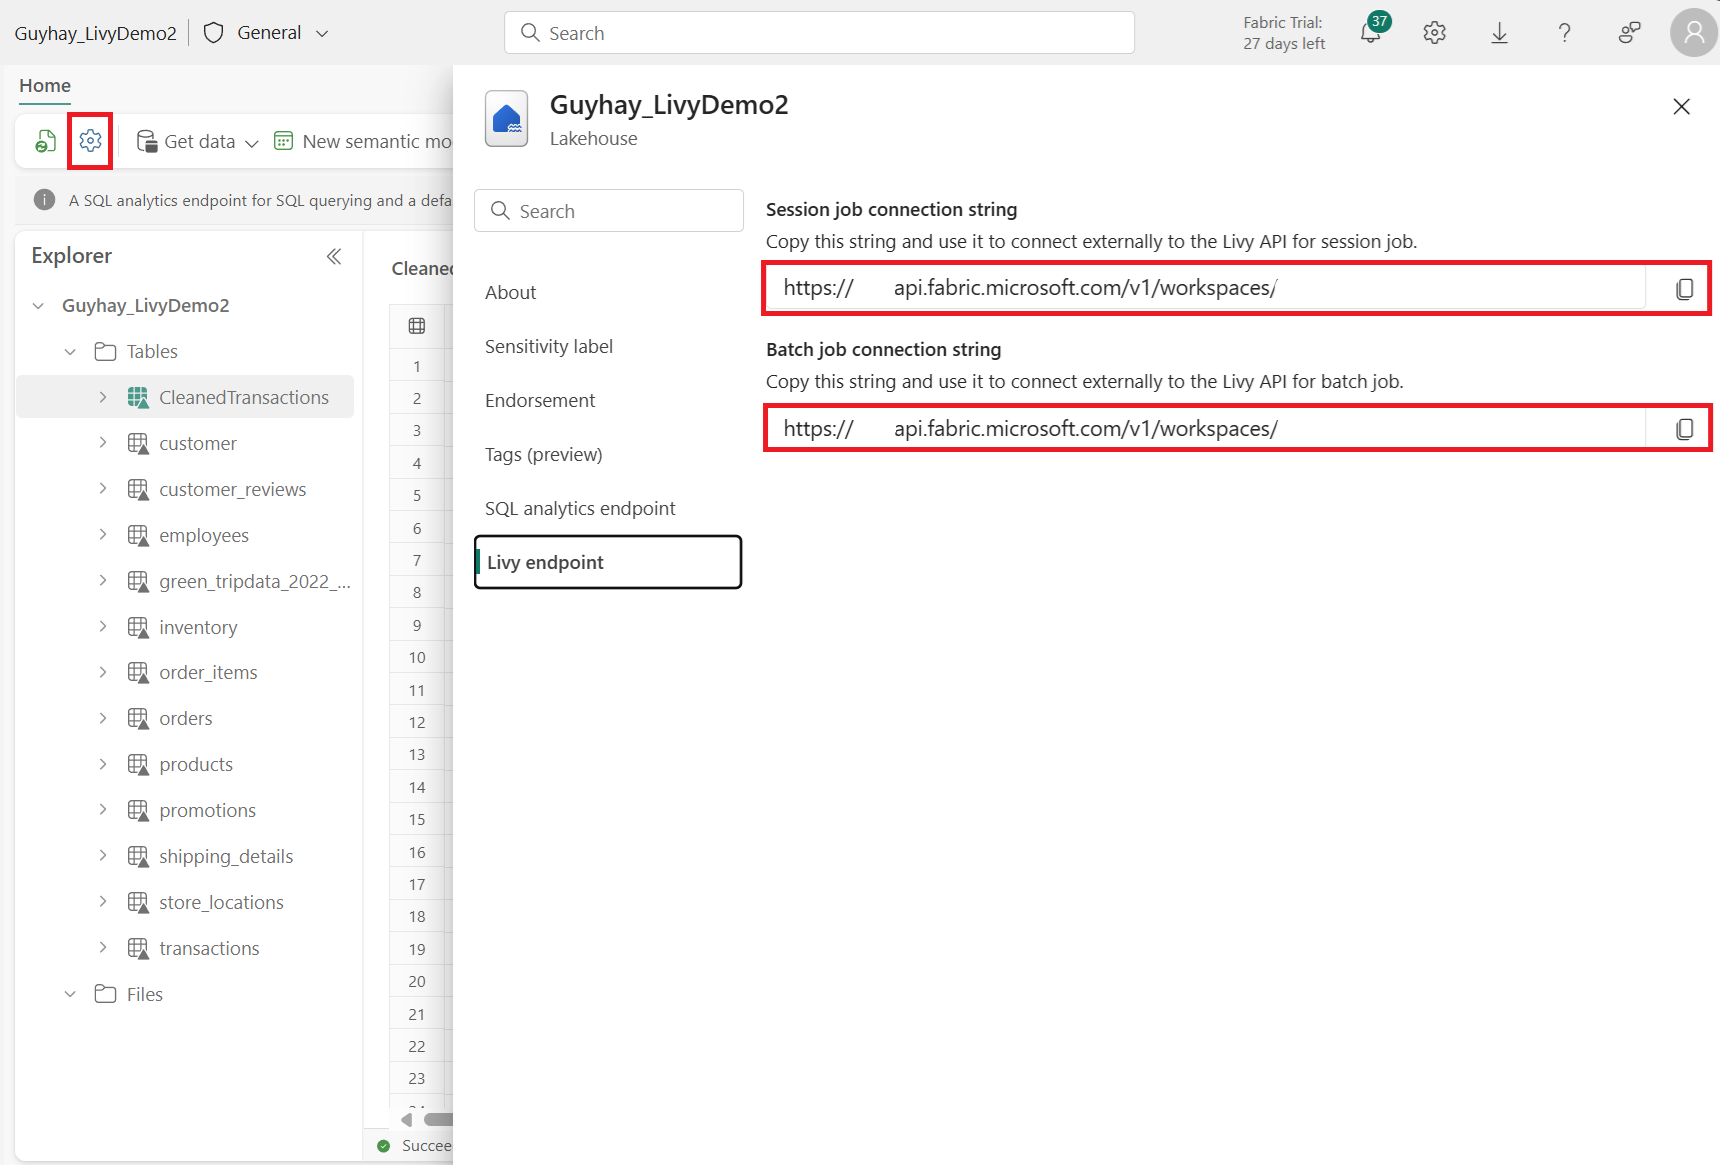
Kopieer de sessietaak verbindingsreeks (eerste rood vak in de afbeelding) naar uw code.
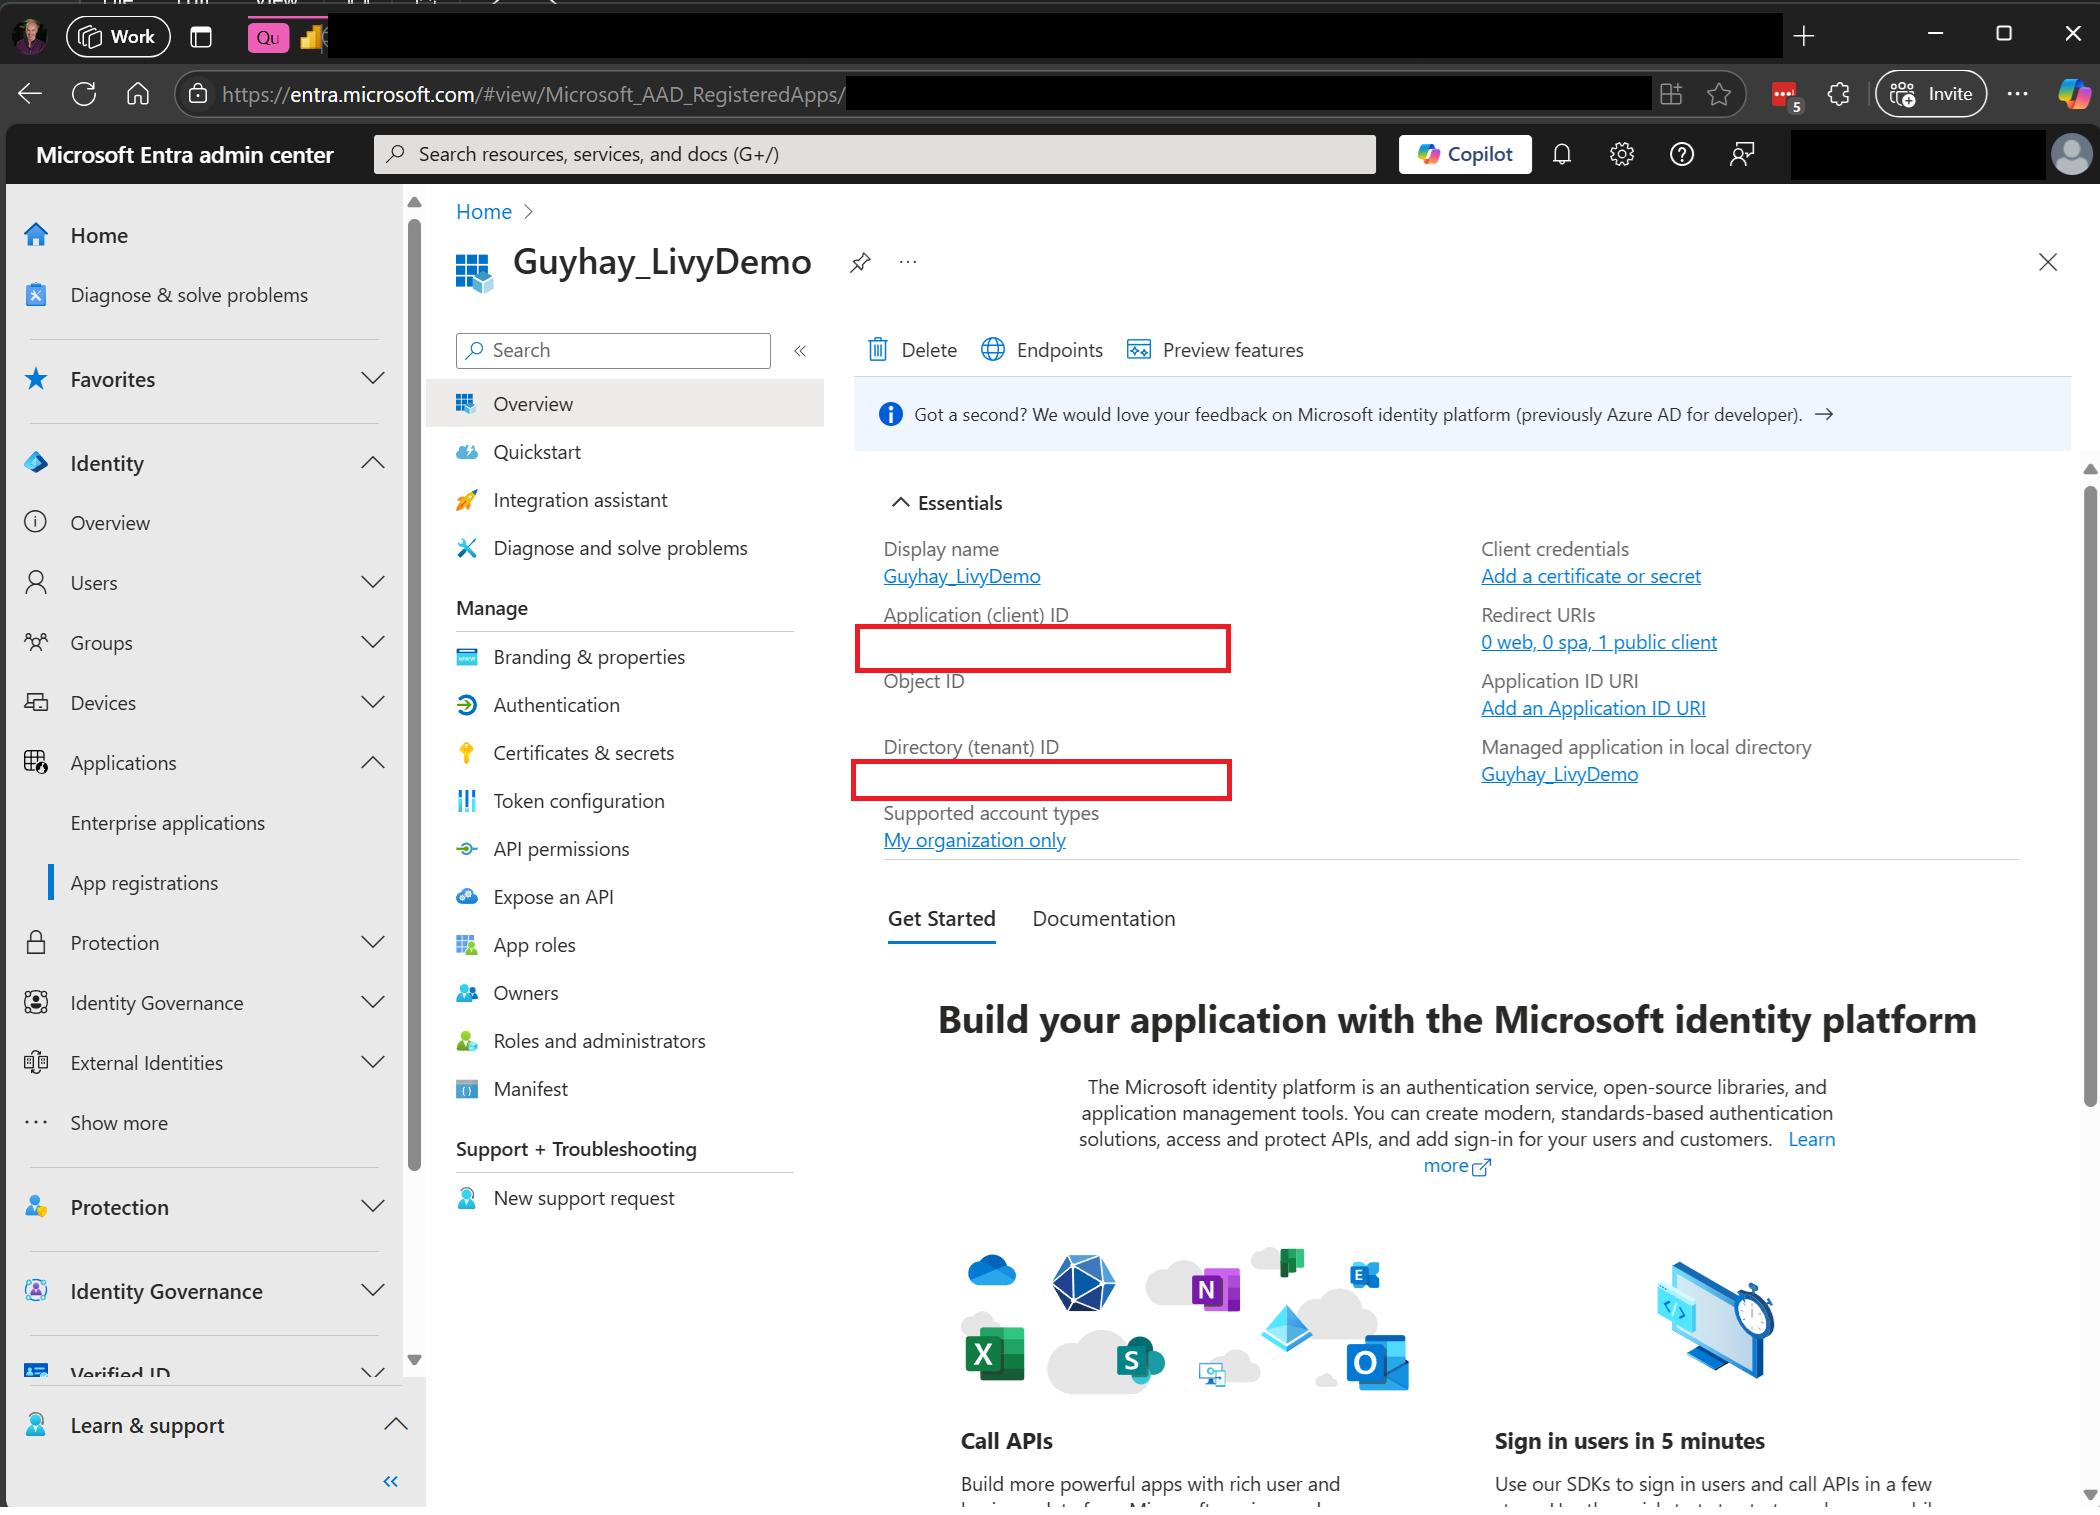
Navigeer naar het Microsoft Entra-beheercentrum en kopieer zowel de toepassings-id (client-id) als de map-id (tenant) naar uw code.


Een Livy API Spark-sessie verifiëren met behulp van een Microsoft Entra-gebruikerstoken of een Microsoft Entra SPN-token
Een Livy API Spark-sessie verifiëren met behulp van een Microsoft Entra SPN-token
Maak een
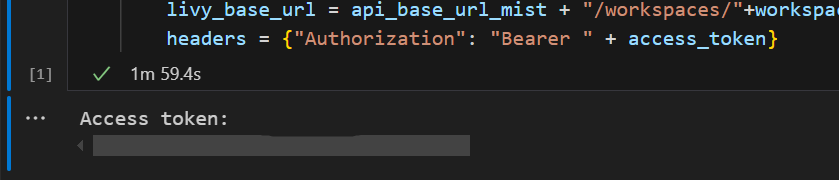
.ipynbnotebook in Visual Studio Code en voeg de volgende code in.import sys from msal import ConfidentialClientApplication # Configuration - Replace with your actual values tenant_id = "Entra_TenantID" # Microsoft Entra tenant ID client_id = "Entra_ClientID" # Service Principal Application ID # Certificate paths - Update these paths to your certificate files certificate_path = "PATH_TO_YOUR_CERTIFICATE.pem" # Public certificate file private_key_path = "PATH_TO_YOUR_PRIVATE_KEY.pem" # Private key file certificate_thumbprint = "YOUR_CERTIFICATE_THUMBPRINT" # Certificate thumbprint # OAuth settings audience = "https://analysis.windows.net/powerbi/api/.default" authority = f"https://login.windows.net/{tenant_id}" def get_access_token(client_id, audience, authority, certificate_path, private_key_path, certificate_thumbprint=None): """ Get an app-only access token for a Service Principal using OAuth 2.0 client credentials flow. This function uses certificate-based authentication which is more secure than client secrets. Args: client_id (str): The Service Principal's client ID audience (str): The audience for the token (resource scope) authority (str): The OAuth authority URL certificate_path (str): Path to the certificate file (.pem format) private_key_path (str): Path to the private key file (.pem format) certificate_thumbprint (str): Certificate thumbprint (optional but recommended) Returns: str: The access token for API authentication Raises: Exception: If token acquisition fails """ try: # Read the certificate from PEM file with open(certificate_path, "r", encoding="utf-8") as f: certificate_pem = f.read() # Read the private key from PEM file with open(private_key_path, "r", encoding="utf-8") as f: private_key_pem = f.read() # Create the confidential client application app = ConfidentialClientApplication( client_id=client_id, authority=authority, client_credential={ "private_key": private_key_pem, "thumbprint": certificate_thumbprint, "certificate": certificate_pem } ) # Acquire token using client credentials flow token_response = app.acquire_token_for_client(scopes=[audience]) if "access_token" in token_response: print("Successfully acquired access token") return token_response["access_token"] else: raise Exception(f"Failed to retrieve token: {token_response.get('error_description', 'Unknown error')}") except FileNotFoundError as e: print(f"Certificate file not found: {e}") sys.exit(1) except Exception as e: print(f"Error retrieving token: {e}", file=sys.stderr) sys.exit(1) # Get the access token token = get_access_token(client_id, audience, authority, certificate_path, private_key_path, certificate_thumbprint)Voer de notebookcel uit. U ziet dat het Microsoft Entra-token is geretourneerd.


Een Livy API Spark-sessie verifiëren met behulp van een Microsoft Entra-gebruikerstoken
Maak een
.ipynbnotebook in Visual Studio Code en voeg de volgende code in.from msal import PublicClientApplication import requests import time # Configuration - Replace with your actual values tenant_id = "Entra_TenantID" # Microsoft Entra tenant ID client_id = "Entra_ClientID" # Application ID (can be the same as above or different) # Required scopes for Microsoft Fabric API access scopes = [ "https://api.fabric.microsoft.com/Lakehouse.Execute.All", # Execute operations in lakehouses "https://api.fabric.microsoft.com/Lakehouse.Read.All", # Read lakehouse metadata "https://api.fabric.microsoft.com/Item.ReadWrite.All", # Read/write fabric items "https://api.fabric.microsoft.com/Workspace.ReadWrite.All", # Access workspace operations "https://api.fabric.microsoft.com/Code.AccessStorage.All", # Access storage from code "https://api.fabric.microsoft.com/Code.AccessAzureKeyvault.All", # Access Azure Key Vault "https://api.fabric.microsoft.com/Code.AccessAzureDataExplorer.All", # Access Azure Data Explorer "https://api.fabric.microsoft.com/Code.AccessAzureDataLake.All", # Access Azure Data Lake "https://api.fabric.microsoft.com/Code.AccessFabric.All" # General Fabric access ] def get_access_token(tenant_id, client_id, scopes): """ Get an access token using interactive authentication. This method will open a browser window for user authentication. Args: tenant_id (str): The Microsoft Entra tenant ID client_id (str): The application client ID scopes (list): List of required permission scopes Returns: str: The access token, or None if authentication fails """ app = PublicClientApplication( client_id, authority=f"https://login.microsoftonline.com/{tenant_id}" ) print("Opening browser for interactive authentication...") token_response = app.acquire_token_interactive(scopes=scopes) if "access_token" in token_response: print("Successfully authenticated") return token_response["access_token"] else: print(f"Authentication failed: {token_response.get('error_description', 'Unknown error')}") return None # Uncomment the lines below to use interactive authentication token = get_access_token(tenant_id, client_id, scopes) print("Access token acquired via interactive login")Voer de notebookcel uit. U ziet dat het Microsoft Entra-token is geretourneerd.

Een Livy API Spark-sessie maken
Voeg nog een notebookcel toe en voeg deze code in.
import json
import requests

api_base_url = "https://api.fabric.microsoft.com/"  # Base URL for Fabric APIs

# Fabric Resource IDs - Replace with your workspace and lakehouse IDs
workspace_id = "Fabric_WorkspaceID"
lakehouse_id = "Fabric_LakehouseID"

# Construct the Livy API session URL
# URL pattern: {base_url}/v1/workspaces/{workspace_id}/lakehouses/{lakehouse_id}/livyapi/versions/{api_version}/sessions
livy_api_session_url = (f"{api_base_url}v1/workspaces/{workspace_id}/lakehouses/{lakehouse_id}/"
                       f"livyapi/versions/2023-12-01/sessions")

# Set up authentication headers
headers = {"Authorization": f"Bearer {token}"}

print(f"Livy API URL: {livy_api_session_url}")
print("Creating Livy session...")

try:
    # Create a new Livy session with default configuration
    create_livy_session = requests.post(livy_api_session_url, headers=headers, json={})

    # Check if the request was successful
    if create_livy_session.status_code == 200:
        session_info = create_livy_session.json()
        print('Livy session creation request submitted successfully')
        print(f'Session Info: {json.dumps(session_info, indent=2)}')

        # Extract session ID for future operations
        livy_session_id = session_info['id']
        livy_session_url = f"{livy_api_session_url}/{livy_session_id}"

        print(f"Session ID: {livy_session_id}")
        print(f"Session URL: {livy_session_url}")

    else:
        print(f"Failed to create session. Status code: {create_livy_session.status_code}")
        print(f"Response: {create_livy_session.text}")

except requests.exceptions.RequestException as e:
    print(f"Network error occurred: {e}")
except json.JSONDecodeError as e:
    print(f"JSON decode error: {e}")
    print(f"Response text: {create_livy_session.text}")
except Exception as e:
    print(f"Unexpected error: {e}")
Voer de notebookcel uit en u zult zien dat er één regel wordt afgedrukt zodra de Livy-sessie is aangemaakt.

U kunt verifiëren of de Livy-sessie is aangemaakt door gebruik te maken van [Het controleren van uw taken in de Bewakingshub](#View uw taken in de Monitoring Hub).

Integratie met Fabric-omgevingen
Deze Livy API-sessie wordt standaard uitgevoerd op basis van de standaardstartgroep voor de werkruimte. U kunt ook Infrastructuuromgevingen maken, configureren en gebruiken in Microsoft Fabric om de Spark-pool aan te passen die door de Livy API-sessie wordt gebruikt voor deze Spark-taken. Als u een Fabric-omgeving wilt gebruiken, update dan de vorige notebookcel met deze JSON payload.
create_livy_session = requests.post(livy_base_url, headers = headers, json = {
    "conf" : {
        "spark.fabric.environmentDetails" : "{\"id\" : \""EnvironmentID""}"}
        }
)
Een spark.sql-instructie verzenden met behulp van de Spark-sessie van de Livy-API
Voeg nog een notebookcel toe en voeg deze code in.
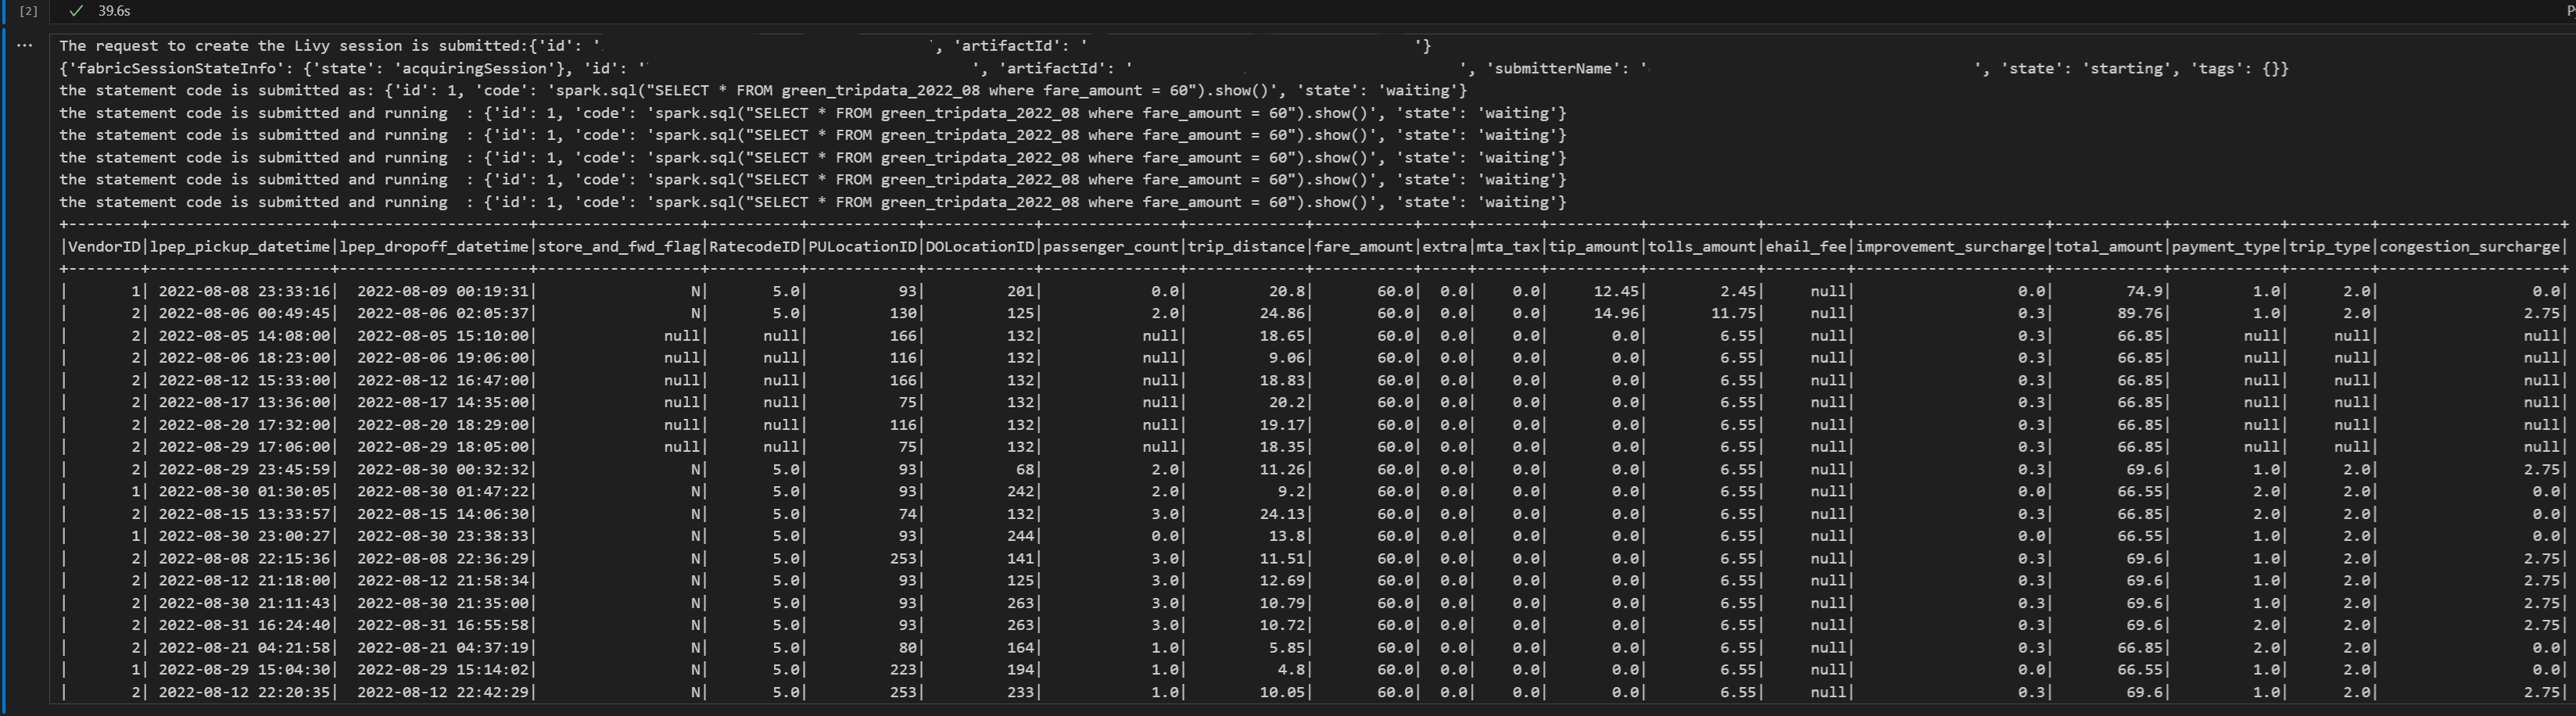
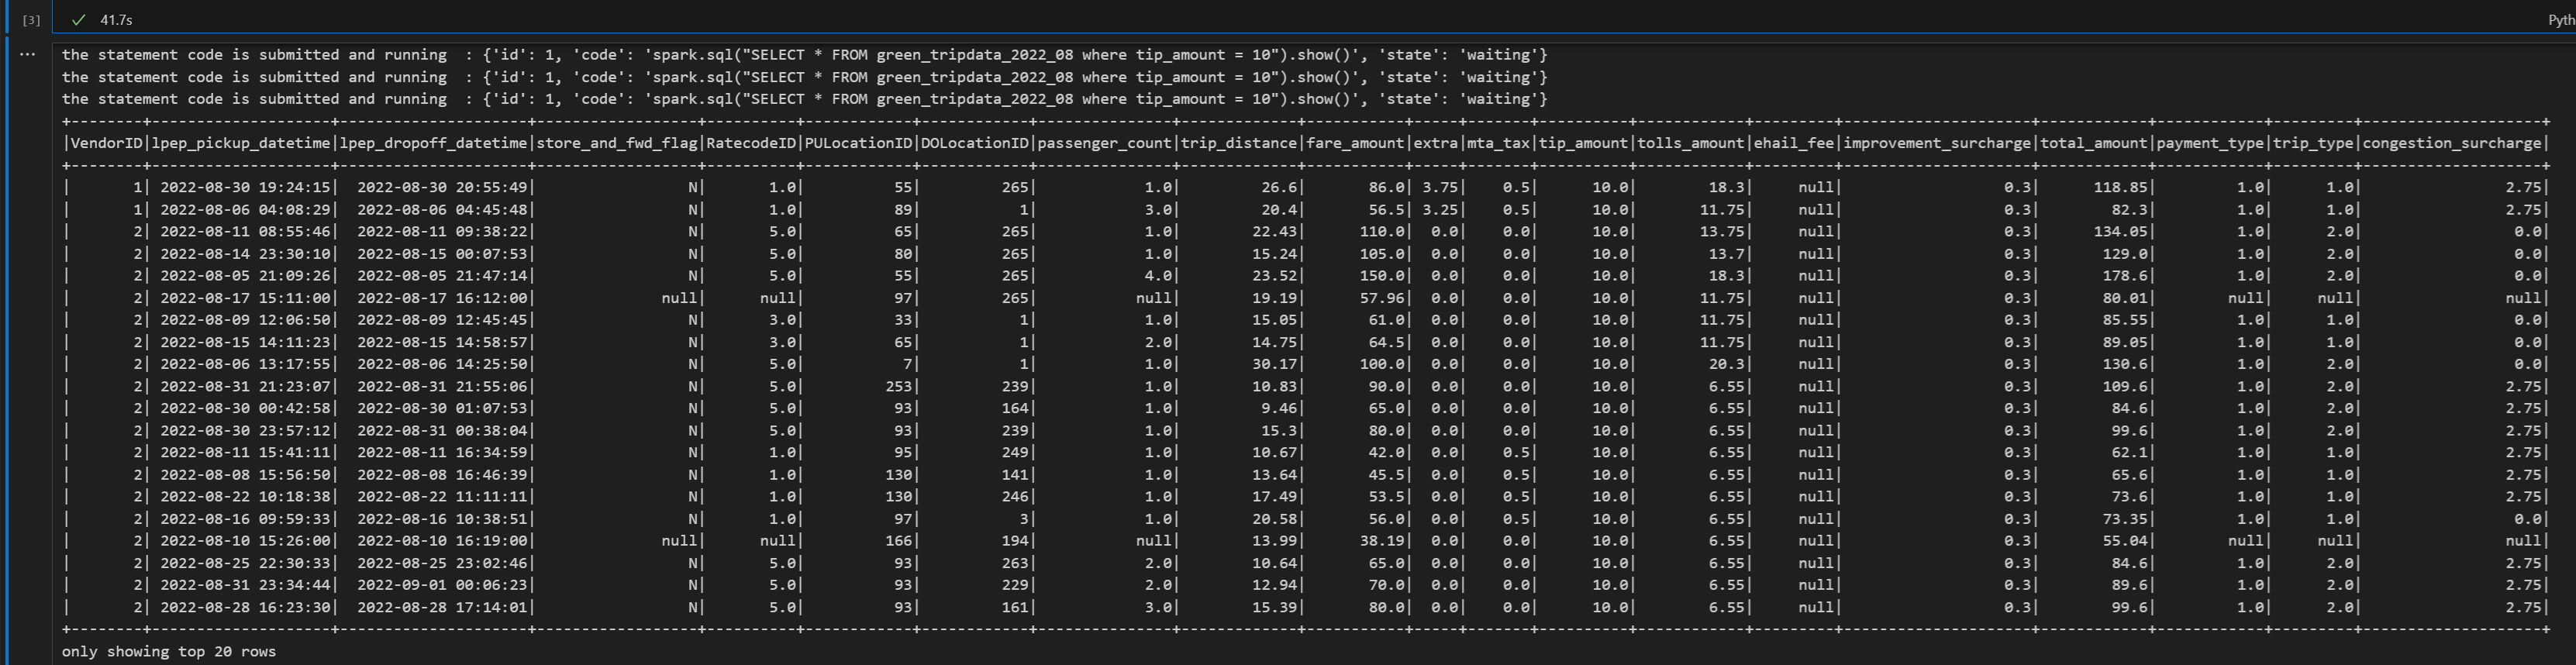
    # call get session API
import time

table_name = "green_tripdata_2022"

print("Checking session status...")

# Get current session status
get_session_response = requests.get(livy_session_url, headers=headers)
session_status = get_session_response.json()
print(f"Current session state: {session_status['state']}")

# Wait for session to become idle (ready to accept statements)
print("Waiting for session to become idle...")
while session_status["state"] != "idle":
    print(f"   Session state: {session_status['state']} - waiting 5 seconds...")
    time.sleep(5)
    get_session_response = requests.get(livy_session_url, headers=headers)
    session_status = get_session_response.json()

print("Session is now idle and ready to accept statements")

# Execute a Spark SQL statement
execute_statement_url = f"{livy_session_url}/statements"

# Define your Spark SQL query - Replace with your actual table and query
payload_data = {
    "code": "spark.sql(\"SELECT * FROM {table_name} WHERE column_name = 'some_value' LIMIT 10\").show()",
    "kind": "spark"  # Type of code (spark, pyspark, sql, etc.)
}

print("Submitting Spark SQL statement...")
print(f"Query: {payload_data['code']}")

try:
    # Submit the statement for execution
    execute_statement_response = requests.post(execute_statement_url, headers=headers, json=payload_data)

    if execute_statement_response.status_code == 200:
        statement_info = execute_statement_response.json()
        print('Statement submitted successfully')
        print(f"Statement Info: {json.dumps(statement_info, indent=2)}")

        # Get statement ID for monitoring
        statement_id = str(statement_info['id'])
        get_statement_url = f"{livy_session_url}/statements/{statement_id}"

        print(f"Statement ID: {statement_id}")

        # Monitor statement execution
        print("Monitoring statement execution...")
        get_statement_response = requests.get(get_statement_url, headers=headers)
        statement_status = get_statement_response.json()

        while statement_status["state"] != "available":
            print(f"   Statement state: {statement_status['state']} - waiting 5 seconds...")
            time.sleep(5)
            get_statement_response = requests.get(get_statement_url, headers=headers)
            statement_status = get_statement_response.json()

        # Retrieve and display results
        print("Statement execution completed!")
        if 'output' in statement_status and 'data' in statement_status['output']:
            results = statement_status['output']['data']['text/plain']
            print("Query Results:")
            print(results)
        else:
            print("No output data available")

    else:
        print(f"Failed to submit statement. Status code: {execute_statement_response.status_code}")
        print(f"Response: {execute_statement_response.text}")

except Exception as e:
    print(f"Error executing statement: {e}")
Voer de notebookcel uit. U zou meerdere oplopende regels moeten zien terwijl de taak wordt ingediend en de resultaten worden geretourneerd.

Een tweede spark.sql-instructie verzenden met behulp van de Spark-sessie van de Livy-API
Voeg nog een notebookcel toe en voeg deze code in.
print("Executing additional Spark SQL statement...")

# Wait for session to be idle again
get_session_response = requests.get(livy_session_url, headers=headers)
session_status = get_session_response.json()

while session_status["state"] != "idle":
    print(f"   Waiting for session to be idle... Current state: {session_status['state']}")
    time.sleep(5)
    get_session_response = requests.get(livy_session_url, headers=headers)
    session_status = get_session_response.json()

# Execute another statement - Replace with your actual query
payload_data = {
    "code": f"spark.sql(\"SELECT COUNT(*) as total_records FROM {table_name}\").show()",
    "kind": "spark"
}

print(f"Executing query: {payload_data['code']}")

try:
    # Submit the second statement
    execute_statement_response = requests.post(execute_statement_url, headers=headers, json=payload_data)

    if execute_statement_response.status_code == 200:
        statement_info = execute_statement_response.json()
        print('Second statement submitted successfully')

        statement_id = str(statement_info['id'])
        get_statement_url = f"{livy_session_url}/statements/{statement_id}"

        # Monitor execution
        print("Monitoring statement execution...")
        get_statement_response = requests.get(get_statement_url, headers=headers)
        statement_status = get_statement_response.json()

        while statement_status["state"] != "available":
            print(f"   Statement state: {statement_status['state']} - waiting 5 seconds...")
            time.sleep(5)
            get_statement_response = requests.get(get_statement_url, headers=headers)
            statement_status = get_statement_response.json()

        # Display results
        print("Second statement execution completed!")
        if 'output' in statement_status and 'data' in statement_status['output']:
            results = statement_status['output']['data']['text/plain']
            print("Query Results:")
            print(results)
        else:
            print("No output data available")

    else:
        print(f"Failed to submit second statement. Status code: {execute_statement_response.status_code}")

except Exception as e:
    print(f"Error executing second statement: {e}")
Voer de notebookcel uit. U zou meerdere oplopende regels moeten zien terwijl de taak wordt ingediend en de resultaten worden geretourneerd.

De Livy-sessie beëindigen
Voeg nog een notebookcel toe en voeg deze code in.
print("Cleaning up Livy session...")

try:
    # Check current session status before deletion
    get_session_response = requests.get(livy_session_url, headers=headers)
    if get_session_response.status_code == 200:
        session_info = get_session_response.json()
        print(f"Session state before deletion: {session_info.get('state', 'unknown')}")

    print(f"Deleting session at: {livy_session_url}")

    # Delete the session
    delete_response = requests.delete(livy_session_url, headers=headers)

    if delete_response.status_code == 200:
        print("Session deleted successfully")
    elif delete_response.status_code == 404:
        print("Session was already deleted or not found")
    else:
        print(f"Delete request completed with status code: {delete_response.status_code}")
        print(f"Response: {delete_response.text}")

    print(f"Delete response details: {delete_response}")

except requests.exceptions.RequestException as e:
    print(f"Network error during session deletion: {e}")
except Exception as e:
    print(f"Error during session cleanup: {e}")
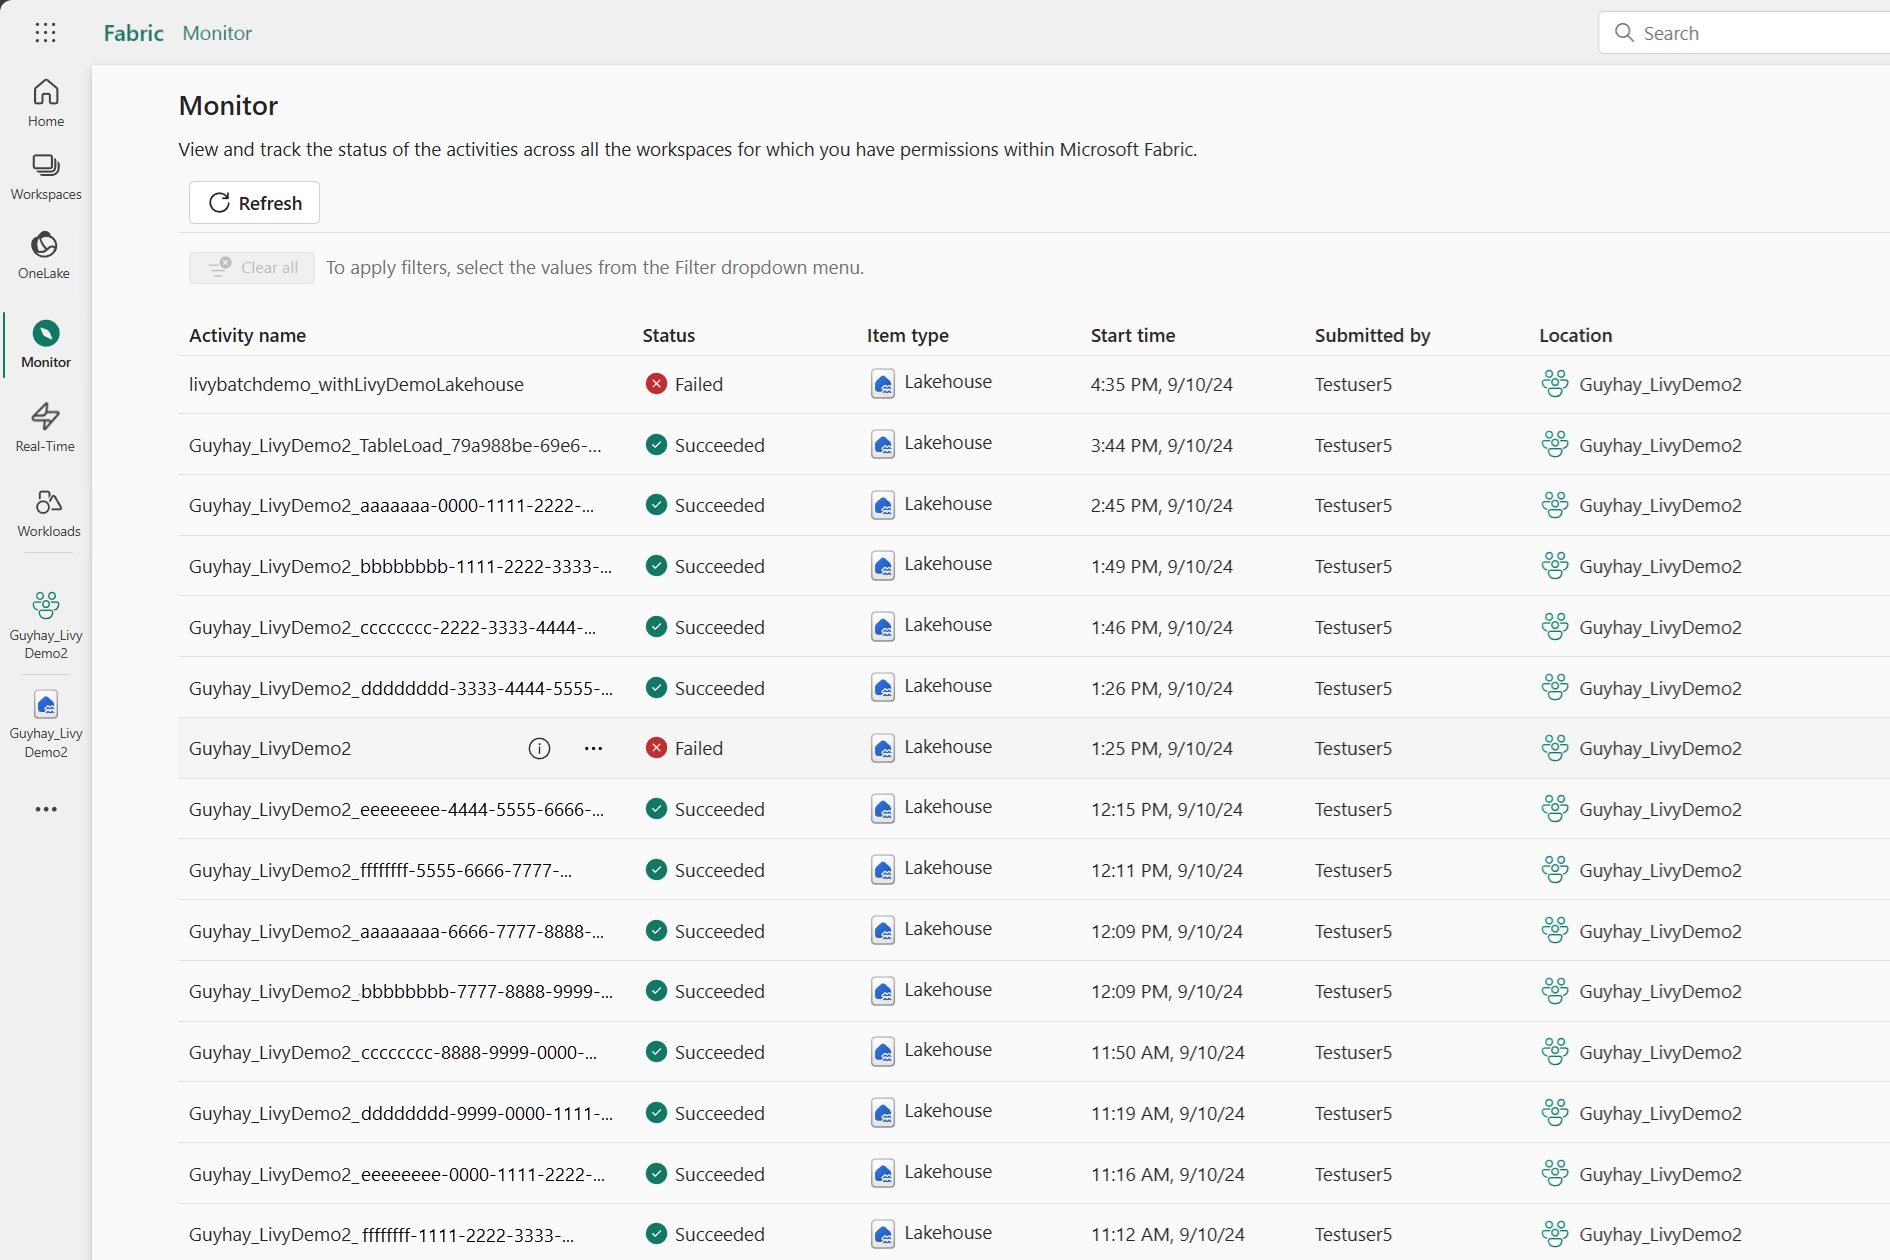
Uw taken weergeven in de Bewakingshub
U hebt toegang tot de Bewakingshub om verschillende Apache Spark-activiteiten weer te geven door Monitor te selecteren in de navigatiekoppelingen aan de linkerkant.
Wanneer de sessie wordt uitgevoerd of de voltooide status heeft, kunt u de sessiestatus bekijken door naar Monitor te navigeren.
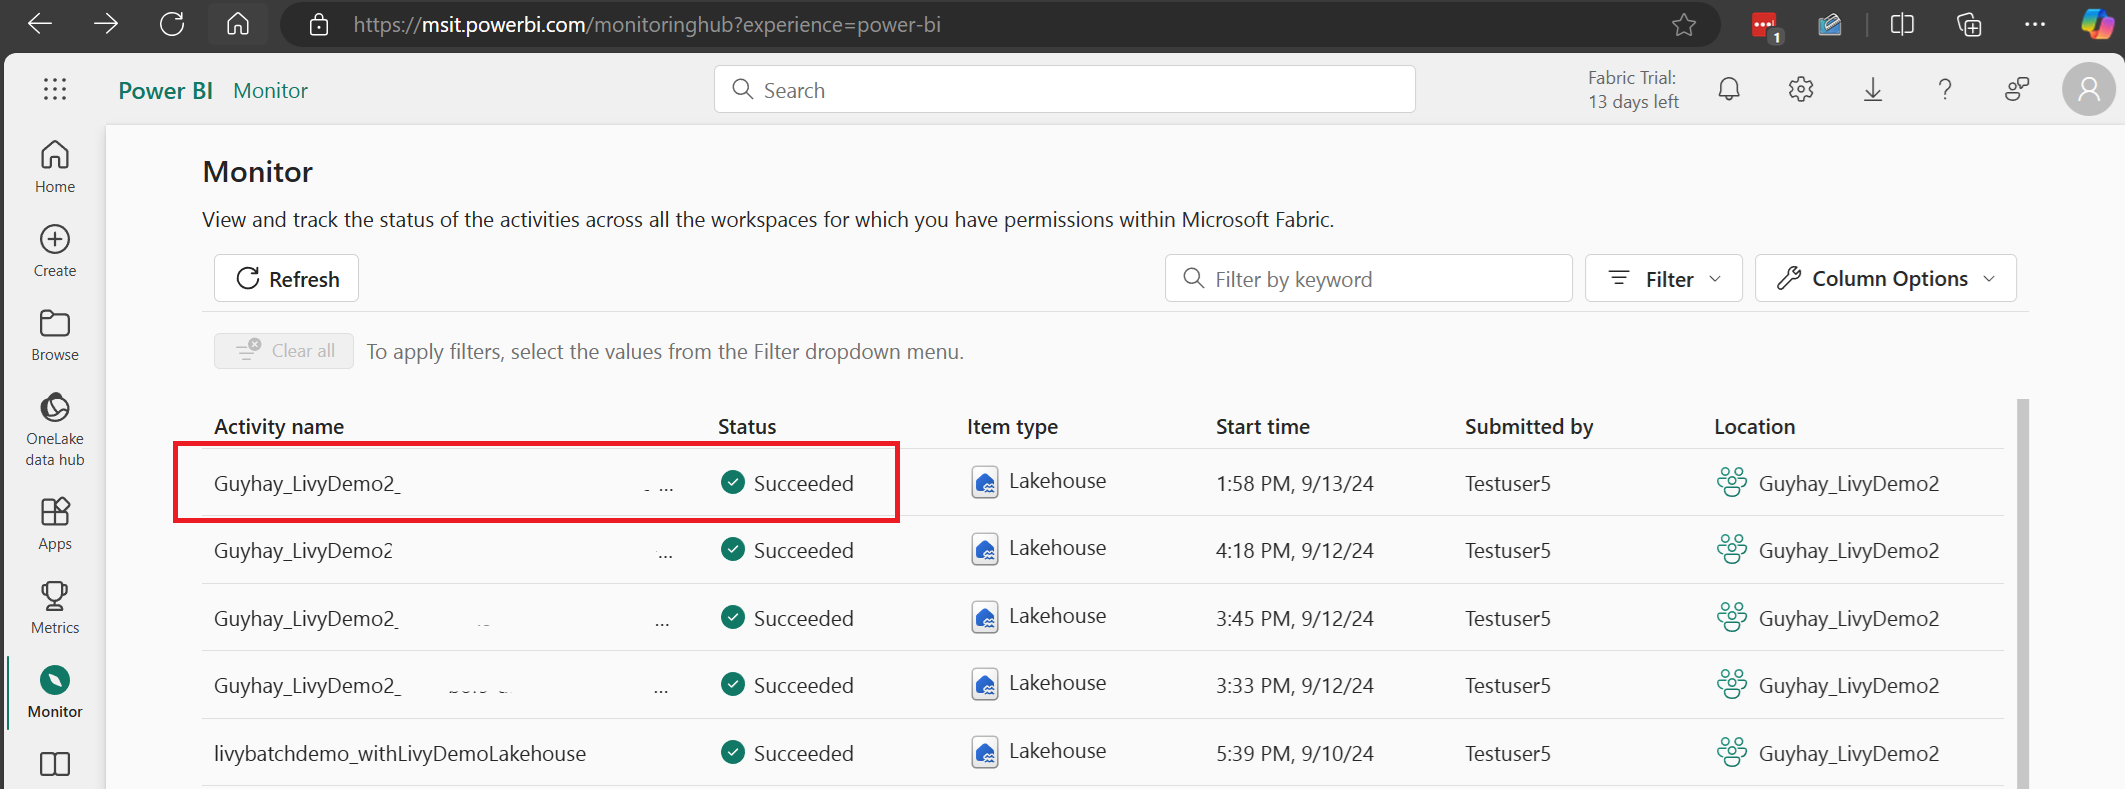
Selecteer en open de naam van de meest recente activiteit.
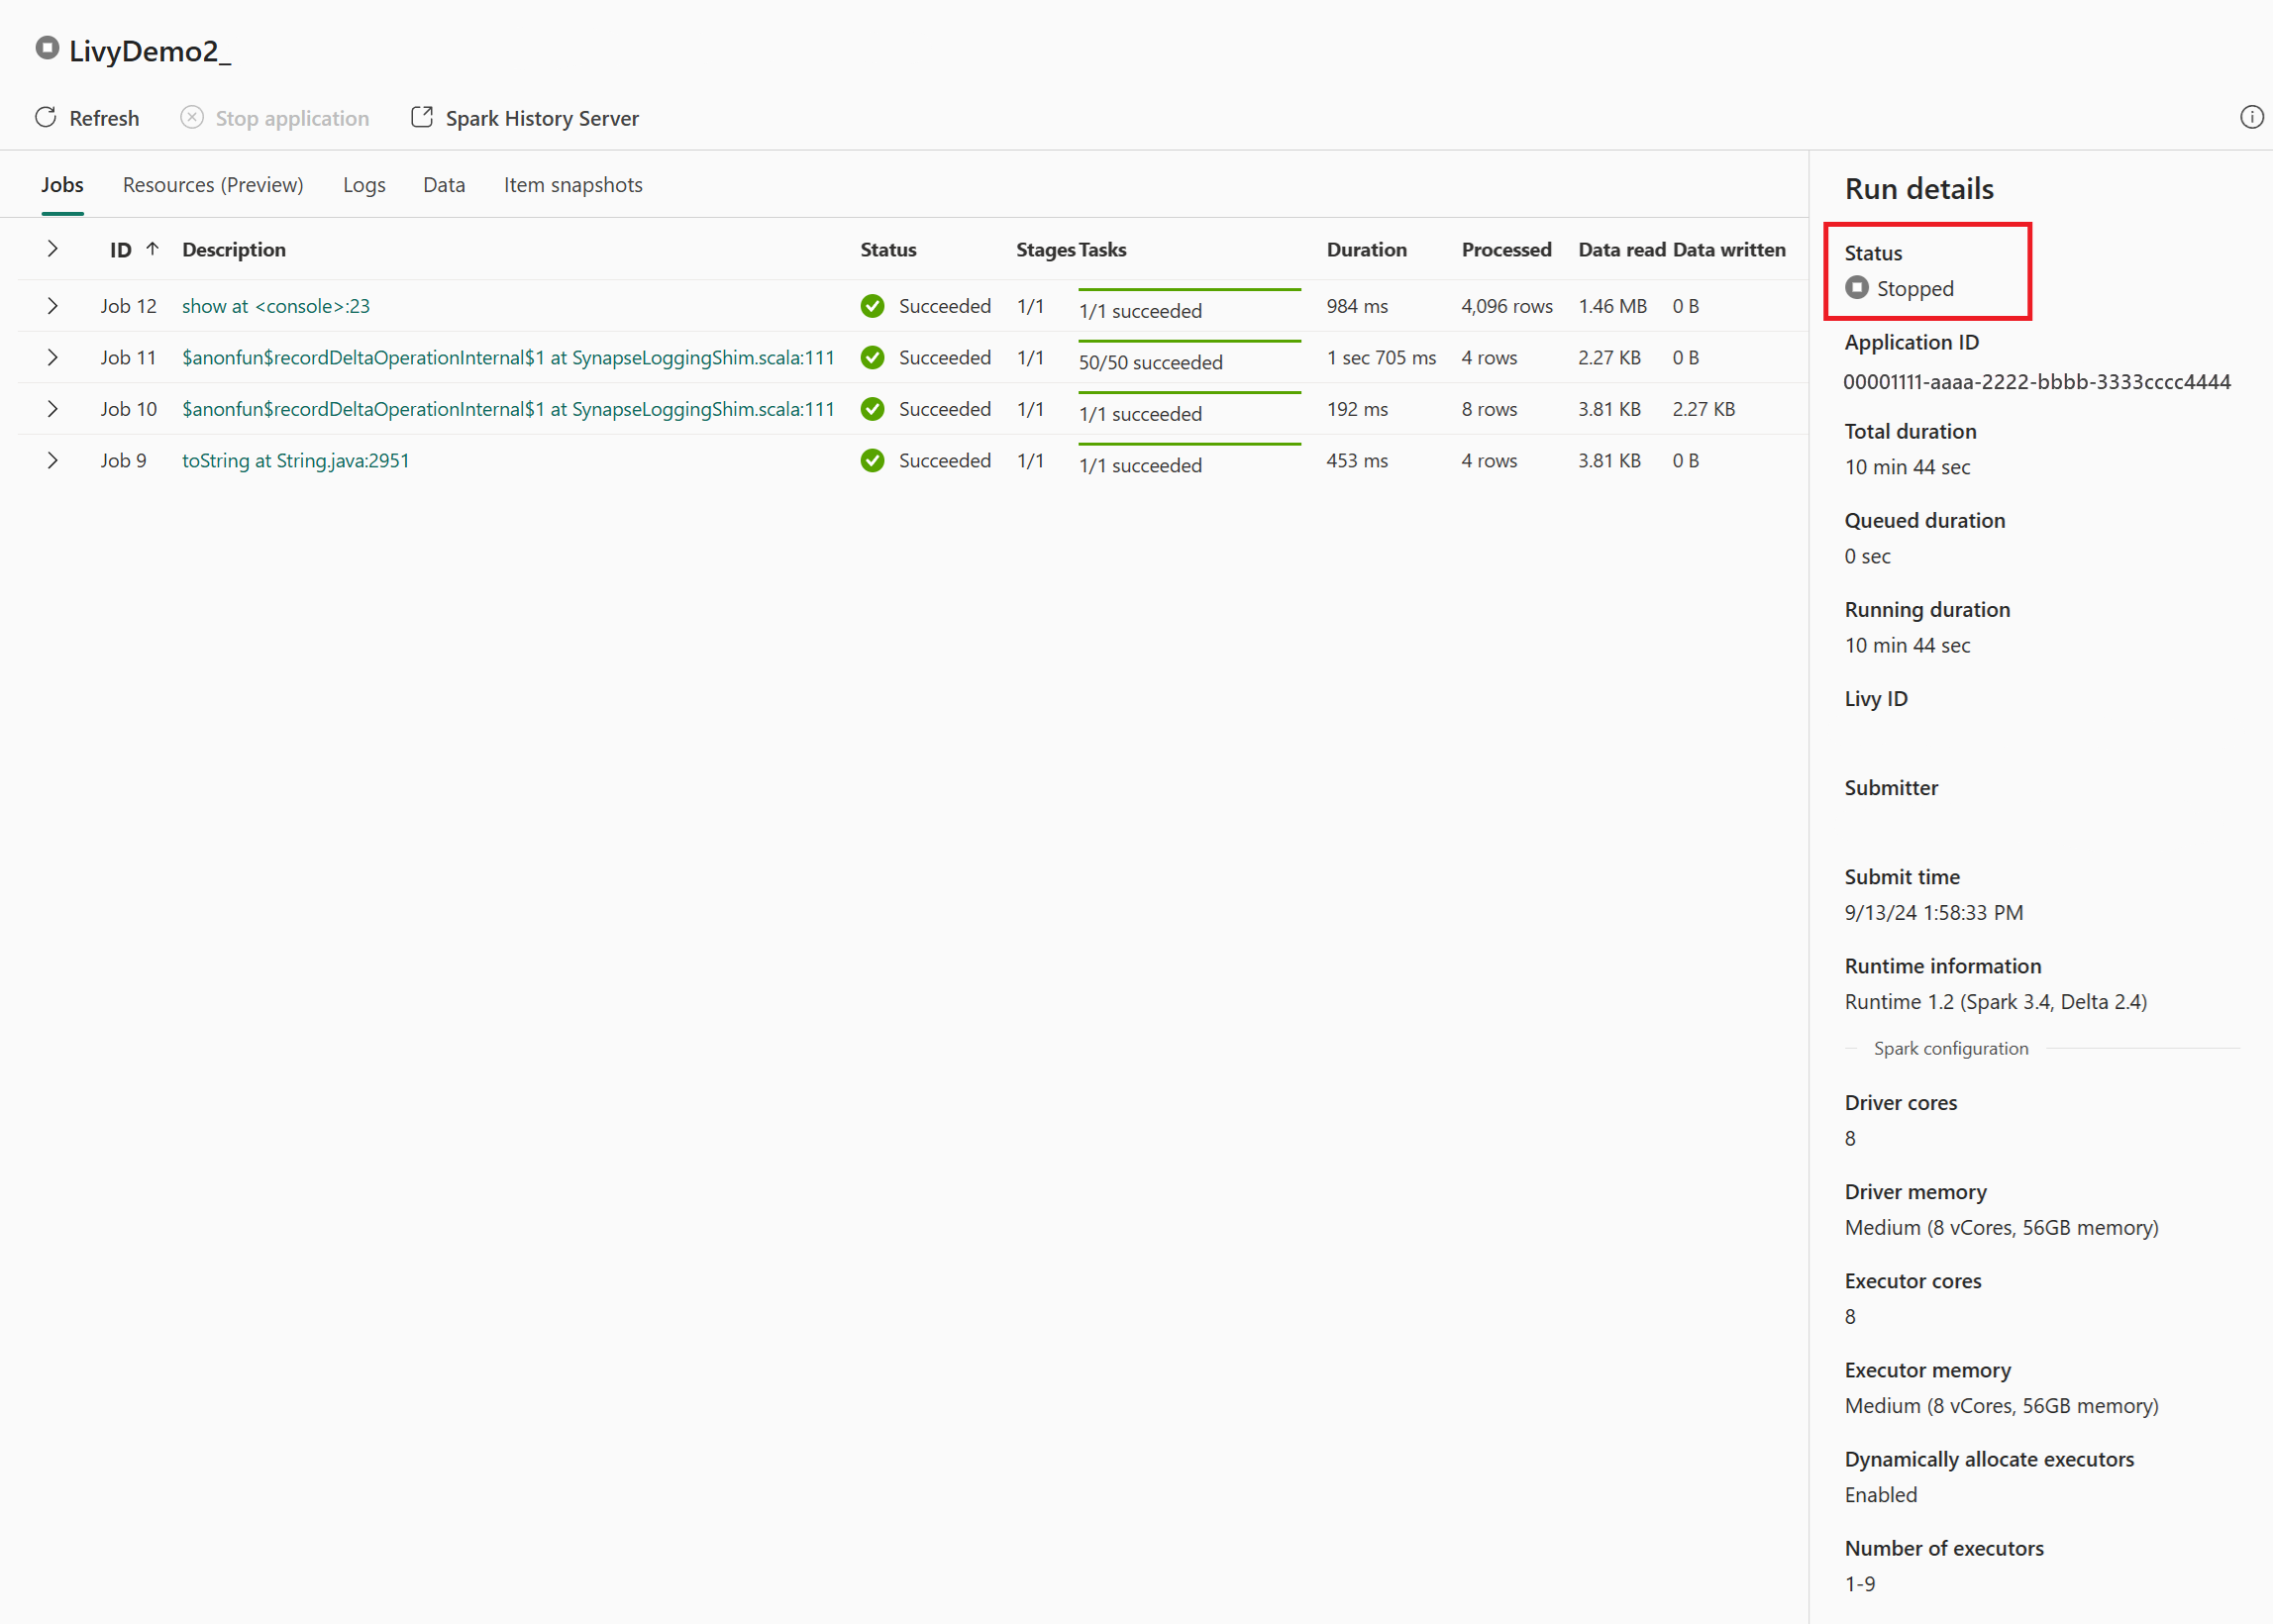
In dit geval van livy-API-sessie kunt u uw eerdere sessies zien, details uitvoeren, Spark-versies en configuratie. Let op de gestopte status rechtsboven.


Als u het hele proces wilt invatten, hebt u een externe client nodig, zoals Visual Studio Code, een Microsoft Entra-app/SPN-token, de URL van het Livy API-eindpunt, verificatie voor uw Lakehouse en ten slotte een Session Livy-API.