Set up Customer Key
With Customer Key, you control your organization's encryption keys and then configure Microsoft 365 to use them to encrypt your data at rest in Microsoft's data centers. In other words, Customer Key allows you to add a layer of encryption that belongs to you, with your keys.
Set up Azure before you use Customer Key. This article describes the steps you need to follow to create and configure the required Azure resources and then provides the steps for setting up Customer Key. After you set up Azure, you determine which policy, and therefore, which keys, to assign to encrypt data across various Microsoft 365 workloads in your organization. For more information about Customer Key, or for a general overview, see Overview of Customer Key.
Important
We strongly recommend that you follow the best practices in this article. These are called out as TIP and IMPORTANT. Customer Key gives you control over root encryption keys whose scope can be as large as your entire organization. This means that mistakes made with these keys can have a broad impact and may result in service interruptions or irrevocable loss of your data.
Tip
If you're not an E5 customer, use the 90-day Microsoft Purview solutions trial to explore how additional Purview capabilities can help your organization manage data security and compliance needs. Start now at the Microsoft Purview compliance portal trials hub. Learn details about signing up and trial terms.
Windows 365 support for Microsoft Purview Customer Key is in public preview and is subject to change.
Before you set up Customer Key
Before you get started, ensure that you have the appropriate Azure subscriptions and Microsoft 365, Office 365, and Windows 365 licensing for your organization. You must use paid Azure Subscriptions. Subscriptions you got through Free, Trial, Sponsorships, MSDN Subscriptions, and subscriptions under Legacy Support aren't eligible.
Important
Valid Microsoft 365 and Office 365 licenses that offer Microsoft 365 Customer Key:
- Office 365 E5
- Microsoft 365 E5
- Microsoft 365 E5 Compliance
- Microsoft 365 E5 Information Protection & Governance SKUs
- Microsoft 365 Security and Compliance for FLW
Existing Office 365 Advanced Compliance licenses are still supported.
To understand the concepts and procedures in this article, review the Azure Key Vault documentation. Also, become familiar with the terms used in Azure, for example, Microsoft Entra tenant.
If you need more support beyond the documentation, contact Microsoft Support. To provide feedback on Customer Key, including the documentation, send your ideas, suggestions, and perspectives to the Microsoft 365 Community
Overview of steps to set up Customer Key
To set up Customer Key, complete these tasks in the listed order. The rest of this article provides detailed instructions for each task, or links out to more information for each step in the process.
In Azure:
Complete the following pre-requisites by remotely connecting to Azure PowerShell. For best results, use version 4.4.0 or later of Azure PowerShell:
Enabling the tenant after completing the previous tasks:
Complete tasks in Azure Key Vault for Customer Key
Complete these tasks in Azure Key Vault. You must complete these steps for all the types data encryption policies (DEPs) you use with Customer Key.
Create two new Azure subscriptions
Customer Key requires two Azure subscriptions. As a best practice, Microsoft recommends that you create new Azure subscriptions for use with Customer Key. Azure Key Vault keys can only be authorized for applications in the same Microsoft Entra tenant. You must create the new subscriptions using the same Microsoft Entra tenant used with your organization where the DEPs are assigned. For example, using your work or school account that has global administrator privileges in your organization. For detailed steps, see Sign up for Azure as an organization.
Important
Customer Key requires two keys for each data encryption policy (DEP). In order to achieve this, you must create two Azure subscriptions. As a best practice, Microsoft recommends that you have separate members of your organization configure one key in each subscription. You should only use these Azure subscriptions to administer encryption keys for Microsoft 365. This protects your organization in case one of your operators accidentally, intentionally, or maliciously deletes or otherwise mismanages the keys for which they are responsible.
There's no practical limit to the number of Azure subscriptions that you can create for your organization. Following these best practices minimizes the impact of human error while helping to manage the resources used by Customer Key.
Register the required Service Principals
To use the Customer Key, your tenant must have the required service principals registered in the tenant. In the following sections, instructions are provided to check if the service principals are already registered in your tenant. If they aren't registered, run the 'New-AzADServicePrincipal' cmdlet as shown.
Register the Service Principal for the Customer Key Onboarding Application
To check if the Customer Key Onboarding application is already registered in your tenant, with Global Administrator privileges, run the following command:
Get-AzADServicePrincipal -ServicePrincipalName 19f7f505-34aa-44a4-9dcc-6a768854d2ea
If the application isn't registered in the tenant, run the following command:
New-AzADServicePrincipal -ApplicationId 19f7f505-34aa-44a4-9dcc-6a768854d2ea
Register the Service Principal for the M365DataAtRestEncryption Application
To check if the M365DataAtRestEncryption application is already registered in your tenant, with Global Administrator privileges, run the following command:
Get-AzADServicePrincipal -ServicePrincipalName c066d759-24ae-40e7-a56f-027002b5d3e4
If the application isn't registered in the tenant, run the following command:
New-AzADServicePrincipal -ApplicationId c066d759-24ae-40e7-a56f-027002b5d3e4
Register the Service Principal for the Office 365 Exchange Online Application
To check if the Office 365 Exchange Online application is already registered in your tenant, with Global Administrator privileges, run the following command:
Get-AzADServicePrincipal -ServicePrincipalName 00000002-0000-0ff1-ce00-000000000000
If the application isn't registered in the tenant, run the following command:
New-AzADServicePrincipal -ApplicationId 00000002-0000-0ff1-ce00-000000000000
Create a premium Azure Key Vault in each subscription
The steps to create a key vault are documented in Getting Started with Azure Key Vault. These steps guide you through installing and launching Azure PowerShell, connecting to your Azure subscription, creating a resource group, and creating a key vault in that resource group.
When you create a key vault, you must choose a SKU: either Standard or Premium. The Standard SKU allows Azure Key Vault keys to be protected with software - there's no Hardware Security Module (HSM) key protection - and the Premium SKU allows the use of HSMs for protection of Key Vault keys. Customer Key accepts key vaults that use either SKU, though Microsoft strongly recommends that you use only the Premium SKU. The cost of operations with keys of either type is the same, so the only difference in cost is the cost per month for each HSM-protected key. See Key Vault pricing for details.
Customer Key has recently added support for RSA keys that are stored in a managed HSM which is FIPS 140-2 Level 3 compliant solution. Azure Key Vault Managed HSM is a fully managed, highly available, single-tenant, standards-compliant cloud service that enables you to safeguards cryptographic keys for your cloud applications, using FIPS 140-2 Level 3 validated HSMs. For more information on managed HSM, review the overview.
Important
Use the Premium SKU key vaults and HSM-protected keys for production data. Only use Standard SKU key vaults and keys for testing and validation purposes.
For each Microsoft 365 service with which you use Customer Key, create a key vault or managed HSM in each of the two Azure subscriptions that you created.
For example, to enable Customer Key to use DEPs for Exchange, SharePoint, and multi-workload scenarios, create three pairs of key vaults or managed HSMs, for a total of 6. Use a naming convention that reflects the intended use of the DEP with which you associate the vaults. The following table shows how to map each Azure Key Vault (AKV) or managed HSM to each workload.
| Key Vault Name | Permissions for Multiple Microsoft 365 Workloads (M365DataAtRestEncryption) | Permissions for Exchange | Permissions for SharePoint and OneDrive |
|---|---|---|---|
| ContosoM365AKV01 | Yes | No | No |
| ContosoM365AKV02 | Yes | No | No |
| ContosoEXOAKV01 | No | Yes | No |
| ContosoEXOAKV02 | No | Yes | No |
| ContosoSPOAKV01 | No | No | Yes |
| ContosoSPOAKV02 | No | No | Yes |
The creation of key vaults also requires the creation of Azure resource groups, since key vaults need storage capacity (though small) and Key Vault logging, if enabled, also generates stored data. As a best practice Microsoft recommends using separate administrators to manage each resource group, with the administration that's aligned with the set of administrators that manages all related Customer Key resources.
For Exchange, the scope of a data encryption policy is chosen when you assign the policy to the mailbox. A mailbox can have only one policy assigned, and you can create up to 50 policies. The scope of a SharePoint policy includes all of the data within an organization in a geographic location, or geo. The scope for a multi-workload policy includes all of the data across the supported workloads for all users.
Important
If you intend to use Customer Key for Multiple Microsoft 365 workloads, Exchange, and SharePoint & OneDrive, make sure to create 2 Azure Key Vaults for each workload. A total of 6 vaults should be created.
Assign permissions to each key vault
Define the required permissions for each key vault using Azure role-based access control (Azure RBAC). Azure Key Vault configuration actions are performed using the Azure portal. This section details how to apply the appropriate permissions using RBAC.
Assigning permissions using RBAC method
To assign wrapKey, unwrapkey, and get permissions on your Azure Key Vault, you must assign the “Key Vault Crypto Service Encryption User” role to the corresponding Microsoft 365 app. See Grant permission to applications to access an Azure key vault using Azure RBAC | Microsoft Learn.
To assign wrapKey, unwrapkey, and get permissions on your managed HSM, you must assign the “Managed HSM Crypto Service Encryption User” role to the corresponding Microsoft 365 app. See Managed HSM role management | Microsoft Learn.
Search the following names for each Microsoft 365 app when adding the role to your Azure Key Vault:
For Exchange:
Office 365 Exchange OnlineFor SharePoint and OneDrive:
Office 365 SharePoint OnlineFor multi-workload policy (Exchange, Teams, Microsoft Purview Information Protection):
M365DataAtRestEncryption
If you don't see the corresponding Microsoft 365 app, verify that you have registered the app in the tenant.
For more information on assigning roles and permissions, see Use role-based access control to manage access to your Azure subscription resources.
Assigning User roles
Key vault administrators or Managed HSM Administrators that do day-to-day management of your key vault for your organization. These tasks include backup, create, get, import, list, and restore.
Important
The set of permissions assigned to key vault administrators doesn't include the permission to delete keys. This is intentional and an important practice. Deleting encryption keys isn't typically done, since doing so permanently destroys data. As a best practice, don't grant the permission of deleting encryption keys to key vault administrators by default. Instead, reserve this permission for key vault contributors and only assign it to an administrator on a short term basis once a clear understanding of the consequences is understood.
To assign these permissions to a user in your organization using RBAC, see Assign Azure roles using the Azure portal, and assign the Key Vault Administrator role.
Contributors that can change permissions on the Azure Key Vault itself. Change these permissions as employees leave or join your team. In the rare situation that the key vault administrators legitimately need permission to delete or restore a key you must also change the permissions. This set of key vault contributors needs to be granted the Contributor role on your key vault. You can assign this role by using RBAC. The administrator who creates a subscription has this access implicitly, and the ability to assign other administrators to the Contributor role.
Add a key to each key vault either by creating or importing a key
There are two ways to add keys to an Azure Key Vault or managed HSM; you can create a key directly in the resource, or you can import a key. Creating a key directly in Key Vault is less complicated, but importing a key provides total control over how the key is generated. Use the RSA keys. Customer Key supports RSA Key lengths up to 4096. Azure Key Vault doesn't support wrapping and unwrapping with elliptical curve keys.
Managed HSMs only support HSM-protected keys. When you create a key for a managed HSM, you must create an RSA-HSM key, not another type.
For instructions to add a key to each vault or managed HSM, see Add-AzKeyVaultKey.
For detailed steps to create a key on-premises and import it into your key vault, see How to generate and transfer HSM-protected keys for Azure Key Vault. Use the Azure instructions to create a key in each key vault.
Verify expiration date of your keys
To verify that an expiration date isn't set for your keys, run the Get-AzKeyVaultKey cmdlet.
For Azure Key Vault:
Get-AzKeyVaultKey -VaultName <vault name>
For managed HSM:
Get-AzKeyVaultKey -HsmName <HSM name>
Customer Key can't use an expired key. Operations attempted with an expired key fail, and possibly result in a service outage. We strongly recommend that keys used with Customer Key don't have an expiration date.
An expiration date, once set, can't be removed, but can be changed to a different date. If a key that has an expiration date must be used, change the expiration value to 12/31/9999 and use the legacy onboarding process. Keys with an expiration date set to a date other than 12/31/9999 fail Microsoft 365 validation.The Customer Key Onboarding Service only accepts keys without an expiration date.
To change an expiration date that is set to any value other than 12/31/9999, run the Update-AzKeyVaultKey cmdlet.
For Azure Key Vault:
Update-AzKeyVaultKey -VaultName <vault name> -Name <key name> -Expires (Get-Date -Date "12/31/9999")
For managed HSM:
Update-AzKeyVaultKey -HsmName <HSM name> -Name <key name> -Expires (Get-Date -Date "12/31/9999")
Caution
Don't set expiration dates on encryption keys you use with Customer Key.
Make sure soft delete is enabled on your key vaults
When you can quickly recover your keys, you're less likely to experience an extended service outage due to accidentally or maliciously deleted keys. This configuration is referred to as Soft Delete. Enabling Soft Delete allows you to recover keys or vaults within 90 days of deletion without having to restore them from backup. This configuration is automatically enabled upon the creation of new Azure Key Vaults. Soft Delete can't be turned off for managed HSM resources. If you're using existing vaults that don't have this setting enabled, you can enable it.
To enable Soft Delete on your key vaults, complete these steps:
Sign in to your Azure subscription with Azure PowerShell. For instructions, see Sign in with Azure PowerShell.
Run the Get-AzKeyVault cmdlet. In this example, vault name is the name of the key vault for which you're enabling soft delete:
$v = Get-AzKeyVault -VaultName <vault name>
$r = Get-AzResource -ResourceId $v.ResourceId
$r.Properties | Add-Member -MemberType NoteProperty -Name enableSoftDelete -Value 'True'
Set-AzResource -ResourceId $r.ResourceId -Properties $r.Properties
Confirm soft delete is configured for the key vault by running the Get-AzKeyVault cmdlet. If soft delete is configured properly for the key vault, then the Soft Delete Enabled property returns a value of True:
Get-AzKeyVault -VaultName <vault name> | fl
Before you continue, make sure the 'Soft Delete Enabled?' is set to 'True' and the 'Soft Delete Retention Period (days)' is set to '90.'

Back up Azure Key Vault
Immediately following creation or any change to a key, perform a backup and store copies of the backup, both online and offline. To create a backup of an Azure Key Vault or managed HSM key, run the Backup-AzKeyVaultKey cmdlet.
Obtain the URI for each Azure Key Vault key
Once you set up your key vaults and added your keys, run the following command to get the URI for the key in each key vault. Use these URIs when you create and assign each DEP later, so save this information in a safe place. Run this command once for each key vault.
In Azure PowerShell:
(Get-AzKeyVaultKey -VaultName <vault name>).Id
For managed HSM:
(Get-AzKeyVaultKey -HsmName <HSM name>).Id
Onboard using the Customer Key Onboarding Service
The Microsoft 365 Customer Key Onboarding Service is a service that allows you to enable Customer Key within your own tenant. This feature automatically validates the required Customer Key resources. If desired, you can validate your resources separately before proceeding with Customer Key enablement within your tenant.
Important
This service isn't yet available for the following scenarios:
- Government tenants - see "Onboard to Customer Key for Government tenants" below.
- SharePoint and OneDrive - see "Onboard to Customer Key for SharePoint and OneDrive" below.
- Tenants using managed HSMs - see "Onboard to Customer Key using the legacy method" below.
The account used for onboarding must have the following roles that satisfy the minimum permissions:
- Global Administrator - Registering the required service principals.
- Reader - On each of the Azure Key Vaults used in the onboarding cmdlet.
Install the 'M365CustomerKeyOnboarding' PowerShell module
Sign in to your Azure subscription with Azure PowerShell. For instructions, see Sign in with Azure PowerShell.
Install the latest version of the M365CustomerKeyOnboarding module available from the PowerShell Gallery. Confirm you're downloading the latest version by viewing the "Version History" tab at the bottom of the page. Start a PowerShell session as an administrator. Copy and paste the command in Azure PowerShell and run it to install the package. Select the option "Yes to All" if prompted. Installation takes a few moments.
Using the 3 different onboarding modes
There are 3 different onboarding modes that each used for different purposes in the onboarding process. These 3 modes are "Validate", "Prepare", "Enable". When running the cmdlet in Create an Onboarding request, indicate the mode using the "-OnboardingMode" parameter.
Validate
Use the "Validate" mode to validate that the configuration of your resources used for Customer Key is correct. No action will be taken on any of your resources in this mode.
Important
You may run this mode as many times as you would like if you change the configuration of any of your resources.
Prepare
"Prepare" mode takes an action on your Customer Key resources by registering the 2 Azure subscriptions that were indicated in the cmdlet to use a MandatoryRetentionPeriod. The temporary or permanent loss of root encryption keys can be disruptive or even catastrophic to service operation and can result in data loss. For this reason, the resources used with Customer Key require strong protection. A mandatory retention period prevents immediate and irrevocable cancellation of your Azure subscription. After running the cmdlet, the subscriptions may take up to 1 hour to reflect the change. To check the status of the MandatoryRetentionPeriod registration, after running the cmdlet in prepare mode, move on to "validate" mode.
Important
Registering the MandatoryRetentionPeriod for your Azure subscriptions is mandatory. You will only be required to run this mode once, unless prompted to do so again by the cmdlet.
Enable
Use this mode when you're ready to onboard to Customer Key. "Enable" will only enable your tenant for Customer Key for the workload indicated by the -Scenario parameter. If you would like to enable Customer Key for both Exchange and M365DataAtRestEncryption, run the onboarding cmdlet a total of 2 times, once for each workload. Before running the cmdlet in "enable" mode, verify that your resources are configured correctly, indicated by "Passed" under the "ValidationResult."
Important
Enable will only successfully onboard your tenant to Customer Key if your resources satisfy the checks in "validate" mode.
Creating an Onboarding request
The first step in this automation process is to create a new request. PowerShell allows you to compact cmdlet results into variables. Compact the new request into a variable. You can create a variable by using the "$" symbol followed by the variable name.
In the example, $request is the variable that you can assign to an onboarding request.
$request = New-CustomerKeyOnboardingRequest -Organization <tenantID> -Scenario <Scenario> -Subscription1 <subscriptionID1> -VaultName1 <AKVVaultName1> -KeyName1 <KeyName1> -Subscription2 <subscriptionID2> -VaultName2 <AKVVaultName2> -KeyName2 <KeyName2> -OnboardingMode <OnboardingMode>
| Parameter | Description | Example |
|---|---|---|
| -Organization | Enter your tenant ID in the form of xxxxxxxx-xxxx-xxxx-xxxx-xxxxxxxxxxxx. | abcd1234-abcd-efgh-hijk-abcdef123456 |
| -Scenario | Enter which workload you would like to onboard to. The options to input are: ‘MDEP’ – Customer Key for Multiple Workloads ‘EXO’ – Customer Key for Exchange |
MDEP or EXO |
| -Subscription1 | Enter the Azure subscription ID of the first subscription you registered for a Mandatory Retention Period. | p12ld534-1234-5678-9876-g3def67j9k12 |
| -VaultName1 | Enter the vault name of the first Azure Key Vault you configured for Customer Key. | EXOVault1 |
| -KeyName1 | Enter the name of the first Azure Key Vault Key within your first Azure Key vault you configured for Customer Key. | EXOKey1 |
| -Subscription2 | Enter the Azure subscription ID of the second subscription you registered for a Mandatory Retention Period. | 21k9j76f-ed3g-6789-8765-43215dl21pbd |
| -VaultName2 | Enter the vault name of the second Azure Key Vault you configured for Customer Key. | EXOVault2 |
| -KeyName2 | Enter the name of the second Azure Key Vault Key within your second Azure Key vault you configured for Customer Key. | EXOKey2 |
| -Onboarding Mode | "Prepare" - Necessary configuration is done on your resources by applying the MandatoryRetentionPeriod on your subscriptions. This may take up to 1 hour to be applied. "Validate" – Only validate Azure Key Vault and Azure subscription resources, don't onboard to Customer Key. This mode would be useful if you want to verify all your resources but choose to officially onboard later. "Enable" – Both validate Azure Key vault and Subscription resources and enable Customer Key within your tenant if the validation succeeds. |
Prepare or Enable or Validate |
Log in with your tenant admin credentials
A browser window opens prompting you to log in with your privileged account. Log in using the appropriate credentials.

View the validation and enablement details
After successfully logging in, navigate back to your PowerShell Window. Run the variable you compacted the onboarding cmdlet with to get an output of your onboarding request.
$request

You receive an output with the ID, CreatedDate, ValidationResult, and EnablementResult.
| Output | Description |
|---|---|
| ID | ID associated with the created onboarding request. |
| CreatedDate | Date of when the request was created. |
| ValidationResult | Indicator of successful/unsuccessful validation. |
| EnablementResult | Indicator of successful/unsuccessful enablement. |
A tenant that is ready to use Customer Key has "Success" under both the 'ValidationResult' and 'EnablementResult' as shown:
Proceed to Next Steps if the tenant has successfully onboarded to Customer Key.
Troubleshooting failed validations details
If the validation is failing for the tenant, the following steps are a guide for investigating the root cause for misconfigured resources. To check which misconfigured resources are causing the validation to fail, store the onboarding result into a variable and navigate to its validation results.
- Find the request ID of the request you would like to investigate by listing all the requests.
Get-CustomerKeyOnboardingRequest -OrganizationID <OrganizationID>
- Store the specific onboarding request into the variable '$request'
$request = Get-CustomerKeyOnboardingRequest -OrganizationID <OrganizationID> -RequestID <RequestID>
- Run the following command.
$request.FailedValidations

The expected value of each rule appears in the "ExpectedValue" column while what the actual value appears in the "ActualValue" column. The "scope" column shows the first five characters of your subscription ID, allowing you to determine which subscription and underlying key vault had the problem. The "Details" section provides a description of the root cause of the error and how to handle it.
| RuleName | Description | Solution |
|---|---|---|
| MandatoryRetentionPeriodState | Returns the state of the MandatoryRetentionPeriod | Verify that "Prepare" mode was run. If the issue persists, navigate to Incorrect Mandatory Retention Period State. |
| SubscriptionInRequestOrganization | Your Azure subscription is within your organization. | Verify that the supplied subscription was created within the indicated tenant |
| VaultExistsinSubscription | Your Azure Key Vault is within your Azure subscription. | Verify that the Azure Key Vault was created within the indicated subscription |
| SubscriptionUniquePerScenario | Your subscription is unique for Customer Key. | Verify that you're using two unique subscription IDs |
| SubscriptionsCountPerScenario | You have two subscriptions per scenario. | Verify that you're using two subscriptions in the request |
| RecoveryLevel | Your AKV key recovery level is Recoverable+ProtectedSubscription. | Incorrect Mandatory Retention Period State |
| KeyOperationsSupported | Your key vault has the required permissions for the appropriate workload. | Assign the proper permissions to AKV Keys |
| KeyNeverExpires | Your AKV Key doesn't have an expiration date. | Verify the expiration of your keys |
| KeyAccessPermissions | Your AKV Key has the required access permissions | Assign the proper permissions to AKV Keys |
| OrganizationHasRequiredServicePlan | Your organization has the correct service plan to use Customer Key. | Ensure your tenant has the required licenses |
Incorrect mandatory retention period state
If the MandatoryRetentionPeriodState is set to 'Recoverable' or 'Recoverable+Purgeable' one hour after running the onboarding cmdlet in 'Prepare' mode and you have Soft Delete enabled on your Azure Key Vaults conduct the following steps:
- Confirm that both Azure subscriptions return a state of 'Registered' by running the following commands:
Set-AzContext -SubscriptionId <Subscription ID>
Get-AzProviderFeature -FeatureName mandatoryRetentionPeriodEnabled -ProviderNamespace Microsoft.Resources
Re-register both the 'Microsoft.Resources' and 'Microsoft.KeyVault' Resource Providers on both subscriptions.
- Re-registration can be performed using three methods: Azure Portal, Azure CLI and Azure PowerShell.
- Azure PowerShell:
Register-AzResourceProvider -ProviderNamespace Microsoft.Resources Register-AzResourceProvider -ProviderNamespace Microsoft.Keyvault - Azure CLI:
az provider register --namespace Microsoft.Resources az provider register --namespace Microsoft.Keyvault - Azure Portal:

- Azure PowerShell:
- Re-registration can be performed using three methods: Azure Portal, Azure CLI and Azure PowerShell.
To check the recovery level of a key, in Azure PowerShell, run the Get-AzKeyVaultKey cmdlet as follows:
(Get-AzKeyVaultKey -VaultName <vault name> -Name <key name>).Attributes
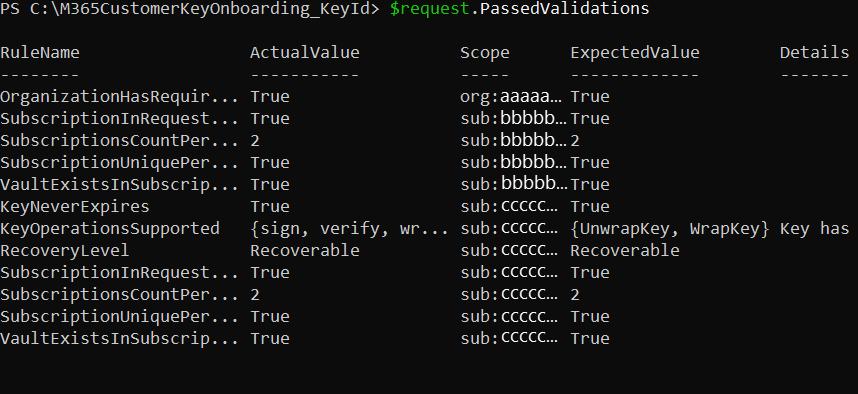
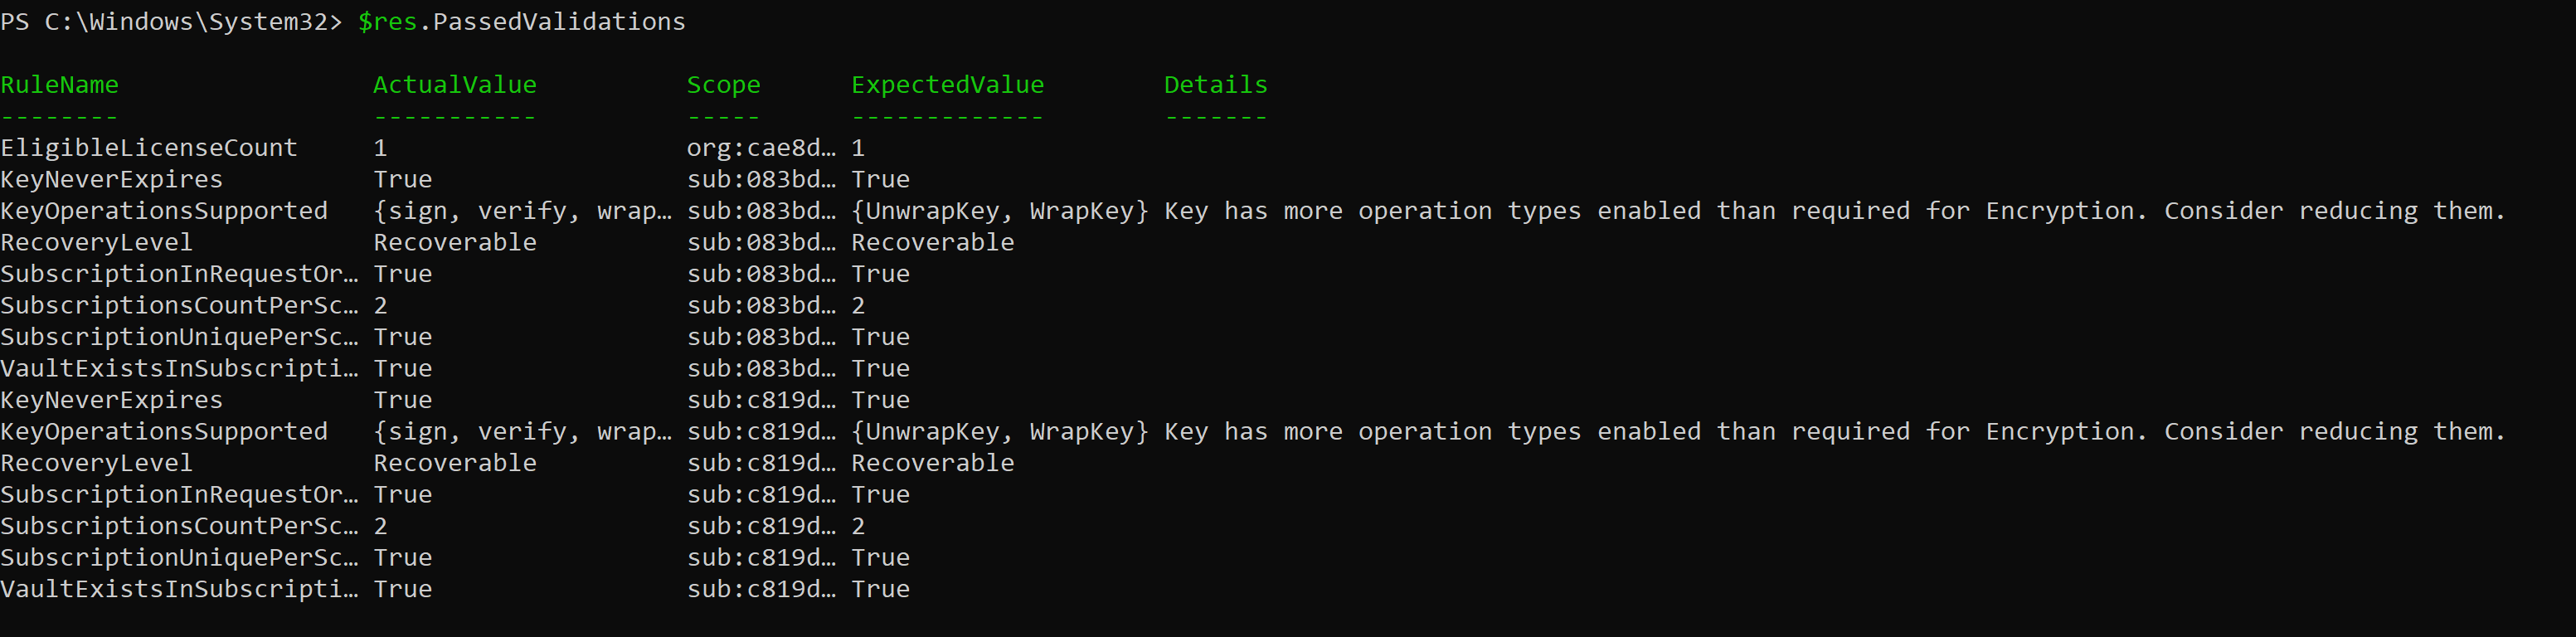
Checking passed validations
To check to see which validations passed, run the following commands:
- Store the specific onboarding request into the variable '$request'
$request = Get-CustomerKeyOnboardingRequest -OrganizationID <OrganizationID> -RequestID <RequestID>
- Run the following command.
$request.PassedValidations
Onboard to Customer Key using the legacy method
Only use this method if the Customer Key Onboarding Service unsupported scenarios apply to your tenant. If you would like to onboard to Customer Key using the legacy method, after completing all the steps to set up your Azure Key Vaults and subscriptions, contact Microsoft Support requesting Customer Key support.
Onboard to Customer Key for government tenants
If you have a tenant located in GCC-H or DoD and would like to enable Customer Key, after completing all the steps to set up your Azure Key Vaults and subscriptions, contact Microsoft Support requesting Customer Key support for government tenants.
Onboard to Customer Key for SharePoint and OneDrive
There are two pre-requisites to onboard to Customer Key for SharePoint and OneDrive.
The tenant has already been onboarded to Customer Key for Exchange or Customer Key for Multiple Workloads.
Both subscriptions are registered to use a Mandatory Retention Period.
If your tenant satisfies both pre-requisites, navigate to Create a DEP for use with SharePoint and OneDrive
Next steps
Once you complete the steps in this article, you're ready to create and assign DEPs. For instructions, see Manage Customer Key.