A basic guide on troubleshooting S/MIME issues
What is S/MIME and what is it used for:
S/MIME (Secure/Multipurpose Internet Mail Extensions) is a standard for public key encryption and signing of MIME data.
It is used to sign and encrypt messages to users using certificates. If a message is encrypted using S/MIME, even Exchange Admins won't be able to see the content of the message.
Usually, it is a government preferred way to secure e-mail communication, or used in institutions where data protection is mandatory. Messages can be either signed, or encrypted.
Messages encrypted or signed using S/MIME can be send and received digitally via Outlook, OWA, and Exchange Active Sync clients (mobile devices).
This article is created as a guide for troubleshooting. For enabling S/MIME, more details can be found: here and here.
Hints for troubleshooting:
What to collect:
The first step would be to gather results of the below commands while connected to Exchange Online via PowerShell:
Get-smimeconfig | export-clixml smimeconfig.xml #run this also in the on premises environment in the case of a hybrid deployment, from EMS#
Get-mailbox user@contoso.com | export-clixml mailbox_A.xml #run one for sender and once for recipient#
These details will help to see if all settings are correct for the mailbox of the recipient or sender. For S/MIME to work, both the Sender and Recipient should have S/MIME encryption enabled.
Since we are still at the stage of collecting data, export also the certificate by running:
$mbx = Get-Mailbox user@contoso.com
[io.file]::WriteAllBytes('c:\temp\UserCertificate.cer', $mbx.UserCertificate[0])
[io.file]::WriteAllBytes('c:\temp\UserSMimeCertificate.p7b', $mbx.UserSMimeCertificate[0])
Then, export the Microsoft Serialized Certificate Store(.SST) chain:
$smimeconfig = Get-SMIMEConfig
[io.file]::WriteAllBytes('C:\temp\SMIMECertificateIssuingCA.SST',$smimeconfig.SMIMECertificateIssuingCA)
Good! So, now you’re set with a considerable chunk of data. Let’s work your way through it!
Analyzing the certificate related data:
On the certificate exported earlier, check General tab, check Validity period and Issued by. Make sure all these details are still valid.
Also, on the same certificate, check Details tab: Show Properties Only, Thumbprint algorithm and Thumbprint to be populated.
Analyzing data collected from PowerShell:
Next step is to open a PowerShell window and import the xml file exported previously, like below:
$smimeconfig = Import-Clixml c:\location\ofexport\filename.xml
This is quite a preferred way of seeing data by support professionals, as it allows for better visibility.
After this, you can just type $smimeconfig and check the following parameters to have values like those below:
OWAAlwaysSign : False
OWAAlwaysEncrypt : False
OWAClearSign : True
OWAEncryptionAlgorithms : 6610
OWASigningAlgorithms : 8004
OWAAllowUserChoiceOfSigningCertificate : True
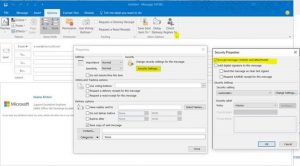
If the values returned match the ones above, the next step is to make sure encryption/signing is not selected by default in Outlook client, if you don’t want it to be:
If none of the above steps help, the next step is to check the messages signed or encrypted with MFC MAPI.
Now, be careful when using this tool, as it bypasses the standard safeguards provided by administrative tools and by doing a wrong change, you could easily break the mailbox functionality, sometimes without the possibility of fixing it. If unsure about the steps you are taking, opening a ticket with Microsoft support is recommended.
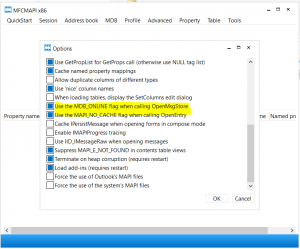
After installing MFC MAPI, go to Tools, Options and make sure the following are selected, in order to connect to the profile in online mode:
MDB_Online flag and MAPI _NO_CACHE flag
Now, click on Session-Logon and select the profile you would like to analyze. Then, double click the mailbox store you are working with (should be the default one). Next, expand the Root Container and click on Top of Information Store->Inbox->Right click Inbox, Open contents table, select the message that is supposed to be signed or encrypted and check the Message class:
IPM.Note.SMIME means that it is encrypted and it can also be signed.
IPM.Note.SMIME.MultipartSigned means that it is clearly signed.
Judging from the data obtained here, you can decide if the message settings are correct or not, for the scenario you must analyze.
If none of the above steps help in any way help, we would recommend getting the below traces and opening a support ticket. You can also get the steps recorder when sending the encrypted/signed email.
To get the traces, follow the below steps:
- Open Internet Explorer and press F12 to bring up the Developer Tools Window and select the Console tab.
- Logon to OWA without changing the url.
- Clear the console Tab.
- Once you are logged on, add " ?traceLevel=4" (case sensitive) to the OWA URL and press enter. For example: https://outlook.office365.com/owa/?traceLevel=4
- At this point, you should see OWA getting refreshed and you will see lines being added to the console.
- Reproduce the issue.
- Copy all traces from the Console tab and save them to a file.
- Alternatively, you can add " ?traceLevel=4 &traceComponents=smimeDump" to the OWA URL and press enter. For example: https://outlook.office365.com/owa/?traceLevel=4&traceComponents=smimeDump
- When trace component is set to smimedump, reproducing the problem writes diagnostic files to the %userprofile% directory. Please attach the files once the repro step is done.Please note the console trace are not captured by the smimedump, you will still need to copy and paste the traces from the console manually. (right click Console, Copy All-> Paste to Notepad)
Other things to consider when troubleshooting S/MIME scenarios:
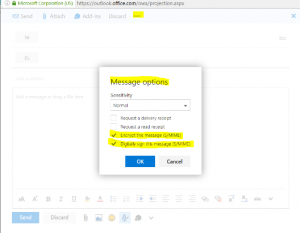
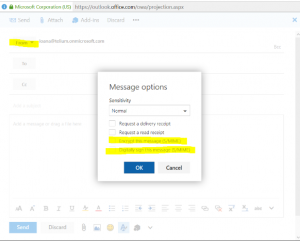
If the From Field is visible in OWA, S/MIME settings from message options will be grayed out!
You must use PowerShell to remove the FROM field, by running the below command:
Set-MailboxMessageConfiguration user@domain.com -AlwaysShowFrom $false
Not grayed out:
Grayed out:
Hope the above will help!


