SharePoint 2010 User Profiles Service: Part 3 Adding WCF BCS Model
In the previous post I described the exact scenario I am trying to implement and detailed how to create the WCF service and deploy it. In this post I will continue by describing how can we prepare this WCF to be consumed from the User Profiles Synchronization service using BCS.
Create the BCS Profile Pages Host
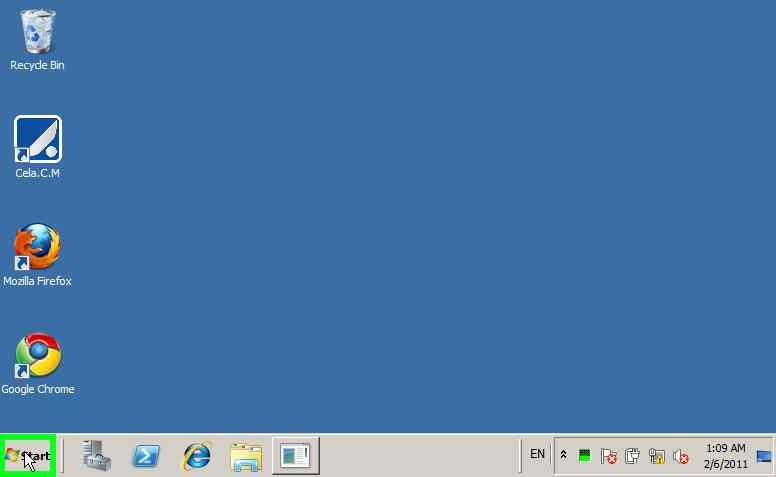
Step 1: User left click on "Start (push button)" in "Start" |
|
Step 2: User left click on "SharePoint 2010 Central Administration (menu item)" in "Start menu" |
|
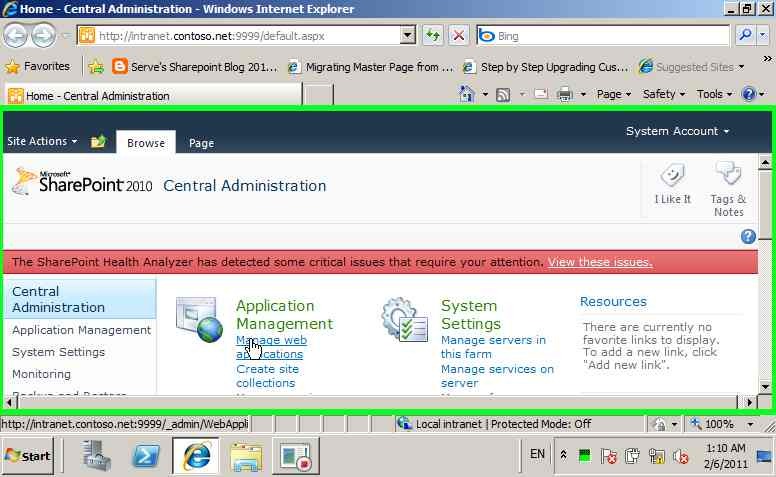
Step 3: User left click on "Manage web applications (editable text)" in "Home - Central Administration - Windows Internet Explorer" |
|
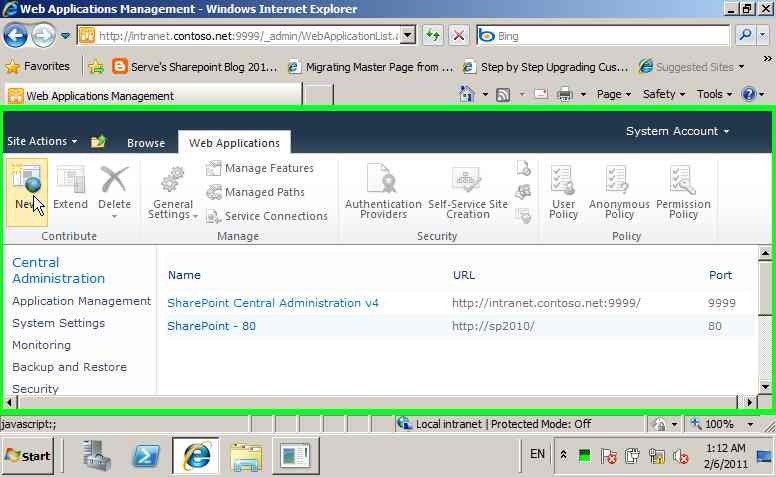
Step 4: User left click on "Web Applications Tab 2 of 2. (pane)" in "Web Applications Management - Windows Internet Explorer" |
|
Step 5: User keyboard input in "Web Applications Management - Windows Internet Explorer" [... Alt-Shift-Tab] |
|
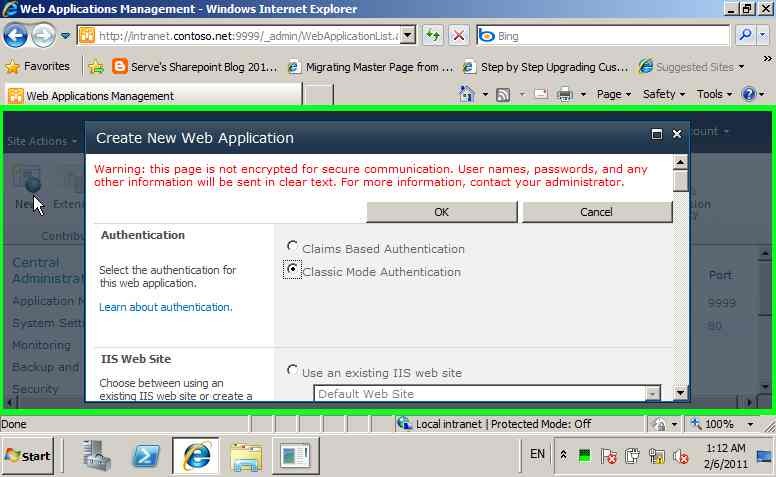
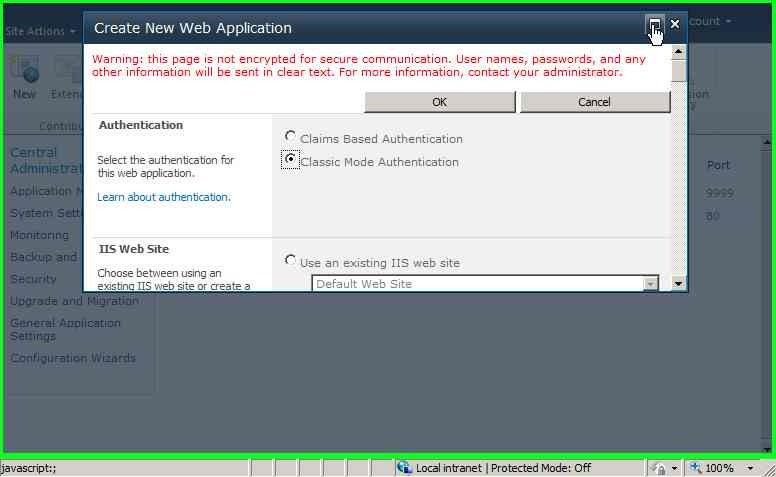
Step 6: User left click on "Create New Web Application (dialog)" in "Web Applications Management - Windows Internet Explorer" |
|
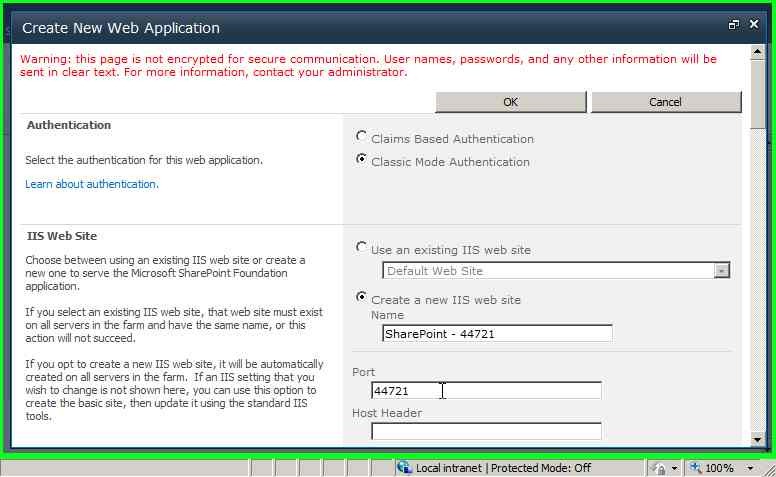
Step 7: User left click on "Port (editable text)" in "Web Applications Management - Windows Internet Explorer" |
|
Step 8: User keyboard input in "Web Applications Management - Windows Internet Explorer" |
|
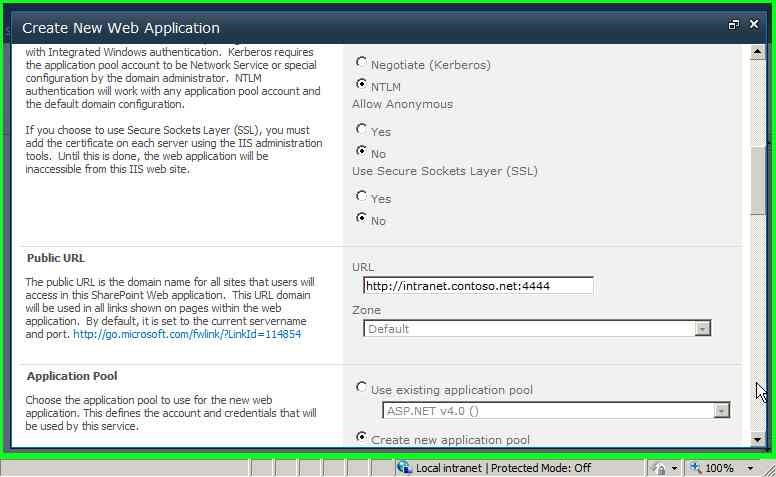
Step 9: User left click on "Create New Web Application (pane)" in "Web Applications Management - Windows Internet Explorer" |
|
Step 10: User left click on "Create New Web Application (pane)" in "Web Applications Management - Windows Internet Explorer" |
|
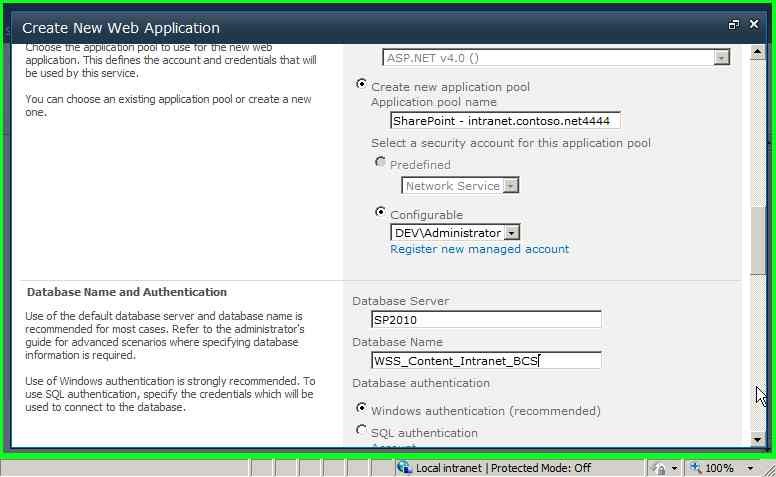
Step 11: User left click on "Database Name (editable text)" in "Web Applications Management - Windows Internet Explorer" |
|
Step 12: User keyboard input in "Web Applications Management - Windows Internet Explorer" [... Shift-End Delete ... Backspace ...] |
|
Step 13: User left click on "Create New Web Application (pane)" in "Web Applications Management - Windows Internet Explorer" |
|
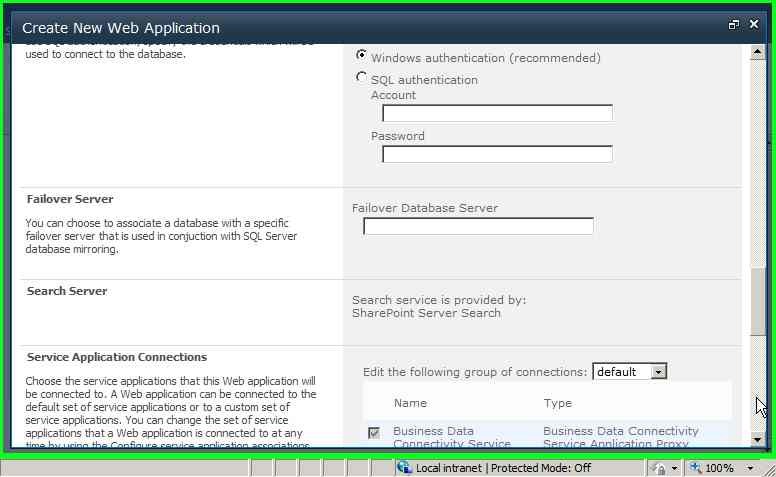
Step 14: User left click on "Create New Web Application (pane)" in "Web Applications Management - Windows Internet Explorer" |
|
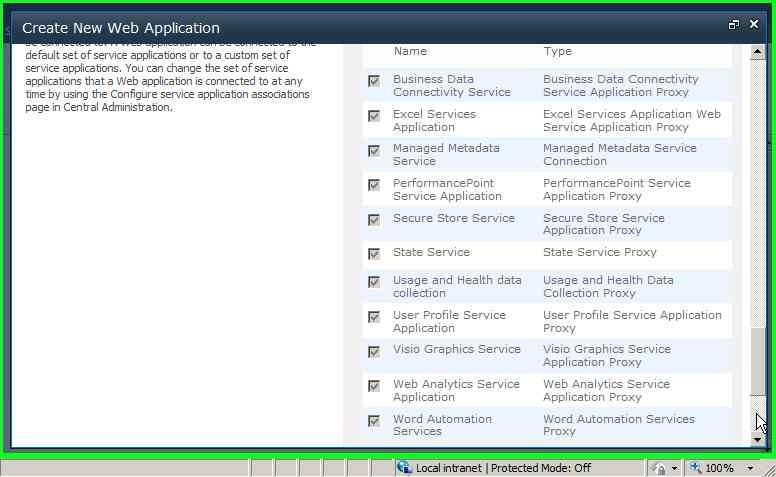
Step 15: User left click on "Create New Web Application (pane)" in "Web Applications Management - Windows Internet Explorer" |
|
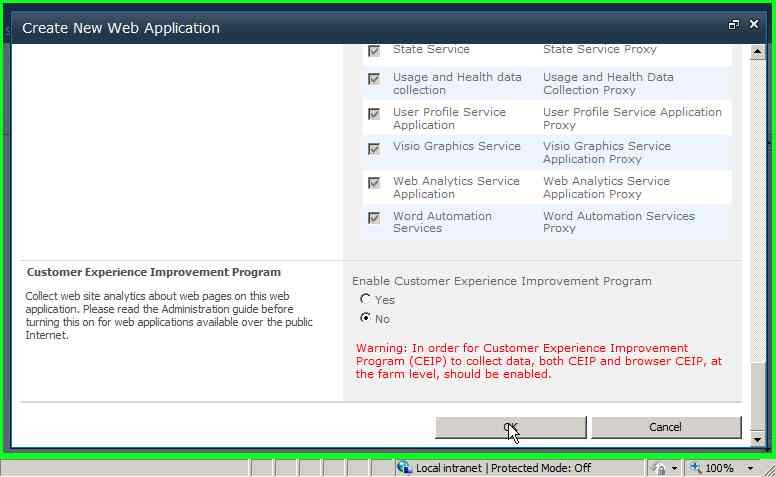
Step 16: User left click on "OK (push button)" in "Web Applications Management - Windows Internet Explorer" |
|
Step 17: User left click on "Title (editable text)" in "Create Site Collection - Windows Internet Explorer" |
|
Step 18: User keyboard input in "Create Site Collection - Windows Internet Explorer" [...] |
|
Step 19: User left click on "Create Site Collection (pane)" in "Create Site Collection - Windows Internet Explorer" |
|
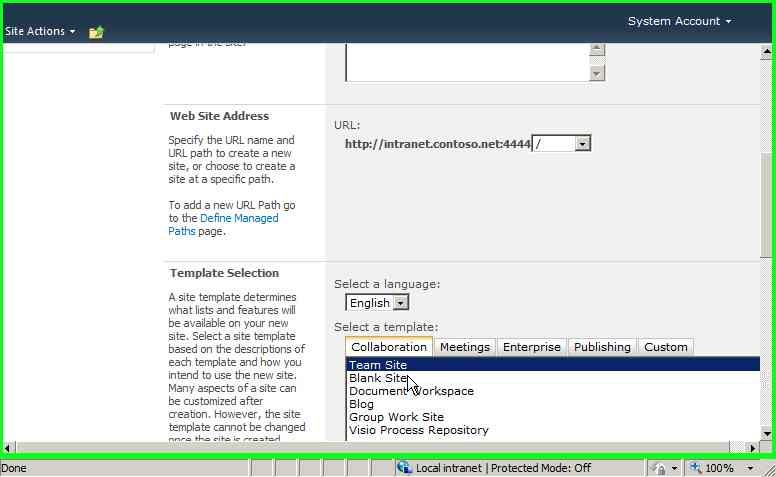
Step 20: User left click on "Blank Site (list item)" in "Create Site Collection - Windows Internet Explorer" |
|
Step 21: User left click in "Create Site Collection - Windows Internet Explorer" |
|
Step 22: User left click in "Create Site Collection - Windows Internet Explorer" |
|
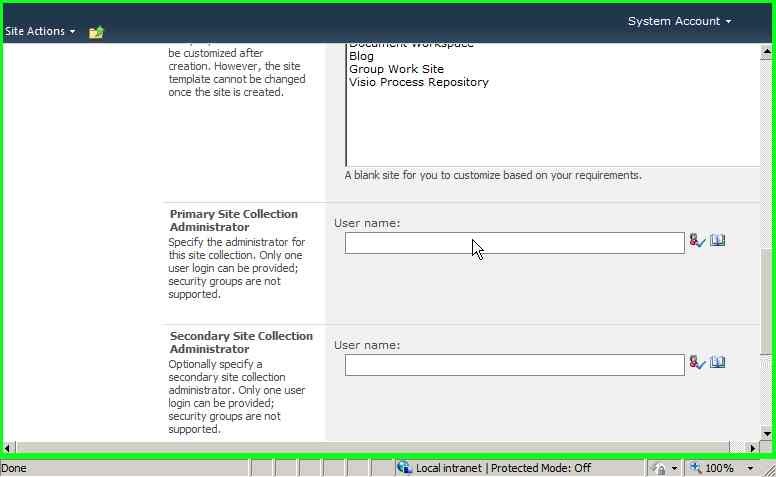
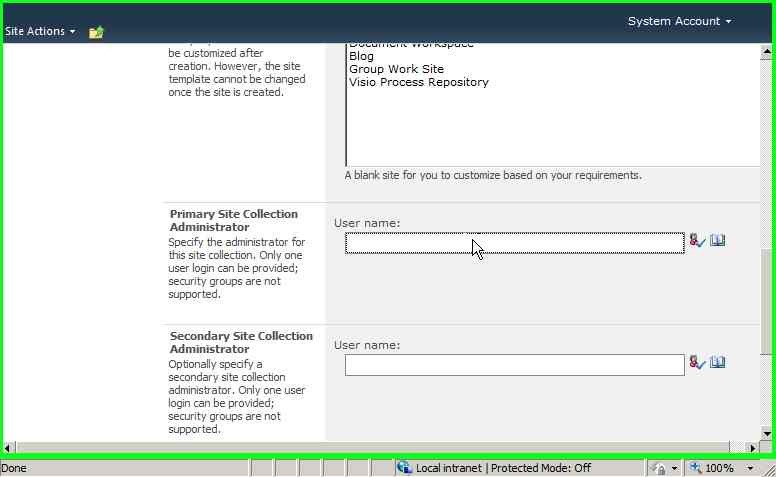
Step 23: User keyboard input in "Create Site Collection - Windows Internet Explorer" [...] |
|
Step 24: User left click on "Create Site Collection (pane)" in "Create Site Collection - Windows Internet Explorer" |
|
Step 25: User left click on "OK (push button)" in "Create Site Collection - Windows Internet Explorer" |
|
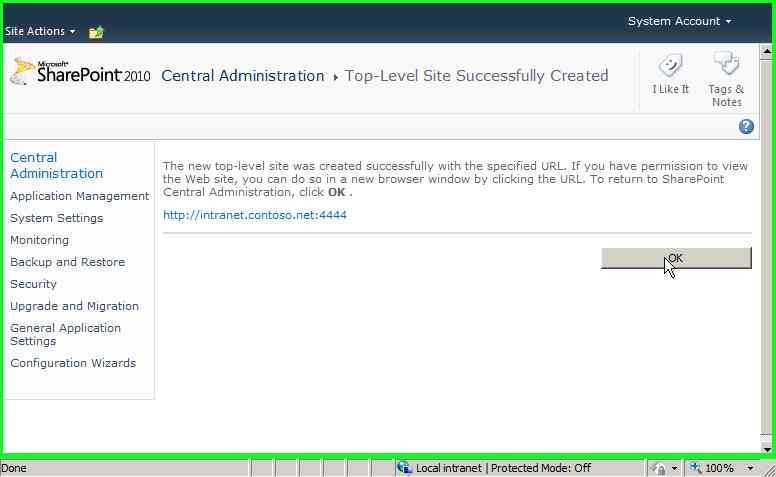
Step 26: User left click on "OK (push button)" in "Top-Level Site Successfully Created - Windows Internet Explorer" |
|
Configure the BCS to Use the New Host
Step 1: User left click on "Manage service applications (editable text)" in "Home - Central Administration - Windows Internet Explorer" |
|
Step 2: User left click on "Business Data Connectivity Service (editable text)" in "Manage Service Applications - Windows Internet Explorer" |
|
Step 3: User left click on "Configure (push button)" in "View External Content Types - Windows Internet Explorer" |
|
Step 4: User keyboard input in "View External Content Types - Windows Internet Explorer" [...] |
|
Step 5: User left click on "Configure External Content Type Profile Page Host (pane)" in "View External Content Types - Windows Internet Explorer" |
|
Step 6: User left click on "OK (push button)" in "View External Content Types - Windows Internet Explorer" |
|
Create the Employee WCF BCS Model
Step 1: User left click on "Start (push button)" in "Start" |
|
Step 2: User left click on "Microsoft SharePoint Designer 2010 (menu item)" in "Start menu" |
|
Step 3: User left click on "Open Site (push button)" in "Microsoft SharePoint Designer" |
|
Step 4: User keyboard input in "Open Site" [... Home ... End ...] |
|
Step 5: User left click on "Open (push button)" in "Open Site" |
|
Step 6: User left click on "External Content Types (push button)" in "https://intranet.contoso.net:4444" |
|
Step 7: User left click on "External Content Type (push button)" in "https://intranet.contoso.net:4444" |
|
Step 8: User left click on "Name (link)" in "https://intranet.contoso.net:4444" |
|
Step 9: User keyboard input in "https://intranet.contoso.net:4444" [... Tab] |
|
Step 10: User left click on "Minimize the Ribbon (push button)" in "https://intranet.contoso.net:4444" |
|
Step 11: User left click on "External System (link)" in "https://intranet.contoso.net:4444" |
|
Step 12: User left click on "Add Connection (push button)" in "https://intranet.contoso.net:4444" |
|
Step 13: User left click on "Data Source Type (text)" in "External Data Source Type Selection" |
|
Step 14: User left click on "WCF Service (list item)" |
|
Step 15: User left click on "OK (push button)" in "External Data Source Type Selection" |
|
Step 16: User keyboard input in "WCF Connection" [... Alt-Shift-Tab ... Ctrl-V] |
|
Step 17: User left click on "Open (push button)" in "WCF Connection" |
|
Step 18: User left click on "Metadata Exchange (list item)" |
|
Step 19: User left click on "Service Endpoint URL: (editable text)" in "WCF Connection" |
|
Step 20: User keyboard input in "WCF Connection" |
|
Step 21: User left click on "OK (push button)" in "WCF Connection" |
|
Step 22: User left click on "https://sp2010.dev.mcs.local:8080/EmployeeWCFService/EmployeeService.svc/mex (outline item)" in "https://intranet.contoso.net:4444" |
|
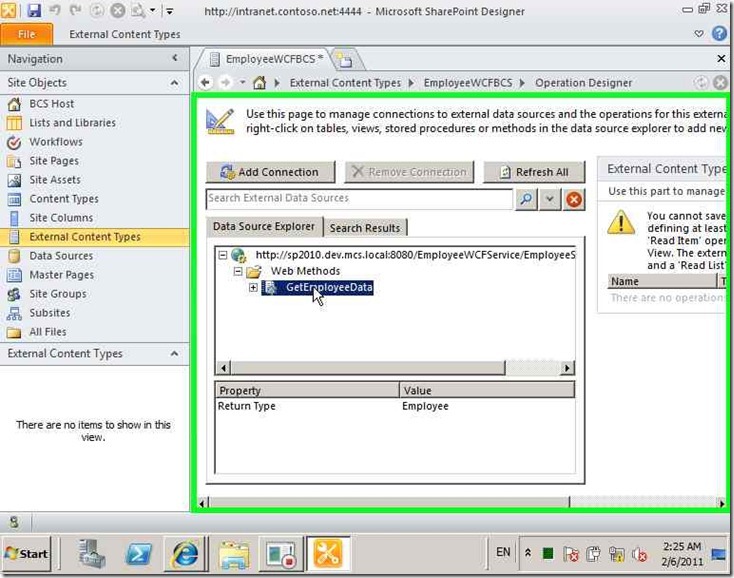
Step 23: User left click on "Web Methods (outline item)" in "https://intranet.contoso.net:4444" |
|
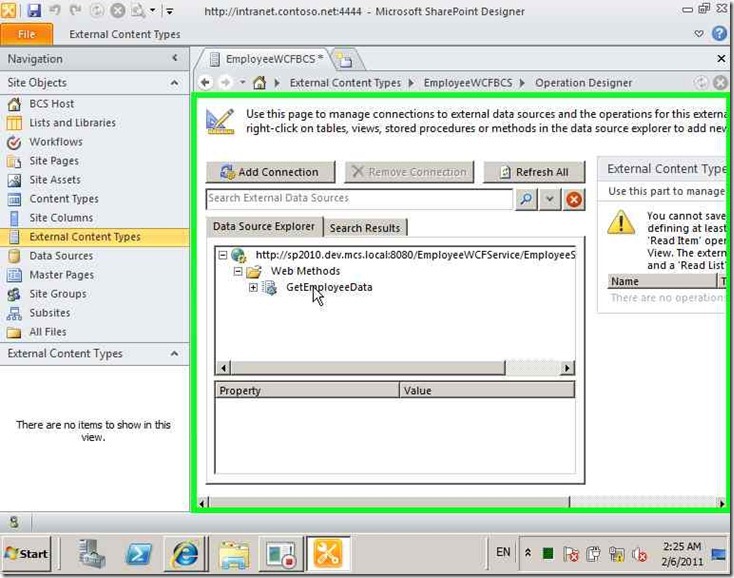
Step 24: User left click on "GetEmployeeData (text)" in "https://intranet.contoso.net:4444" |
|
Step 25: User right click on "GetEmployeeData (text)" in "https://intranet.contoso.net:4444" |
|
Step 26: User left click on "New Read Item Operation (menu item)" |
|
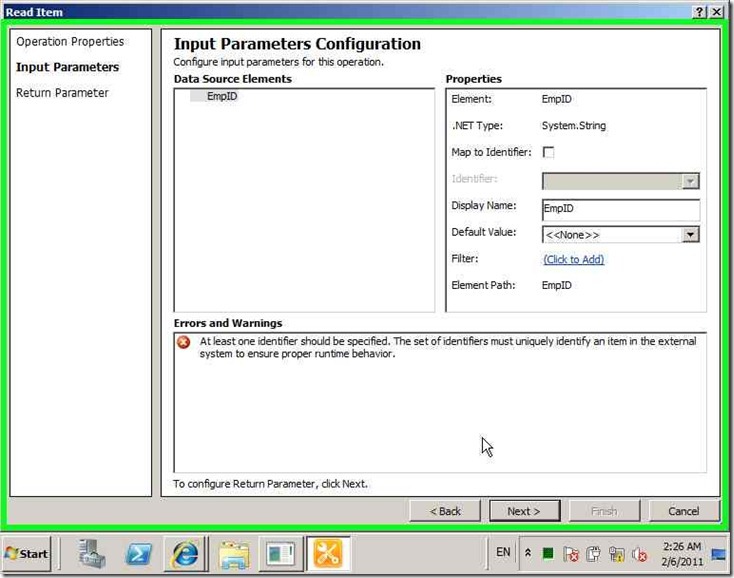
Step 27: User left click on "Next > (push button)" in "Read Item" |
|
Step 28: User keyboard input in "Read Item" [... Alt-Shift-Tab] |
|
Step 29: User left click on "Next > (push button)" in "Read Item" |
|
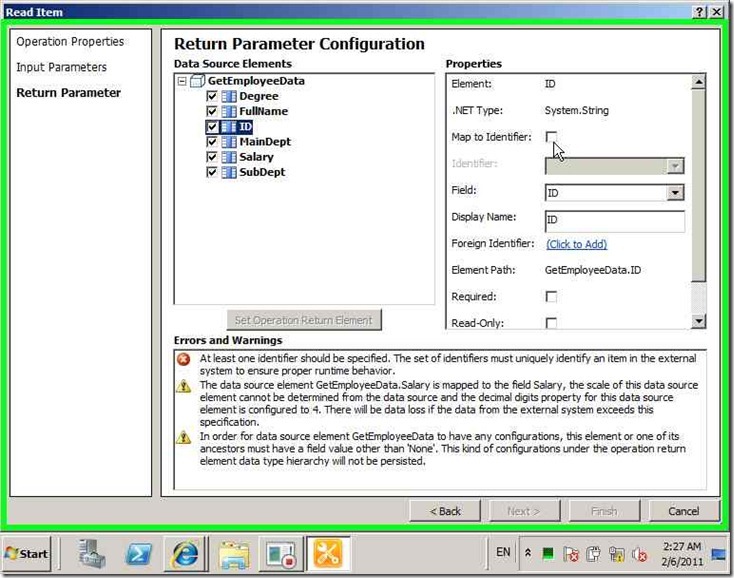
Step 30: User left click on "Map to Identifier: (check box)" in "Read Item" |
|
Step 31: User left click on "Map to Identifier: (check box)" in "Read Item" |
|
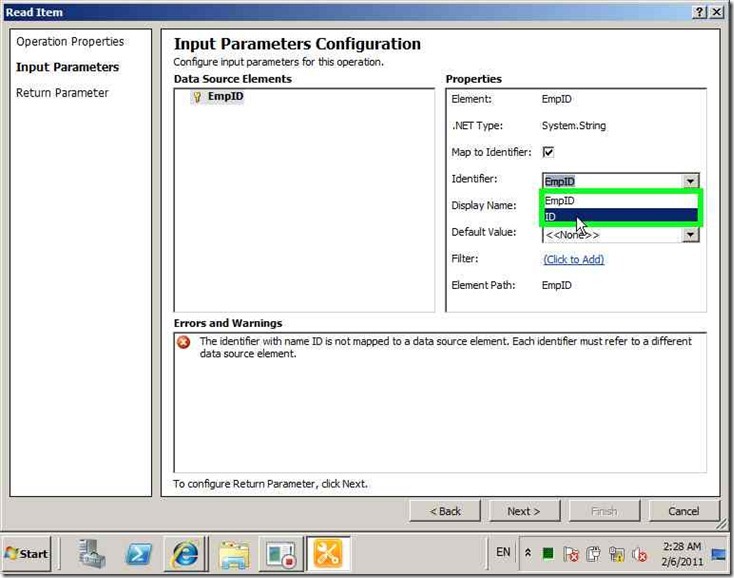
Step 32: User left click on "ID (text)" in "Read Item" |
|
Step 33: User left click on "Map to Identifier: (check box)" in "Read Item" |
|
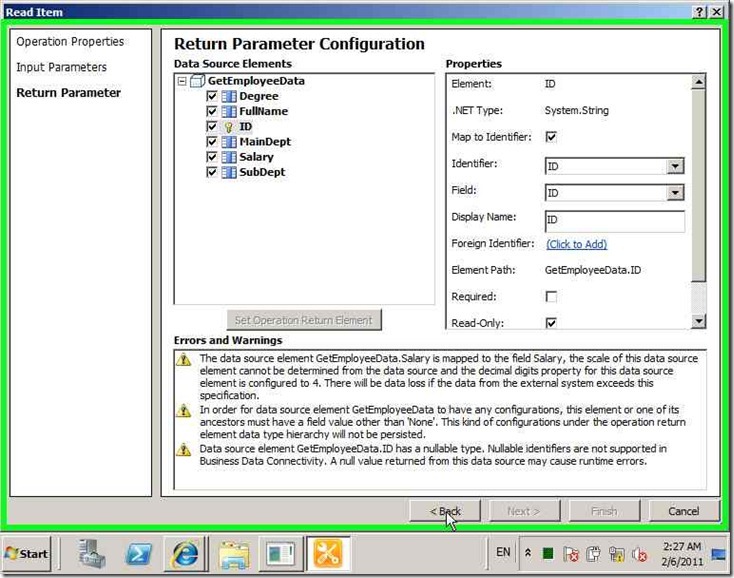
Step 34: User left click on "< Back (push button)" in "Read Item" |
|
Step 44: User keyboard input in "https://intranet.contoso.net:4444" [... Alt-Shift-Tab] |
Step 35: User left click on "Map to Identifier: (check box)" in "Read Item" |
|
Step 36: User left click on "Open (push button)" in "Read Item" |
|
Step 37: User left click on "ID (list item)" |
|
Step 38: User left click on "Next > (push button)" in "Read Item" |
|
Step 39: User left click on "Finish (push button)" in "Read Item" |
|
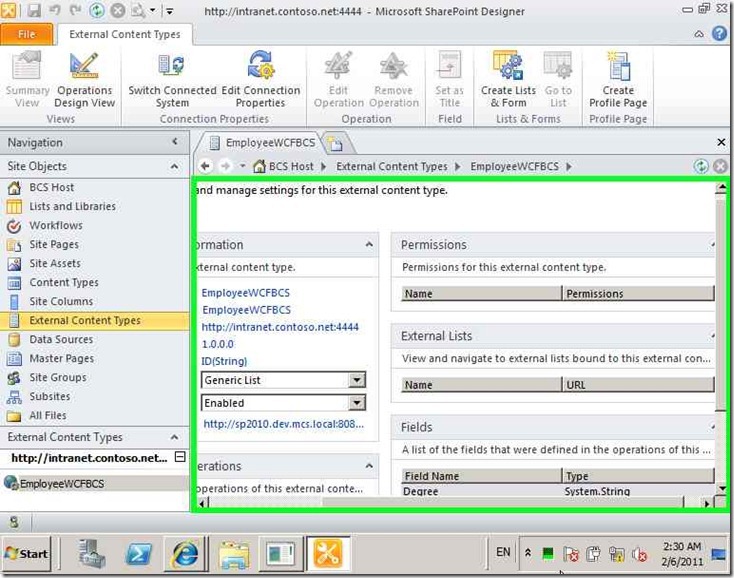
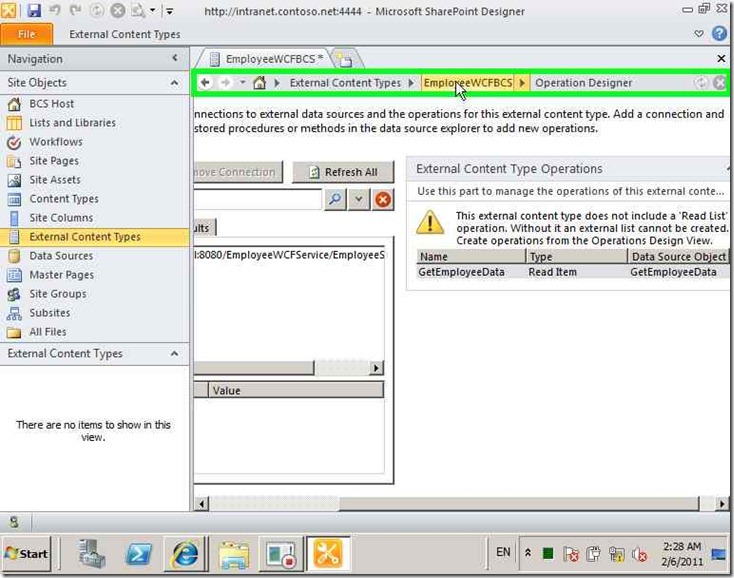
Step 40: User left click on "EmployeeWCFBCS (push button)" in "https://intranet.contoso.net:4444" |
|
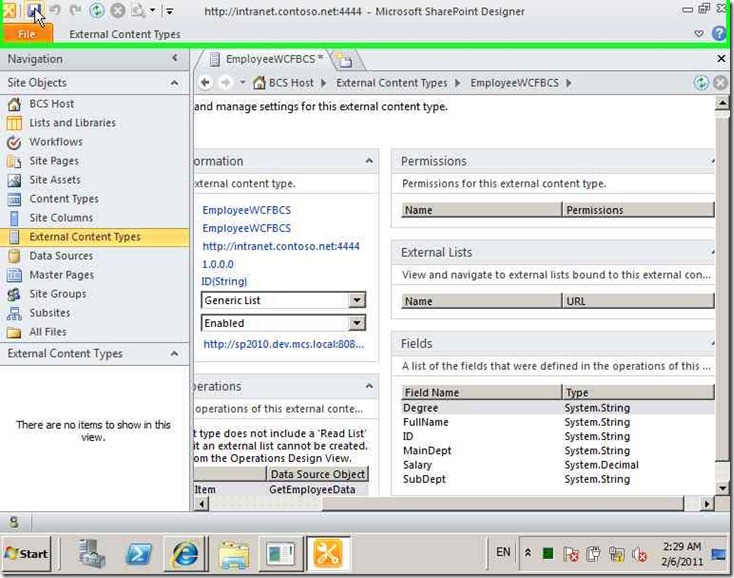
Step 41: User left click on "Save (push button)" in "https://intranet.contoso.net:4444" |
|
Step 42: User left click on "Minimize the Ribbon (push button)" in "https://intranet.contoso.net:4444" |
|
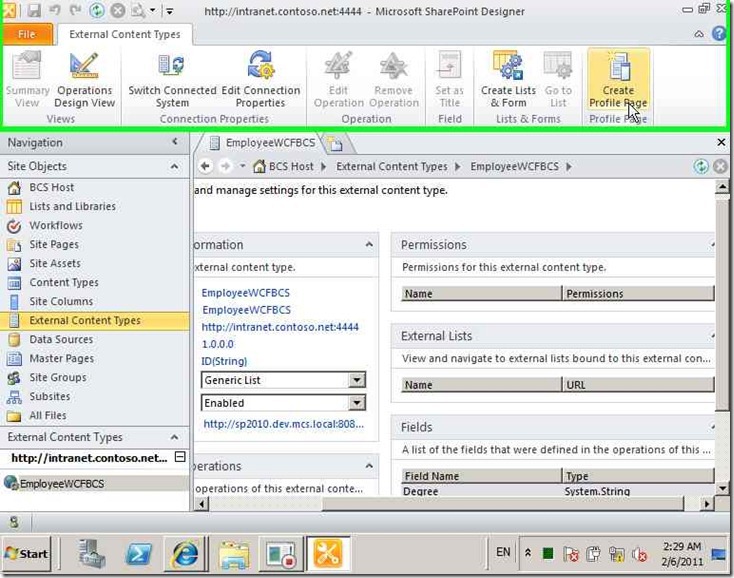
Step 43: User left click on "Create Profile Page (push button)" in "https://intranet.contoso.net:4444" |
|
Deploy and Test the Employee BCS Model
Step 1: User left click on "Manage service applications (editable text)" in "Home - Central Administration - Windows Internet Explorer" |
|
Step 2: User left click on "Business Data Connectivity Service (editable text)" in "Manage Service Applications - Windows Internet Explorer" |
|
Step 3: User left click on "Open Menu (graphic)" in "View External Content Types - Windows Internet Explorer" |
|
Step 4: User left click on "Set Permissions (link)" in "View External Content Types - Windows Internet Explorer" |
|
Step 5: User keyboard input in "View External Content Types - Windows Internet Explorer" [...] |
|
Step 6: User left click on "Check Names (graphic)" in "View External Content Types - Windows Internet Explorer" |
|
Step 7: User left click on "Add (push button)" in "View External Content Types - Windows Internet Explorer" |
|
Step 8: User left click on "Set Object Permissions (pane)" in "View External Content Types - Windows Internet Explorer" |
|
Step 9: User left click on "Set Object Permissions (pane)" in "View External Content Types - Windows Internet Explorer" |
|
Step 10: User left click on "Set Object Permissions (pane)" in "View External Content Types - Windows Internet Explorer" |
|
Step 11: User left click on "Set Object Permissions (pane)" in "View External Content Types - Windows Internet Explorer" |
|
Step 12: User left click on "OK (push button)" in "View External Content Types - Windows Internet Explorer" |
|
Step 13: User left click on "View External Content Types (pane)" in "View External Content Types - Windows Internet Explorer" |
|
Step 14: User left click on "https://intranet.contoso.net:4444/_bdc/http___intranet_contoso_net_4444/EmployeeWCFBCS_1.aspx?ID={0} (editable text)" in "View External Content Types - Windows Internet Explorer" |
|
Step 15: User left click on "Address (editable text)" in "EmployeeWCFBCS - Windows Internet Explorer" |
|
Step 16: User keyboard input in "EmployeeWCFBCS - Windows Internet Explorer" [End Backspace Backspace Backspace ... Enter] |
|
Step 17: User keyboard input in "EmployeeWCFBCS - Windows Internet Explorer" [... Alt-Tab] |
|
So Now the BCS model is deployed and working as expected. The next step is to configure the UPS connections.










![clip_image001[6] clip_image001[6]](https://msdntnarchive.z22.web.core.windows.net/media/MSDNBlogsFS/prod.evol.blogs.msdn.com/CommunityServer.Blogs.Components.WeblogFiles/00/00/01/39/29/metablogapi/2063.clip_image0016_thumb_21B8629E.jpg)
![clip_image002[6] clip_image002[6]](https://msdntnarchive.z22.web.core.windows.net/media/MSDNBlogsFS/prod.evol.blogs.msdn.com/CommunityServer.Blogs.Components.WeblogFiles/00/00/01/39/29/metablogapi/2158.clip_image0026_thumb_591A5FCD.jpg)
![clip_image003[6] clip_image003[6]](https://msdntnarchive.z22.web.core.windows.net/media/MSDNBlogsFS/prod.evol.blogs.msdn.com/CommunityServer.Blogs.Components.WeblogFiles/00/00/01/39/29/metablogapi/5775.clip_image0036_thumb_42FFBA6F.jpg)
![clip_image004[6] clip_image004[6]](https://msdntnarchive.z22.web.core.windows.net/media/MSDNBlogsFS/prod.evol.blogs.msdn.com/CommunityServer.Blogs.Components.WeblogFiles/00/00/01/39/29/metablogapi/1050.clip_image0046_thumb_19D40E32.jpg)
![clip_image005[6] clip_image005[6]](https://msdntnarchive.z22.web.core.windows.net/media/MSDNBlogsFS/prod.evol.blogs.msdn.com/CommunityServer.Blogs.Components.WeblogFiles/00/00/01/39/29/metablogapi/3618.clip_image0056_thumb_72297E08.jpg)
![clip_image006[6] clip_image006[6]](https://msdntnarchive.z22.web.core.windows.net/media/MSDNBlogsFS/prod.evol.blogs.msdn.com/CommunityServer.Blogs.Components.WeblogFiles/00/00/01/39/29/metablogapi/8103.clip_image0066_thumb_736A02E8.jpg)
![clip_image001[8] clip_image001[8]](https://msdntnarchive.z22.web.core.windows.net/media/MSDNBlogsFS/prod.evol.blogs.msdn.com/CommunityServer.Blogs.Components.WeblogFiles/00/00/01/39/29/metablogapi/8037.clip_image0018_39C6A757.jpg)
![clip_image002[8] clip_image002[8]](https://msdntnarchive.z22.web.core.windows.net/media/MSDNBlogsFS/prod.evol.blogs.msdn.com/CommunityServer.Blogs.Components.WeblogFiles/00/00/01/39/29/metablogapi/5775.clip_image0028_0AF0C8E8.jpg)
![clip_image004[8] clip_image004[8]](https://msdntnarchive.z22.web.core.windows.net/media/MSDNBlogsFS/prod.evol.blogs.msdn.com/CommunityServer.Blogs.Components.WeblogFiles/00/00/01/39/29/metablogapi/4237.clip_image0048_14493BC4.jpg)
![clip_image006[8] clip_image006[8]](https://msdntnarchive.z22.web.core.windows.net/media/MSDNBlogsFS/prod.evol.blogs.msdn.com/CommunityServer.Blogs.Components.WeblogFiles/00/00/01/39/29/metablogapi/0435.clip_image0068_6C2666D7.jpg)
![clip_image008[4] clip_image008[4]](https://msdntnarchive.z22.web.core.windows.net/media/MSDNBlogsFS/prod.evol.blogs.msdn.com/CommunityServer.Blogs.Components.WeblogFiles/00/00/01/39/29/metablogapi/8865.clip_image0084_761ABC68.jpg)
![clip_image009[4] clip_image009[4]](https://msdntnarchive.z22.web.core.windows.net/media/MSDNBlogsFS/prod.evol.blogs.msdn.com/CommunityServer.Blogs.Components.WeblogFiles/00/00/01/39/29/metablogapi/7384.clip_image0094_1802CC95.jpg)
![clip_image010[4] clip_image010[4]](https://msdntnarchive.z22.web.core.windows.net/media/MSDNBlogsFS/prod.evol.blogs.msdn.com/CommunityServer.Blogs.Components.WeblogFiles/00/00/01/39/29/metablogapi/4276.clip_image0104_7CC9B1EC.jpg)
![clip_image011[4] clip_image011[4]](https://msdntnarchive.z22.web.core.windows.net/media/MSDNBlogsFS/prod.evol.blogs.msdn.com/CommunityServer.Blogs.Components.WeblogFiles/00/00/01/39/29/metablogapi/2548.clip_image0114_2A772F18.jpg)
![clip_image012[4] clip_image012[4]](https://msdntnarchive.z22.web.core.windows.net/media/MSDNBlogsFS/prod.evol.blogs.msdn.com/CommunityServer.Blogs.Components.WeblogFiles/00/00/01/39/29/metablogapi/1452.clip_image0124_6D9E9946.jpg)
![clip_image013[4] clip_image013[4]](https://msdntnarchive.z22.web.core.windows.net/media/MSDNBlogsFS/prod.evol.blogs.msdn.com/CommunityServer.Blogs.Components.WeblogFiles/00/00/01/39/29/metablogapi/3515.clip_image0134_0F3A0071.jpg)
![clip_image014[4] clip_image014[4]](https://msdntnarchive.z22.web.core.windows.net/media/MSDNBlogsFS/prod.evol.blogs.msdn.com/CommunityServer.Blogs.Components.WeblogFiles/00/00/01/39/29/metablogapi/6646.clip_image0144_563F5B09.jpg)
![clip_image015[4] clip_image015[4]](https://msdntnarchive.z22.web.core.windows.net/media/MSDNBlogsFS/prod.evol.blogs.msdn.com/CommunityServer.Blogs.Components.WeblogFiles/00/00/01/39/29/metablogapi/4657.clip_image0154_184277F3.jpg)
![clip_image016[4] clip_image016[4]](https://msdntnarchive.z22.web.core.windows.net/media/MSDNBlogsFS/prod.evol.blogs.msdn.com/CommunityServer.Blogs.Components.WeblogFiles/00/00/01/39/29/metablogapi/5810.clip_image0164_34DBA16E.jpg)
![clip_image017[4] clip_image017[4]](https://msdntnarchive.z22.web.core.windows.net/media/MSDNBlogsFS/prod.evol.blogs.msdn.com/CommunityServer.Blogs.Components.WeblogFiles/00/00/01/39/29/metablogapi/4336.clip_image0174_10664B85.jpg)
![clip_image018[4] clip_image018[4]](https://msdntnarchive.z22.web.core.windows.net/media/MSDNBlogsFS/prod.evol.blogs.msdn.com/CommunityServer.Blogs.Components.WeblogFiles/00/00/01/39/29/metablogapi/2273.clip_image0184_4854C743.jpg)
![clip_image019[4] clip_image019[4]](https://msdntnarchive.z22.web.core.windows.net/media/MSDNBlogsFS/prod.evol.blogs.msdn.com/CommunityServer.Blogs.Components.WeblogFiles/00/00/01/39/29/metablogapi/2273.clip_image0194_54162043.jpg)
![clip_image020[4] clip_image020[4]](https://msdntnarchive.z22.web.core.windows.net/media/MSDNBlogsFS/prod.evol.blogs.msdn.com/CommunityServer.Blogs.Components.WeblogFiles/00/00/01/39/29/metablogapi/0042.clip_image0204_1E6CECB7.jpg)
![clip_image021[4] clip_image021[4]](https://msdntnarchive.z22.web.core.windows.net/media/MSDNBlogsFS/prod.evol.blogs.msdn.com/CommunityServer.Blogs.Components.WeblogFiles/00/00/01/39/29/metablogapi/0523.clip_image0214_3DEB5518.jpg)
![clip_image022[4] clip_image022[4]](https://msdntnarchive.z22.web.core.windows.net/media/MSDNBlogsFS/prod.evol.blogs.msdn.com/CommunityServer.Blogs.Components.WeblogFiles/00/00/01/39/29/metablogapi/0488.clip_image0224_5A54CED3.jpg)
![clip_image023[4] clip_image023[4]](https://msdntnarchive.z22.web.core.windows.net/media/MSDNBlogsFS/prod.evol.blogs.msdn.com/CommunityServer.Blogs.Components.WeblogFiles/00/00/01/39/29/metablogapi/5751.clip_image0234_738C60A6.jpg)
![clip_image024[4] clip_image024[4]](https://msdntnarchive.z22.web.core.windows.net/media/MSDNBlogsFS/prod.evol.blogs.msdn.com/CommunityServer.Blogs.Components.WeblogFiles/00/00/01/39/29/metablogapi/3362.clip_image0244_22021DEF.jpg)
![clip_image025[4] clip_image025[4]](https://msdntnarchive.z22.web.core.windows.net/media/MSDNBlogsFS/prod.evol.blogs.msdn.com/CommunityServer.Blogs.Components.WeblogFiles/00/00/01/39/29/metablogapi/8623.clip_image0254_1A463D1B.jpg)
![clip_image026[4] clip_image026[4]](https://msdntnarchive.z22.web.core.windows.net/media/MSDNBlogsFS/prod.evol.blogs.msdn.com/CommunityServer.Blogs.Components.WeblogFiles/00/00/01/39/29/metablogapi/4035.clip_image0264_24E348D6.jpg)









![clip_image001[10] clip_image001[10]](https://msdntnarchive.z22.web.core.windows.net/media/MSDNBlogsFS/prod.evol.blogs.msdn.com/CommunityServer.Blogs.Components.WeblogFiles/00/00/01/39/29/metablogapi/6237.clip_image00110_4C2BB5FD.jpg)
![clip_image002[10] clip_image002[10]](https://msdntnarchive.z22.web.core.windows.net/media/MSDNBlogsFS/prod.evol.blogs.msdn.com/CommunityServer.Blogs.Components.WeblogFiles/00/00/01/39/29/metablogapi/1488.clip_image00210_660BFDFA.jpg)
![clip_image003[8] clip_image003[8]](https://msdntnarchive.z22.web.core.windows.net/media/MSDNBlogsFS/prod.evol.blogs.msdn.com/CommunityServer.Blogs.Components.WeblogFiles/00/00/01/39/29/metablogapi/7416.clip_image0038_441FD9CF.jpg)
![clip_image004[10] clip_image004[10]](https://msdntnarchive.z22.web.core.windows.net/media/MSDNBlogsFS/prod.evol.blogs.msdn.com/CommunityServer.Blogs.Components.WeblogFiles/00/00/01/39/29/metablogapi/6403.clip_image00410_41765C77.jpg)
![clip_image005[8] clip_image005[8]](https://msdntnarchive.z22.web.core.windows.net/media/MSDNBlogsFS/prod.evol.blogs.msdn.com/CommunityServer.Blogs.Components.WeblogFiles/00/00/01/39/29/metablogapi/2158.clip_image0058_56943C52.jpg)
![clip_image006[10] clip_image006[10]](https://msdntnarchive.z22.web.core.windows.net/media/MSDNBlogsFS/prod.evol.blogs.msdn.com/CommunityServer.Blogs.Components.WeblogFiles/00/00/01/39/29/metablogapi/1638.clip_image00610_55E833D0.jpg)
![clip_image007[4] clip_image007[4]](https://msdntnarchive.z22.web.core.windows.net/media/MSDNBlogsFS/prod.evol.blogs.msdn.com/CommunityServer.Blogs.Components.WeblogFiles/00/00/01/39/29/metablogapi/3660.clip_image0074_1318C2CB.jpg)
![clip_image008[6] clip_image008[6]](https://msdntnarchive.z22.web.core.windows.net/media/MSDNBlogsFS/prod.evol.blogs.msdn.com/CommunityServer.Blogs.Components.WeblogFiles/00/00/01/39/29/metablogapi/1643.clip_image0086_0ECE9F6C.jpg)
![clip_image009[6] clip_image009[6]](https://msdntnarchive.z22.web.core.windows.net/media/MSDNBlogsFS/prod.evol.blogs.msdn.com/CommunityServer.Blogs.Components.WeblogFiles/00/00/01/39/29/metablogapi/1715.clip_image0096_2F359384.jpg)
![clip_image010[6] clip_image010[6]](https://msdntnarchive.z22.web.core.windows.net/media/MSDNBlogsFS/prod.evol.blogs.msdn.com/CommunityServer.Blogs.Components.WeblogFiles/00/00/01/39/29/metablogapi/6574.clip_image0106_75DEE0F4.jpg)
![clip_image011[6] clip_image011[6]](https://msdntnarchive.z22.web.core.windows.net/media/MSDNBlogsFS/prod.evol.blogs.msdn.com/CommunityServer.Blogs.Components.WeblogFiles/00/00/01/39/29/metablogapi/5732.clip_image0116_24D0F6FF.jpg)
![clip_image012[6] clip_image012[6]](https://msdntnarchive.z22.web.core.windows.net/media/MSDNBlogsFS/prod.evol.blogs.msdn.com/CommunityServer.Blogs.Components.WeblogFiles/00/00/01/39/29/metablogapi/4617.clip_image0126_2C3C1AD2.jpg)
![clip_image013[6] clip_image013[6]](https://msdntnarchive.z22.web.core.windows.net/media/MSDNBlogsFS/prod.evol.blogs.msdn.com/CommunityServer.Blogs.Components.WeblogFiles/00/00/01/39/29/metablogapi/4276.clip_image0136_1AE7F195.jpg)
![clip_image014[6] clip_image014[6]](https://msdntnarchive.z22.web.core.windows.net/media/MSDNBlogsFS/prod.evol.blogs.msdn.com/CommunityServer.Blogs.Components.WeblogFiles/00/00/01/39/29/metablogapi/1425.clip_image0146_2952C7ED.jpg)
![clip_image015[6] clip_image015[6]](https://msdntnarchive.z22.web.core.windows.net/media/MSDNBlogsFS/prod.evol.blogs.msdn.com/CommunityServer.Blogs.Components.WeblogFiles/00/00/01/39/29/metablogapi/3247.clip_image0156_28D66F2B.jpg)
![clip_image016[6] clip_image016[6]](https://msdntnarchive.z22.web.core.windows.net/media/MSDNBlogsFS/prod.evol.blogs.msdn.com/CommunityServer.Blogs.Components.WeblogFiles/00/00/01/39/29/metablogapi/5850.clip_image0166_7A5C9DE3.jpg)
![clip_image017[6] clip_image017[6]](https://msdntnarchive.z22.web.core.windows.net/media/MSDNBlogsFS/prod.evol.blogs.msdn.com/CommunityServer.Blogs.Components.WeblogFiles/00/00/01/39/29/metablogapi/3660.clip_image0176_7B14B833.jpg)