Notitie
Voor toegang tot deze pagina is autorisatie vereist. U kunt proberen u aan te melden of de directory te wijzigen.
Voor toegang tot deze pagina is autorisatie vereist. U kunt proberen de mappen te wijzigen.
Summary: Use a script to enable metrics logging for PaaS resources.
Azure Platform as a Service (PaaS) resources, like Azure SQL and Web Sites (Web Apps), can emit performance metrics data natively to OMS. This script allows users to enable metrics logging for PaaS resources at a the level of a subscription or resource group. Today, there is no way to enable metrics logging for PaaS resources through the UI. Therefore, customers need to use a PowerShell script. This native metrics logging capability and OMS monitoring enable customers to monitor Azure Resources at scale. For example, you can now use OMS to monitor hundreds of thousands of SQL Azure databases in one OMS workspace.
Prerequisites
Make sure that you have the following AzureRM modules installed on your workstation before you begin:
- AzureRM.Insights
- AzureRM.OperationalInsights
- AzureRM.Resources
- AzureRM.profile
Note: We recommend that all your Azure Resource Manager modules are the same version to ensure compatibility when you run Azure Resource Manager commands from PowerShell.
To install the latest set of AzureRM modules on your workstation:
PS C:\> install-module -Name AzureRM -Force
- Open PowerShell in Administrator mode: Run As Administrator.
- To save the Enable-AzureRMDiagnostics.ps1 script file locally, run the following command and provide a path to store the script.
PS C:\> save-script -Name Enable-AzureRMDiagnostics -Path "C:\users\<username>\desktop\temp"
- Go to the folder where you saved the script, and execute
Enable-AzureRMDiagnostics.ps1.
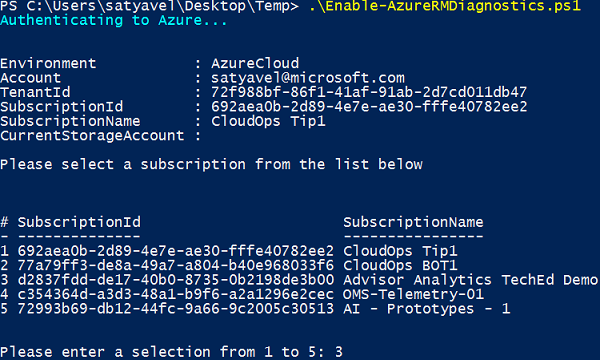
PS C:\users\<username>\Desktop\temp> .\Enable-AzureRMDiagnostics.ps1
Notes:
- If you want to enable metrics logging for a specific Resource Group instead of the entire subscription, you can use these advanced steps.
- If you have not already authenticated to Azure, this script will prompt you for your credentials.
- For a synopsis with examples for the script, just type
get-help <PathName to Set-AzureDiagnosticsSetting.ps1> -Examples.
- Select the Azure Subscription that has the Azure resources that you want to monitor.
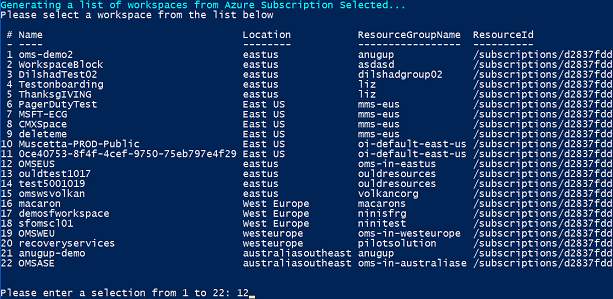
- Select the OMS Log Analytics Workspace that you want to have for this data set.
- Select the Azure Resource Type that you would like to enable. For example, if you type 5, you enable the metrics data collection for SQL Azure Databases.

- Type Y to enable metrics logging for all databases in that subscription.
The PowerShell script will run against each database and enable the metrics collection for those resources. After it’s finished, you will see a Complete message.
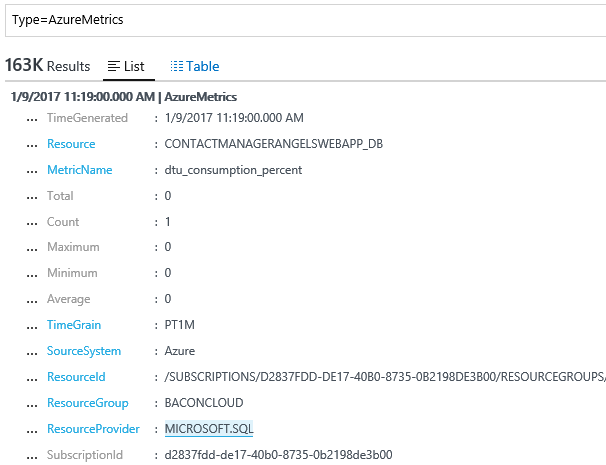
After completion, you will start to see metrics data in OMS Log Search as shown in the following screenshot. The data from the Azure PaaS resource can be found under Type=AzureMetrics. The new Azure SQL and Web App solutions will use this data.
Advanced scenarios
Enable metrics for a specific Resource Group
The following steps enable you to specify the resource group for which you would like to enable metrics logging.
Run the following command:
PS C:\> .\Enable-AzureRMDiagnostics.ps1 -ResourceGroup "anugup"
The rest of the prompt will remain the same as previously shown in step 5.
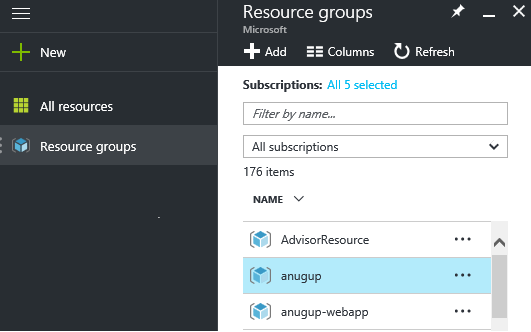
You can find the resource group name in the Azure portal as shown in the following screenshot.
Update a resource to send data to another workspace
If you have a resource type that is already sending metrics to a workspace, but you want to change it to another workspace, you can use the -Update switch.
Run the following command:
PS C:\> .\Enable-AzureRMDiagnostics.ps1 -Update
-or-
PS C:\> .\Enable-AzureRMDiagnostics.ps1 -Update -ResourceGroupName “Leyla”
The rest of the prompt will remain the same as previously shown in step 5.
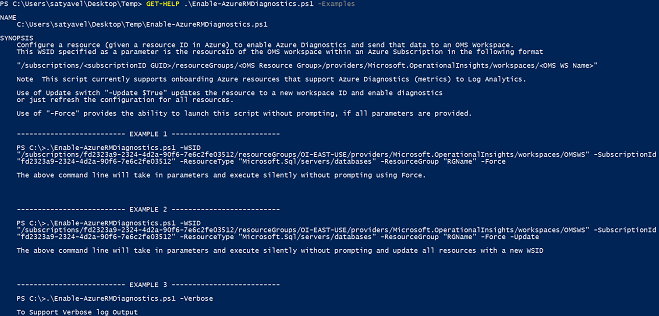
Examples for the PowerShell script
For a synopsis with examples for the script, you can also just type GET-HELP .\Enable-AzureRMDiagnostics.ps1 -Examples.
The complete script is available in the PowerShell Gallery.
Jim Britt
Senior Program Manager
Comments
- Anonymous
February 03, 2017
The comment has been removed- Anonymous
February 03, 2017
@Florent, have you downloaded the latest script version? There was a bug in the initial version where the array was not instantiated properly when a single value was returned (aka created a string). What version are you currently leveraging (should be in the header of the script).- Anonymous
February 06, 2017
@Jim, I deleted the script and downloaded it again and now, it works :) Thanks.
- Anonymous
- Anonymous
- Anonymous
February 05, 2017
Thanks1. can i change work space?2. what is the interval for the Metric collection?pini- Anonymous
February 15, 2017
@Pini - you can use the -update switch and provide a new WSID as a parameter or simply use -update with the menu process to select a new workspace. I believe the interval is now 1 minute for metrics.
- Anonymous
- Anonymous
February 06, 2017
mhh I get no OMS workspaces available after selecting subscription. Any requirements on the workspace like pricing tier ?- Anonymous
February 07, 2017
solved, works for me only with PS ISE- Anonymous
February 15, 2017
The comment has been removed
- Anonymous
- Anonymous
- Anonymous
February 10, 2017
Hello, it did not work for me with only one resource to update.it seems there is missing part at the end to deal with this scenario... here is the part of code that worked for me : if ( $DiagnosticCapable.'#'.Count -eq 1) { $ResourceTypeToProcess = 1 $ResourceType = $DiagnosticCapable.resourcetype } else { while($ResourceTypeToProcess -gt $DiagnosticCapable.'#'.Count -or $ResourceTypeToProcess -lt 1 -or $ResourceTypeToProcess.GetType().Name -ne "int32" -and $Force -ne $True) { Write-Host "In following table are the resources that you can send diagnostics to Log Analytics" $DiagnosticCapable | select "#", ResourceType |ft [int]$ResourceTypeToProcess = Read-Host "Please select a number from 1 - $($DiagnosticCapable.count) to enable" } $ResourceType = $DiagnosticCapable.resourcetype[$ResourceTypeToProcess -1] }- Anonymous
February 15, 2017
@Jean, thanks for the feedback. This bug should have been fixed with the latest version of the script. Let me investigate and update appropriately thank you for the feedback.
- Anonymous
- Anonymous
February 10, 2017
Can we send data from a customer in a different Azure tenant? More info here - serverfault.com/questions/826786/- Anonymous
February 15, 2017
@Brett - as long as the Azure AD ID you are using has access to both resources, I believe you can. Currently I'm only aware of this working within a tenant however there shouldn't be any reason why this wouldn't work. I have not tried this however as internally I'm dealing only with the Microsoft tenant. Curious your results here. You would obviously need to provide the WSID parameter since this will be not only in a separate subscription, but also a separate tenant.
- Anonymous
- Anonymous
February 14, 2017
Now how to disable it?- Anonymous
February 15, 2017
@Usman, the script executes iteratively against resources provided and uses the -Enable $True. You can update the script (or take a portion of the script) to reverse this to -Enable $False to turn off diagnostics going to LA. The script currently doesn't provide this option but I'm looking into potentially adding it.
- Anonymous
- Anonymous
February 15, 2017
I am getting the below error while running the Enable-AzureRMDiagnostics.ps1. I see the subscription has few OMS workspaces.Please enter a selection from 1 to 124: 121Selecting Azure Subscription: d1xxxx-b11e-41eee-92eyyy-71xxxxxxx ...Get-AzureRmOperationalInsightsWorkspace : Run Login-AzureRmAccount to login.At C:\Program Files\WindowsPowerShell\Scripts\Enable-AzureRMDiagnostics.ps1:285 char:43+ ... es = Add-IndexNumberToArray (Get-AzureRmOperationalInsightsWorkspace)+ ~~~~~~~~~~~~~~~~~~~~~~~~~~~~~~~~~~~~~~~ + CategoryInfo : InvalidOperation: (:) [Get-AzureRmOperationalInsightsWorkspace], PSInvalidOperationExcep tion + FullyQualifiedErrorId : InvalidOperation,Microsoft.Azure.Commands.OperationalInsights.GetAzureOperationalInsight sWorkspaceCommandGenerating a list of workspaces from Azure Subscription Selected...No OMS workspaces available in selected subscription d1be0ef8-b110-417e-992e-71a61d0e06cfAt C:\Program Files\WindowsPowerShell\Scripts\Enable-AzureRMDiagnostics.ps1:314 char:9+ Throw "No OMS workspaces available in selected subscription $ ...+ ~~~~~~~~~~~~~~~~~~~~~~~~~~~~~~~~~~~~~~~~~~~~~~~~~~~~~~~~~~~~~ + CategoryInfo : OperationStopped: (No OMS workspac...2e-71a61d0e06cf:String) [], RuntimeException + FullyQualifiedErrorId : No OMS workspaces available in selected subscription d1be0ef8-b110-417e-992e-71a61d0e06cf- Anonymous
February 16, 2017
@Murthy From the looks of the error, you need to update your AzureRM modules. See the pre-requisites at the top of the post.PrerequisitesMake sure that you have the following AzureRM modules installed on your workstation before you begin:AzureRM.InsightsAzureRM.OperationalInsightsAzureRM.ResourcesAzureRM.profileMore than likely you have a different version of AzureRM.Profile than you have of AzureRM.OperationalInsights. All of the above modules need to be the same version. The best way to ensure you have the latest is to do as described in the post above as well.From an elevated PowerShell console (closing all other consoles) run the belowinstall-module -Name AzureRM -ForceThe above will ensure you have the latest. If you run into issues installing the modules, more than likely you are dealing with modules that are located in various locations on your system.Please look at the specifics on my response to the question @Funzel posted in the comments above for more information.
- Anonymous
- Anonymous
February 17, 2017
Thanks for this blog.Is there a way to pinpoint a single database that I want to enable instead of all my databases?I see that you can enable a resource type, but can I get more specific about which database to enable?Thanks!- Anonymous
February 23, 2017
@Matt, great question. In that case, you don't really need the script - you could just enable it via the cmdlet here. You will still need the latest AzureRM.Insights which requires you to update your AzureRM module set so see the instructions at the top of the post. But below you could use something similar with a one liner to turn it on (you'll need the resourceID of your Workspace as well as your Azure Resource (Database for example) which you can find both of those by just browsing to the resource in Azure, and taking everything from "/Subscriptions/...." all the way through till the end of the actual resource name in Azure.PS C:> Set-AzureRmDiagnosticSetting -ResourceId "/subscriptions//resourceGroups//providers/Microsoft.Sql/servers//databases/" -WorkspaceId "" -Enabled $True- Anonymous
February 28, 2017
@Jim, thanks so much for your help I got it going and it works great.
- Anonymous
- Anonymous
- Anonymous
February 24, 2017
Hi Jim,I am having trouble running the script. Which version of Powershell you using?Thanks,Isa- Anonymous
February 24, 2017
@ISA - what are the errors you are getting? You need to be running with the latest AzureRM modules as a first requirement. My environment looks like thisPS C:\Users\jbritt> $PSVersionTableName Value---- -----PSVersion 5.1.15040.0PSEdition DesktopPSCompatibleVersions {1.0, 2.0, 3.0, 4.0...}BuildVersion 10.0.15040.0CLRVersion 4.0.30319.42000WSManStackVersion 3.0PSRemotingProtocolVersion 2.3SerializationVersion 1.1.0.1PS C:\Users\jbritt> $hostName : ConsoleHostVersion : 5.1.15040.0InstanceId : b0720b3b-ea02-478f-82f3-7075ca94de78UI : System.Management.Automation.Internal.Host.InternalHostUserInterfaceCurrentCulture : en-USCurrentUICulture : en-USPrivateData : Microsoft.PowerShell.ConsoleHost+ConsoleColorProxyDebuggerEnabled : TrueIsRunspacePushed : FalseRunspace : System.Management.Automation.Runspaces.LocalRunspace
- Anonymous
- Anonymous
March 01, 2017
The comment has been removed- Anonymous
March 02, 2017
@Soma Jagadeesh - the error you are seeing indicates that your AzureRM modules are unfortunately still out of sync. It could be that you have more than one directory providing your module path for AzureRM. If you do an install-module -name AzureRM -Force what happens?- Anonymous
March 06, 2017
Jim,Post running the command below is the error we are receiving:PS C:\windows\system32> install-module -name AzureRM -ForcePackageManagement\Install-Package : Cannot process argument transformation on parameter 'InstalledModuleInfo'. Cannot convert the "System.Object[]" value of type "System.Object[]" to type "System.Management.Automation.PSModuleInfo".At C:\Program Files\WindowsPowerShell\Modules\PowerShellGet\1.0.0.1\PSModule.psm1:1772 char:21+ ... $null = PackageManagement\Install-Package @PSBoundParameters+ ~~~~~~~~~~~~~~~~~~~~~~~~~~~~~~~~~~~~~~~~~~~~~~~~~~~~ + CategoryInfo : InvalidData: (Microsoft.Power....InstallPackage:InstallPackage) [Install-Package], Exception + FullyQualifiedErrorId : ParameterArgumentTransformationError,Validate-ModuleAuthenticodeSignature,Microsoft.PowerShell.PackageManagement.Cmd lets.InstallPackage PS C:\windows\system32>- Anonymous
March 10, 2017
@AMPSJAG can you attempt to reinstall your modules leveraging WebPI. It seems that you may have a mix of older and newer modules spread across two different paths. This can happen if you at one time used WebPI to install the Azure SDK and then used PS Get to install ARM Modules later. The conflict arises when you try to update with PS Get.
- Anonymous
- Anonymous
- Anonymous
- Anonymous
March 02, 2017
Hello Jim,I completed by step 7, but i can't see any metrics of web App & SQL Datbase.Windows VM & Linux VM can get metrics on Log Analytics.Thanks.Akihiro- Anonymous
March 03, 2017
@AkihiroIt is possible you aren't seeing these where you think you should. The metrics are captured and sent to this type in Log AnalyticsType=AzureMetrics Details on Azure SQL are below for sending (and viewing) w/in Log Analytics. There is also a WebApps solution in the Azure Marketplace that you can leverage that will visualize the WebApps metrics once you have configured it with this script in this post.https://blogs.technet.microsoft.com/msoms/2017/02/21/azure-sql-analytics-solution-public-preview/ https://docs.microsoft.com/en-us/azure/log-analytics/log-analytics-azure-sql
- Anonymous
- Anonymous
March 04, 2017
Is there any other step not mentioned here that might trip the script up? I have one account and one OMS instance. Wen I puck server farm or database or web sites I get a message similar to:An error occurred setting diagnostics on bakroundnoise of type [Microsoft.Web/serverFarms]That's it. No other clues other than that. Is there a more detailed log somewhere?- Anonymous
March 10, 2017
@David, please check the version of AzureRM.Insights. The error you are seeing indicates potentially that your version doesn't have the workspaceID option available. I believe this parameter became available in version 2.6 of the AzureRM.Insights module.get-module -name AzureRM.Insights | FLThe above command should give you the information to see what version you have. Likely it is pre-2.6. If so, you need to update your AzureRM Module set by following the process in this blog post at the top.
- Anonymous
- Anonymous
March 08, 2017
Hello, Jim,We're using Elastic Pools. Although it's not necessary to refresh the setup for the pools, I assume every new Azure SQL Database you might add to your subscription must be set up anew? Would you recommend using this script to maintain diagnostics configuration in an Automation context? Or would you rather recommend a custom script to be run for each new database added at the time of creation?Thanks.- Anonymous
March 10, 2017
@Larry, you are correct in assuming that new elastic pools will not be picked up. An option could be to run this as an automation runbook on some schedule to pick up new elastic pools and dbs as they are created. You can leverage the -force parameter along with the required parameters to make the script run silent. This should solve the scenario for you.
- Anonymous
- Anonymous
March 09, 2017
Hi Jim,Love the script, thank you for this. Just a quick question, we have currently around 250 Azure SQL databases across two subscriptions, with roughly 4 added each week. Is there a way to ensure any newly created databases have this option enabled by default?Secondly, although we have two subscriptions, our OMS workspace is in one subscription only, how do we enable the metrics on the subscription where the OMS workspace is not present?Finally, we too would need a disable option, it has my vote if you are considering this.Kind regardsJames- Anonymous
March 10, 2017
The comment has been removed- Anonymous
March 28, 2017
Script has been updated: https://www.powershellgallery.com/packages/Enable-AzureRMDiagnostics/ to now support Logs as well as support the option of disabling specific logs as well as metrics on resources if needed. Great for testing and debugging or fixing accidental configurations :). See get-help .\script -examples for more information. See get-help .\script -detailed for full details of examples, updated synopsis, etc.
- Anonymous
- Anonymous
- Anonymous
April 10, 2017
When I run the script I receive an exception. I've tried updating AzureRM modules several times, including forcing an upgrade to versions 2.5.0 and 2.6.0, all with the same error each time. Thinking it was a permissions issue, I logged in as the account owner. Here's the exception:Set-AzureRmDiagnosticSetting : Exception of type 'Microsoft.Rest.Azure.CloudException' was thrown.At C:\temp\Enable-AzureRMDiagnostics.ps1:302 char:41+ ... $Diag = Set-AzureRmDiagnosticSetting -WorkspaceId $WSID -Resource ...+ ~~~~~~~~~~~~~~~~~~~~~~~~~~~~~~~~~~~~~~~~~~~~~~~~~~~~~~~~~ + CategoryInfo : CloseError: (:) [Set-AzureRmDiagnosticSetting], CloudException + FullyQualifiedErrorId : Microsoft.Azure.Commands.Insights.Diagnostics.SetAzureRmDiagnosticSettingCommand I am passing in a WSID to enable logging across subscriptions. The list of subscriptions appears, I select a subscription (we have 4), a list of resource types appears (there are 3). I choose the first one (service bus) and then ask it to enable operational logs. The script reports each service bus is updated but this exception is thrown for each service bus and no data appears in OMS. I have received the error several times and have tried several different selections, it's not just a service bus resource type issue.Can you point me in the right direction of what might be causing the exception?- Anonymous
April 11, 2017
@Dave - a couple of things you can check.1. Can you ensure that under your subscription (for the resources as well as the OMS workspace) that under Resource providers, that microsoft.insights is registered?2. Can you validate that set-azurermdiagnosticsetting will take -workspaceID?3. Is the workspaceID being sent as a parameter and if so is it being sent as a resourceID (not the WorkspaceID)?Example set-azurermdiagnosticsetting -ResourceID -workspaceID -Enabled $Trueset-azurermdiagnosticsetting -ResourceID "/subscriptions//ResourceLocation" -workspaceID "/subscriptions/fd2323a9-2324-4d2a-90f6-7e6c2fe03512/resourceGroups/OI-EAST-USE/providers/Microsoft.OperationalInsights/workspaces/OMSWS"Email me direct if you want as well: jbritt@microsoft.com and we can troubleshoot over email or skype. :).- Anonymous
April 11, 2017
The comment has been removed- Anonymous
April 13, 2017
@Dave, Sorry for my delayed response. I'm wondering if there is an issue specific to Service Bus. Have you tried this with any other Azure Resources? I'm going to do some testing to see if I can figure out what may be going on. I'll report back. You can email me directly as well if you are in a jam. Happy to help over email to speed things up. I don't get notified on updates to this unfortunately :). - Anonymous
April 13, 2017
The comment has been removed
- Anonymous
- Anonymous
- Anonymous
- Anonymous
April 17, 2017
Hi, Thanks for detailed information. Is there anyway to select a specific database to onboard instead of all DBs in selected subscription?- Anonymous
April 17, 2017
@Anusha, I just enabled this option with the latest version of the script so good timing :). You can see all updated examples by doing a “Get-Help .\scriptname -examples” to display new options. For the scenario you are attempting to do, it would be similar to the below example————————– EXAMPLE 8 ————————–PS C:>.\Enable-AzureRMDiagnostics.ps1 -SubscriptionId “fd2323a9-2324-4d2a-90f6-7e6c2fe03512” -ResourceName“MyResource” -EnableMetrics -ResourceType “Microsoft.EventHub/namespaces”[Enable] all metrics for all specified resource named of a resourceType within a targeted subscriptionNote if resourcetype is left off – resource must support requested operation or error will be thrownI hope this helps – please let me know! And thanks for leveraging the script and providing feedback!- Anonymous
April 17, 2017
The comment has been removed- Anonymous
April 18, 2017
@Anusha, hmm...can you try to see if the data is showing up directly in Log Search?type=AzureMetricsYou should see some data in there if it is populating. Also, attempt to close all browsers and re-open in case this is an odd caching issue though this should not be the case.
- Anonymous
- Anonymous
- Anonymous
- Anonymous
April 24, 2017
Can we do this within an ARM template?- Anonymous
April 27, 2017
@Peter - yes. Please take a look at the following url: https://docs.microsoft.com/en-us/azure/log-analytics/log-analytics-azure-storage and go to the section titled "Enable diagnostics with Resource Manager templates"
- Anonymous
- Anonymous
May 10, 2017
Note you need to install psget to get this example to work from http://psget.net/. Took me a while to figure this out. - Anonymous
May 30, 2017
Hi Jim,It is failing for me using my Visual Subscription. From OMS, no logs are being collected. I have the latest modules.Authenticating to Azure...Selecting Azure Subscription: ...Configuring 1 [Microsoft.Sql/servers/databases] resources in your subscription.Processing resources. Please wait....Set-AzureRmDiagnosticSetting : Exception type: CloudException, Message: Please register the subscription '' with Microsoft.Insights., Code: Null, Status code:Conflict, Reason phrase: ConflictAt C:\temp\Enable-AzureRMDiagnostics.ps1:324 char:33+ ... $Diag = Set-AzureRmDiagnosticSetting -WorkspaceId $WSID -Resource ...+ ~~~~~~~~~~~~~~~~~~~~~~~~~~~~~~~~~~~~~~~~~~~~~~~~~~~~~~~~~ + CategoryInfo : CloseError: (:) [Set-AzureRmDiagnosticSetting], PSInvalidOperationException + FullyQualifiedErrorId : Microsoft.Azure.Commands.Insights.Diagnostics.SetAzureRmDiagnosticSettingCommand Metrics gathering for new resource chasqlsrvlozanom/AdventureWorksLT was set to enabledComplete- Anonymous
June 03, 2017
@Mayzing, thanks for your interest, trying the script and providing feedback. The specific error you are seeing is actually related to not having a resource provider properly registered within your Azure Subscription. Please register this resource provider in both the subscription that you are attempting to monitor resources in as well as the subscription where your OMS workspace is located (if they are not the same subscription).Details on this are documented here: https://docs.microsoft.com/en-us/azure/log-analytics/log-analytics-azure-storage in the section entitled "Troubleshoot Azure Diagnostics". Additionally, please download the very latest script as there were some recent changes to the Azure RM CMDLETS that would prevent this script from executing properly once you resolved the resource provider issue above. Updated script located here: https://www.powershellgallery.com/packages/Enable-AzureRMDiagnostics/2.51/DisplayScript - Anonymous
July 13, 2017
Get-AzureRmResourceProvider -ListAvailable | Where-Object -FilterScript { $.ProviderNameSpace -eq 'microsoft.insights' -and $.RegistrationState -eq 'NotRegistered' } | Register-AzureRmResourceProvider -Confirm
- Anonymous
- Anonymous
June 05, 2017
The comment has been removed- Anonymous
June 06, 2017
@G. Pradeep Kumar Reddy - for workspaceID the cmdlet is actually expecting a resourceID of the OMS workspace. So similar to your resourceID for your resource you are configuring.Note the script can support this scenario as well with the example pasted below from the script.————————– EXAMPLE 8 ————————–PS C:>.\Enable-AzureRMDiagnostics.ps1 -SubscriptionId “fd2323a9-2324-4d2a-90f6-7e6c2fe03512” -ResourceName“MyResource” -EnableMetrics -ResourceType “Microsoft.EventHub/namespaces”[Enable] all metrics for all specified resource named of a resourceType within a targeted subscription Note if resourcetype is left off – resource must support requested operation or error will be thrown- Anonymous
June 07, 2017
@Jim, I used the below cmdlet for configuring the log analytics to single database..\Enable-AzureRMDiagnostics.ps1 -SubscriptionId "5XXXXXX" -ResourceName "Research_db" -EnableMetrics -ResourceType "Microsoft.Sql/servers/databases"when i run the above cmdlet in Power shell, I got the error like below.No diagnostic capable resources of type Microsoft.Sql/servers/databases available in selected subscription XXXXXXXXXXXXXXXXXXAt E:\User\PowershellScripts\Enable-AzureRMDiagnostics.ps1:610 char:9+ Throw "No diagnostic capable resources of type $ResourceType ...+ ~~~~~~~~~~~~~~~~~~~~~~~~~~~~~~~~~~~~~~~~~~~~~~~~~~~~~~~~~~~~~ + CategoryInfo : OperationStopped: (No diagnostic c...c7-ba2ae87ffcda:String) [], RuntimeException + FullyQualifiedErrorId : No diagnostic capable resources of type Microsoft.Sql/servers/databases available in selected subscrip tion XXXXXXXXXXXAny idea?Thanks.Pradeep- Anonymous
June 13, 2017
@G. Pradeep Kumar Reddy to configure it in that way for SQL DBs you need to provide the name a bit differently. Something like the below indicating the DB and server it is located on. The script does that for you behind the scenes but if you supply the name, it then gets the resourceID for that name. Hope that makes sense."contactmanagersub2server/ContactManagerWebAppSub2_db"
- Anonymous
- Anonymous
- Anonymous
- Anonymous
July 24, 2017
It seems that there has been a change recently to this feature. I had to remove and redeploy it and the previous dashboards built using the log type sqlazure_CL no longer work.- Anonymous
August 03, 2017
@Hassan - very sorry for my long delay - was on vacation. The sqlazure_CL is the custom log that was generated from a previous version of this solution prior to it being supported as a first party solution in OMS by the SQL Team. The data for Azure SQL is actually represented in Type=AzureMetrics ResourceProvider="MICROSOFT.SQL". The script on this blog post is actually showing how you can configure Azure Diagnostic Logs and Metrics to be sent to Log Analytics so that you no longer need to use Azure Automation Runbooks (part of the previous solution) to represent metrics for a PaaS Resource like Azure SQL. Please see this URL for details on what resources are supported by this approach (represented as Diagnostic logs and metrics in the details). https://docs.microsoft.com/en-us/azure/log-analytics/log-analytics-azure-storage
- Anonymous
- Anonymous
August 16, 2017
Which services do I need to enable logging separately from this CMDLET within Azure or does this support enabling logging for ALL Azure services?- Anonymous
August 23, 2017
@BoredSloth sorry for my delay in responding (I don't get notified on new questions so I have to check back :).This script supports logs and metrics for Azure Diagnostics documented here: https://docs.microsoft.com/en-us/azure/log-analytics/log-analytics-azure-storage In some cases you can find resources (such as Event Hub) that are available in the Azure Portal to be configured directly. In many cases, this script will discover other resources not exposed in that location of the Azure Portal such as Azure SQL, WebApps, etc. This script is meant to allow you to onboard both logs and metrics for Azure Diagnostics to Log Analytics in larger scales (beyond one at a time). Hope that helps.
- Anonymous
- Anonymous
September 12, 2017
Hi, I have PaaS resources deployed in several suscriptions and my OMS workspace is in another Suscription (all subs are in the same tenant). How can I add the PaaS resources from my subscriptions to my OMS workspace? I don't seem to find the way with your script.- Anonymous
September 14, 2017
The comment has been removed
- Anonymous
- Anonymous
September 13, 2017
The comment has been removed- Anonymous
September 14, 2017
@Paul - thank you! As luck would have it, I was going to research that odd bug today. Thank you for posting your refinement there. I'll get a new version out there today or tomorrow. Also, I've been considering GitHub to support pull requests and then have the latest stable located here. I'm going to look into that as well - thank you for your feedback, use case as well - good to know how it is being leveraged.- Anonymous
September 14, 2017
@Paul - thanks again for the feedback. I've compiled a couple of updates in today.https://www.powershellgallery.com/packages/Enable-AzureRMDiagnostics/2.52/DisplayScriptFeel free to email me if you run into any issues here.
- Anonymous
- Anonymous
- Anonymous
September 20, 2017
The comment has been removed- Anonymous
September 22, 2017
@Sam, not sure what is going on there. Going across subscriptions (as long as it is in the same Tenant) is fully supported. I see that looking here: https://docs.microsoft.com/en-us/azure/log-analytics/log-analytics-azure-storage key vault is enabled for Logs so the action you are taking should work. My recommendation is to ensure that you are running with the latest AzureRM Modules and that they are all in sync to the proper versions though I don't believe that is your issue. Also, you need to ensure you have contributor rights to both the resource you are configuring and the OMS workspace you are targeting or you will not be able to configure it. My recommendation is to bust out of my script and leverage the cmdlets to see if you get any additional errors thrown - that may help you decipher if it is the script or something else.Set-AzureRmDiagnosticSetting is the cmdlet that is being used in this script. - Anonymous
September 22, 2017
@Sam, actually do a search in the comments for that specific error - I have a recommendation in there: Set-AzureRmDiagnosticSetting : Exception type: CloudExceptionHas to do with the resource provider not registered. Someone shared a bit of PowerShell to do a query on that as well within your subs to make it easier :);.- Anonymous
September 22, 2017
Thanks Jim,I did actually trace the modules and took the try catch out I can capture all the exceptions, unfortunately I got the same response. I am attempting to add websites and Key vaults I will look at the RP registration, though, I see the insight , key vault are already registered, I am a contributors on both subscriptions.I can go to the portal, select the Keyvault and connect from resources tabs, and it can do that.something I am missing- Anonymous
September 22, 2017
@Sam, make sure that the Insights resource providers are registered both in the target sub and the source sub. I believe you need both Microsoft.OperationalInsights and microsoft.insights.
- Anonymous
- Anonymous
- Anonymous
- Anonymous
September 26, 2017
Thanks for the blog. Could you please tell me, if I select 'Microsoft.Compute' when it asks for the Azure Resource Type then, will it restart those machines?- Anonymous
September 28, 2017
@Sangharsh it should not reboot the systems. This is enabling a feature with those supported Azure Resource Types to send data either to Event Hub, Storage, or Log Analytics. In this case this script is helping automate the configuration of resources at scale to Log Analytics. Hope this helps.
- Anonymous