Stage 5: Connect your publishing site to a catalog
This is a blog post in the series “How to set up a product-centric website in SharePoint Server 2013”. In this series, I'll use data from a fictitious company called "Contoso" to show you how to use search features to set up a website based on product catalog data.
Note: Most of the features described in this series are not available in SharePoint 2013 Online.
For an overview of the blog posts in this series, go to How to set up a product-centric website in SharePoint Server 2013.
Quick overview
As described in previous steps, we created a Publishing Portal Site Collection called Contoso, and also enabled the Products list as a catalog.
We’re now going to connect the publishing site to our catalog. In this blog post, I'll describe how to:
- Getting to the Catalog Source Settings page
- Specifying the settings on the Catalog Source Settings page
- What happens when I click the OK button to connect to a catalog
Throughout this stage, we won’t have much clicking to do because a lot of the settings have already been preconfigured with what we specified in Stage 3, How to enable a list as a catalog. However, I’ll be introducing a lot of new concepts throughout this post. Exciting, eh? I’ll be explaining these features as we go along, so, if you haven’t already gotten a cup of your favorite beverage, grab one now!
To help you along, for this blog post, I'll be using these icons.
| This icon | means that I’ll be explaining the concepts of a setting. | |
| This icon | |
means that we’ll be doing activities (clicking) in order to connect to a catalog. |
Start stage 5
Getting to the Catalog Source Settings page
| About the Catalog Source Settings page |
The Catalog Source Settings page is an important page, because this is where you specify how your publishing site should be connected to your catalog. If you have several catalogs on your farm, each catalog will have its own Catalog Source Settings page.
In our scenario, we only have one catalog, the Products catalog, so we want to go to the Catalog Source Settings page for the Products catalog.
Remember, in Stage3, we learned how to enable a list as a catalog, and we set a check box called Enable this library as a catalog? Well, in this step, SharePoint will search for libraries or lists where this check box has been selected.
| How to get to the Catalog Source Settings page |
- On the Contoso site, go to Site settings --> Manage catalog connections.
- On the Manage catalog connections page, click Connect to a catalog.
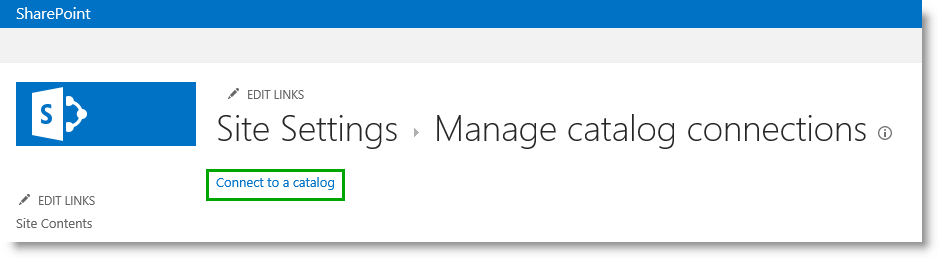
Our Products list displays as an available catalog. To connect to it, simply click Connect.

Tip: If you click Connect to a catalog and there aren’t any available catalogs, this could be because you haven’t yet crawled the catalog.
Now that we have successfully navigated to the Catalog Source Settings page for our Products catalog, it's time to specify how the catalog should be integrated into our Contoso site.
Specify the settings on the Catalog Source Settings page
This table gives an overview of the settings that we have to specify on the Catalog Source Settings page. If you want to go straight to a subsection, use the "Go to" links.
Specify Catalog Integration
| About specifying Catalog Integration |
For this setting, you specify how the catalog content should be integrated in your publishing site. Your selection will impact if you have to specify further settings on the Catalog Settings Page.
| How to specify Catalog Integration |
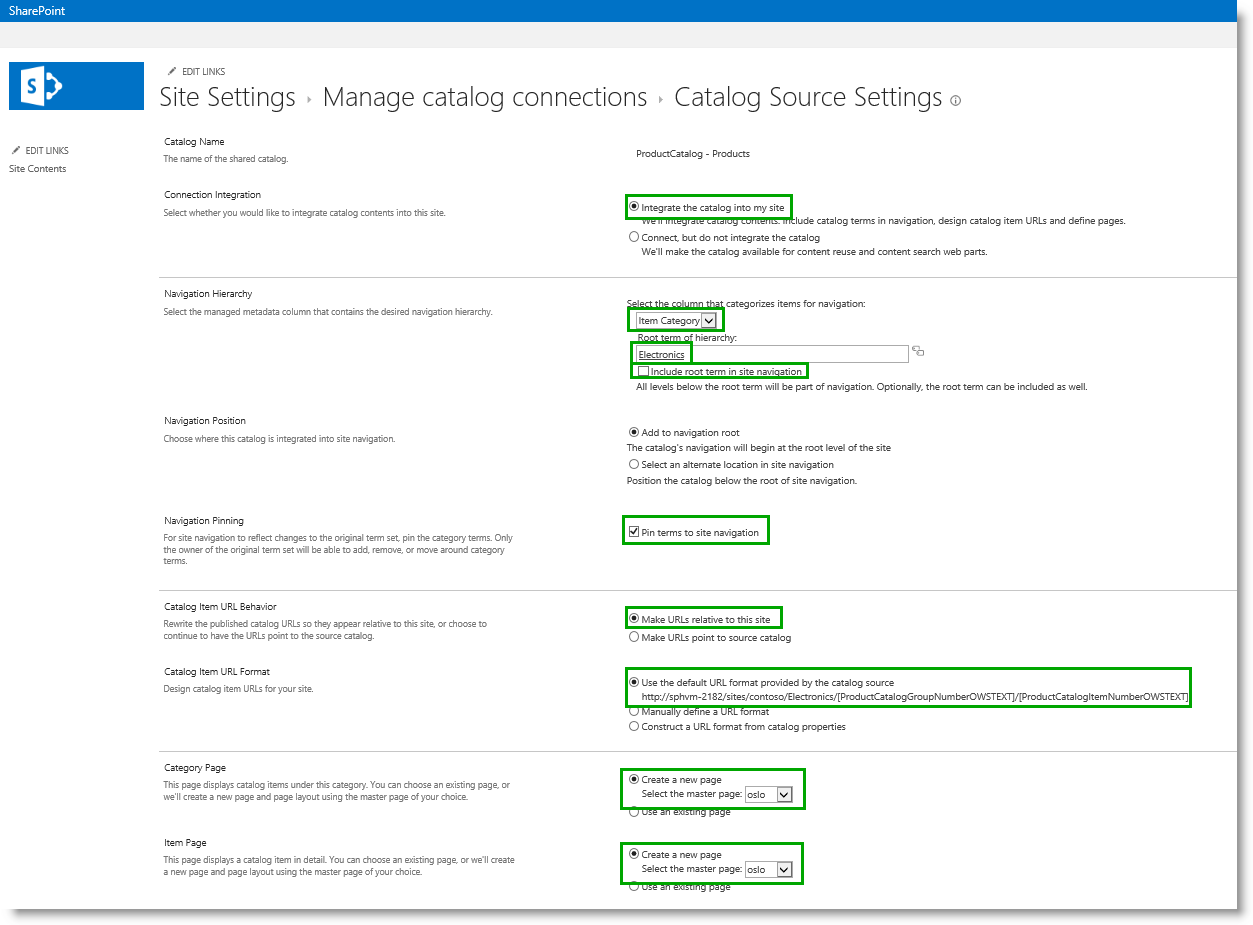
In the Connection Integration section, keep the setting Integrate the catalog into my site as it is -- selected.

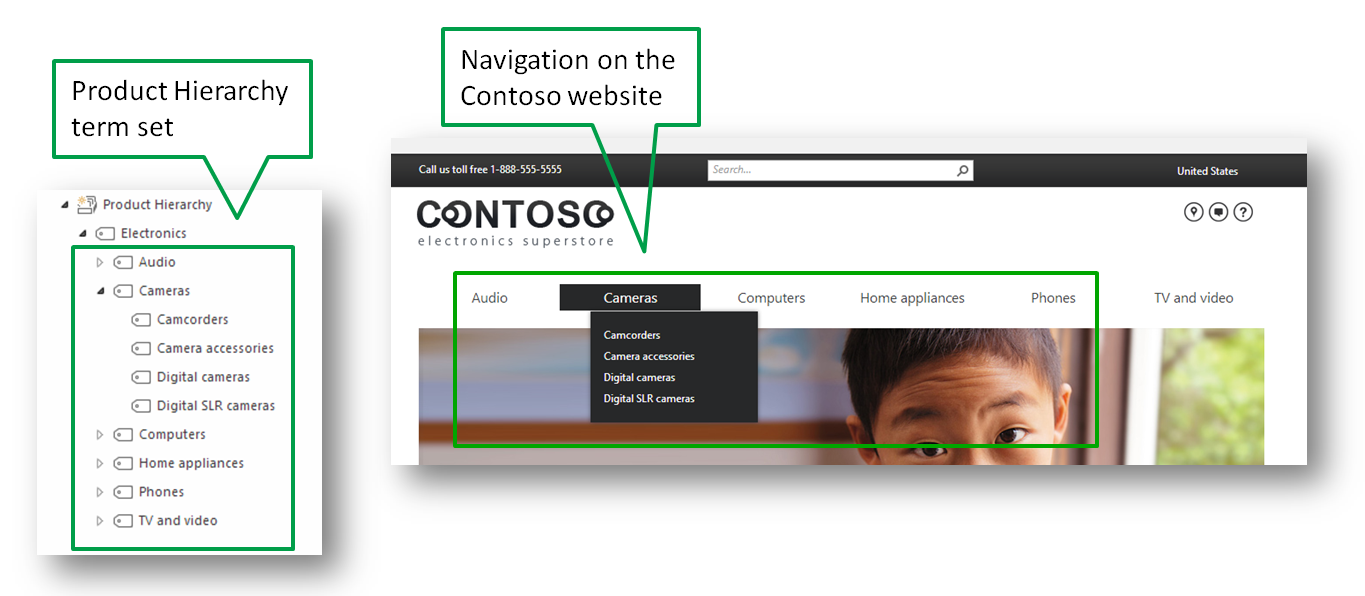
The reason why we're keeping this setting selected, is because we want to use the terms from the Product Hierarchy term set (from our Product Catalog Site Collection) in the navigation of our Contoso site.
By keeping this setting selected, this will also enable us to define user friendly URLs, and have a category page and an item page automatically created for us (I'll describe what a category page and an item page is in more detail later).
Specify the full site navigation
| About specifying the full site navigation |
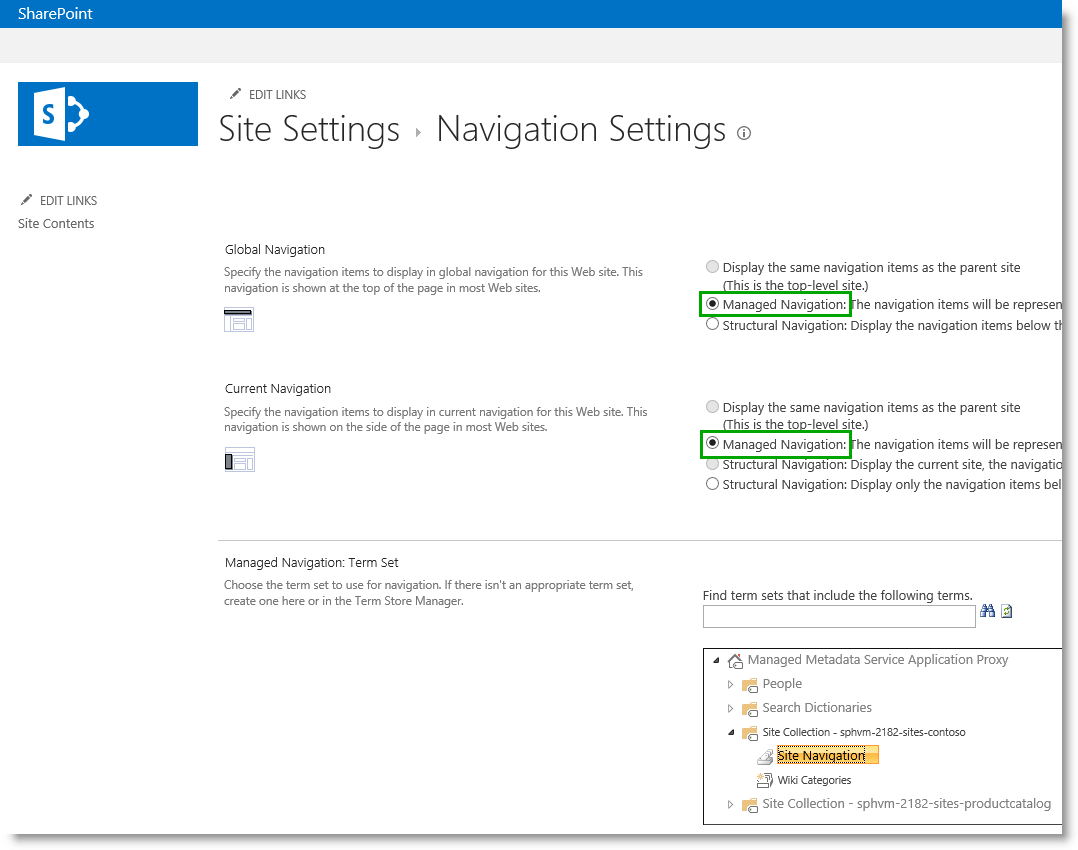
A site that has been created by using the Publishing Portal Site Collection template (which is what we used when we created this site), will by default have Managed navigation selected as its navigation method. Managed navigation is a new navigation method introduced in SharePoint Server 2013, which lets you define and maintain the navigation on your site by using term sets.
To view how the navigation of your site has been set up:
- Go to Site settings --> Navigation.
- Verify that:
- Managed Navigation has been selected.
- The Site Navigation term set has been specified as the term set that defines the navigation on your site.
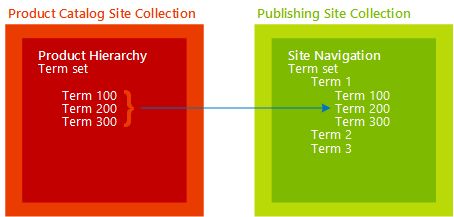
We are now going to build the full site navigation by integrating terms from the Product Hierarchy term set (from the Product Catalog Site Collection) into the Site Navigation term set.
In our scenario, the navigation structure of our Contoso site will be quite simple, as it'll be made up of the terms from the Product Hierarchy term set only.
| How to specify the full site navigation |
To specify the full site navigation, we have to specify:
- Navigation Hierarchy
- Navigation Position
- Navigation Pinning
Navigation Hierarchy
You'll notice that one of the settings, Select the column that categorizes items for navigation, already contains information. Do you remember how in Stage 3 we specified Item Category for the Navigation Hierarchy setting, when we enabled a list as a catalog? That setting is automatically carried over to this page, so we will keep the selected Item Category as is.

And, do you remember in Stage 2: Import list content into the Product Catalog Site Collection, that I showed you how the Item Category column is tied to the Product Hierarchy term set? I'm reminding you about this because we're now going to specify from where in the Product Hierarchy term set the catalog navigation should start. Here goes!
- In the Root term of hierarchy section, click the label icon.
A dialog box showing the Product Hierarchy term set opens. - Select “Electronics”.
We're selecting this because we want all terms from the term set to be included in the catalog navigation.
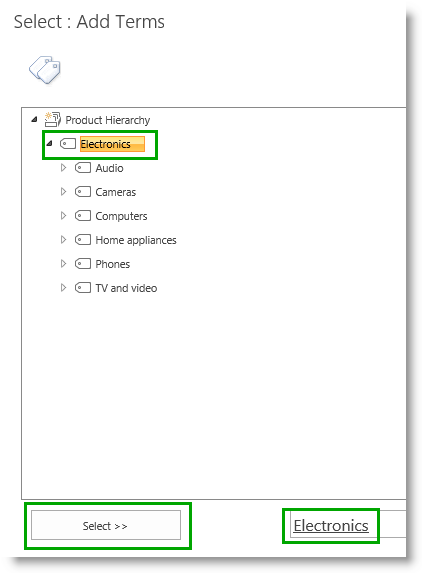
- Don't select Include root term in site navigation as we don't want the root term “Electronics” to be shown in the site navigation.
Our final Navigation Hierarchy settings will look like this:

Navigation Position
Navigation Position defines where, in the current site navigation, the catalog navigation should be integrated. In other words, where, in the Site Navigation term set, the Product Hierarchy term set should be integrated. As the Contoso site will only contain catalog pages, I keep the setting Add to navigation root selected.

Navigation Pinning
Navigation Pinning determines whether or not changes that are made to the Product Hierarchy term set in the Product Catalog Site Collection should be reflected on your site navigation.
If we decide to make changes to our Product Hierarchy term set, for example by changing the name of a term from “Printers, scanners and fax” to “Printers, scanners & fax”, we want this to be reflected on our site navigation. For this to happen, the Pin terms to site navigation check box should remain selected.

Specify URL details for a product page
| About specifying URL details for a product page |
When specifying URL details for a product page, you first have to decide which page you want your visitors to land on when they're browsing to a specific product. To do this, you've two options:
- Visitors can land on a page within the publishing portal
- Visitors can land on the list item in the Product Catalog Site Collection
We're building a customer-facing website for Contoso, with colorful, attractive pages to showcase our products. We similarly want our pages to have friendly URLs. Therefore, we'll choose the first option.
If we were building an internal company website, where we wanted employees to view the actual list items in our catalog, we'd have chosen the second option.
Important note: When specifying URL settings for a product page, your security settings and site access settings remain the same. Visitors will only see what you've granted them permissions to see.
| How to specify URL details for a product page |
To specify the URL details for a product page, you have to specify:
- Catalog Item URL Behavior
- Catalog Item URL Format
Catalog Item URL Behavior
To specify Catalog Item URL Behavior, keep the Make URLs relative to this site setting selected.
By keeping this setting selected, when our Contoso visitors browse for a specific product, they'll be taken directly to a page in the publishing site collection.

Catalog Item URL Format
Catalog Item URL Format defines how to build a friendly URL to the product page. We already specified this in Stage 3, How to enable a list as a catalog, when we selected Catalog Item URL Fields.
In our Contoso scenario, we'll keep the setting Use the default URL format provided by the catalog source selected. This means that the URL to the product page will contain values from the managed properties ProductCatalogGroupNumberOWSTEXT, and ProductCatalogItemNumberOWSTEXT.

(If the manage property names are confusing, take a look at a previous blog where I show you how automatically created properties are named)
Specify a Category Page and an Item Page
| About specifying a Category Page and an Item Page |
When you display information in a catalog format, the layout and structure should be consistent across the catalog. For example, you want to display the image of a product in the top left corner, followed by a table of product specifications, such as the height and color of the product. The same applies to category pages. For example, you want the page for all TVs to have the same layout as the page for all cameras.
To avoid having to create several pages for each product, and several pages for each category, you can use one template page for each. In SharePoint, an Item Page and a Category Page serve this purpose.
In our Contoso website scenario, we'll neither create an Item Page, nor shall we create a Category Page as SharePoint will do this for us automatically.
| How to specify a Category Page and an Item Page |
- In the section Category Page, keep Create a new page selected.
By doing this, SharePoint automatically creates a new category page.

- In the section Item Page, keep Create a new page selected.
By doing this, SharePoint automatically creates a new item page.

Here's what our final Catalog Source Settings page will look like:
Click OK, and watch some cool things happen!
What happens when I click the OK button to connect to a catalog
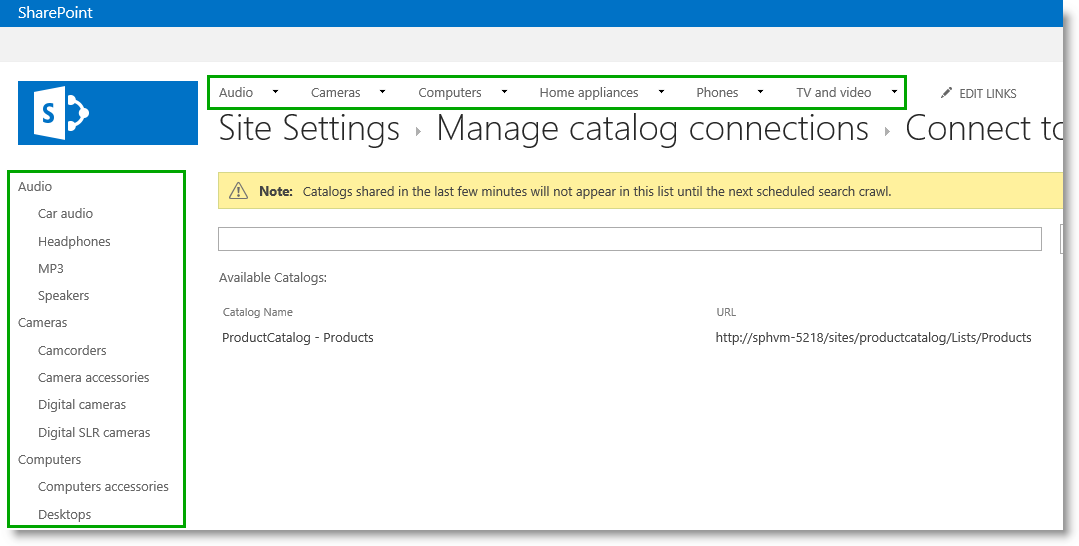
Our Contoso site navigation now includes terms from the Product Hierarchy term set.
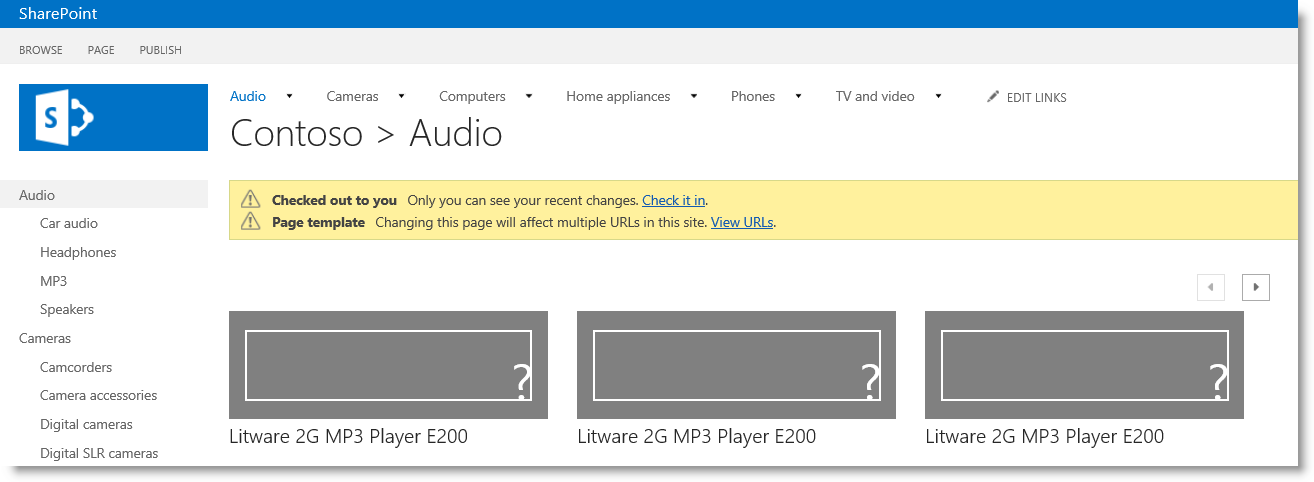
If you browse to the “Audio” page, you'll see three MP3 products displayed.
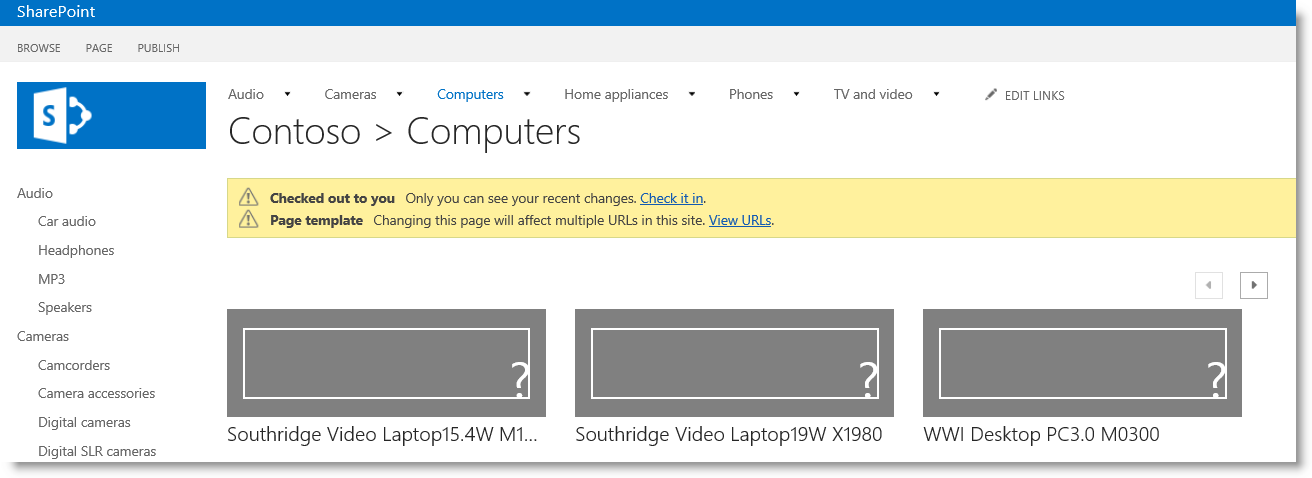
If you browse to the “Computers” page, you'll see three laptop products displayed.
In a later blog post, I'll explain why the correct categorized products “magically” appear when we browse through the different categories.
However, for now, let’s take a look at a specific product.
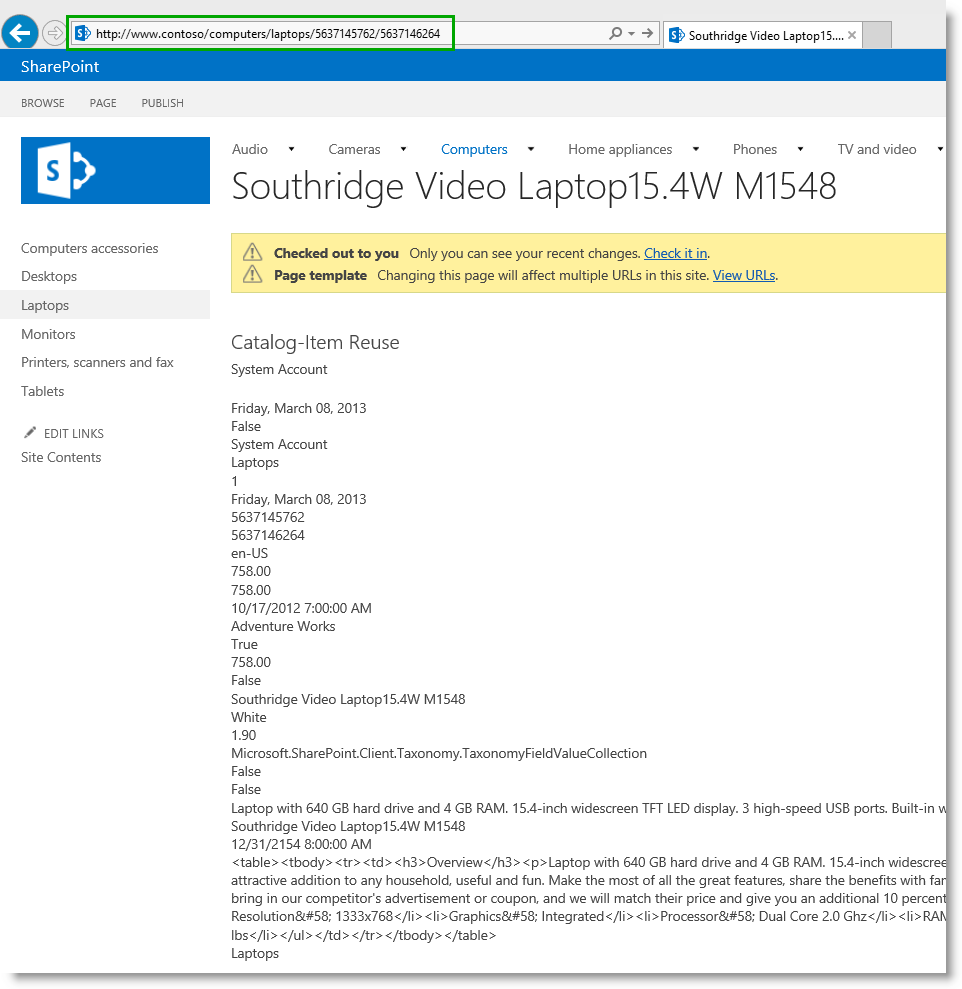
As you can see, at the moment, it's not exactly pretty to look at, but information about the product is displayed on the page, and there's also a friendly URL.
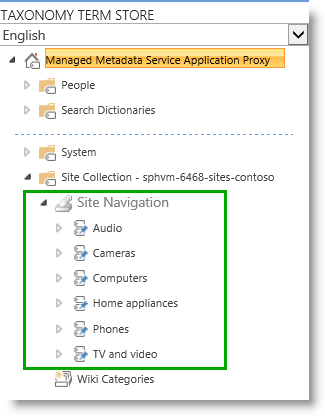
Also, the terms from the Product Hierarchy term set have been integrated into the Site Navigation term set. If you want to see this in more detail, go to Site settings --> Term store management.
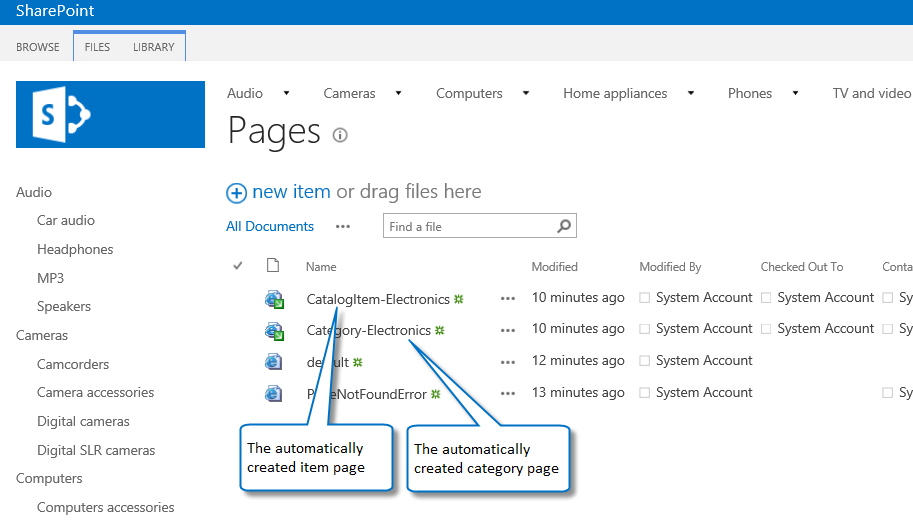
 And two new pages have been added to the Pages library. If you want to see this in more detail, go to Site contents --> Pages.
So, a lot of cool things have just happened on our Contoso website. Now it is time to start improving the appearance of our pages.
Next blog article in this series Stage 6: Upload and apply a new master page to a publishing site
Additional Resources
- For more information about how to connect a publishing site to a catalog, see the TechNet articel Connect a publishing site to a catalog in SharePoint Server 2013.
- For more information about cross-site Publishing, see the TechNet scenario page Create SharePoint sites by using cross-site publishing in SharePoint Server 2013.