WPF 3.5 SP1 Feature: Alternating Rows
So what else is new in WPF 3.5 SP1? Here is a smaller but pretty nice feature for you ItemsControl fans: alternating rows.
This alternating row feature has been added in WPF 3.5 SP1 to make it easier to set properties like Background, Foreground, etc. on the rows of an ItemsControl in alternating fashion. Two new properties have been added to ItemsControl.
public class ItemsControl : Control, IAddChild, IGeneratorHost
{
public int AlternationCount { get; set; }
public static readonly DependencyProperty AlternationCountProperty;
public static readonly DependencyProperty AlternationIndexProperty;
public static void SetAlternationIndex(DependencyObject element, int index){ }
}
AlternationCount is basically the count that the sequence will alternate on. It is set to the value 0 by default which means it is turned off. AlternationIndex is an attached property that gets set on each container item and will have a value in the range of [0, AlternationCount). Some examples may clarify its usage.
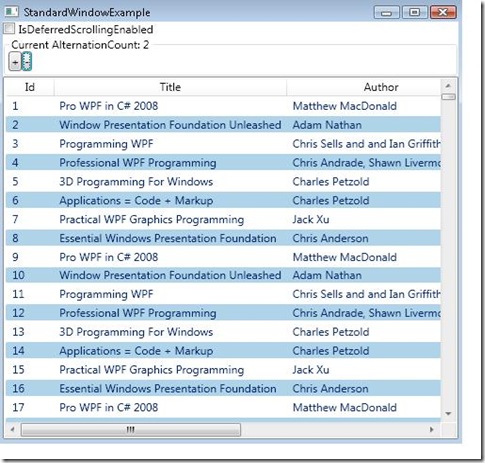
Here is a ListView that sets the AlternationCount to 2 and uses triggers for the AlternationIndex to change the background color.
<Style x:Key="alternatingListViewItemStyle" TargetType="{x:Type ListViewItem}">
<Style.Triggers>
<Trigger Property="ItemsControl.AlternationIndex" Value="1">
<Setter Property="Background" Value="LightBlue"></Setter>
</Trigger>
<Trigger Property="ItemsControl.AlternationIndex" Value="2">
<Setter Property="Background" Value="LightGray"></Setter>
</Trigger>
</Style.Triggers>
</Style>
<ListView ItemContainerStyle="{StaticResource alternatingListViewItemStyle}"
AlternationCount="2" />
With the AlternationCount set to 2, the AlternationIndex can be set to 0 or 1. On every AlternationIndex set to 1, I’m going to set the background to blue.
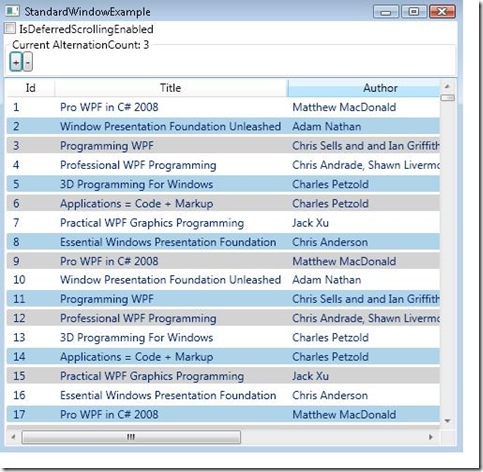
Notice that I also have a trigger when the AlternationIndex is set to 2, however, the current range for my AlternationIndex is [0, AlternationCount) so this trigger will not fire. If I do set the AlternationCount to 3, I will get something like this,
AlternationCount has also been added the HierarchicalDataTemplate and GroupStyle. Here are some examples of both. Oh, and you can also set properties with the AlternationIndex through a converter which I also have an example for below.
Here is the usage with a GroupStyle:
<ListView.GroupStyle>
<GroupStyle AlternationCount="2">
<GroupStyle.HeaderTemplate>
…
</GroupStyle.HeaderTemplate>
<GroupStyle.ContainerStyle>
<Style TargetType="{x:Type GroupItem}">
…
<Style.Triggers>
<Trigger Property="ItemsControl.AlternationIndex" Value="1">
<Setter Property="Background" Value="LightBlue"></Setter>
</Trigger>
</Style.Triggers>
</Style>
</GroupStyle.ContainerStyle>
</ListView.GroupStyle>
Here is one using the HierarchicalDataTemplate (I don’t show it here but I could set different alternation counts for each treeview level if I wanted to):
<!--root tree data template-->
<HierarchicalDataTemplate DataType="{x:Type local:Band}" ItemsSource="{Binding Path=Albums}" >
<TextBlock Text="{Binding Path=BandName}" />
</HierarchicalDataTemplate>
<!--next level with alternation count set-->
<HierarchicalDataTemplate DataType="{x:Type local:Album}" ItemsSource="{Binding Path=Songs}" AlternationCount="2">
<TextBlock Text="{Binding Path=AlbumName}" />
</HierarchicalDataTemplate>
<!--leaf-->
<DataTemplate DataType="{x:Type local:Song}">
<TextBlock Text="{Binding Path=SongName}" />
</DataTemplate>
<TreeView Name="mytv" />
Here is an example of using a converter to set properties on the control.
<!--style using a converter-->
<Style x:Key="alternatingTreeViewItemStyle" TargetType="{x:Type TreeViewItem}">
<Setter Property="Background" Value="{Binding
RelativeSource={RelativeSource Self},
Path=(ItemsControl.AlternationIndex),
Converter={StaticResource BGConverter}}"/>
</Style>
<!--treeview using the converter-->
<TreeView Name="mytv2"
ItemContainerStyle="{StaticResource alternatingTreeViewItemStyle}"
AlternationCount="2" />
// code for convert function
public object Convert(object value, Type targetType, object parameter, CultureInfo culture)
{
switch ((int)value)
{
case 1:
return Brushes.LightBlue;
case 2:
return Brushes.LightGray;
default:
return Brushes.White;
}
}
Remember that you aren’t restricted to background color. You can use any DP on the items control to alternate. I’ve attached a project that has all the above examples for you to try out and explore.
Comments
Anonymous
May 28, 2008
i need example about Item-Level Validation thank youAnonymous
August 25, 2008
How is it possible to select the row background according to a field value?Anonymous
August 26, 2008
Can't you do it using the converter example (the last example in the post)? Instead of hard coding the brushes, you can specify then from your app. Does that work?Anonymous
August 26, 2008
Probably something wrong, but in the converter, the row Item seems to be always null: --- XAML --- <Window.Resources> <local:BGConverter x:Key="BGConverter"/> <Style x:Key="dataGridRowStyle" TargetType="{x:Type dg:DataGridRow}"> <Setter Property="Background" Value="{Binding RelativeSource={RelativeSource Self}, Converter={StaticResource BGConverter}}"/> </Style> </Window.Resources> <Grid> <dg:DataGrid x:Name="dataGrid" AutoGenerateColumns="True" Background="Transparent" CanUserAddRows="False" CanUserDeleteRows="False" RowStyle="{StaticResource dataGridRowStyle}"/> </Grid> --- C# --- public object Convert(object value, Type targetType, object parameter, CultureInfo culture) { DataGridRow row = value as DataGridRow; Brush brush = null; // Item is always null; if (row != null && row.Item != null) { Alarm alarm = row.Item as Alarm; switch (alarm.Severity) { ... } } return brush; }Anonymous
August 26, 2008
I tried something similar but didn't have any issues. Item was null for me on initial rendering but that is expected as it hasn't been set yet. But it eventually passes in the correct non-null value of the Item. If you are still having a problem just send me a packaged repro and I can take a look. <Style x:Key="defaultRowStyle" TargetType="{x:Type dg:DataGridRow}"> <Setter Property="Background" Value="{Binding RelativeSource={RelativeSource Self}, Path=Item, Converter={StaticResource BGConverter}}"/> </Style> public object Convert(object value, Type targetType, object parameter, CultureInfo culture) { if (value != null) { Person person = value as Person; if (person != null) { if (person.Id % 2 == 0) { return Brushes.LightSalmon; } else { return Brushes.LightGray; } } } return Brushes.Tan; }Anonymous
August 26, 2008
Works really better if Path=Item is specified and casting directly the Convert value parameter to the correct Item type. Thank you very much for your help.Anonymous
September 04, 2008
Hi, I have implemented this into my listview, the rows display in alternate colours. One thing I have noticed is that when the alternate row is selected, the colour is light yellow, the row looks like it is not selected i.e. it does not change its colour to blue. Selecting the row with no colour assigned shows the row as selected changing its colour to blue. Any help would be great.Anonymous
September 04, 2008
Rishi, I am curious why it is turning light yellow for alternating rows. Do you have other styles there that are overriding when it is selected. Could you provide some code snippets to further diagnose.Anonymous
March 01, 2009
I had no idea about this. They added some pretty nifty stuff in 3.5SP1.Anonymous
April 24, 2009
The comment has been removedAnonymous
June 23, 2009
I have created a convertor & used the below as per your sample <Setter Property="Background" Value="{Binding RelativeSource={RelativeSource Self}, Path=(ItemsControl.AlternationIndex), Converter={StaticResource BGConverter}}"/> I am overriding the style of listboxItem as below: <Style x:Key="ListBoxItemStyle" TargetType="{x:Type ListBoxItem}"> <Setter Property="SnapsToDevicePixels" Value="true"/> <Setter Property="OverridesDefaultStyle" Value="true"/> <Setter Property="Background" Value="{Binding RelativeSource={RelativeSource Self}, Path=(ItemsControl.AlternationIndex), Converter={StaticResource BGConverter}}"/> <Setter Property="Foreground" Value="{DynamicResource EclpListFontColor}" /> <Setter Property="FocusVisualStyle" Value="{DynamicResource {ComponentResourceKey TypeInTargetAssembly={x:Type local:EclpButton}, ResourceId=CustomFocusStyleTransparent}}" /> <Setter Property="Template"> <Setter.Value> <ControlTemplate TargetType="{x:Type ListBoxItem}"> <Grid x:Name="ContentGrid" HorizontalAlignment="Stretch" Height="Auto"> <Grid.ColumnDefinitions> <ColumnDefinition Width="*"/> <ColumnDefinition Width="Auto"/> </Grid.ColumnDefinitions> <Grid HorizontalAlignment="Stretch" VerticalAlignment="Stretch" x:Name="grd_ListBoxItem" Grid.Column="0" Grid.ColumnSpan="1"> <!-- FIRST Layer - Background Base --> <Rectangle x:Name="BorderBaseItem" HorizontalAlignment="Stretch" VerticalAlignment="Stretch" RadiusX="2" RadiusY="2" StrokeThickness="2" Visibility="Hidden"/> <Border HorizontalAlignment="Stretch" VerticalAlignment="Stretch" Padding="2"> <ContentPresenter Margin="11,5,11,5" /> <!--<DockPanel HorizontalAlignment="Stretch" VerticalAlignment="Stretch"> <local:EclpTextEditor x:Name="ListItem" IsHitTestVisible="True" Focusable="True" HorizontalAlignment="Stretch" DockPanel.Dock="Left" Text="{Binding Path=SelectedValue,RelativeSource={RelativeSource FindAncestor, AncestorType={x:Type ListBoxItem}}}"/> </DockPanel>--> </Border> </Grid> <Grid x:Name="OverflowGrid" Visibility="Collapsed" Grid.Column="1" Grid.ColumnSpan="1"> <Image x:Name="OverflowImage" SnapsToDevicePixels="True" Source="{Binding Path=OverflowVector, RelativeSource={RelativeSource TemplatedParent}}" VerticalAlignment="Center" HorizontalAlignment="Left" Margin="1,0,0,0" Height="17" Width="17" ToolTip="{Binding Path=Text, RelativeSource={RelativeSource TemplatedParent}}"> <!--<Image.ToolTip> <TextBlock Text="{Binding Path=Text, RelativeSource={RelativeSource TemplatedParent}}" /> </Image.ToolTip>--> </Image> </Grid> </Grid> <ControlTemplate.Triggers> <Trigger Property="IsSelected" Value="true"> <Setter TargetName="BorderBaseItem" Property="Fill" Value="{DynamicResource ListSelectedColor}" /> <Setter TargetName="BorderBaseItem" Property="Stroke" Value="{DynamicResource EclpListBorder}" /> <Setter TargetName="BorderBaseItem" Property="Visibility" Value="Visible" /> <Setter Property="Foreground" Value="{DynamicResource EclpListFontColor}" /> <Setter TargetName="BorderBaseItem" Property="StrokeThickness" Value="0.5" /> <Setter TargetName="BorderBaseItem" Property="BitmapEffect"> <Setter.Value> <OuterGlowBitmapEffect GlowColor="{DynamicResource WPFFocusGlow}" GlowSize="{DynamicResource {ComponentResourceKey ResourceId=FocusGlowSize, TypeInTargetAssembly={x:Type local:EclpButton}}}" Noise="{DynamicResource {ComponentResourceKey ResourceId=FocusGlowNoise, TypeInTargetAssembly={x:Type local:EclpButton}}}" Opacity="{DynamicResource {ComponentResourceKey ResourceId=FocusGlowOpacity, TypeInTargetAssembly={x:Type local:EclpButton}}}"/> </Setter.Value> </Setter> </Trigger> <!--<Trigger Property="IsFocused" Value="True"> <Setter TargetName="BorderBaseItem" Property="Stroke" Value="{DynamicResource {ComponentResourceKey ResourceId=FocusGlowRectColor, TypeInTargetAssembly={x:Type local:EclpButton}}}" /> <Setter TargetName="BorderBaseItem" Property="StrokeThickness" Value="0.5" /> <Setter TargetName="BorderBaseItem" Property="Visibility" Value="Visible" /> <Setter TargetName="BorderBaseItem" Property="BitmapEffect"> <Setter.Value> <OuterGlowBitmapEffect GlowColor="{DynamicResource WPFFocusGlow}" GlowSize="{DynamicResource {ComponentResourceKey ResourceId=FocusGlowSize, TypeInTargetAssembly={x:Type local:EclpButton}}}" Noise="{DynamicResource {ComponentResourceKey ResourceId=FocusGlowNoise, TypeInTargetAssembly={x:Type local:EclpButton}}}" Opacity="{DynamicResource {ComponentResourceKey ResourceId=FocusGlowOpacity, TypeInTargetAssembly={x:Type local:EclpButton}}}"/> </Setter.Value> </Setter> </Trigger>--> <Trigger Property="IsEnabled" Value="false"> <Setter Property="Foreground" Value="{DynamicResource WPFListBoxTextDisabled}"/> <Setter Property="Opacity" TargetName="OverflowImage" Value="0.4"/> </Trigger> <MultiTrigger> <MultiTrigger.Conditions> <Condition Property="IsMouseOver" Value="true"/> <Condition Property="IsSelected" Value="false"/> </MultiTrigger.Conditions> <Setter TargetName="BorderBaseItem" Property="Fill" Value="{DynamicResource WPFListItemHotTrack}" /> <Setter TargetName="BorderBaseItem" Property="Stroke" Value="{DynamicResource EclpListBorder}" /> <Setter TargetName="BorderBaseItem" Property="Visibility" Value="Visible" /> <Setter TargetName="BorderBaseItem" Property="StrokeThickness" Value="0.5" /> </MultiTrigger> <DataTrigger Binding="{Binding Path=IsReadOnly, RelativeSource={RelativeSource FindAncestor, AncestorType={x:Type local:EclpList}}}" Value="True"> <Setter Property="IsEnabled" Value="False" /> <Setter Property="Foreground" Value="{DynamicResource WPFListBoxText}" /> </DataTrigger> </ControlTemplate.Triggers> </ControlTemplate> </Setter.Value> </Setter> <!--<Style.Triggers> <Trigger Property="ItemsControl.AlternationIndex" Value="0"> <Setter Property="Background" Value="LightBlue"></Setter> </Trigger> <Trigger Property="ItemsControl.AlternationIndex" Value="2"> <Setter Property="Background" Value="{DynamicResource EclpListAltRowBase}"></Setter> </Trigger> </Style.Triggers>--> </Style> </Style.Resources> But there is no change on the alternating rows. Convertor code is object IValueConverter.Convert(object value, Type targetType, object parameter, CultureInfo culture) { switch ((int)value) { case 0: return Brushes.White; case 1:Anonymous
March 16, 2010
Pretty nifty stuff of .NET 3.5 WPF rocks!!!

