Enterprise PKI with Windows Server 2012 R2 Active Directory Certificate Services (Part 1 of 2)
PKI is heavily employed in cloud computing for encrypting data and securing transactions. While Windows Server 2012 R2 is developed as a building block for cloud solutions, there is an increasing demand for IT professionals to acquire proficiency on implementing PKI with Windows Server 2012 R2. This two-part blog post series is to help those who, like me, perhaps do not work on Active Directory Certificate Services (AD CS) everyday while every so often do need to implement a simple PKI for assessing or piloting solutions better understand and become familiar with the process.
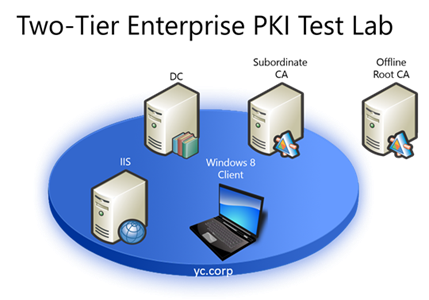
I believe the most effective way to learn AD CS is to walk through the process, build a test lab, practice and learn from mistakes. You can download Windows Server 2012 R2 VMs from https://aka.ms/R2 and build a simple AD environment with Hyper-V like the following to test out these steps.
The following six steps form the core process of implementing PKI. The common practices are to first build a root CA with a standalone server, followed by configuring a subordinate CA on a member server for issuing certificates, while securing the root CA by taking it offline and bringing it back online only when issuing a subordinate CA certificate. Notice Part 1 include the first four steps, while the rest are in Part 2. All descriptions and screen captures are based on Windows Server 2012 R2.
Logical Steps
- Build a standalone root CA
- Create an enterprise subordinate CA
- Deploy certificate templates
- Enable certificate auto-enrollment
- Set certificate revocation policies
- Configure and verify private key archive and recovery
1. Build a standalone root CA
This is the first AD CS role to be installed in an enterprise PKI. It is a trust anchor and establishes the root of a trust hierarchy. To secure the root CA, a common practice is to keep it offline to minimize the exposure. And bring it online only when issuing a subordinate CA certificate. The process is to simply add and configure AD CS role as a Certificate Authority (CA) on a non-domain joined server
Once CA is installed, configure the AD CS role as a standalone root CA. Here, as shown below, I set the key length to 4096 and name it as ycCorpRootCA.
Subsequently I also set the validity period to 2 instead of the default 5 years.
Once the CA is created, need to configure the CA properties with the information of the subordinate CA. Click the Extensions tab and add a CDP pointing to the subordinate CA which will be the one actually distributing certificates. The following figure shows a target CDP with optional settings is configured as the following:
https://subCA.yc.corp/certdata/\<CaName><CRLNameSuffix><DeltaCRLAllowed>.crl
Also a new location for AIA with an optional setting as
https://subCa.yc.corp/certdata/\<ServerDNSName><CaName><CertificateName>.crt
Now publish the revocation list.
In MMC Certificate snap-in, export the .cer file, i.e. without the private key, and also copy the content of c:\windows\system32\certsrv\certenroll to an intended location, here \\rootCA\_pocket$, for later access from a subordinate CA as depicted below.
At this time, the root CA of yc.corp is in place.
2. Create an enterprise subordinate CA
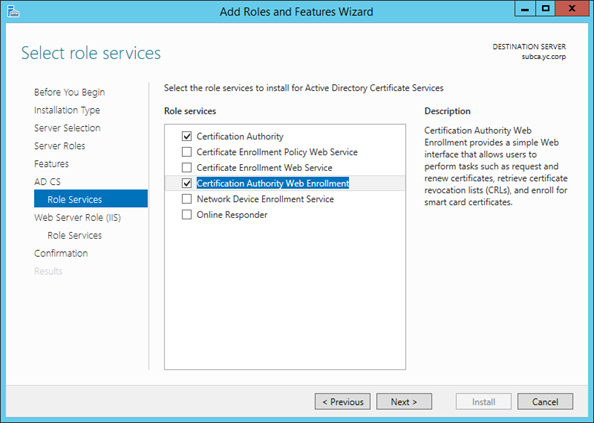
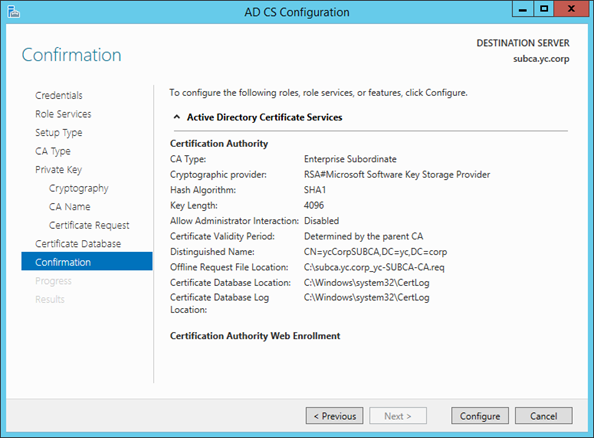
Here, I am integrating a subordinate CA into AD to publish her certificate to all domain clients. The process is to first add AD CS role with CA and Web Enrollment services in a target member server, subCA, as shown, followed by configuring the Setup type as Enterprise CA and the CA Type as a subordinate CA as shown below.
And the following shows that it is named as ycCorpSUBCA and a request file is saved locally.
On the subordinate CA, install the root CA certificate in the local machine’s Trusted Root CA certificate store.
Also create c:\inetpub\wwwroot\certdata and copy the crl and crt files from the root CA server to as the following.
Now copy the subordinate CA’s request file from the subordinate CA to the root CA’s share folder for acquiring a certificate in p7b with complete certificate chain for the subordinate CA accordingly. On the root CA server, open the CA console to submit the request file, subca.yc.corp-SUBCA-CA.req, as shown below. Once submitted, the request will be placed in the folder, Pending Requests. Once issued, the certificate will then listed in the folder, Issued Certificates.
Once the p7b certificate is exported, open it and examine all certificates for establishing the trust as shown below.
Finally, on the subordinate CA server, at this time the CA service is stopped. Use CA console to install the p7b certificate followed by starting the CA service.
The following shows that once the CA service has successfully started, the icon is now with a green check mark.
At this time, distribute the root CA certificate to the domain by importing the root CA certificate into Trusted Root CA of Public Key Policies at an intended domain level GPO, and then the subordinate CA is in place. The following shows, for example, importing the root CA certificate, ycCorpRootCA.cer, into a GPO linked at the domain level.
3. Deploy certificate templates
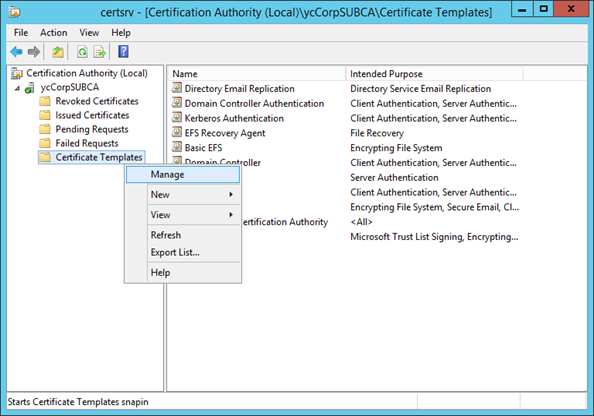
With the CA infrastructure ready, next deploy certificate templates. On the subordinate CA server, open the CA console followed by right-clicking and managing Certificate Templates folder.
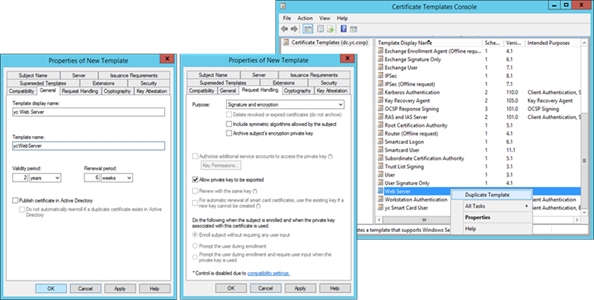
Now from Certificate Template Console, duplicate a target template and modify the definitions. The following are sample template definitions for smart card logon and web server.
As the following shows the Certificate Templates Console now include the two newly defined templates.
The next is to publish the two templates for issuing certificates. This is done from Certificate Templates folder of CA console. The steps are depicted as the following.
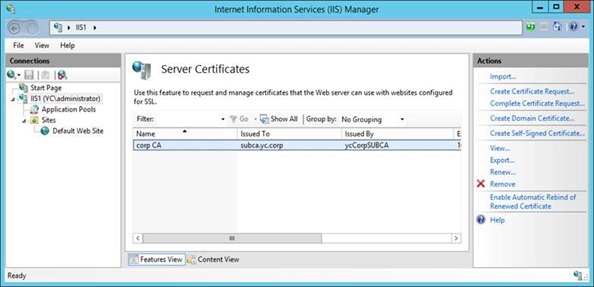
At this time, newly created certificate templates are published. Test the new web server template by requesting a domain certificate from IIS console as shown below.
And the following shows a web server certificate was subsequently issued accordingly. This certificate can then bind with a port to establish SSL.
4. Enable certificate auto-enrollment
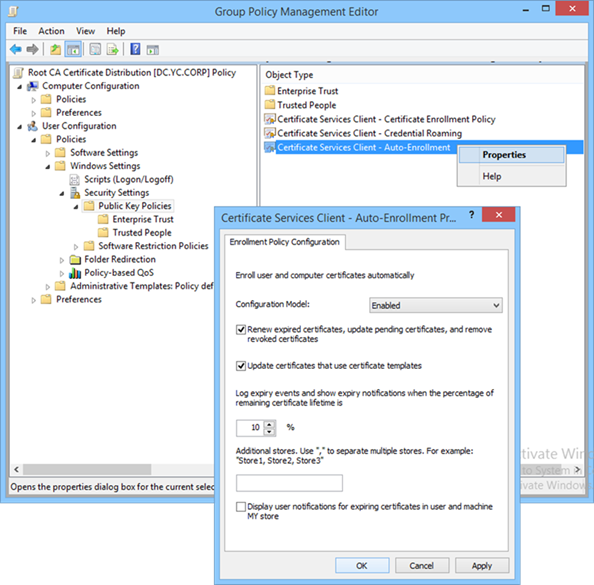
This step is to auto-enroll users such that much of legitimate maintenance like enrolling, renewing, and updating certificates as applicable can be carried out automatically. These user settings are in Public Key Policies of a GPO. The following are the steps carried out in the DC, dc.yc.corp, to enable auto-enrollment and certificate enrollment policy of an AD CS client.
On the subordinate CA, run gpupdate/force to refresh Group Policy. And use mmc to check the user certificate store and a user certificate issued by the subordinate CA from auto-enrollment should be in place as shown below.
If certificate auto-enrollment does not work as expected, use the Certificate Template Console to check the security settings of the properties of a questioned certificate template.
