Manage project collections in Azure DevOps Server
Azure DevOps Server 2022 | Azure DevOps Server 2020 | Azure DevOps Server 2019
When your Azure DevOps Server hosts multiple projects, you can manage them more efficiently by grouping them together and assigning the same resources to them. For example, you can group projects that have similar requirements or objectives, such as all projects that access a particular code base. You can then manage the group of team projects as an autonomous resource with its own user groups, server resources, and maintenance schedule.
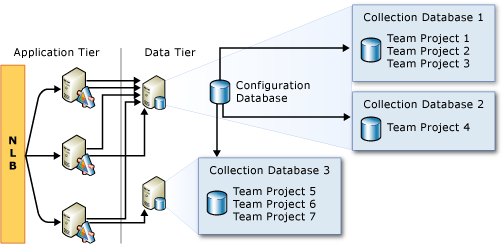
A group of projects is called a project collection. When you install Azure DevOps Server, a default collection is created to contain all projects. When you create a collection, you specify the logical and physical resources that projects within that collection can use. All the artifacts and data that those projects use are stored in the single database of the collection.
The following illustration shows how databases for project collections are integrated with the logical architecture. When you create a project, you specify the collection which will store its data.
View information or configure existing project
If you haven't been added as an Azure DevOps Server administrator, get added now.
You must be a member of the local Administrators group on the server where you want to open the console, and either a member of the Azure DevOps Server or Team Foundation Administrators group, or your Edit Server-Level Information permission must be set to Allow.
Sign in to the application-tier server, open the Administration Console, and open the Team Project Collections node.
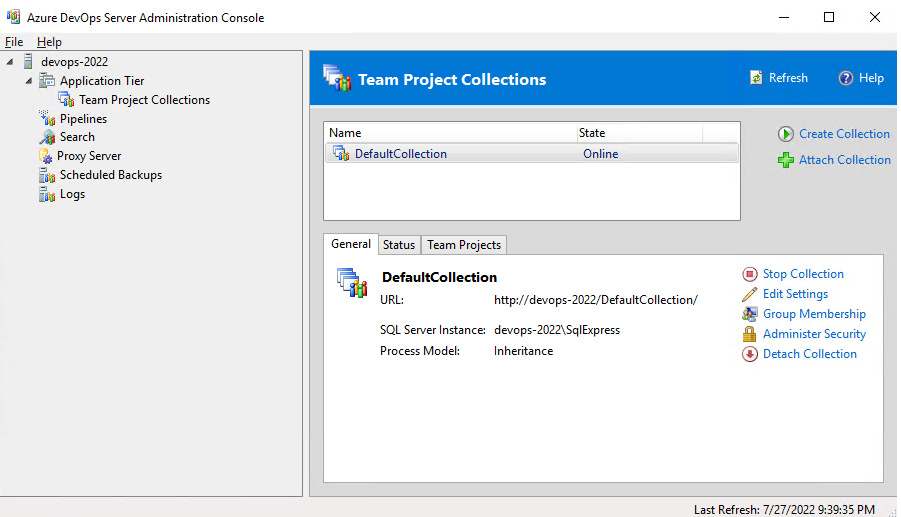
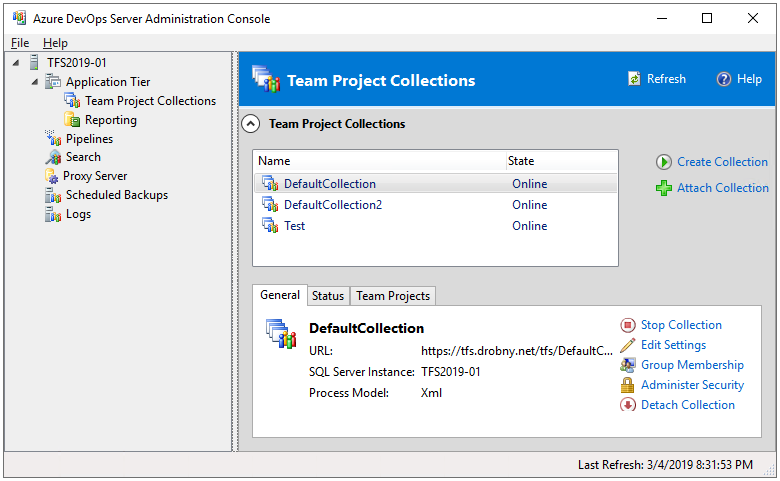
Highlight the name of a collection and review the information provided from the various tabs. Some tabs only appear if the corresponding application has been configured.
You can perform the following tasks from the corresponding tab.
Tab Tasks General - Start Collection or Stop Collection: Start or stop a collection. Projects become unavailable when you stop a collection. You typically stop a collection to support maintenance operations, such as moving or splitting a collection.
- If the collection is started, only Stop Collection appears. If the collection is stopped, only Start Collection appears. Starting or stopping a collection can take several minutes to complete. You might need to choose Refresh to display the change in state.
- Edit settings: Edit the collection's description or configuration.
- Group Membership: Add or remove users or groups as members of a collection. To learn more, see Set administrator permissions for project collections.
- Administer Security: Manage the permissions of a collection group. To learn more, see Permissions and groups reference.
Status - View an activity log or rerun a job.
Projects - View the projects defined for a collection and Delete a project.
- To learn more about projects, see Create a project.
Configure reporting
The Reporting page only appears when you've added a report server to Azure DevOps. Choose this page to perform the following tasks:
- Configure the report server for use by the collection.
- When you edit the default folder location, the operation will fail if you type the path of a folder that does not exist on the server and you do not have permission to create a folder on that server. You must specify an existing folder if you do not have permissions to create folders on that server.
- To remove the default location for report subfolders, choose Clear Configuration.
- Removing the configuration removes the reporting functionality for all existing and future projects in the collection.
Create a project collection
Before creating a project collection, review What are the pros and cons of creating multiple project collections? as described later in this article.
If you haven't been added as an administrator, get added now.
You must be a member of the local Administrators group on the server where you want to open the console, and either a member of the Team Foundation Administrators group or your Edit Server-Level Information permission must be set to Allow.
From the administration console, open the Team Project Collections page and choose Create Collection.
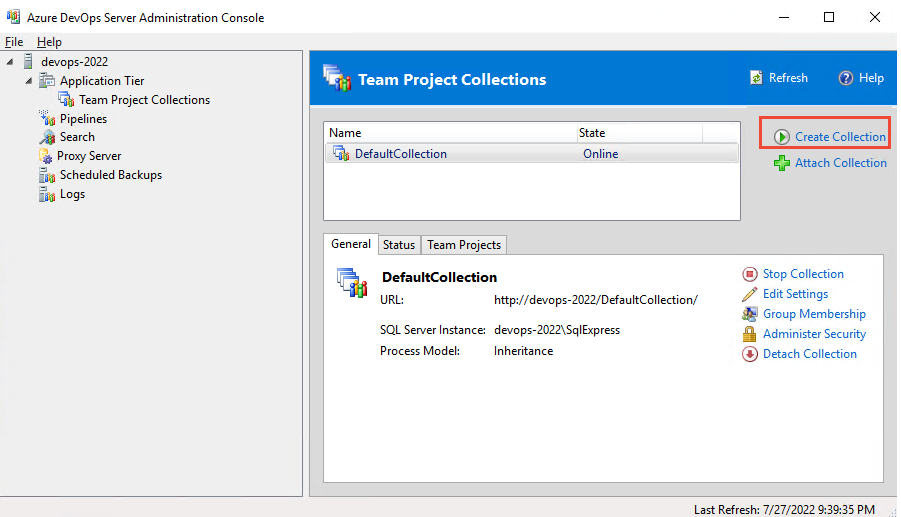
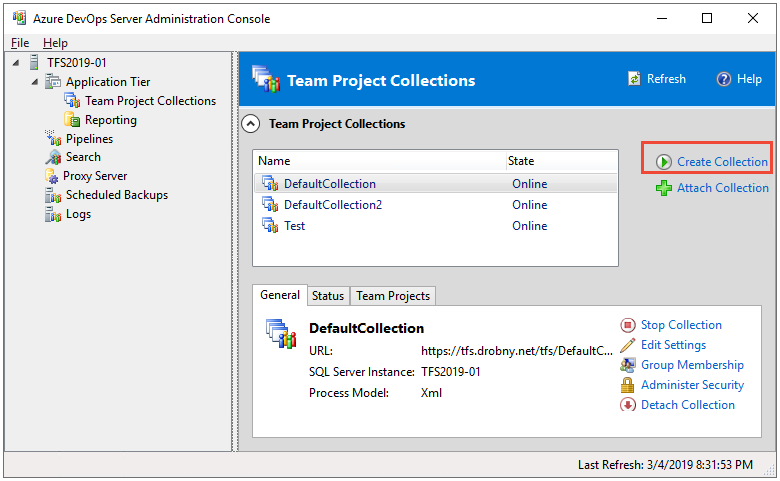
Follow the guidance provided by the Create Team Project Collection wizard.
For the Name, specify a unique name with no more than 64 characters (the shorter the better), and don't specify slashes, or other special characters listed in Naming restrictions.
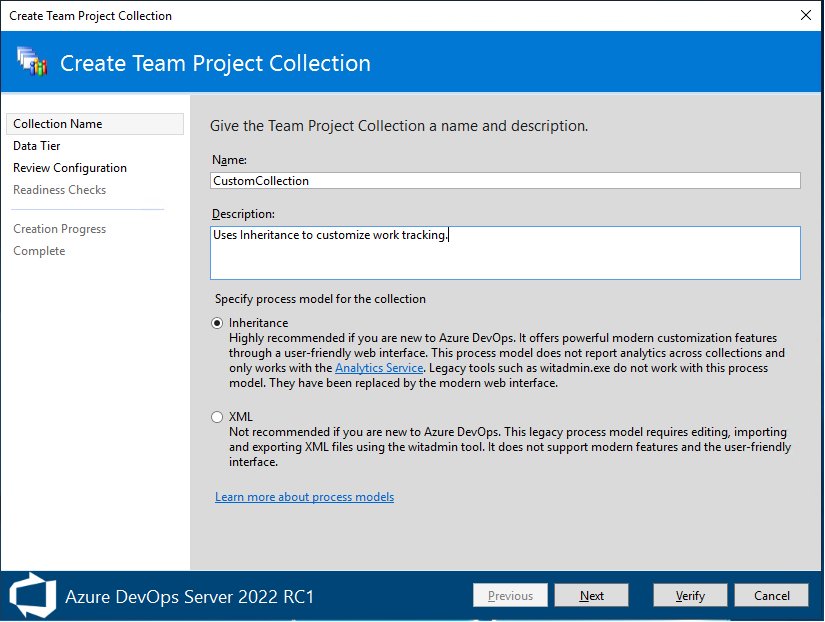
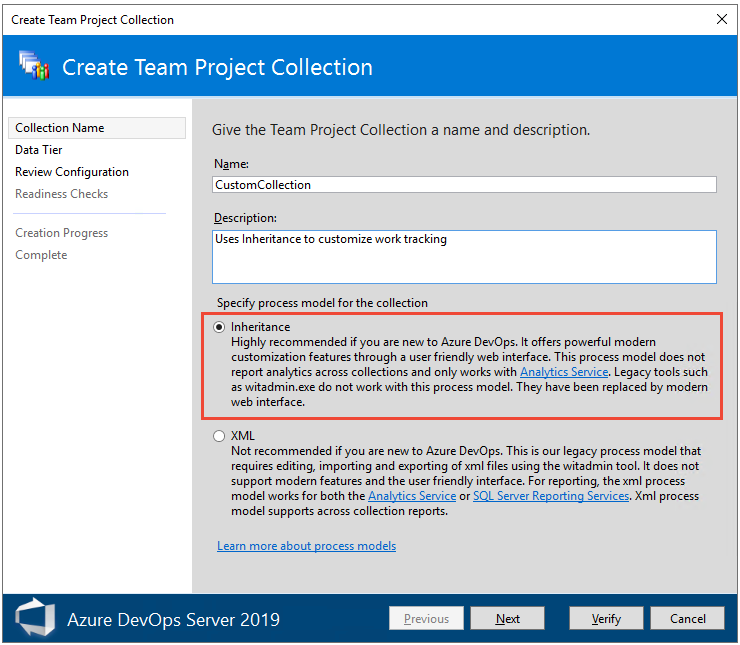
Choose Inheritance if you want to use the user interface to customize work tracking. This choice relies on the Analytics Service to support your reporting needs.
Choose XML if you want to use XML definition files to customize work tracking.
Note
For the On-premises XML process model, you can use witadmin to list, import, export, and modify a process for a project. For the Inherited process models, you can only use witadmin to list and export process information. For an overview of process models and what is supported, see Customize your work tracking experience.
The wizard supports configuration of the following resources. Some resources can only be configured if the application-tier server that hosts the collection has been previously configured to support the corresponding application.
Data Tier or SQL Server instance
Specify the name of the Azure DevOps data-tier server. If you want to use a named instance to host the database for this project collection, you must also specify the name of the instance as in the following example:
ServerName \ InstanceName
Choose Create a new database for this collection if you want to create a database for the collection. This option requires that the service account used by the Visual Studio Team Foundation Background Job Agent has permissions to create a database on the instance of SQL Server.
Or, choose Use this existing database if you want to use a database that already exists, and specify the name of the database. This option requires that an empty database exists on the named SQL Server instance and you have write permissions.
SQL Server Reporting Services
Reports appears if you have configured the application-tier to use SQL Server Reporting Services, otherwise it is disabled. To configure it later, see Add a report server.
Review the information for the server and the folder that will host reports, and choose Next. This option requires your user account to have permissions to create a folder on the server that is running Reporting Services.
Unless security restrictions in your business infrastructure prevent the automatic creation of a folder as part of the wizard, you should use the default option to create a folder.
If you must use a folder that an administrator created for you on the server that is running Reporting Services, expand Advanced configuration, choose Specify a path to an existing folder, and specify the relative path of the folder that has been created for you.
Choose Verify Path, and if the path is correct, choose Next.
Verification process
In Readiness Checks, review the status of the checks.
A blue underlined Error indicator appears next to any configuration that contains an error. You can choose the indicator for a detailed message about the problem. You must address all errors before you can continue.
After all readiness checks have passed, choose Create.
The process of creating a project collection starts.
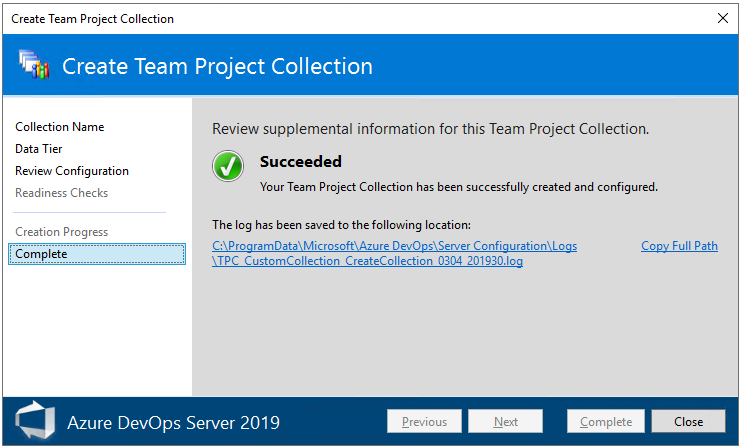
After the wizard finishes, choose Close.
Detach or delete a project collection
You detach a project collection when you want to perform a maintenance operation, such as moving or splitting a collection. Teams can't access projects or source code when you detach the collection.
You delete a collection when you no longer need the data stored in the projects defined in the collection. The three steps to delete a collection are (1) detach the collection and (2) delete the collection database.
Detach the collection
From the administration console, highlight the name of the collection that you want to delete, and then choose Detach Collection.
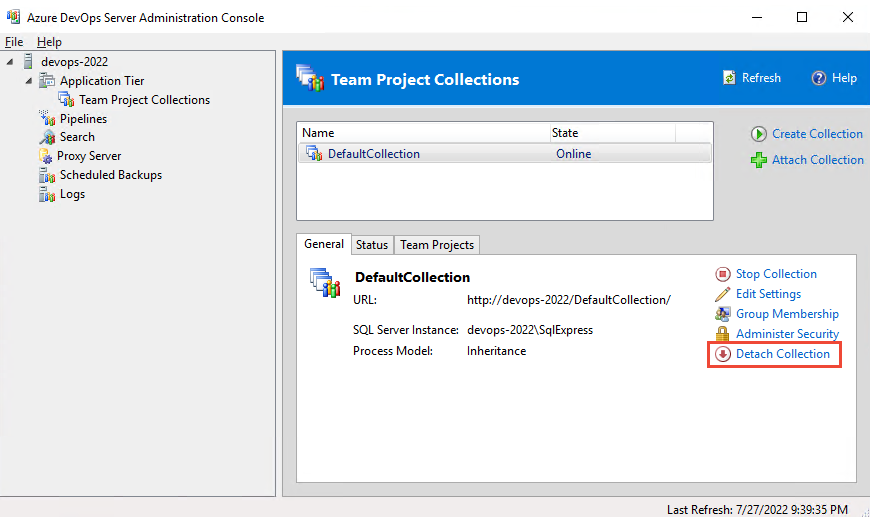
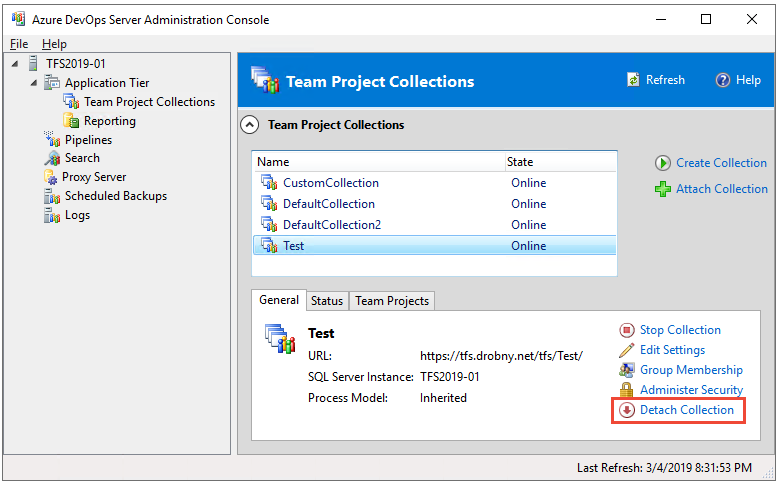
Follow the guidance provided by the Detach Team Project Collection Wizard.
(Optional) On the Provide a servicing message for the project collection page, in Servicing Message, specify a message for users who might try to connect to projects in this collection.
When all the readiness checks have completed successfully, choose Detach.
On the Monitor the project collection detach progress page, when all processes have completed, choose Next.
(Optional) On the Review supplemental information for this project collection page, note the location of the log file.
Delete the collection database
Open SQL Server Management Studio, connect to the instance of the SQL Server Database Engine that hosts the collection database, and expand the instance.
Highlight the name of the collection database (by default, TFS_CollectionName), and then delete the database.
For more information, see Delete a Database.
The project collection no longer appears in the list of collections in the administration console.
Q & A
Q: Is there a command line tool for managing collections?
A: You can use the TFSConfig Collection command to attach, detach, delete, or clone a project collection.
Q: What are the pros and cons of creating multiple project collections?
If your development efforts will benefit from the ability to branch and merge code or you must query the status of work items that relate to the same code, you should consolidate your projects in the same project collection.
A: Advantages for creating more than one collection
You can better separate the operational needs for one code base or other grouping of projects from the operational needs for another grouping. Because the data for each collection is stored in its own database, you can independently manage many aspects of each collection separately from other collections in your deployment. For example, you can stop and start each collection individually. Therefore, you can schedule maintenance operations for each collection at different times.
Grouping projects into more than one collection provides the following advantages:
Greater flexibility and scalability in managing and distributing databases and resources. A group of related projects share reports, work items, and process guidance, as well as a code base.
By creating a database for each collection, teams and administrators can perform the following tasks:
- Build, branch, merge, and iterate an autonomous code base according to the needs of the projects within the collection. Code dependencies outside the collection can be formally managed.
- Back up and restore the data for each collection independently of other collections.
- Store all collection databases on a single instance of SQL Server, or distribute the databases across one or more instances.
- Detach a collection, back it up, and then restore it to a different Azure DevOps deployment.
- Reassign resources to better meet the demands of projects as they increase in size over time.
Increased operational security. Because each collection has its own set of users and permissions, isolating different code bases can be isolated under different collections. Administrators can add users only to the collection that contains the project or projects that pertain to that particular code base.
Increased capability to support custom workflow processes. Each collection manages process templates, work item types, link types, global lists, and work item fields separate from other collections. By separating projects that have different workflow processes into different collections, you only expose those customizations needed to those projects within a collection.
A: Disadvantages of creating more than one collection
The main disadvantage of creating more than one project collection is that you increase the complexity of your Azure DevOps deployment.
- You must backup and restore the database for each collection, and other management and maintenance tasks also increase in proportion to the number of collections that you have. For example, you must manage the set of users and permissions for each project collection individually.
- Teams cannot link work items across collections.
- Teams cannot branch or merge code across collections.
- Teams cannot create queries across collections.
Q: What resources are managed at the collection level?
A: Each project belongs to a collection. To learn about managing a collection, see Get started managing your organization or project collection.
Q: How does data stored for different team collections support reporting?
A: A single relational data warehouse contains all reportable data from all projects that are defined in all project collections for an Azure DevOps deployment. Data from that warehouse is then processed and written to the OLAP cube. Because data is collected into a single data warehouse, you can report across multiple project collections.
To create or customize reports, you must add user accounts to the TfsWarehouseDataReader role. Report authors need read access to both the relational data warehouse and Analysis Services cube. These accounts can view data for all team projects that are hosted in all project collections in the Azure DevOps deployment. There is no way to limit access to a project or collection.
Q: How do I scale my deployment with collections?
A: See Move a project collection or Split a project collection.