Notitie
Voor toegang tot deze pagina is autorisatie vereist. U kunt proberen u aan te melden of de directory te wijzigen.
Voor toegang tot deze pagina is autorisatie vereist. U kunt proberen de mappen te wijzigen.
VAN TOEPASSING OP: Python SDK azure-ai-ml v2 (actueel)
Meer informatie over hoe een data scientist Azure Machine Learning gebruikt om een model te trainen. In dit voorbeeld gebruikt u een gegevensset met creditcards om te begrijpen hoe u Azure Machine Learning gebruikt voor een classificatieprobleem. Het doel is om te voorspellen of een klant een hoge kans heeft op een creditcardbetaling. Het trainingsscript verwerkt de gegevensvoorbereiding. Het script traint en registreert vervolgens een model.
In deze zelfstudie wordt u stapsgewijs begeleid bij het verzenden van een cloudtrainingstaak (opdrachttaak).
- Een ingang krijgen voor uw Azure Machine Learning-werkruimte
- Uw rekenresource en taakomgeving maken
- Uw trainingsscript maken
- Uw opdrachttaak maken en uitvoeren om het trainingsscript op de rekenresource uit te voeren
- De uitvoer van uw trainingsscript weergeven
- Het nieuw getrainde model implementeren als eindpunt
- Het Azure Machine Learning-eindpunt aanroepen voor deductie
Als u meer wilt weten over het laden van uw gegevens in Azure, raadpleegt u zelfstudie: Uw gegevens uploaden, openen en verkennen in Azure Machine Learning.
In deze video ziet u hoe u aan de slag gaat in Azure Machine Learning-studio, zodat u de stappen in de zelfstudie kunt volgen. In de video ziet u hoe u een notebook maakt, een rekenproces maakt en het notebook kloont. In de volgende secties worden ook de stappen beschreven.
Vereisten
-
Als u Azure Machine Learning wilt gebruiken, hebt u een werkruimte nodig. Als u er nog geen hebt, voltooit u Resources maken die u nodig hebt om aan de slag te gaan met het maken van een werkruimte en meer informatie over het gebruik ervan.
Belangrijk
Als uw Azure Machine Learning-werkruimte is geconfigureerd met een beheerd virtueel netwerk, moet u mogelijk uitgaande regels toevoegen om toegang tot de openbare Python-pakketopslagplaatsen toe te staan. Zie Scenario: Toegang tot openbare machine learning-pakketten voor meer informatie.
-
Meld u aan bij de studio en selecteer uw werkruimte als deze nog niet is geopend.
-
Open of maak een notitieblok in uw werkruimte:
- Als u code in cellen wilt kopiëren en plakken, maakt u een nieuw notitieblok.
- Of open zelfstudies/get-started-notebooks/train-model.ipynb vanuit de sectie Samples van studio. Selecteer Vervolgens Klonen om het notitieblok toe te voegen aan uw bestanden. Zie Learn from sample notebooks(Learn from sample notebooks) (Learn from sample notebooks) voor meer informatie over voorbeeldnotebooks.
Uw kernel instellen en openen in Visual Studio Code (VS Code)
Maak op de bovenste balk boven het geopende notitieblok een rekenproces als u er nog geen hebt.

Als het rekenproces is gestopt, selecteert u Rekenproces starten en wacht u totdat het wordt uitgevoerd.

Wacht totdat het rekenproces wordt uitgevoerd. Zorg er vervolgens voor dat de kernel, in de rechterbovenhoek, is
Python 3.10 - SDK v2. Als dit niet het probleem is, gebruikt u de vervolgkeuzelijst om deze kernel te selecteren.
Als u deze kernel niet ziet, controleert u of uw rekenproces wordt uitgevoerd. Als dat het is, selecteert u de knop Vernieuwen rechtsboven in het notitieblok.
Als u een banner ziet met de melding dat u moet worden geverifieerd, selecteert u Verifiëren.
U kunt het notebook hier uitvoeren of openen in VS Code voor een volledige IDE (Integrated Development Environment) met de kracht van Azure Machine Learning-resources. Selecteer Openen in VS Code en selecteer vervolgens de optie web of bureaublad. Bij het starten op deze manier wordt VS Code gekoppeld aan uw rekenproces, de kernel en het bestandssysteem van de werkruimte.


Belangrijk
De rest van deze zelfstudie bevat cellen van het zelfstudienotitieblok. Kopieer en plak deze in uw nieuwe notitieblok of ga nu naar het notitieblok als u het hebt gekloond.
Een opdrachttaak gebruiken om een model te trainen in Azure Machine Learning
Als u een model wilt trainen, moet u een taak indienen. Azure Machine Learning biedt verschillende soorten taken voor het trainen van modellen. U kunt uw trainingsmethode selecteren op basis van de complexiteit van het model, de gegevensgrootte en de vereisten voor trainingssnelheid. In deze zelfstudie leert u hoe u een opdrachttaak verzendt om een trainingsscript uit te voeren.
Een opdrachttaak is een functie die u gebruikt om een aangepast trainingsscript te verzenden om uw model te trainen. U kunt deze taak ook definiëren als een aangepaste trainingstaak. Een opdrachttaak in Azure Machine Learning is een type taak waarmee een script of opdracht in een opgegeven omgeving wordt uitgevoerd. U kunt opdrachttaken gebruiken om modellen te trainen, gegevens te verwerken of andere aangepaste code uit te voeren die u in de cloud wilt uitvoeren.
Deze zelfstudie is gericht op het gebruik van een opdrachttaak om een aangepaste trainingstaak te maken die u gebruikt om een model te trainen. Voor elke aangepaste trainingstaak zijn de volgende items vereist:
- omgeving
- gegevens
- opdrachttaak
- trainingsscript
Deze zelfstudie bevat deze items voor het voorbeeld: het maken van een classificatie om klanten te voorspellen die een hoge kans hebben op het standaarderen van creditcardbetalingen.
Greep maken voor werkruimte
Voordat u de code gaat bekijken, hebt u een manier nodig om naar uw werkruimte te verwijzen. Maak ml_client als ingang voor de werkruimte. Gebruik vervolgens ml_client om resources en taken te beheren.
Voer in de volgende cel uw abonnements-id, resourcegroepnaam en werkruimtenaam in. Deze waarden zoeken:
- Selecteer in de rechterbovenhoek Azure Machine Learning-studio werkbalk de naam van uw werkruimte.
- Kopieer de waarde voor werkruimte, resourcegroep en abonnements-id naar de code. U moet één waarde kopiëren, het gebied sluiten en plakken en vervolgens terugkomen voor de volgende waarde.
from azure.ai.ml import MLClient
from azure.identity import DefaultAzureCredential, InteractiveBrowserCredential

# authenticate
try:
    credential = DefaultAzureCredential()
    credential.get_token("https://management.azure.com/.default")
except Exception:
    credential = InteractiveBrowserCredential()

SUBSCRIPTION="<SUBSCRIPTION_ID>"
RESOURCE_GROUP="<RESOURCE_GROUP>"
WS_NAME="<AML_WORKSPACE_NAME>"
# Get a handle to the workspace
ml_client = MLClient(
    credential=credential,
    subscription_id=SUBSCRIPTION,
    resource_group_name=RESOURCE_GROUP,
    workspace_name=WS_NAME,
)
Notitie
Het maken van MLClient maakt geen verbinding met de werkruimte. De initialisatie van de client is lui. Er wordt gewacht op de eerste keer dat deze een aanroep moet maken. Dit gebeurt in de volgende codecel.
# Verify that the handle works correctly.
# If you ge an error here, modify your SUBSCRIPTION, RESOURCE_GROUP, and WS_NAME in the previous cell.
ws = ml_client.workspaces.get(WS_NAME)
print(ws.location,":", ws.resource_group)
Een taakomgeving maken
Als u uw Azure Machine Learning-taak wilt uitvoeren op uw rekenresource, hebt u een omgeving nodig. Een omgeving bevat de softwareruntime en bibliotheken die u wilt installeren op de berekening waar de training plaatsvindt. Het is vergelijkbaar met de Python-omgeving op uw lokale computer. Zie Wat zijn Azure Machine Learning-omgevingen? voor meer informatie.
Azure Machine Learning biedt veel gecureerde of kant-en-klare omgevingen die nuttig zijn voor algemene trainings- en deductiescenario's.
In dit voorbeeld maakt u een aangepaste Conda-omgeving voor uw taken met behulp van een Conda Yaml-bestand.
Maak eerst een map waarin het bestand moet worden opgeslagen.
import os

dependencies_dir = "./dependencies"
os.makedirs(dependencies_dir, exist_ok=True)
In de volgende cel wordt IPython magic gebruikt om het conda-bestand naar de map te schrijven die u hebt gemaakt.
%%writefile {dependencies_dir}/conda.yaml
name: model-env
channels:
  - conda-forge
dependencies:
  - python=3.8
  - numpy=1.21.2
  - pip=21.2.4
  - scikit-learn=1.0.2
  - scipy=1.7.1
  - pandas>=1.1,<1.2
  - pip:
    - inference-schema[numpy-support]==1.3.0
    - mlflow==2.8.0
    - mlflow-skinny==2.8.0
    - azureml-mlflow==1.51.0
    - psutil>=5.8,<5.9
    - tqdm>=4.59,<4.60
    - ipykernel~=6.0
    - matplotlib
De specificatie bevat enkele gebruikelijke pakketten die u in uw taak gebruikt, zoals numpy en pip.
Raadpleeg dit yaml-bestand om deze aangepaste omgeving in uw werkruimte te maken en te registreren:
from azure.ai.ml.entities import Environment

custom_env_name = "aml-scikit-learn"

custom_job_env = Environment(
    name=custom_env_name,
    description="Custom environment for Credit Card Defaults job",
    tags={"scikit-learn": "1.0.2"},
    conda_file=os.path.join(dependencies_dir, "conda.yaml"),
    image="mcr.microsoft.com/azureml/openmpi4.1.0-ubuntu20.04:latest",
)
custom_job_env = ml_client.environments.create_or_update(custom_job_env)

print(
    f"Environment with name {custom_job_env.name} is registered to workspace, the environment version is {custom_job_env.version}"
)
Een trainingstaak configureren met behulp van de opdrachtfunctie
U maakt een Azure Machine Learning-opdrachttaak om een model te trainen voor standaardvoorspelling voor tegoed. Met de opdrachttaak wordt een trainingsscript uitgevoerd in een opgegeven omgeving op een opgegeven rekenresource. U hebt de omgeving en het rekencluster al gemaakt. Maak vervolgens het trainingsscript. In dit geval traint u de gegevensset om een classificatie te produceren met behulp van het GradientBoostingClassifier model.
Het trainingsscript verwerkt de gegevensvoorbereiding, training en registratie van het getrainde model. De methode train_test_split splitst de gegevensset op in test- en trainingsgegevens. In deze zelfstudie maakt u een Python-trainingsscript.
U kunt opdrachttaken uitvoeren vanuit cli, Python SDK of studio-interface. In deze zelfstudie gebruikt u de Azure Machine Learning Python SDK v2 om de opdrachttaak te maken en uit te voeren.
Trainingsscript maken
Begin met het maken van het trainingsscript: het main.py python-bestand. Maak eerst een bronmap voor het script:
import os

train_src_dir = "./src"
os.makedirs(train_src_dir, exist_ok=True)
Met dit script worden de gegevens vooraf verwerkt, gesplitst in test- en traingegevens. Vervolgens worden de gegevens gebruikt om een model op basis van een structuur te trainen en het uitvoermodel te retourneren.
MLFlow wordt gebruikt om de parameters en metrische gegevens tijdens deze taak te registreren. Met het MLFlow-pakket kunt u metrische gegevens en resultaten bijhouden voor elk azure-model. Gebruik MLFlow om het beste model voor uw gegevens op te halen. Bekijk vervolgens de metrische gegevens van het model in Azure Studio. Zie MLflow en Azure Machine Learning voor meer informatie.
%%writefile {train_src_dir}/main.py
import os
import argparse
import pandas as pd
import mlflow
import mlflow.sklearn
from sklearn.ensemble import GradientBoostingClassifier
from sklearn.metrics import classification_report
from sklearn.model_selection import train_test_split

def main():
    """Main function of the script."""

    # input and output arguments
    parser = argparse.ArgumentParser()
    parser.add_argument("--data", type=str, help="path to input data")
    parser.add_argument("--test_train_ratio", type=float, required=False, default=0.25)
    parser.add_argument("--n_estimators", required=False, default=100, type=int)
    parser.add_argument("--learning_rate", required=False, default=0.1, type=float)
    parser.add_argument("--registered_model_name", type=str, help="model name")
    args = parser.parse_args()

    # Start Logging
    mlflow.start_run()

    # enable autologging
    mlflow.sklearn.autolog()

    ###################
    #<prepare the data>
    ###################
    print(" ".join(f"{k}={v}" for k, v in vars(args).items()))

    print("input data:", args.data)

    credit_df = pd.read_csv(args.data, header=1, index_col=0)

    mlflow.log_metric("num_samples", credit_df.shape[0])
    mlflow.log_metric("num_features", credit_df.shape[1] - 1)

    #Split train and test datasets
    train_df, test_df = train_test_split(
        credit_df,
        test_size=args.test_train_ratio,
    )
    ####################
    #</prepare the data>
    ####################

    ##################
    #<train the model>
    ##################
    # Extracting the label column
    y_train = train_df.pop("default payment next month")

    # convert the dataframe values to array
    X_train = train_df.values

    # Extracting the label column
    y_test = test_df.pop("default payment next month")

    # convert the dataframe values to array
    X_test = test_df.values

    print(f"Training with data of shape {X_train.shape}")

    clf = GradientBoostingClassifier(
        n_estimators=args.n_estimators, learning_rate=args.learning_rate
    )
    clf.fit(X_train, y_train)

    y_pred = clf.predict(X_test)

    print(classification_report(y_test, y_pred))
    ###################
    #</train the model>
    ###################

    ##########################
    #<save and register model>
    ##########################
    # Registering the model to the workspace
    print("Registering the model via MLFlow")
    mlflow.sklearn.log_model(
        sk_model=clf,
        registered_model_name=args.registered_model_name,
        artifact_path=args.registered_model_name,
    )

    # Saving the model to a file
    mlflow.sklearn.save_model(
        sk_model=clf,
        path=os.path.join(args.registered_model_name, "trained_model"),
    )
    ###########################
    #</save and register model>
    ###########################

    # Stop Logging
    mlflow.end_run()

if __name__ == "__main__":
    main()
Nadat het model is getraind, wordt in dit script het modelbestand opgeslagen en geregistreerd bij de werkruimte. Als u uw model registreert, kunt u uw modellen opslaan en versieren in de Azure-cloud, in uw werkruimte. Nadat u een model hebt geregistreerd, kunt u alle andere geregistreerde modellen op één plaats vinden in Azure Studio, het modelregister genoemd. Het modelregister helpt u bij het organiseren en bijhouden van uw getrainde modellen.
De opdracht configureren
Nu u een script hebt dat de classificatietaak kan uitvoeren, gebruikt u de opdracht algemeen gebruik waarmee opdrachtregelacties kunnen worden uitgevoerd. Deze opdrachtregelactie kan rechtstreeks systeemopdrachten aanroepen of door een script uit te voeren.
Maak invoervariabelen om de invoergegevens, de splitsingsverhouding, de leersnelheid en de geregistreerde modelnaam op te geven. Het opdrachtscript:
- Maakt gebruik van de omgeving die u eerder hebt gemaakt. Gebruik de
@latestnotatie om de nieuwste versie van de omgeving aan te geven wanneer de opdracht wordt uitgevoerd. - Hiermee configureert u de opdrachtregelactie zelf,
python main.pyin dit geval. U hebt toegang tot de invoer en uitvoer in de opdracht met behulp van${{ ... }}notatie. - Omdat er geen rekenresource is opgegeven, wordt het script uitgevoerd op een serverloos rekencluster dat automatisch wordt gemaakt.
from azure.ai.ml import command
from azure.ai.ml import Input

registered_model_name = "credit_defaults_model"

job = command(
    inputs=dict(
        data=Input(
            type="uri_file",
            path="https://azuremlexamples.blob.core.windows.net/datasets/credit_card/default_of_credit_card_clients.csv",
        ),
        test_train_ratio=0.2,
        learning_rate=0.25,
        registered_model_name=registered_model_name,
    ),
    code="./src/",  # location of source code
    command="python main.py --data ${{inputs.data}} --test_train_ratio ${{inputs.test_train_ratio}} --learning_rate ${{inputs.learning_rate}} --registered_model_name ${{inputs.registered_model_name}}",
    environment="aml-scikit-learn@latest",
    display_name="credit_default_prediction",
)
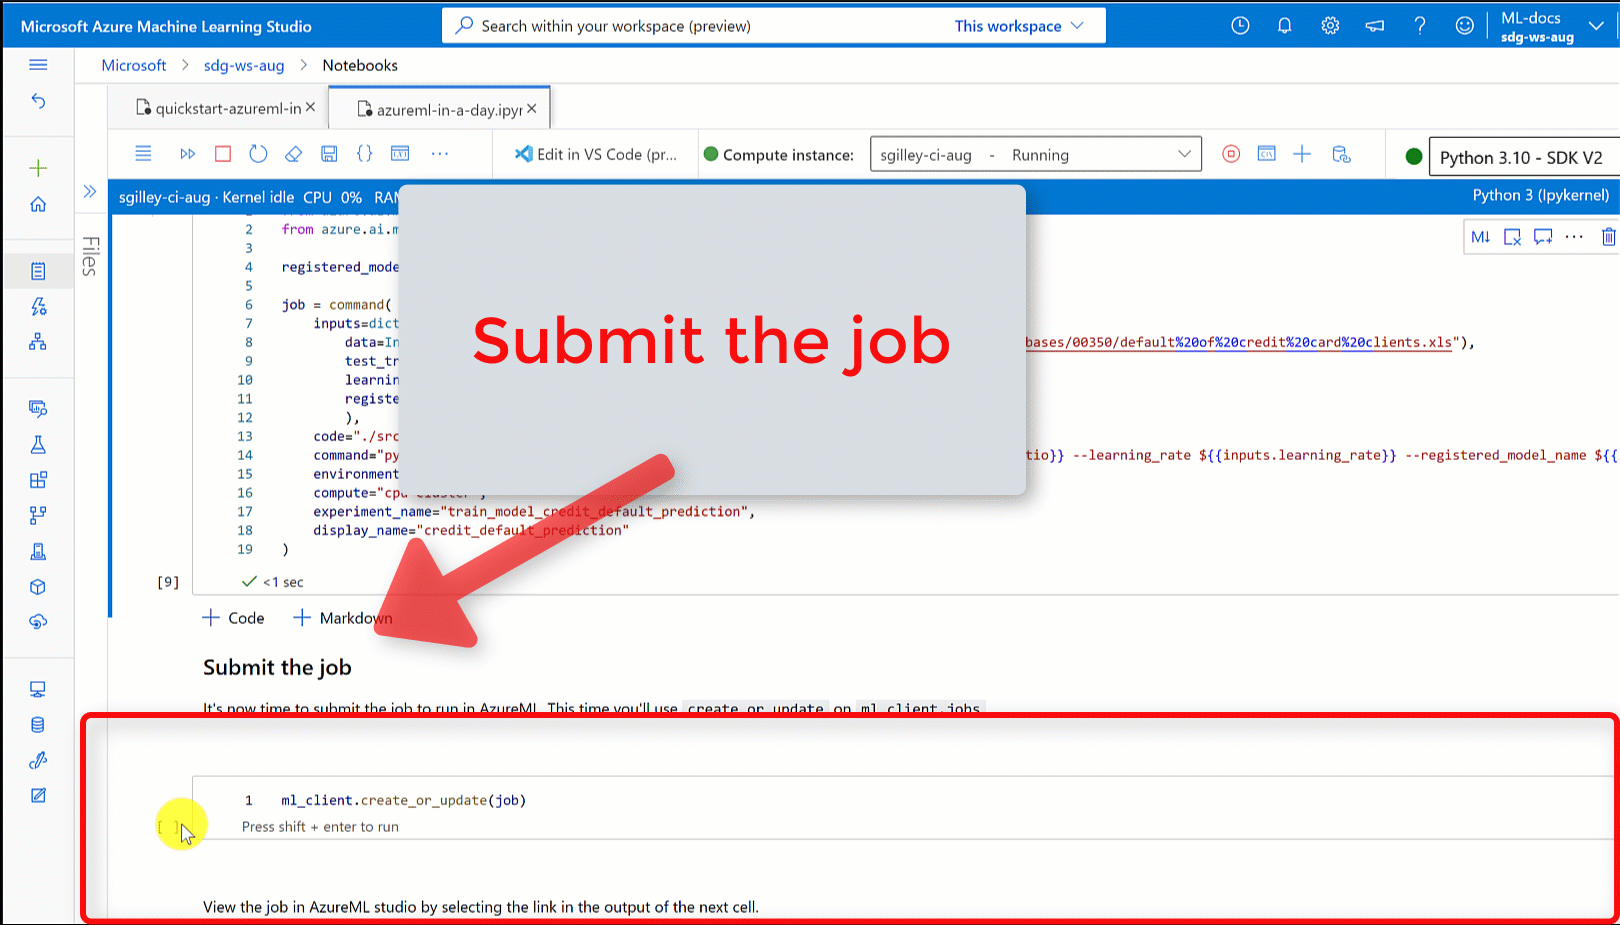
De taak verzenden
Verzend de taak die moet worden uitgevoerd in Azure Machine Learning-studio. Gebruik deze keer create_or_update op ml_client.
ml_client is een clientklasse waarmee u verbinding kunt maken met uw Azure-abonnement met behulp van Python en kunt communiceren met Azure Machine Learning-services.
ml_client hiermee kunt u uw taken verzenden met behulp van Python.
ml_client.create_or_update(job)
Taakuitvoer weergeven en wachten op voltooiing van de taak
Als u de taak in Azure Machine Learning-studio wilt weergeven, selecteert u de koppeling in de uitvoer van de vorige cel. De uitvoer van deze taak ziet er als volgt uit in de Azure Machine Learning-studio. Verken de tabbladen voor verschillende details, zoals metrische gegevens, uitvoer en meer. Nadat de taak is voltooid, wordt er een model in uw werkruimte geregistreerd als gevolg van de training.
Belangrijk
Wacht totdat de status van de taak is voltooid voordat u teruggaat naar dit notitieblok om door te gaan. Het uitvoeren van de taak duurt 2 tot 3 minuten. Het kan langer duren, tot 10 minuten, als het rekencluster omlaag wordt geschaald naar nul knooppunten en de aangepaste omgeving nog steeds wordt gebouwd.
Wanneer u de cel uitvoert, ziet u in de notebookuitvoer een koppeling naar de detailpagina van de taak in Machine Learning Studio. U kunt ook Jobs selecteren in het linkerdeelvenster.
Een taak is een groepering van veel uitvoeringen vanuit een opgegeven script of stukje code. In de run worden gegevens onder die taak opgeslagen. De detailpagina geeft een overzicht van de taak, de tijd die nodig was om de taak uit te voeren, wanneer deze is gemaakt en andere informatie. De pagina bevat ook tabbladen naar andere informatie over de taak, zoals metrische gegevens, Uitvoer en logboeken en code. Dit zijn de tabbladen die beschikbaar zijn op de pagina met details van de taak:
- Overzicht: Basisinformatie over de taak, inclusief de status, begin- en eindtijden en het type taak dat is uitgevoerd
- Invoer: de gegevens en code die u hebt gebruikt als invoer voor de taak. Deze sectie kan gegevenssets, scripts, omgevingsconfiguraties en andere resources bevatten die u tijdens de training hebt gebruikt.
- Uitvoer en logboeken: logboeken die zijn gegenereerd terwijl de taak werd uitgevoerd. Dit tabblad helpt bij het oplossen van problemen als er iets misgaat met het maken van uw trainingsscript of model.
- Metrische gegevens: Belangrijke prestatiegegevens van uw model, zoals trainingsscore, f1-score en precisiescore.
Resources opschonen
Als u van plan bent om door te gaan naar andere handleidingen, sla dan over naar gerelateerde inhoud.
Rekenproces stoppen
Als u de compute-instance niet gaat gebruiken, stop het.
- Selecteer Compute in de studio in het linkerdeelvenster.
- Selecteer Compute-exemplaren op de bovenste tabbladen.
- Selecteer het rekenproces in de lijst.
- Selecteer Stoppen op de bovenste werkbalk.
Alle resources verwijderen
Belangrijk
De resources die u hebt gemaakt, kunnen worden gebruikt als de vereisten voor andere Azure Machine Learning-zelfstudies en artikelen met procedures.
Als u niet van plan bent om een van de resources te gebruiken die u hebt gemaakt, verwijdert u deze zodat er geen kosten in rekening worden gebracht:
Voer in azure Portal in het zoekvak resourcegroepen in en selecteer deze in de resultaten.
Selecteer de resourcegroep die u hebt gemaakt uit de lijst.
Selecteer op de pagina Overzicht de optie Resourcegroep verwijderen.
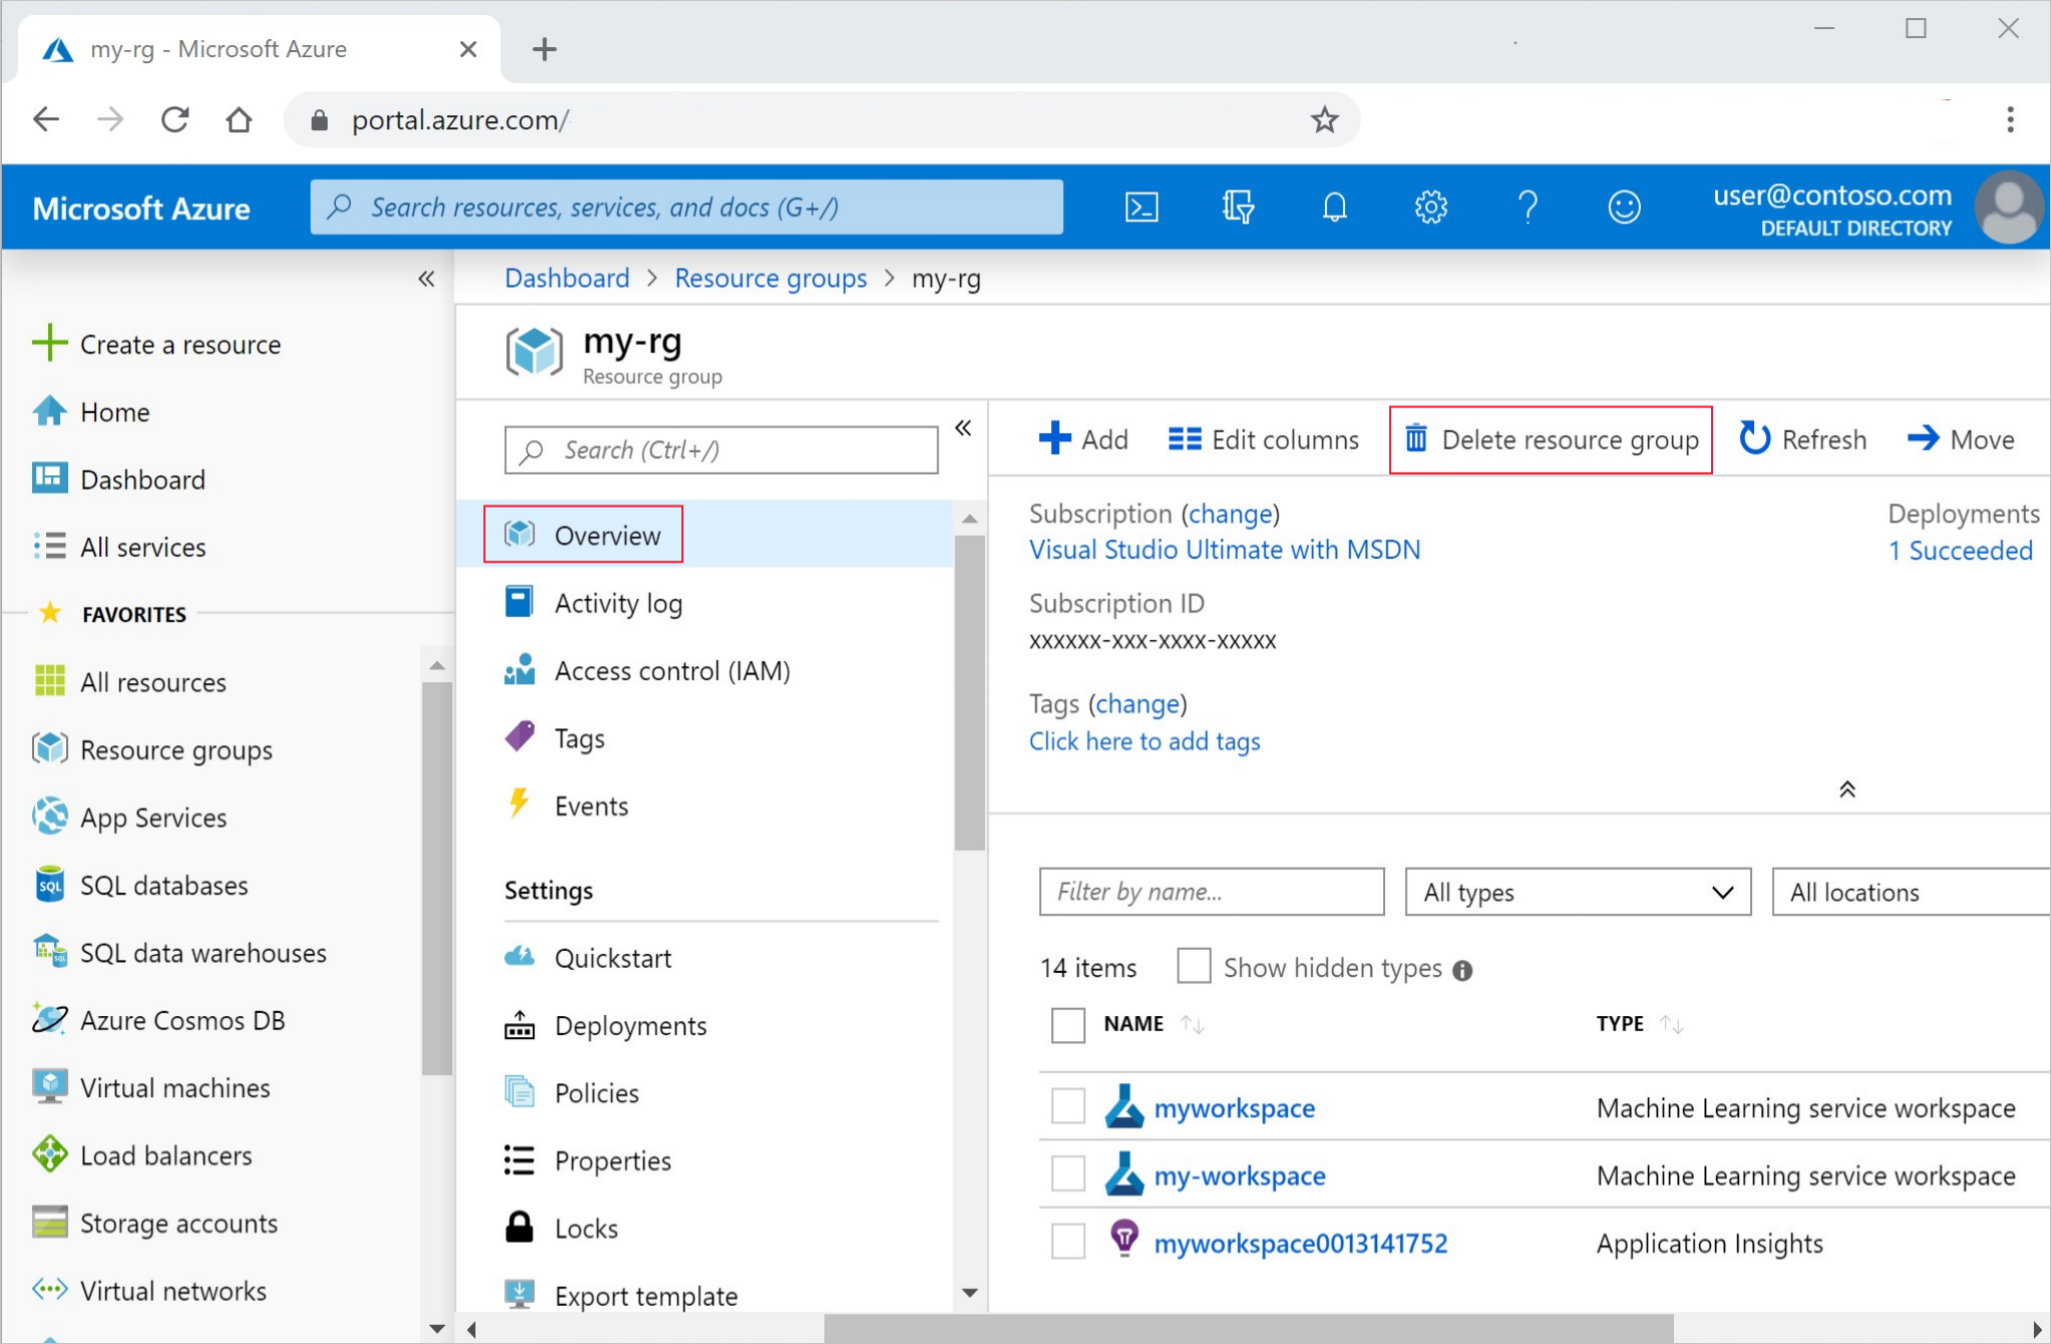
Voer de naam van de resourcegroup in. Selecteer daarna Verwijderen.
Gerelateerde inhoud
Meer informatie over het implementeren van een model:
Een model implementeren.
In deze zelfstudie wordt gebruikgemaakt van een onlinegegevensbestand. Zie zelfstudie: Uw gegevens uploaden, openen en verkennen in Azure Machine Learning voor meer informatie over andere manieren om toegang te krijgen tot gegevens.
Geautomatiseerde ML is een aanvullend hulpprogramma waarmee de hoeveelheid tijd die een data scientist besteedt aan het vinden van een model dat het beste werkt met hun gegevens vermindert. Zie Wat is geautomatiseerde machine learning voor meer informatie.
Als u meer voorbeelden wilt die vergelijkbaar zijn met deze zelfstudie, kijk dan bij Leer van voorbeeldnotebooks. Deze voorbeelden zijn beschikbaar op de gitHub-voorbeeldenpagina. De voorbeelden zijn volledige Python Notebooks waarmee u code kunt uitvoeren en leert hoe u een model traint. U kunt bestaande scripts wijzigen en uitvoeren vanuit de voorbeelden, met scenario's zoals classificatie, verwerking van natuurlijke taal en anomaliedetectie.