Deploy an iOS app using hot restart
Typically when building an app, your code is compiled and combined with other project resources to build an app bundle that's deployed to your simulator or device. With this model, when you make a change to your app, a new app bundle has to be built and deployed. While incremental builds can help to reduce compilation time, deployments usually take the same amount of time regardless of the size of the change.
.NET Multi-platform App UI (.NET MAUI) hot restart enables you to quickly deploy a .NET MAUI app to a 64-bit local iOS device, from Visual Studio 2022, without requiring a Mac build host. It removes the need for a full app bundle rebuild by pushing changes to the existing app bundle that's already present on your locally connected iOS device. It supports changes to code files, resources, and project references, enabling you to quickly test changes to your app during its development.
Important
Hot restart isn't a replacement for the full build experience provided by a Mac build host. For example, it can only deploy apps that use the debug build configuration, and it doesn't support static libraries and frameworks, XCFrameworks, or binding resource packages. For more information, see Limitations.
There are a number of requirements that must be met to use hot restart to deploy a .NET MAUI app to a locally connected iOS device:
- You must be using Visual Studio 2022 version 17.3 or greater.
- You must have iTunes (Microsoft Store or 64-bit version) installed on your development machine.
- You must have an Apple Developer account and paid Apple Developer Program enrollment.
Setup
Perform the following steps to set up hot restart:
In the Visual Studio toolbar, use the Debug Target drop-down to select iOS Local Devices and then the Local Device entry:

In the Visual Studio toolbar, select Local Device:

The Setup Hot Restart setup wizard will appear, which will guide you through setting up a local iOS device for hot restart deployment.
In the Setup Hot Restart setup wizard, select Next:

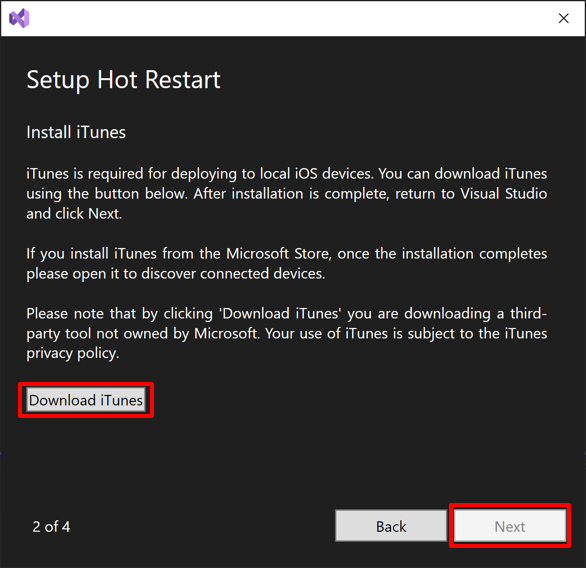
If you don't have iTunes installed, the setup wizard will prompt you to install it. In the Setup Hot Restart setup wizard, select Download iTunes:

Note
iTunes can either be installed from the Microsoft Store, or by downloading it from Apple.
Wait for iTunes to download and then install it. If you install it from the Microsoft Store, once the installation completes please open it, then follow additional prompts to enable it to discover locally connected devices.
In the Setup Hot Restart setup wizard, select Next to move to the next step of the wizard that will prompt you to connect a local iOS device:

Connect your iOS device to your development machine via a USB cable. A prompt may appear on your device asking you to trust your development machine. On your device, click Trust and follow any additional device prompts.
In the Setup Hot Restart setup wizard, select Next once your local iOS device is detected:

Note
If the setup wizard fails to detect your local iOS device, disconnect then reconnect your local iOS device from your development machine. In addition, ensure that iTunes recognizes your local iOS device.
In the Setup Hot Restart setup wizard, click the Sign in with an individual account hyperlink to configure hot restart to use your individual Apple Developer Program account:

The Individual account dialog appears.
Note
Alternatively, to configure hot restart to use an enterprise Apple Developer account, click the Sign in with an enterprise account hyperlink and enter your credentials in the dialog that appears. Then proceed to step 12.
Create an App Store Connect API key. This will require you to have an Apple Developer account and paid Apple Developer Program enrollment. For information about creating an App Store Connect API key, see Creating API Keys for App Store Connect API on developer.apple.com.
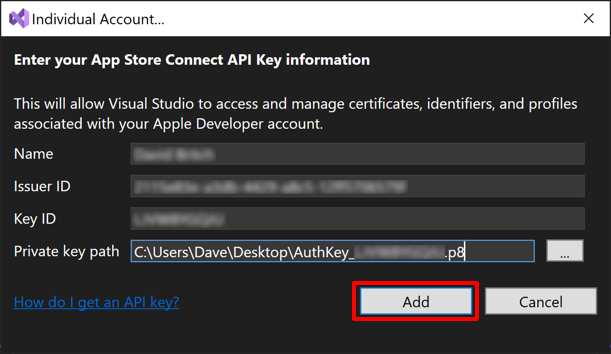
In the Individual account dialog, enter your App Store Connect API key data:

The Name, Issuer ID, and Key ID data can be found in App Store Connect by selecting Users and Access and then the Keys tab. The Private key can also be downloaded from this location:
In the Individual account dialog, click the Add button. The Individual account dialog will close.
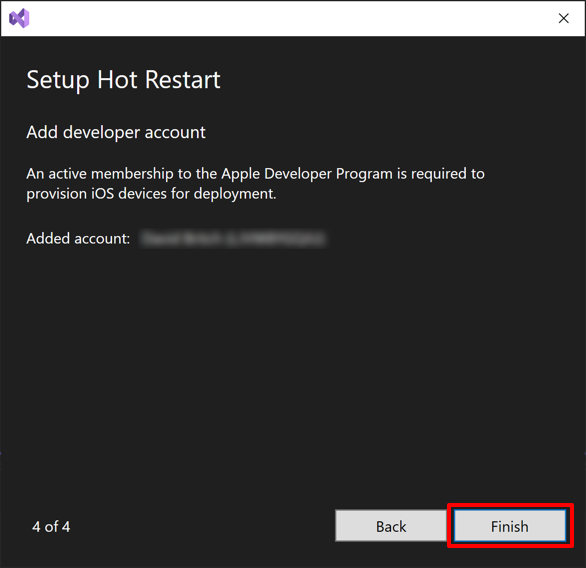
In the Setup Hot Restart setup wizard, click the Finish button:

Your Apple Developer Program account will be added to Visual Studio and the Setup Hot Restart setup wizard will close.
In Solution Explorer, right-click on your project and select Properties.
In the project properties, expand iOS and select Bundle Signing. Use the Scheme drop-down to select Automatic Provisioning and then click the Configure Automatic Provisioning hyperlink:

The Configure Automatic Provisioning dialog will appear.
In the Configure Automatic Provisioning dialog, select the team for your Connect API key:

Visual Studio will complete the automatic provisioning process. Then, click the Ok button to dismiss the Configure Automatic Provisioning dialog.
Note
Using automatic provisioning is recommended so that additional iOS devices can be easily configured for deployment. However, you can use manual provisioning if the correct provisioning profiles are present on your machine.
Deploy and debug using hot restart
After performing the initial setup, your local connected iOS device will appear in the debug target drop-down menu. To deploy and debug your app:
Ensure that your local connected iOS device is unlocked.
In the Visual Studio toolbar, select your local connected iOS device in the debug target drop-down, and click the Run button to build your app and deploy it to your local iOS device:

After deploying your app, Visual Studio will display the Connecting Debugger dialog:

Launch the app on your device and Visual Studio will connect the debugger to your running app, and the Connecting Debugger dialog will be dismissed.
While you're debugging your app, you can edit your C# code and press the restart button in the Visual Studio toolbar to restart your debug session with the new changes applied:

Prevent code from executing
The HOTRESTART preprocessor symbol can be used to prevent code from executing when debugging with hot restart:
#if !HOTRESTART
  // Code here won't be executed when debugging with hot restart
#endif
Enable hot restart
Hot restart is enabled by default in Visual Studio 2022. If it's been previously disabled, it can be enabled by selecting Tools > Options from the Visual Studio menu bar. Next, in the Options dialog box, expand Xamarin and select iOS Settings. Then, ensure that Enable Hot Restart is checked:

Limitations
There are limitations when using hot restart:
- It can only be used to deploy apps that use the debug build configuration. You'll still need a Mac build host to build, sign, and deploy your app for production purposes.
- Storyboard and XIB files aren't supported, and your app may crash if it attempts to load these at runtime.
- Static iOS libraries, and frameworks containing static libraries, aren't supported and you may see runtime errors or crashes if your app attempts to load these.
- XCFrameworks and binding resource packages are supported, as long as they don't contain static iOS libraries or frameworks with static libraries.
- Asset catalogs aren't supported. When using Hot Restart, your app will show a .NET icon and launch screen.
Troubleshoot
iOS uses a watchdog that monitors app launch times and responsiveness, and terminates unresponsive apps. For example, the watchdog terminates apps that block the main thread for a significant time. On old iOS devices, the watchdog may terminate an app that's been deployed using hot restart before the debugger has connected to it. The workaround is to reduce the amount of processing performed in the app's startup path, and to use a more recent iOS device.
To report additional issues, please use the feedback tool at Help > Send Feedback > Report a Problem.

