Manage user profiles in the SharePoint admin center
This article is for SharePoint Administrators and above in Microsoft 365.
If you're running SharePoint Server, see Administer the User Profile service in SharePoint Server.
If you're not an admin, see View and update your profile in Office Delve for info about changing your profile.
Most organizations don't need to change any user profile settings in the SharePoint admin center. For the organizations that do need to work with user profile settings, this article describes the most common tasks.
Create and edit custom user properties
In Microsoft 365, identity is managed by Microsoft Entra ID. For info about this, see Understanding Microsoft 365 identity and Microsoft Entra ID. SharePoint receives this profile information as described in About user profile synchronization. If you need to store additional info about your users, you can create custom properties in the classic SharePoint admin center. For info about doing this, see Add and edit user profile properties in SharePoint.
Note
Instead of creating user sub-types in the SharePoint admin center, we recommend using the Microsoft 365 admin center to Compare groups or using the Microsoft Entra admin center to create groups with dynamic membership.
Add and remove admins for a user's OneDrive
Follow these steps to transfer ownership of a OneDrive to a different user, or give a user full control over another user's OneDrive.
- Go to More features in the SharePoint admin center, and sign in with an account that has admin permissions for your organization.
Note
If you have Office 365 operated by 21Vianet (China), sign in to the Microsoft 365 admin center, then browse to the SharePoint admin center and open the More features page.
Under User profiles, select Open.
Under People, select Manage User Profiles.

Enter the user's name and select Find.
Right-click the user, and then select Manage site collection owners.
Add and remove admins for the OneDrive, and then select OK.

Warning
Do not remove a user as the admin of their own OneDrive. Doing this causes many experiences to break.
For info about automatically transferring ownership of OneDrive to a user's manager when the user account is marked for deletion, see Set up access delegation.
Manage audiences (classic experience)
Audiences let you customize content on pages so that it appears only to particular people based on their:
Membership in a distribution list or security group
Location in the reporting structure or public info in the user profile
For example, you can display a navigational link to only people in a particular geographic location. For info about using audiences and information about using audience targeting in the modern experience, see Target content to specific audiences.
Note
Only sites that use classic templates can be customized based on audience.
Audiences are not a security feature. They help you deliver relevant content to specific groups of people, but don't prevent content from being available to anyone with the appropriate permissions.
To add, edit, or delete an audience or an audience rule, go to the Manage Audiences page:
- Go to More features in the SharePoint admin center, and sign in with an account that has admin permissions for your organization.
Note
If you have Office 365 operated by 21Vianet (China), sign in to the Microsoft 365 admin center, then browse to the SharePoint admin center and open the More features page.
Under User profiles, select Open.
Under People, select Manage Audiences.

Creating a new audience:

Creating a new rule for the audience:

Audiences compile approximately weekly, and you can only view audience members after the audience compiles. The user profiles page shows the number of audiences, the number of uncompiled audiences, and the compilation status and time.
Disable OneDrive creation for some users
If some users are licensed to use OneDrive, but you don't want them to create a OneDrive (perhaps for regulatory reasons), you can prevent them from doing so.
Note
If a user already created a OneDrive, changing the following setting won't delete it.
- Go to More features in the SharePoint admin center, and sign in with an account that has admin permissions for your organization.
Note
If you have Office 365 operated by 21Vianet (China), sign in to the Microsoft 365 admin center, then browse to the SharePoint admin center and open the More features page.
Under User profiles, select Open.
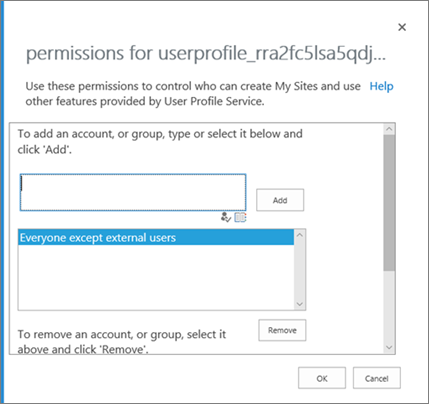
Under People, select Manage User Permissions.

By default, "Everyone except external users" has permission to "Create Personal Site" (which includes creating a OneDrive and saving user data such as followed and frequent sites). Remove that group and add specific groups to allow only a subset of licensed users to create a OneDrive.

Select OK.