Oefening: variabelen en uitvoerlussen gebruiken
Voor uw speelgoedbedrijf moet u virtuele netwerken implementeren in elk land/elke regio waar u de teddybeer start. Uw ontwikkelaars hebben u ook gevraagd om ze de FQDN's (Fully Qualified Domain Names) te geven van elk van de regionale logische Azure SQL-servers die u hebt geïmplementeerd.
In deze oefening voegt u het virtuele netwerk en de configuratie ervan toe aan uw Bicep-code en voert u de FQDN's van de logische server uit.
Tijdens het proces gaat u het volgende doen:
- Werk uw Bicep-code bij om een parameter op te geven voor de subnetten van elk virtueel netwerk.
- Voeg een variabelelus toe om een subnetmatrix te maken, die u gaat gebruiken in de declaratie van de virtuele netwerkresource.
- Voeg een uitvoerlus toe om de lijst met FQDN's van logische servers te maken.
- Implementeer het Bicep-bestand en controleer de implementatie.
Het virtuele netwerk toevoegen aan uw Bicep-bestand
Open het bestand main.bicep .
Voeg onder de parameterdeclaraties de volgende parameters toe:
@description('The IP address range for all virtual networks to use.')
param virtualNetworkAddressPrefix string = '10.10.0.0/16'

@description('The name and IP address range for each subnet in the virtual networks.')
param subnets array = [
  {
    name: 'frontend'
    ipAddressRange: '10.10.5.0/24'
  }
  {
    name: 'backend'
    ipAddressRange: '10.10.10.0/24'
  }
]
Voeg onder de parameters een lege regel toe en voeg vervolgens de
subnetPropertiesvariabelelus toe:var subnetProperties = [for subnet in subnets: { name: subnet.name properties: { addressPrefix: subnet.ipAddressRange } }]Voeg onder aan het bestand, onder de
databasesmodulelus, de volgende resourcelus toe:resource virtualNetworks 'Microsoft.Network/virtualNetworks@2021-08-01' = [for location in locations: { name: 'teddybear-${location}' location: location properties:{ addressSpace:{ addressPrefixes:[ virtualNetworkAddressPrefix ] } subnets: subnetProperties } }]Notitie
In dit voorbeeld wordt dezelfde adresruimte gebruikt voor alle virtuele netwerken. Normaal gesproken zou u, wanneer u meerdere virtuele netwerken maakt, verschillende adresruimten geven in het geval dat u ze met elkaar wilt verbinden.
Sla de wijzigingen in het bestand op.
Uitvoer toevoegen aan de databasemodule
Open het bestand modules/database.bicep .
Voeg onder aan het bestand de volgende uitvoer toe:
output serverName string = sqlServer.name output location string = location output serverFullyQualifiedDomainName string = sqlServer.properties.fullyQualifiedDomainNameSla de wijzigingen in het bestand op.
De uitvoer door het bovenliggende Bicep-bestand doorstromen
Open het bestand main.bicep .
Voeg onder aan het bestand de volgende uitvoerlus toe:
output serverInfo array = [for i in range(0, length(locations)): { name: databases[i].outputs.serverName location: databases[i].outputs.location fullyQualifiedDomainName: databases[i].outputs.serverFullyQualifiedDomainName }]Sla de wijzigingen in het bestand op.
Uw Bicep-bestand controleren
Nadat u alle voorgaande wijzigingen hebt voltooid, moet het bestand main.bicep er als volgt uitzien:
@description('The Azure regions into which the resources should be deployed.')
param locations array = [
'westeurope'
'eastus2'
'eastasia'
]
@secure()
@description('The administrator login username for the SQL server.')
param sqlServerAdministratorLogin string
@secure()
@description('The administrator login password for the SQL server.')
param sqlServerAdministratorLoginPassword string
@description('The IP address range for all virtual networks to use.')
param virtualNetworkAddressPrefix string = '10.10.0.0/16'
@description('The name and IP address range for each subnet in the virtual networks.')
param subnets array = [
{
name: 'frontend'
ipAddressRange: '10.10.5.0/24'
}
{
name: 'backend'
ipAddressRange: '10.10.10.0/24'
}
]
var subnetProperties = [for subnet in subnets: {
  name: subnet.name
  properties: {
    addressPrefix: subnet.ipAddressRange
  }
}]
module databases 'modules/database.bicep' = [for location in locations: {
name: 'database-${location}'
params: {
location: location
sqlServerAdministratorLogin: sqlServerAdministratorLogin
sqlServerAdministratorLoginPassword: sqlServerAdministratorLoginPassword
}
}]
resource virtualNetworks 'Microsoft.Network/virtualNetworks@2021-08-01' = [for location in locations: {
  name: 'teddybear-${location}'
  location: location
  properties:{
    addressSpace:{
      addressPrefixes:[
        virtualNetworkAddressPrefix
      ]
    }
    subnets: subnetProperties
  }
}]
output serverInfo array = [for i in range(0, length(locations)): {
name: databases[i].outputs.serverName
location: databases[i].outputs.location
fullyQualifiedDomainName: databases[i].outputs.serverFullyQualifiedDomainName
}]
Uw database.bicep-bestand moet er als volgt uitzien:
@description('The Azure region into which the resources should be deployed.')
param location string
@secure()
@description('The administrator login username for the SQL server.')
param sqlServerAdministratorLogin string
@secure()
@description('The administrator login password for the SQL server.')
param sqlServerAdministratorLoginPassword string
@description('The name and tier of the SQL database SKU.')
param sqlDatabaseSku object = {
name: 'Standard'
tier: 'Standard'
}
@description('The name of the environment. This must be Development or Production.')
@allowed([
'Development'
'Production'
])
param environmentName string = 'Development'
@description('The name of the audit storage account SKU.')
param auditStorageAccountSkuName string = 'Standard_LRS'
var sqlServerName = 'teddy${location}${uniqueString(resourceGroup().id)}'
var sqlDatabaseName = 'TeddyBear'
var auditingEnabled = environmentName == 'Production'
var auditStorageAccountName = take('bearaudit${location}${uniqueString(resourceGroup().id)}', 24)
resource sqlServer 'Microsoft.Sql/servers@2021-11-01-preview' = {
name: sqlServerName
location: location
properties: {
administratorLogin: sqlServerAdministratorLogin
administratorLoginPassword: sqlServerAdministratorLoginPassword
}
}
resource sqlDatabase 'Microsoft.Sql/servers/databases@2021-11-01-preview' = {
parent: sqlServer
name: sqlDatabaseName
location: location
sku: sqlDatabaseSku
}
resource auditStorageAccount 'Microsoft.Storage/storageAccounts@2021-09-01' = if (auditingEnabled) {
name: auditStorageAccountName
location: location
sku: {
name: auditStorageAccountSkuName
}
kind: 'StorageV2'
}
resource sqlServerAudit 'Microsoft.Sql/servers/auditingSettings@2021-11-01-preview' = if (auditingEnabled) {
parent: sqlServer
name: 'default'
properties: {
state: 'Enabled'
storageEndpoint: environmentName == 'Production' ? auditStorageAccount.properties.primaryEndpoints.blob : ''
storageAccountAccessKey: environmentName == 'Production' ? listKeys(auditStorageAccount.id, auditStorageAccount.apiVersion).keys[0].value : ''
}
}
output serverName string = sqlServer.name
output location string = location
output serverFullyQualifiedDomainName string = sqlServer.properties.fullyQualifiedDomainName
Als dat niet het geval is, kopieert u de voorbeelden of past u uw sjablonen aan zodat deze overeenkomen met de voorbeelden.
De Bicep-sjabloon implementeren in Azure
Implementeer in de Visual Studio Code-terminal de Bicep-sjabloon in Azure door de volgende code uit te voeren. Het kan enkele minuten duren voordat dit proces is voltooid. Vervolgens hebt u een geslaagde implementatie.
az deployment group create --template-file main.bicep
Implementeer in de Visual Studio Code-terminal de Bicep-sjabloon in Azure door de volgende Azure PowerShell-opdracht uit te voeren. Het kan enkele minuten duren voordat dit proces is voltooid. Vervolgens hebt u een geslaagde implementatie.
New-AzResourceGroupDeployment -TemplateFile main.bicep
Let op
Zorg ervoor dat u dezelfde aanmelding en hetzelfde wachtwoord gebruikt als u eerder hebt gebruikt, anders wordt de implementatie niet voltooid.
Wacht tot de implementatie is voltooid.
De implementatie controleren
Nadat de implementatie is voltooid, wilt u controleren of er nieuwe virtuele netwerken zijn geïmplementeerd en of er subnetten zijn geconfigureerd zoals verwacht.
Ga naar Azure Portal en zorg ervoor dat u zich in het sandbox-abonnement bevindt.
Selecteer
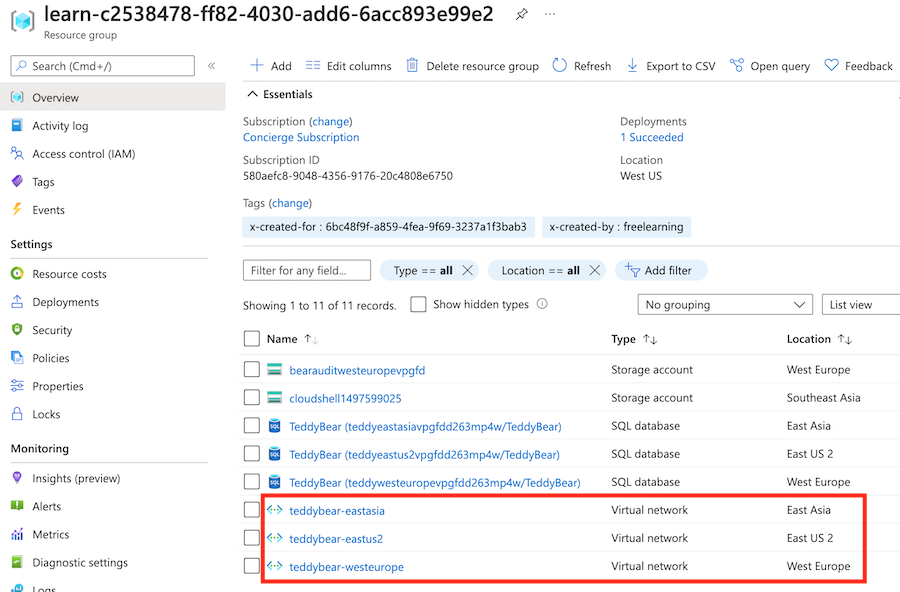
[naam sandboxresourcegroep] .Controleer of de virtuele netwerken zijn geïmplementeerd op de drie Azure-locaties.
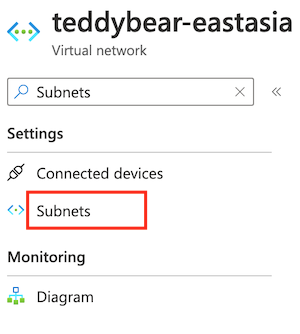
Selecteer het virtuele netwerk met de naam
teddybear-eastasia.Voer subnetten in de zoekbalk in. Selecteer onder Instellingen de optie Subnetten.
Controleer of de geïmplementeerde subnetten de namen en IP-adressen hebben die zijn opgegeven in de standaardwaarde van de
subnetsparameter.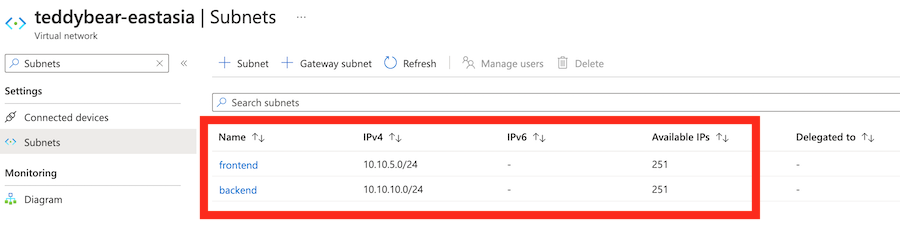
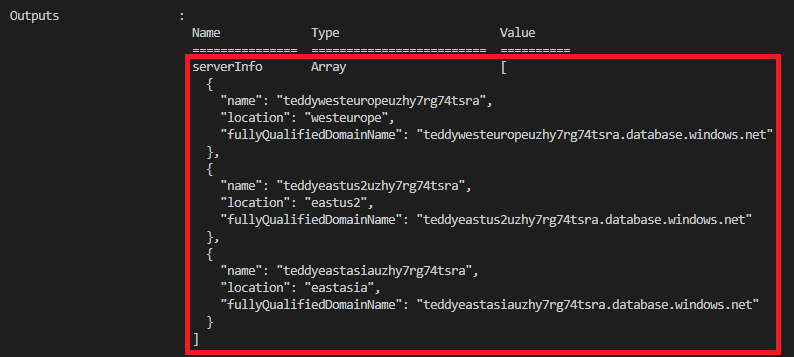
Controleer de uitvoer van de implementatieopdracht. Deze moet de naam en FQDN bevatten van alle drie de logische servers die zijn geïmplementeerd, zoals hier wordt weergegeven:

Ga naar Azure Portal en zorg ervoor dat u zich in het sandbox-abonnement bevindt.
Selecteer
[naam sandboxresourcegroep] .Controleer of de virtuele netwerken zijn geïmplementeerd op de drie Azure-locaties.
Selecteer het virtuele netwerk met de naam
teddybear-eastasia.Voer subnetten in de zoekbalk in. Selecteer onder Instellingen de optie Subnetten.
Controleer of de geïmplementeerde subnetten de namen en IP-adressen hebben die zijn opgegeven in de standaardwaarde van de
subnetsparameter.
Controleer de uitvoer van de implementatieopdracht. Deze moet de naam en FQDN bevatten van alle drie de logische servers die zijn geïmplementeerd, zoals hier wordt weergegeven: