Notitie
Voor toegang tot deze pagina is autorisatie vereist. U kunt proberen u aan te melden of de directory te wijzigen.
Voor toegang tot deze pagina is autorisatie vereist. U kunt proberen de mappen te wijzigen.
Elke Roslyn analyzer-regel of diagnostic heeft een standaard ernstniveau en onderdrukstatus die u naar uw project kunt aanpassen. Dit artikel bevat informatie over het instellen van de ernst van de analyse en het onderdrukken van analyseschendingen.
Ernstniveaus
U kunt de ernst van analyseregels configureren in een EditorConfig-bestand en in het gloeilampmenu.
In de volgende tabel ziet u de verschillende ernstopties die u voor een diagnose kunt configureren:
| Ernst (Solution Explorer) | Ernst (EditorConfig-bestand) | Gedrag van buildtijd | Editor gedrag |
|---|---|---|---|
| Fout | error |
Schendingen worden weergegeven op het tabblad Fout in het venster Foutenlijst en in opdrachtregelbuild-uitvoer, waardoor builds mislukken. | De foute code wordt aangegeven met een rode golvende lijn en gemarkeerd door een klein rood kader in de schuifbalk. |
| Waarschuwing | warning |
Schendingen worden weergegeven op het tabblad Waarschuwing in het venster Foutenlijst en in uitvoer van de opdrachtregelbuild, maar veroorzaken geen fouten in builds. | De offending-code wordt onderstreept met een groene golvende lijn en gemarkeerd door een klein groen vak in de schuifbalk. |
| Suggestie | suggestion |
Schendingen worden weergegeven op het tabblad Bericht in het venster Foutenlijst , maar niet in uitvoer van de build van de opdrachtregel. | De betreffende code wordt onderstreept met een grijze golvende lijn en gemarkeerd door een klein grijs vak in de schuifbalk. |
| Stilzwijgend | silent |
Onzichtbaar voor de gebruiker. | Onzichtbaar voor de gebruiker, maar de diagnose wordt gerapporteerd aan de diagnostische IDE-engine. |
| Geen | none |
Volledig onderdrukt. | Volledig onderdrukt. |
| Verstek | default |
Komt overeen met de standaard ernst van de regel. Als u de standaardwaarde voor een regel wilt bepalen, bekijkt u het venster Eigenschappen. | Komt overeen met de standaard ernst van de regel. |
Regelschendingen weergeven
Als een analyzer schendingen van analyseregels vindt, worden deze in het venster Foutenlijst en in de code-editor gerapporteerd.
In de volgende schermopname ziet u regelschendingen die zijn gerapporteerd in het venster Foutenlijst . De analyseschendingen die in de lijst met fouten zijn gerapporteerd, komen overeen met de instelling van het ernstniveau van de regel:
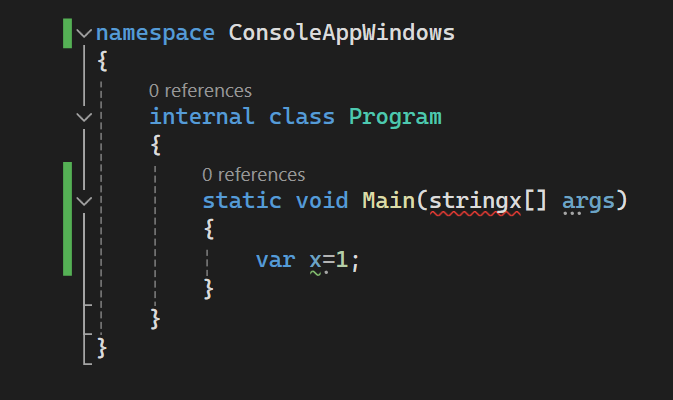
De schendingen van de analyseregel worden ook weergegeven in de code-editor als golvende regels onder de offending-code. In de volgende schermopname ziet u bijvoorbeeld drie schendingen: één fout (rode golvende lijn), één waarschuwing (groene golvende lijn) en één suggestie (drie grijze stippen):
Veel diagnostische gegevens hebben een of meer gekoppelde codecorrecties die u kunt toepassen om de schending van de regel te corrigeren. Codecorrecties worden weergegeven in het pictogrammenu van de gloeilamp, samen met andere typen snelle acties. Zie Algemene snelle acties voor meer informatie over codecorrecties.
Ernstniveaus configureren
U kunt de ernst van de regel instellen met behulp van een van de volgende methoden:
Stille modus vs. Geen ernstgraad
Silent ernstregels die standaard zijn ingeschakeld, verschillen van uitgeschakelde of None ernstregels:
- Als een codeverbetering is geregistreerd voor een
Silenternstigheidsregel, biedt Visual Studio de codeverbeteringsactie als een gloeilamp aan, zelfs als de verborgen diagnose niet zichtbaar is voor de gebruiker. Als de ernstregel is uitgeschakeld alsNone, wordt de codeoplossing niet aangeboden. - Vermeldingen die de ernst van meerdere analyseregels tegelijk in een EditorConfig-bestand instellen , kunnen de ernstregels bulksgewijs configureren
Silent.NoneErnstregels kunnen niet op deze manier worden geconfigureerd. In plaats daarvan moeten ze worden geconfigureerd via vermeldingen die de ernst instellen in een EditorConfig-bestand voor elke regel-id.
De ernst van de regel instellen in een EditorConfig-bestand
EditorConfig-bestanden zijn beschikbaar in Visual Studio 2019 versie 16.3 en hoger.
Het instellen van de ernst van een regel in een EditorConfig-bestand heeft voorrang op elke ernstset in een regelset of in Solution Explorer. U kunt de ernst handmatig configureren in een EditorConfig-bestand of automatisch via de gloeilamp die naast een schending wordt weergegeven.
De ernst van regels handmatig configureren in een EditorConfig-bestand
Voer de volgende stappen uit om de ernst van de regel te configureren:
Voeg een EditorConfig-bestand toe aan uw project als u er nog geen hebt.
Voeg een vermelding toe voor elke regel die u wilt configureren onder de bijbehorende bestandsextensie.
Het invoeritem om het ernstniveau voor CA1822 in te stellen voor C#-bestanden is bijvoorbeeld als volgt:
[*.cs]
dotnet_diagnostic.CA1822.severity = error
U kunt de ernst van de regel instellen voor elke id van de diagnostische regel in een EditorConfig-bestand met de volgende syntaxis:
dotnet_diagnostic.<rule ID>.severity = <severity>Voor IDE code-stijlanalyses kunt u deze ook configureren in een EditorConfig-bestand met behulp van een andere syntaxis.
Bijvoorbeeld:
dotnet_style_qualification_for_field = false:suggestion. Als u echter een ernst instelt met behulp van dedotnet_diagnosticsyntaxis, heeft deze prioriteit. Zie Taalconventies voor EditorConfig voor meer informatie.
De ernst van meerdere analyseregels tegelijk instellen in een EditorConfig-bestand
De mogelijkheid om meerdere analyseregels tegelijk in te stellen in een EditorConfig-bestand is beschikbaar in Visual Studio 2019 versie 16.5 en hoger.
U kunt de ernst instellen voor een specifieke categorie analyseregels of voor alle analyseregels met één vermelding in een EditorConfig-bestand:
Stel de ernst van de regel in voor een categorie analyseregels:
dotnet_analyzer_diagnostic.category-<rule category>.severity = <severity>Stel de ernst van de regel in voor alle analyseregels:
dotnet_analyzer_diagnostic.severity = <severity>
Vermeldingen die meerdere analyseregels tegelijk configureren, zijn alleen van toepassing op regels die standaard zijn ingeschakeld. Analyseregels die standaard zijn gemarkeerd als uitgeschakeld in het analysepakket, moeten worden ingeschakeld via expliciete dotnet_diagnostic.<rule ID>.severity = <severity> vermeldingen.
Als u meerdere vermeldingen hebt die van toepassing zijn op een specifieke regel-id, is de volgorde van prioriteit voor de toepasselijke vermelding als volgt:
- Een ernstvermelding voor een afzonderlijke regel op id heeft voorrang op een ernstvermelding voor een categorie.
- Een ernstvermelding voor een categorie heeft voorrang op een ernstvermelding voor alle analyseregels.
Bekijk het volgende EditorConfig-voorbeeld, waarbij CA1822 een prestatieregel is:
[*.cs]
dotnet_diagnostic.CA1822.severity = error
dotnet_analyzer_diagnostic.category-performance.severity = warning
dotnet_analyzer_diagnostic.severity = suggestion
In dit voorbeeld zijn alle drie de vermeldingen van toepassing op de prestatieregel CA1822. Met behulp van de opgegeven prioriteitsregels heeft de eerste regel-id-gebaseerde ernstvermelding echter voorrang op de volgende vermeldingen. In dit voorbeeld heeft CA1822 een effectieve ernst van error. De resterende prestatieregels hebben een ernst van warning. De analyseregels die geen prestatieregels zijn, hebben een ernst van suggestion.
Stel de ernst van de regel in via het lampjesmenu
Visual Studio biedt een handige manier om de ernst van een regel te configureren vanuit het menu Snelle acties gloeilamp. Volg deze stappen:
Nadat er een schending is opgetreden, beweegt u de muisaanwijzer over de golvende lijn van de schending in de editor en kiest u Mogelijke oplossingen weergeven om het gloeilampmenu te openen. Ofwel plaats de cursor op de regel en druk op Ctrl+. (punt).
Beweeg in het menu met gloeilampen de muisaanwijzer over een ernstniveau voor een voorbeeld van de wijziging en configureer vervolgens de ernst volgens de volgende opties:
Configureer de ernst van <regel ID>. Stel de ernst voor de specifieke regel in.
Ernstinstellingen configureren voor alle <stijlcontrole> . Stel de ernst in voor alle regels in de specifieke regelcategorie.
Het ernstniveau voor alle analyzers configureren. Stel de ernst in voor alle categorieën analyseregels.
Selecteer in het volgende voorbeeld Problemen onderdrukken of configureren>Configureren <regel-ID> ernst.
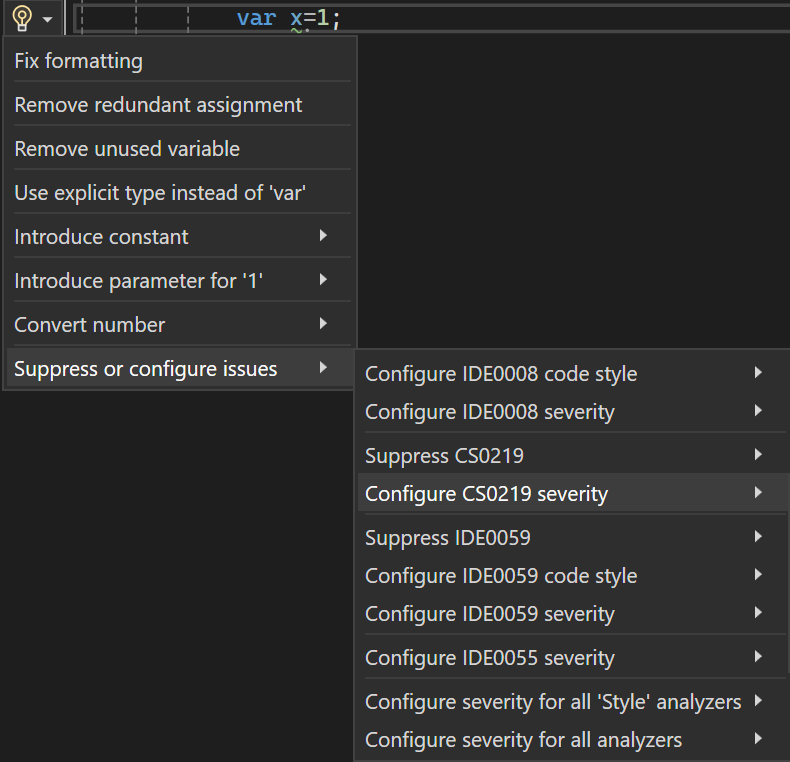
Kies een van de ernstopties.
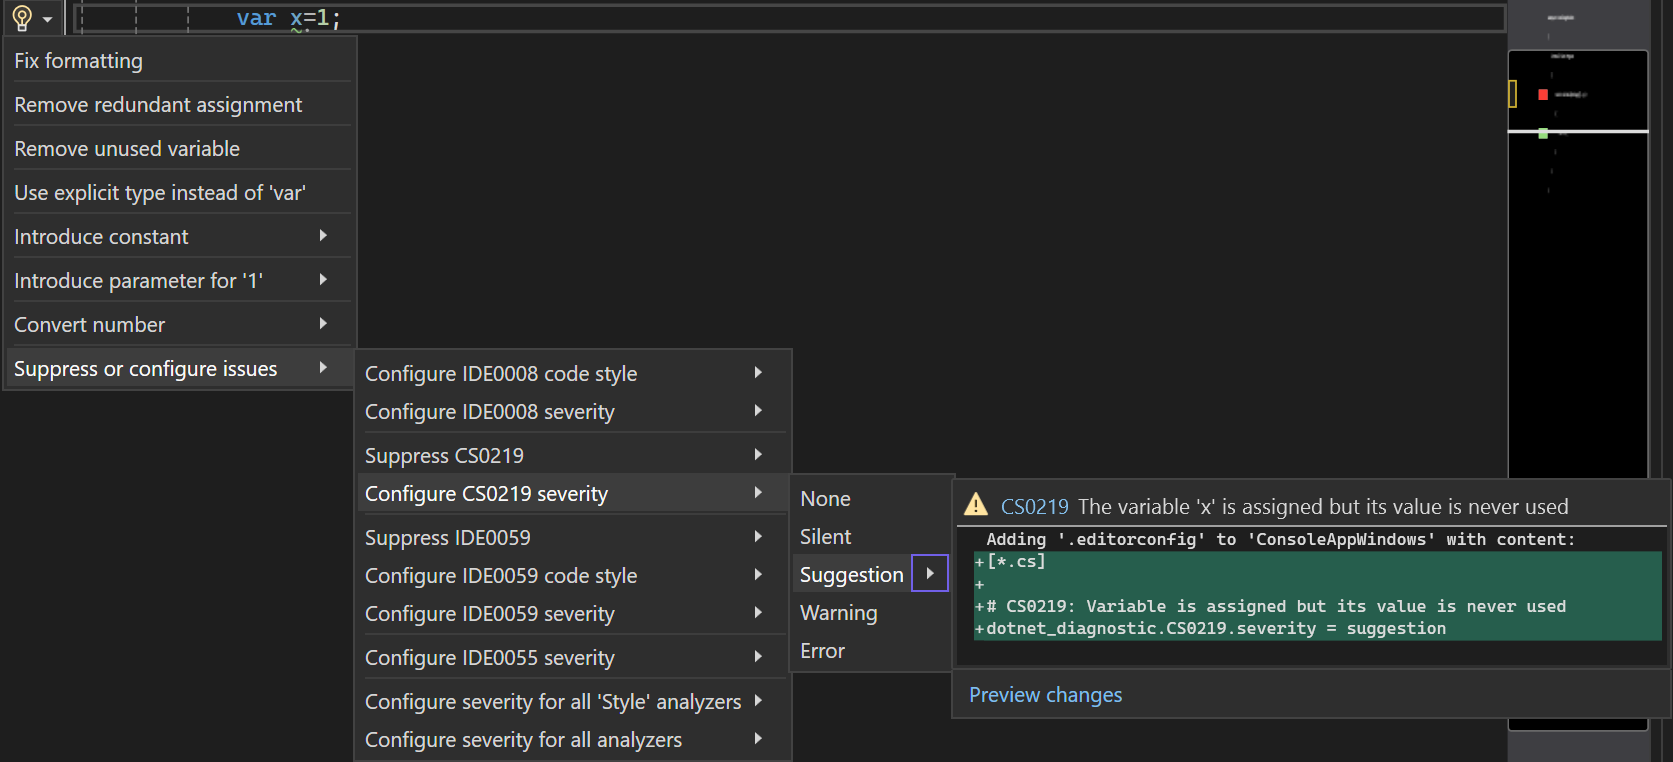
Visual Studio voegt een vermelding toe aan het EditorConfig-bestand om de regel te configureren op het aangevraagde ernstniveau, zoals wordt weergegeven in het voorbeeldvak.
Als u nog geen EditorConfig-bestand in het project hebt, maakt Visual Studio er een voor u.
De ernst van regels instellen vanuit Solution Explorer
Voer de volgende stappen uit om de ernst van de regel in Solution Explorer in te stellen:
Vouw in Solution Explorer Verwijzingen>Analyzers (of Afhankelijkheden>Analyzers voor .NET Core-projecten) uit.
Vouw het assembly uit dat de regel bevat waarvoor u de ernst wilt instellen.
Klik met de rechtermuisknop op de regel en selecteer Ernstniveau instellen. Kies in het contextmenu een van de ernstopties.
Visual Studio voegt een vermelding toe aan het EditorConfig-bestand om de regel te configureren op het aangevraagde niveau. Als uw project gebruikmaakt van een regelsetbestand in plaats van een EditorConfig-bestand, wordt de ernstvermelding toegevoegd aan het regelsetbestand.
Als u nog geen EditorConfig-bestand of een setbestand met regels in het project hebt, maakt Visual Studio een nieuw EditorConfig-bestand voor u.
Analyses en diagnostische gegevens weergeven vanuit Solution Explorer
U kunt veel van de aanpassingen van analysediagnose uitvoeren vanuit Solution Explorer. Als u een analyzer installeert als een NuGet-pakket, wordt een Analyzers-knooppunt weergegeven onder het knooppunt Verwijzingen (of afhankelijkhedenknooppunt voor .NET Core-projecten) in Solution Explorer. Volg deze stappen om de analyses en diagnostische gegevens weer te geven:
Vouw in Solution Explorer uw project uit, vouw verwijzingen of afhankelijkheden uit en vouw vervolgens Analyzers uit. Open een van de analysemodules om de diagnostische gegevens in de module te bekijken.
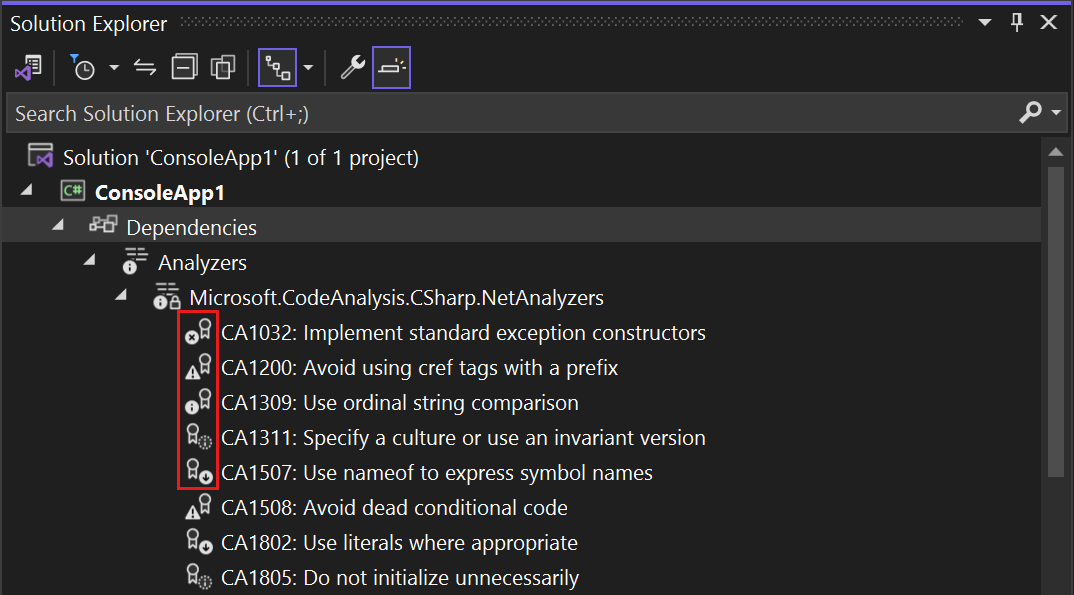
Het pictogram naast elke diagnose geeft het ernstniveau aan:
-
xin een cirkel geeft de ernst van de fout aan -
!in een driehoek geeft de ernst van waarschuwing aan -
iin een volle cirkel duidt op de ernst van Suggestie -
iin een stippelcirkel geeft de ernst van Stil aan - Omlaag wijzende pijl in een ononderbroken cirkel geeft een ernst van Geen aan
-
Als u de eigenschappen van een diagnose wilt weergeven, inclusief de beschrijving en de standaard ernst, klikt u met de rechtermuisknop op de diagnose en selecteert u Eigenschappen. Of selecteer de diagnostische gegevens en druk vervolgens op Alt+Enter.
Het venster Eigenschappen wordt weergegeven.
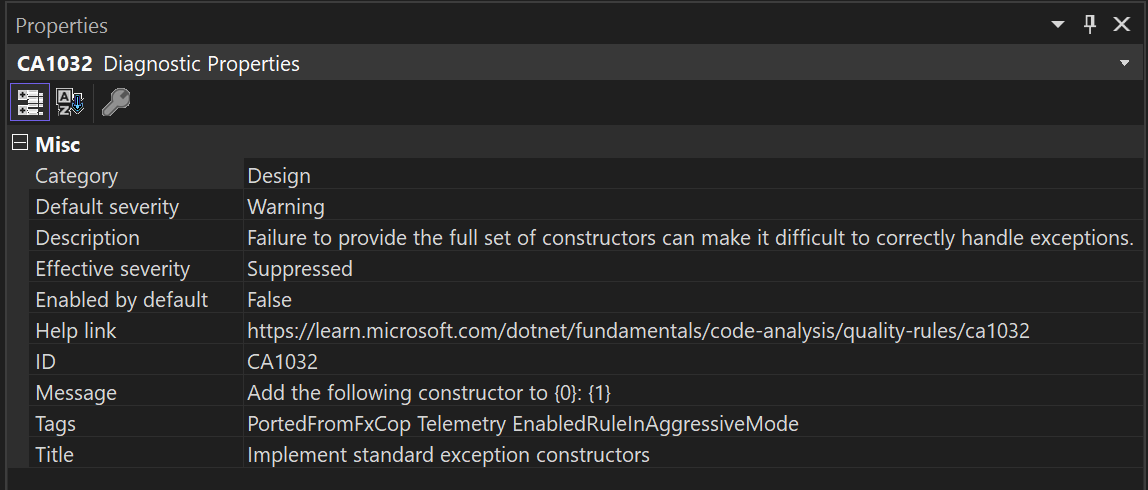
Als u eigenschappen voor codestijlregels (IDE-voorvoegsel) wilt weergeven in het venster Eigenschappen , zoals de standaard ernst, stelt u de eigenschap EnforceCodeStyleInBuild in op
true.Voor onlinedocumentatie voor een diagnose klikt u met de rechtermuisknop op de diagnostische gegevens en selecteert u Help weergeven.
Een bestaand regelsetbestand converteren naar een EditorConfig-bestand
In Visual Studio 2019 versie 16.5 en hoger worden regelsetbestanden afgeschaft ten gunste van EditorConfig-bestanden voor analyseconfiguratie voor beheerde code. EditorConfig-bestanden zijn flexibeler en u kunt zowel de ernst van de analyseregel als de opties voor analyseregels configureren, waaronder opties voor Codestijl in Visual Studio IDE. Omdat de Visual Studio-hulpprogramma's voor de configuratie van de ernst van analyseregels nu zijn geoptimaliseerd voor gebruik met EditorConfig-bestanden in plaats van regelsetbestanden, wordt u aangeraden bestaande projecten te converteren die nog steeds gebruikmaken van regelsetbestanden.
Wanneer u uw bestaande regelsetbestand converteert naar een EditorConfig-bestand, slaat u het op in de hoofdmap van uw opslagplaats of in de oplossingsmap. Dit zorgt ervoor dat de ernst-instellingen van dit bestand automatisch van toepassing zijn op de hele opslagplaats of oplossing.
U kunt een bestaand regelsetbestand converteren naar een EditorConfig-bestand met behulp van de editor voor regelsets of de opdrachtregel.
Opmerking
.NET Core- en .NET 5+-projecten bieden geen ondersteuning voor de menuopdrachten voor regelsets in Solution Explorer, bijvoorbeeld Open Active Rule Set. Als u een niet-standaardregelset wilt opgeven voor een .NET Core- of .NET 5+-project, voegt u de eigenschap CodeAnalysisRuleSet handmatig toe aan het projectbestand. U kunt de regels in de regelset nog steeds configureren in de editor voor regelsets.
Volg deze stappen om de editor voor regelsets te gebruiken. Als uw project al een specifiek regelsbestand gebruikt voor de eigenschapswaarde van CodeAnalysisRuleSet, kunt u het converteren naar een equivalent EditorConfig-bestand vanuit de regelseteditor.
Dubbelklik op het regelsetbestand in Solution Explorer.
Het regelsetbestand wordt geopend in de editor voor regelsets met een klikbare infobalk bovenaan.

Selecteer de infobalkkoppeling om het editorbestand voor regelsets te migreren.
Selecteer in het dialoogvenster Opslaan als de map waarin u het EditorConfig-bestand wilt genereren en selecteer Vervolgens Opslaan.
De gegenereerde EditorConfig wordt geopend in de editor. Daarnaast wordt de eigenschap
CodeAnalysisRuleSetMSBuild bijgewerkt in het projectbestand, zodat deze niet meer verwijst naar het oorspronkelijke setbestand met regels.Het oorspronkelijke setbestand voor regels kan worden verwijderd uit het project.
Opmerking
In een .NET Framework-project kan het standaardbestand voor de regelset niet worden gemigreerd of verwijderd uit het project.
Voer de volgende stappen uit om de opdrachtregel te gebruiken:
Installeer het NuGet-pakket Microsoft.CodeAnalysis.RulesetToEditorconfigConverter.
Voer RulesetToEditorconfigConverter.exe uit vanuit het geïnstalleerde pakket, met paden naar het set-bestand met regels en het EditorConfig-bestand als opdrachtregelargumenten.
Voorbeeld:
Usage: RulesetToEditorconfigConverter.exe <%ruleset_file%> [<%path_to_editorconfig%>]
In het volgende voorbeeld ziet u een set regels om te converteren naar een EditorConfig-bestand:
<?xml version="1.0" encoding="utf-8"?>
<RuleSet Name="Rules for ConsoleApp" Description="Code analysis rules for ConsoleApp.csproj." ToolsVersion="16.0">
  <Rules AnalyzerId="Microsoft.Analyzers.ManagedCodeAnalysis" RuleNamespace="Microsoft.Rules.Managed">
    <Rule Id="CA1001" Action="Warning" />
    <Rule Id="CA1821" Action="Warning" />
    <Rule Id="CA2213" Action="Warning" />
    <Rule Id="CA2231" Action="Warning" />
  </Rules>
</RuleSet>
In het volgende voorbeeld ziet u het resulterende EditorConfig-bestand na de conversie:
# NOTE: Requires **VS2019 16.3** or later

# Rules for ConsoleApp
# Description: Code analysis rules for ConsoleApp.csproj.

# Code files
[*.{cs,vb}]

dotnet_diagnostic.CA1001.severity = warning
dotnet_diagnostic.CA1821.severity = warning
dotnet_diagnostic.CA2213.severity = warning
dotnet_diagnostic.CA2231.severity = warning
Gegenereerde code configureren
Analyzers worden uitgevoerd op bronbestanden in een project en rapporteren eventuele schendingen die ze vinden. Deze schendingen zijn echter niet nuttig voor door het systeem gegenereerde bestanden. Voorbeelden zijn codebestanden, zoals door ontwerper gegenereerde codebestanden, tijdelijke bronbestanden die door het buildsysteem worden gegenereerd, enzovoort. Voor deze typen bestanden kunnen gebruikers de bestanden niet handmatig bewerken en zijn ze niet bezorgd over het oplossen van schendingen.
Daarom onderzoekt het analysestuurprogramma standaard alleen bestanden met bepaalde namen, bestandsextensies of automatisch gegenereerde bestandsheaders als gegenereerde codebestanden. Een bestandsnaam die eindigt op .designer.cs of .generated.cs wordt bijvoorbeeld beschouwd als gegenereerde code. Deze heuristieken kunnen echter mogelijk niet alle aangepaste gegenereerde codebestanden in de broncode van de gebruiker identificeren.
In Visual Studio 2019 versie 16.5 en hoger kunnen eindgebruikers specifieke bestanden en mappen configureren die moeten worden behandeld als gegenereerde code in een EditorConfig-bestand.
Voer de volgende stappen uit om een dergelijke configuratie toe te voegen:
Als u nog geen EditorConfig-bestand voor uw project hebt, voegt u er een toe.
Voeg de
generated_code = true | falsevermelding toe voor specifieke bestanden en mappen. Als u bijvoorbeeld alle bestanden wilt behandelen waarvan de naam eindigt op.MyGenerated.csals gegenereerde code, gebruikt u deze vermelding:[*.MyGenerated.cs] generated_code = true
Schendingen onderdrukken
U kunt regelschendingen onderdrukken met behulp van verschillende methoden. Voor meer informatie, zie Schendingen van codeanalyse onderdrukken.
Gebruik van de opdrachtregel
Als u uw project op de commandoregel compileert, worden schendingen van regels weergegeven in de build-uitvoer als aan de volgende voorwaarden wordt voldaan.
De analyzers worden geïnstalleerd met de .NET SDK of als een NuGet-pakket, en niet als een .vsix-extensie .
Voor analysen die zijn geïnstalleerd met behulp van de .NET SDK, moet u de analyse mogelijk inschakelen. Voor codestijlen kunt u ook codestijlen afdwingen voor builds door een MSBuild-eigenschap in te stellen.
Een of meer regels worden geschonden in de code van het project.
Het ernstniveau van een geschonden regel is ingesteld op een waarschuwing. In dat geval mislukken schendingen van de build niet, of fout, in welk geval schendingen ertoe leiden dat de build mislukt.
De uitgebreidheid van de build-uitvoer heeft geen invloed op het feit of regelschendingen worden weergegeven. Zelfs met stille uitgebreidheid worden regelschendingen weergegeven in de build-uitvoer.
Als u gewend bent om legacy-analyse uit te voeren vanaf de opdrachtregel, met FxCopCmd.exe of via msbuild met de RunCodeAnalysis flag, kunt u dit voortaan met codeanalysers doen.
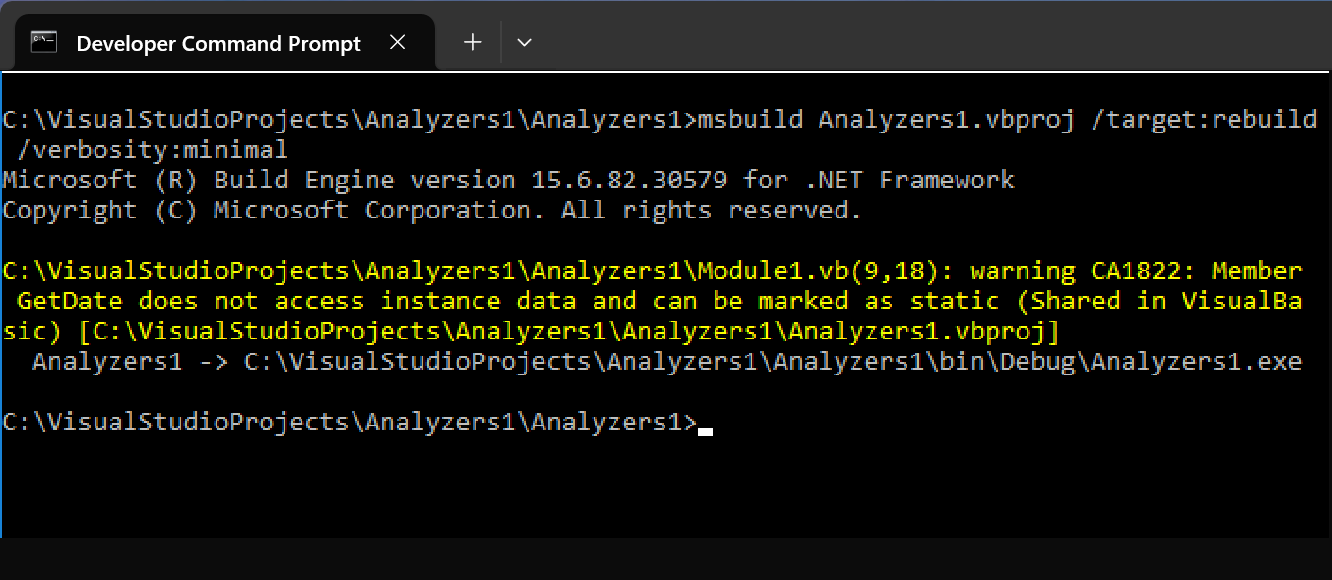
Als u analyseschendingen in de commandoregel wilt zien wanneer u uw project bouwt met msbuild, voert u een soortgelijke opdracht uit:
msbuild myproject.csproj /target:rebuild /verbosity:minimal
In de volgende schermopname ziet u de commandoregeluitvoer van een project met een overtreding van de analyseringsregel:
Afhankelijke projecten
Als u in een .NET Core-project een verwijzing toevoegt naar een project met NuGet Analyzers, worden deze analyses automatisch toegevoegd aan het afhankelijke project. Als u dit gedrag wilt uitschakelen (bijvoorbeeld als het afhankelijke project een eenheidstestproject is), markeert u het NuGet-pakket als privé door het kenmerk in te PrivateAssets stellen in het bestand .csproj of .vbproj van het project waarnaar wordt verwezen:
<PackageReference Include="Microsoft.CodeAnalysis.NetAnalyzers" Version="5.0.0" PrivateAssets="all" />
