Notatka
Dostęp do tej strony wymaga autoryzacji. Może spróbować zalogować się lub zmienić katalogi.
Dostęp do tej strony wymaga autoryzacji. Możesz spróbować zmienić katalogi.
Jeśli wykonano poprzednie samouczki, masz działający klaster Kubernetes i aplikację Azure Store Front.
W tym samouczku zwiększ liczbę zasobników w aplikacji, wypróbuj automatyczne skalowanie zasobników i dostosuj liczbę węzłów maszyn wirtualnych na platformie Azure, aby zmienić pojemność klastra na potrzeby hostowania obciążeń. Uczysz się, jak:
- Skalowanie węzłów platformy Kubernetes.
- Ręcznie skaluj zasobniki Kubernetes uruchamiające aplikację.
- Skonfiguruj zasobniki skalowania automatycznego, które uruchamiają fronton aplikacji.
Zanim rozpoczniesz
W poprzednich samouczkach spakujesz aplikację do obrazu kontenera, przekazano obraz do usługi Azure Container Registry, utworzono klaster usługi AKS, wdrożono aplikację i użyto usługi Azure Service Bus do ponownego wdrożenia zaktualizowanej aplikacji. Jeśli te kroki nie zostały wykonane i chcesz wykonać te czynności, zacznij od samouczka 1 — Przygotowywanie aplikacji dla usługi AKS.
Ten samouczek zmienia liczbę podów i węzłów oraz może zwiększyć koszty mocy obliczeniowej. Użyj tożsamości z uprawnieniami do skalowania obciążeń usługi AKS i pul węzłów, takich jak Współautor lub Właściciel dla grupy zasobów.
Ten samouczek wymaga interfejsu wiersza polecenia platformy Azure w wersji 2.34.1 lub nowszej. Uruchom az --version, aby znaleźć wersję. Jeśli konieczna będzie instalacja lub uaktualnienie, zobacz Instalowanie interfejsu wiersza polecenia platformy Azure.
Ręczne skalowanie podów
AKS Desktop
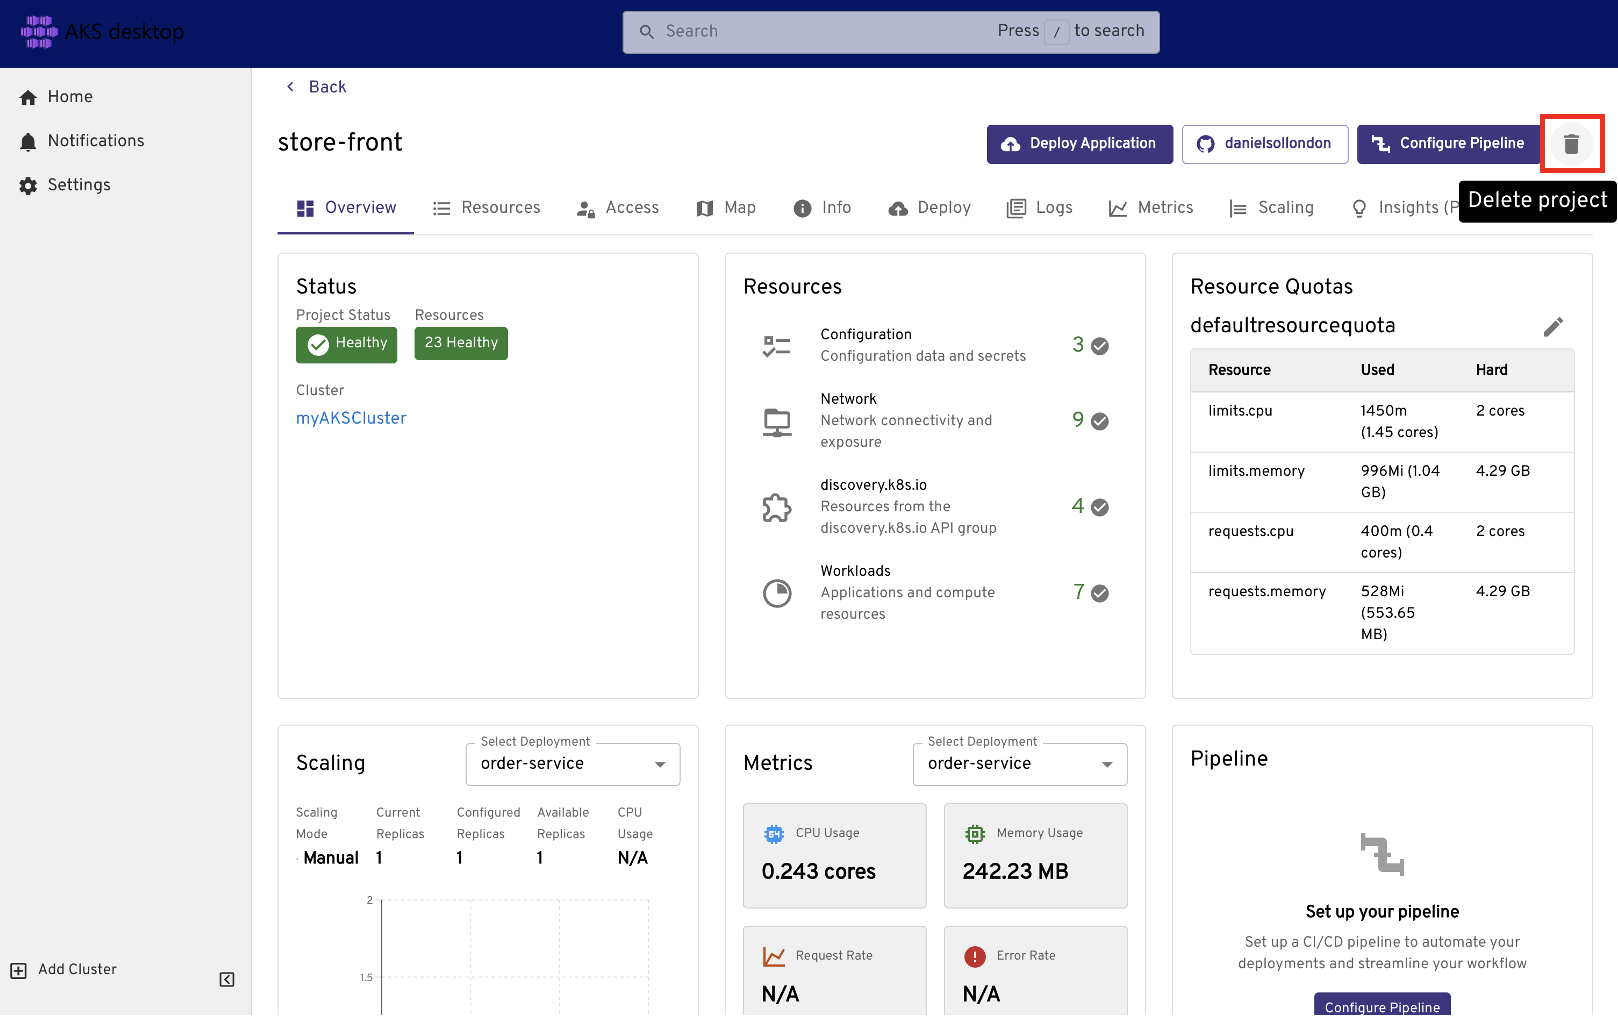
Edytuj konfigurację skalowania dla usługi order-service, wybierając Skalowanie>Wybierz wdrożenie: order-service>Edytuj konfigurację>Liczba replik: 5.
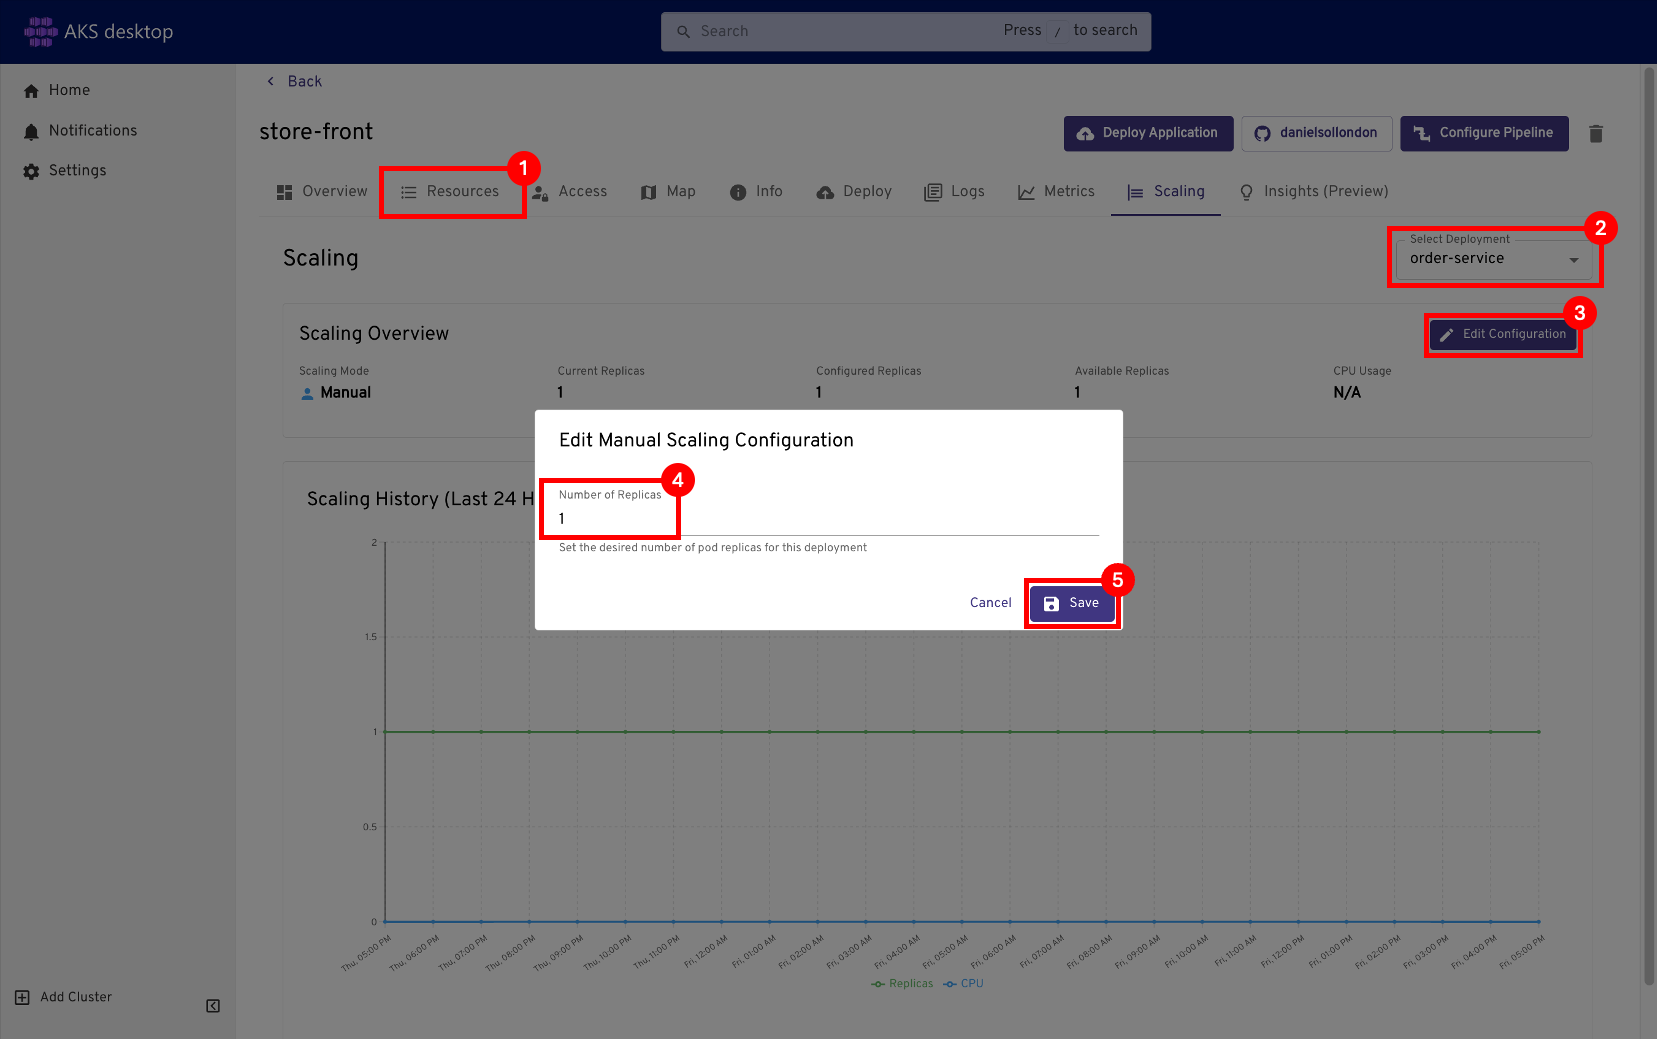
Przed kontynuowaniem sprawdź, czy aktualizacja wdrożenia została ukończona.
Wyświetl pody w klastrze przy użyciu polecenia
kubectl get.kubectl get podsW poniższym przykładowym wyniku przedstawiono zasobniki z uruchomioną aplikacją Azure Store Front.
NAME                               READY     STATUS     RESTARTS   AGE
order-service-848767080-tf34m      1/1       Running    0          31m
product-service-4019737227-2q2qz   1/1       Running    0          31m
store-front-2606967446-2q2qz       1/1       Running    0          31m
Ręcznie zmień liczbę podów we wdrożeniu store-front przy użyciu polecenia
kubectl scale.kubectl scale --replicas=5 deployment.apps/store-frontSprawdź, czy dodatkowe zasobniki zostały utworzone przy użyciu polecenia
kubectl get pods.kubectl get pods --selector app=store-frontPoniższe dane wyjściowe przykładu pokazują dodatkowe pody uruchamiające aplikację Azure Store Front.
NAME                              READY     STATUS    RESTARTS   AGE
store-front-3309479140-2hfh0      1/1       Running   0          3m
store-front-3309479140-bzt05      1/1       Running   0          3m
store-front-3309479140-fvcvm      1/1       Running   0          3m
store-front-3309479140-hrbf2      1/1       Running   0          15m
store-front-3309479140-qphz8      1/1       Running   0          3m
Automatyczne skalowanie podów
AKS Desktop
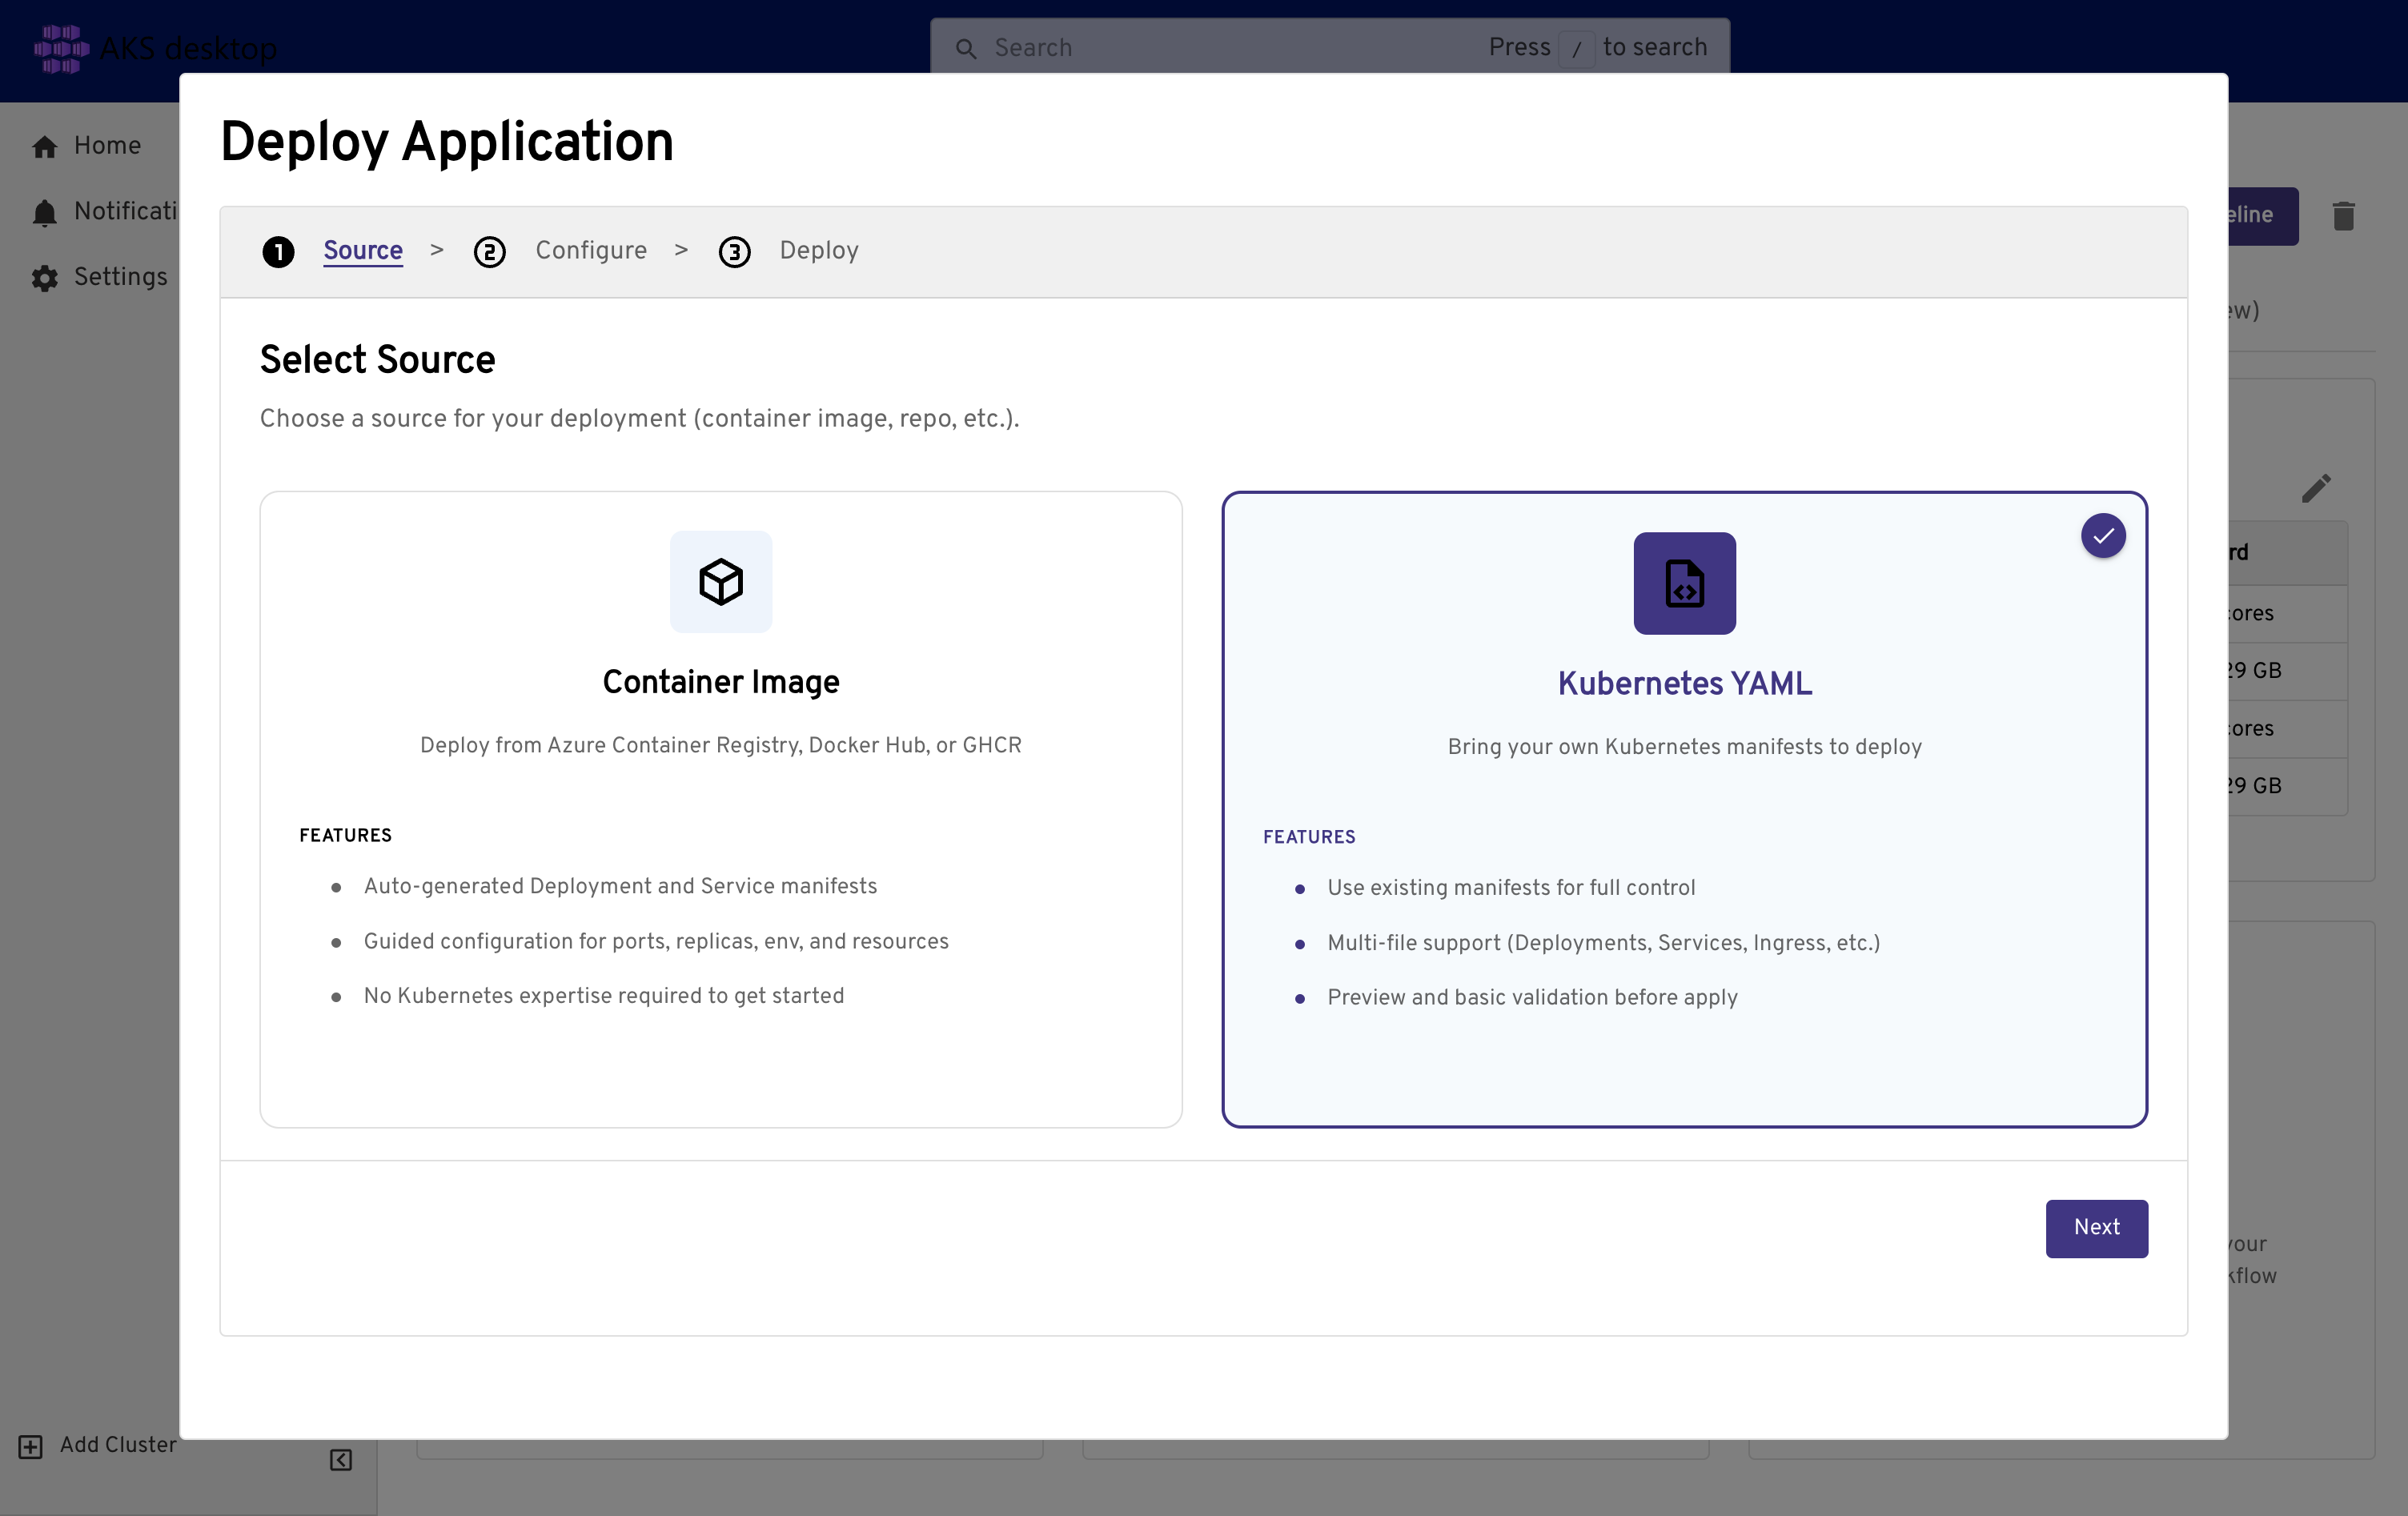
W Project wybierz przycisk >Kubernetes YAML.
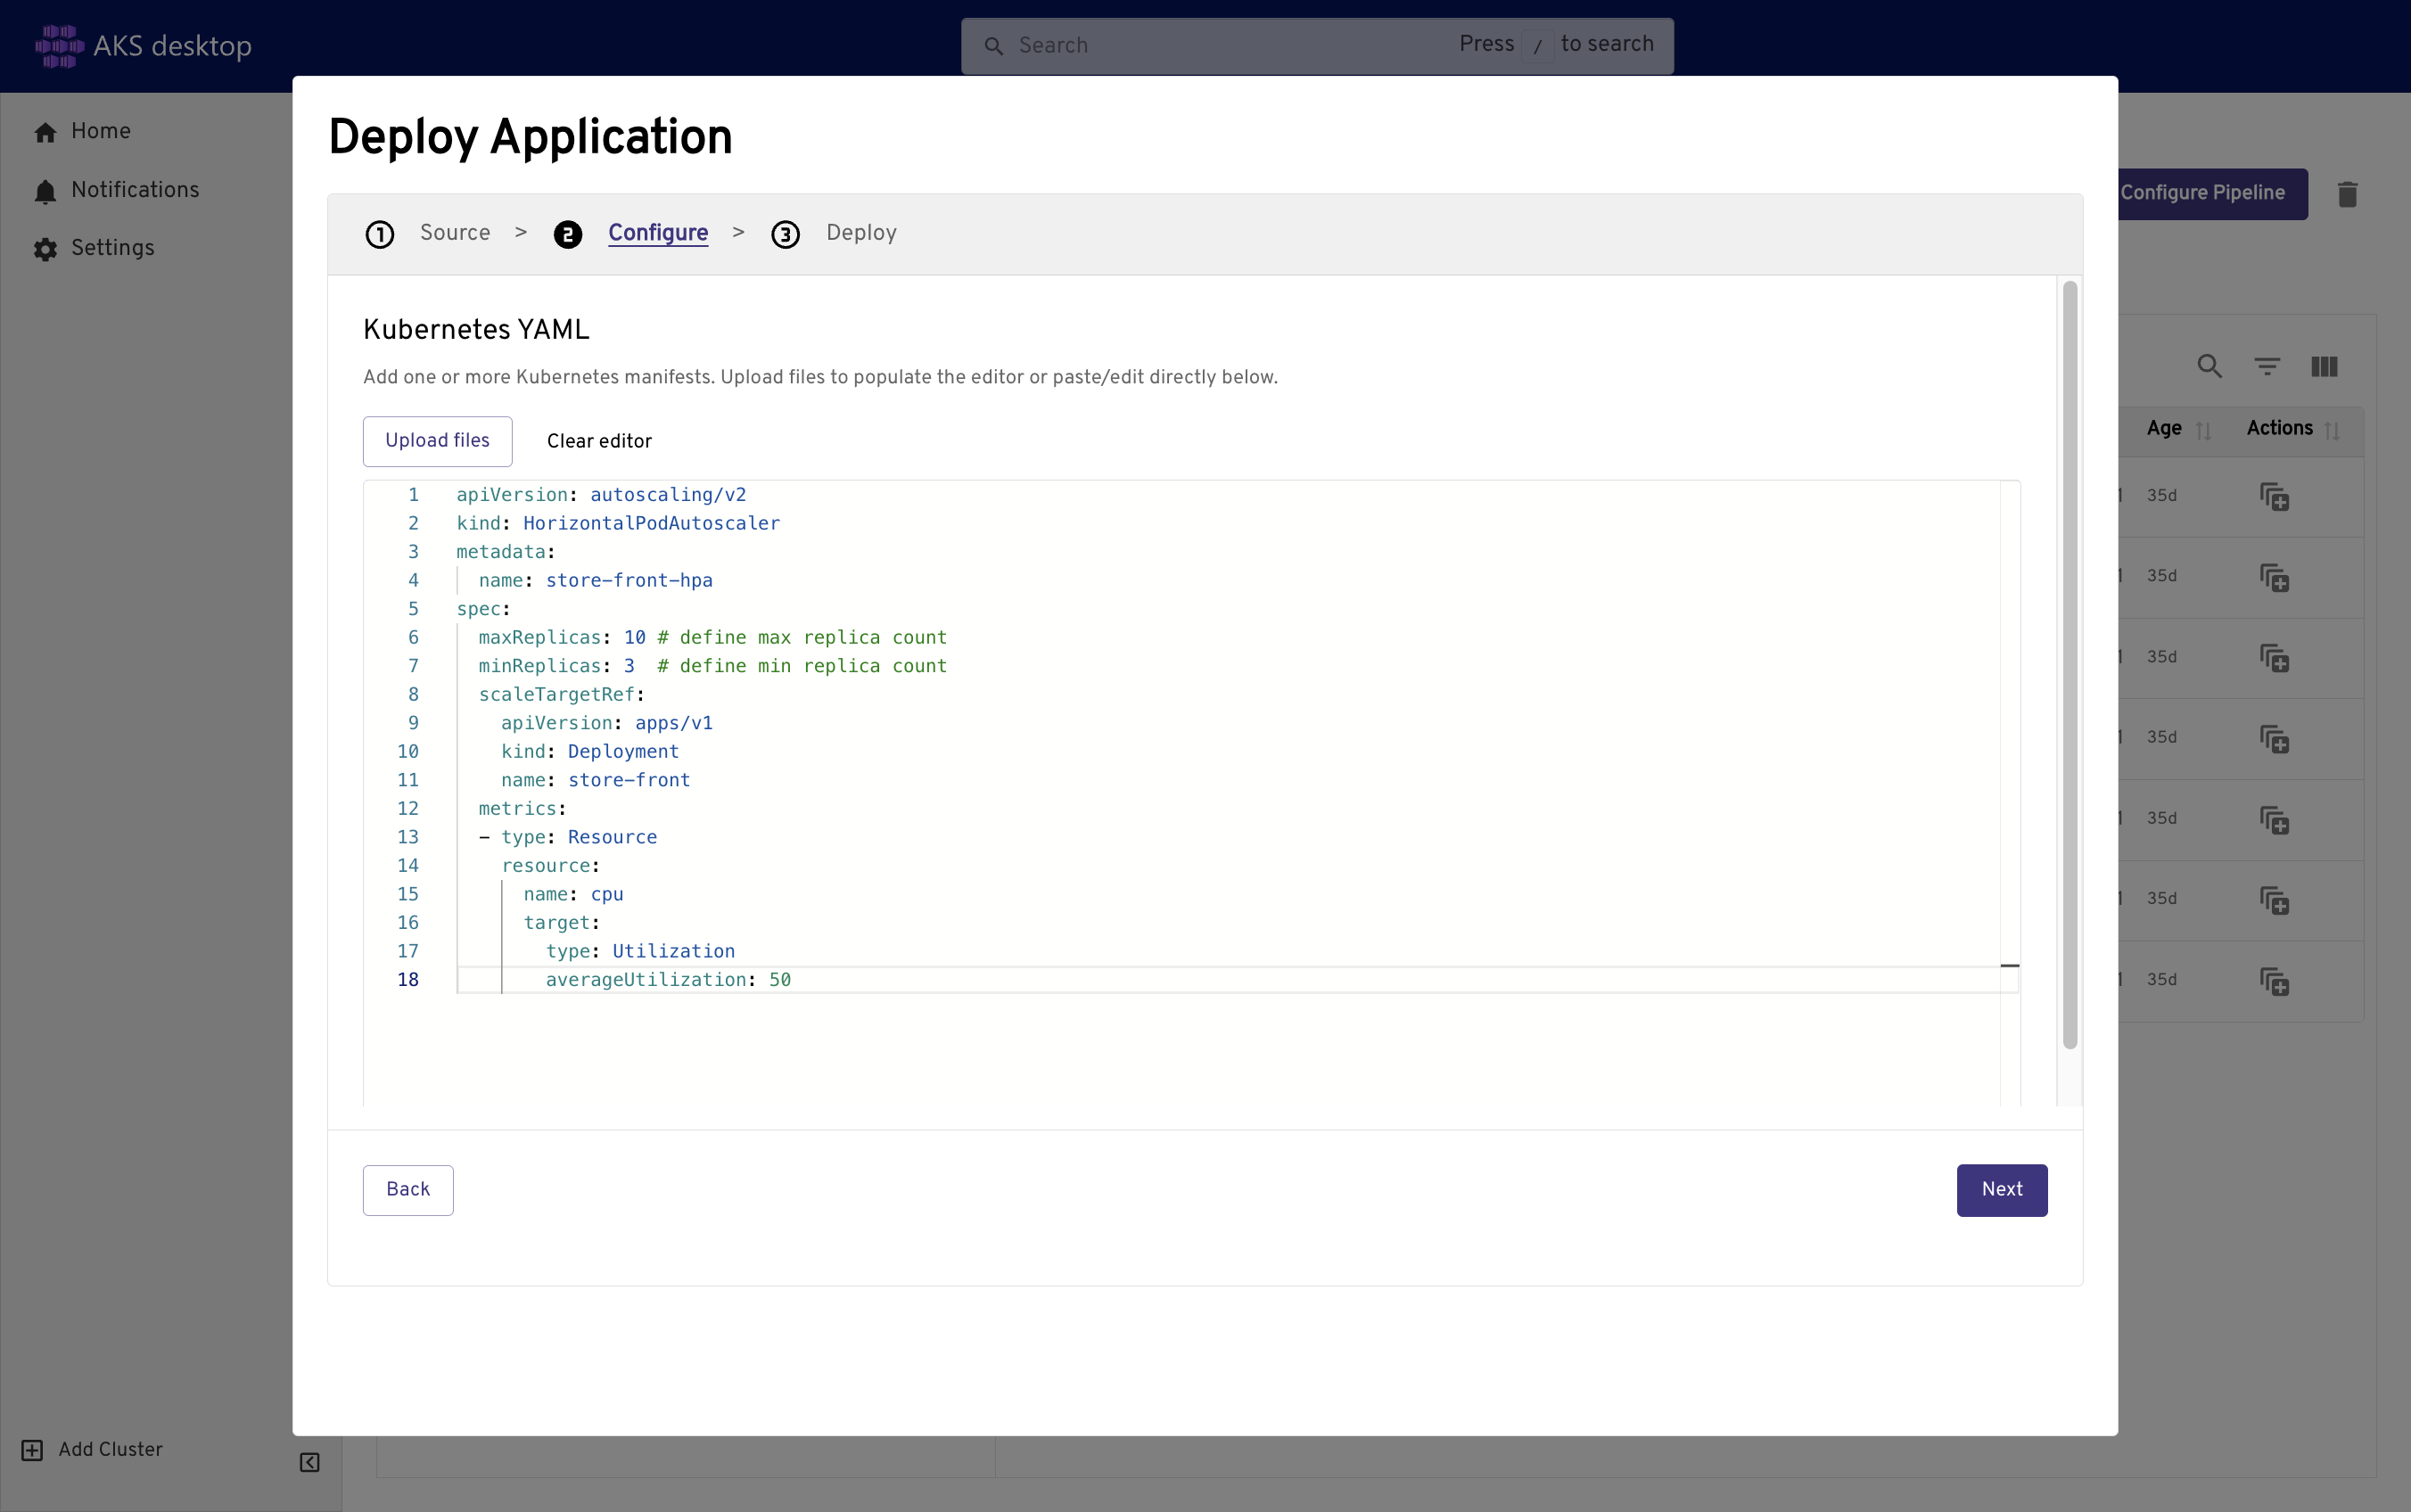
Skopiuj i wklej ten manifest autoskalatora YAML i limity zasobów.
apiVersion: autoscaling/v2
kind: HorizontalPodAutoscaler
metadata:
  name: store-front-hpa
spec:
  maxReplicas: 10 # define max replica count
  minReplicas: 3  # define min replica count
  scaleTargetRef:
    apiVersion: apps/v1
    kind: Deployment
    name: store-front
  metrics:
  - type: Resource
    resource:
      name: cpu
      target:
        type: Utilization
        averageUtilization: 50
Wybierz pozycję Dalej>Wdróż>zamknij.
Wybierz pozycję Skalowanie>wybierz pozycję Wdrożenie: store-front. Możesz zobaczyć, że tryb skalowania jest teraz ustawiony na HPA, limity liczby replik oraz użycie CPU / wartość docelową określone w konfiguracji.
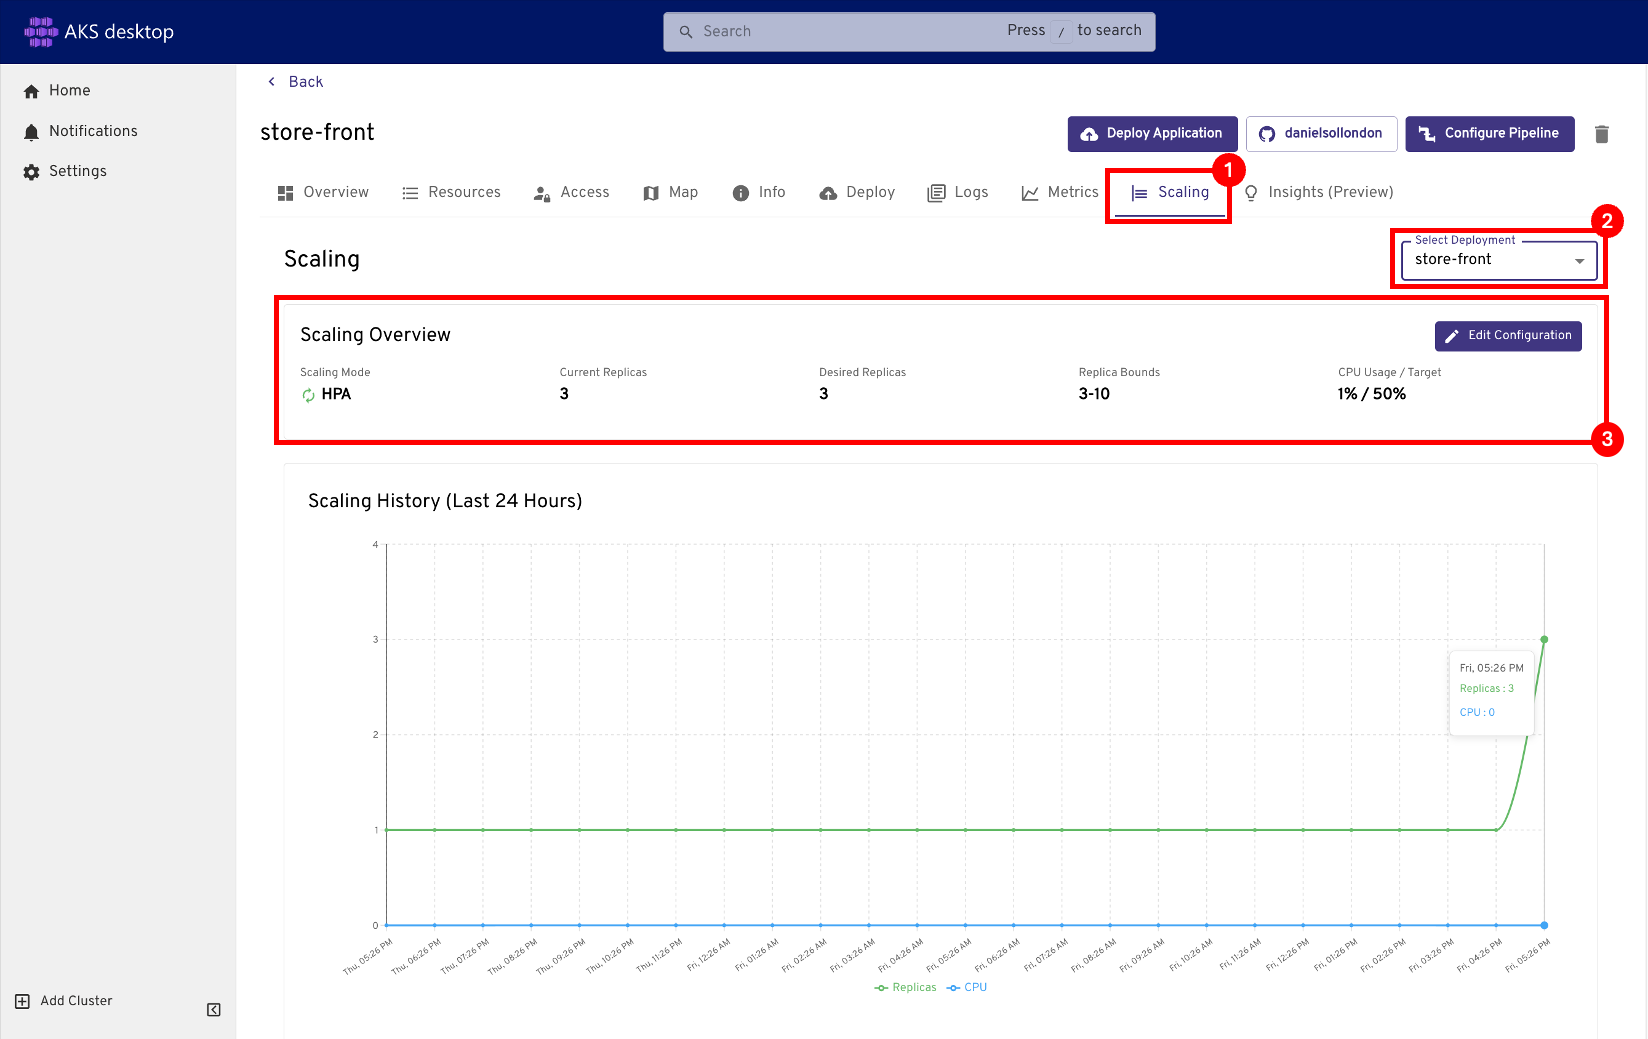
Sprawdź, czy tryb HPA jest włączony, a granice repliki są zgodne z wartościami manifestu.
Wiersz polecenia
Aby korzystać z poziomego automatycznego skalowania podów, wszystkie kontenery muszą mieć zdefiniowane limity i żądania procesora, a pody muszą mieć zdefiniowane żądania. We wdrożeniu aks-store-quickstart kontener front-end żąda 1m CPU z limitem 1000m CPU.
Te żądania zasobów i limity są definiowane dla każdego kontenera, jak pokazano w poniższym skondensowanym przykładzie YAML:
...
  containers:
  - name: store-front
    image: ghcr.io/azure-samples/aks-store-demo/store-front:latest
    ports:
    - containerPort: 8080
      name: store-front
...
    resources:
      requests:
        cpu: 1m
...
      limits:
        cpu: 1000m
...
Automatyczne skalowanie zasobników przy użyciu pliku manifestu
Utwórz plik manifestu, aby zdefiniować zachowanie narzędzia do automatycznego skalowania i limity zasobów, jak pokazano w poniższym skondensowanym przykładowym pliku manifestu
aks-store-quickstart-hpa.yaml:apiVersion: autoscaling/v2 kind: HorizontalPodAutoscaler metadata: name: store-front-hpa spec: maxReplicas: 10 # define max replica count minReplicas: 3 # define min replica count scaleTargetRef: apiVersion: apps/v1 kind: Deployment name: store-front metrics: - type: Resource resource: name: cpu target: type: Utilization averageUtilization: 50Zastosuj plik manifestu autoskalatora za pomocą komendy
kubectl apply.kubectl apply -f aks-store-quickstart-hpa.yamlSprawdź stan narzędzia do automatycznego skalowania przy użyciu
kubectl get hpapolecenia .kubectl get hpaPo kilku minutach przy minimalnym obciążeniu aplikacji Azure Store Front liczba replik zasobników zmniejsza się do trzech. Ponownie możesz użyć polecenia
kubectl get pods, aby zobaczyć, że niepotrzebne pody są usuwane.Kontynuuj, gdy kolumny
TARGETSiREPLICASwyświetlają oczekiwane zachowanie automatycznego skalowania dlastore-front-hpa.
Uwaga
Możesz włączyć dodatek AKS oparty na rozwiązaniu Kubernetes Event-Driven Autoscaler (KEDA) do klastra, aby zwiększyć skalowanie na podstawie liczby zdarzeń, które należy przetworzyć. Aby uzyskać więcej informacji, zobacz Włącz uproszczone automatyczne skalowanie aplikacji przy użyciu dodatku Kubernetes Event-Driven Autoscaling (KEDA) (wersja zapoznawcza).
Ręczne skalowanie węzłów AKS
Uwaga
Jeśli utworzyłeś klaster AKS Automatic, te kroki nie mają zastosowania, ponieważ węzły w klastrze są skalowane automatycznie.
Jeśli swój klaster AKS w warstwie Standard utworzono za pomocą poleceń z poprzednich samouczków, ma on trzy węzły. Jeśli chcesz zwiększyć lub zmniejszyć tę ilość, możesz ręcznie dostosować liczbę węzłów.
Poniższy przykład zwiększa liczbę węzłów do pięciu w klastrze Kubernetes o nazwie myAKSCluster. Wykonanie polecenia trwa kilka minut.
Skaluj węzły klastra przy użyciu polecenia
az aks scale.Po pomyślnym skalowaniu klastra dane wyjściowe będą podobne do następujących przykładowych danych wyjściowych:
az aks nodepool list --resource-group myResourceGroup --cluster-name myAKSCluster --query "[].{name:name,count:count}" -o tableaz aks scale --resource-group myResourceGroup --name myAKSCluster --node-count 5Po pomyślnym skalowaniu klastra dane wyjściowe będą podobne do następujących przykładowych danych wyjściowych:
"aadProfile": null,
"addonProfiles": null,
"agentPoolProfiles": [
  {
    ...
    "count": 5,
    "mode": "System",
    "name": "nodepool1",
    "osDiskSizeGb": 128,
    "osDiskType": "Managed",
    "osType": "Linux",
    "ports": null,
    "vmSize": "Standard_DS2_v2",
    "vnetSubnetId": null
    ...
  }
  ...
]
Możesz również automatycznie skalować węzły w klastrze. Aby uzyskać więcej informacji, zobacz Używanie narzędzia do automatycznego skalowania klastra z pulami węzłów.
Dalsze kroki
W tym samouczku korzystałeś z różnych funkcji skalowania w swoim klastrze Kubernetes. Nauczyłeś się, jak:
- Ręcznie skaluj zasobniki Kubernetes uruchamiające aplikację.
- Skonfiguruj zasobniki skalowania automatycznego, które uruchamiają fronton aplikacji.
- Ręczne skalowanie węzłów Kubernetes.
Jeśli skończysz, wybierz ikonę Usuń , a w komunikacie potwierdzającym wybierz pozycję Usuń również przestrzeń nazw.
W następnym samouczku dowiesz się, jak zaktualizować Kubernetes w klastrze usługi AKS.