Notatka
Dostęp do tej strony wymaga autoryzacji. Może spróbować zalogować się lub zmienić katalogi.
Dostęp do tej strony wymaga autoryzacji. Możesz spróbować zmienić katalogi.
Dotyczy: ✔️ Maszyny wirtualne z systemem Linux — elastyczne zestawy skalowania ✔️
W tym artykule przedstawiono sposób dołączania zarówno nowych, jak i istniejących dysków do maszyny wirtualnej z systemem Linux za pośrednictwem witryny Azure Portal. Dysk danych można również dołączyć do maszyny wirtualnej z systemem Windows w witrynie Azure Portal.
Wymagania wstępne
Przed dołączeniem dysków do maszyny wirtualnej platformy Azure zapoznaj się z następującymi wskazówkami:
Rozmiar maszyny wirtualnej decyduje o tym, ile dysków danych można dołączyć. Aby uzyskać szczegółowe informacje, zobacz Rozmiary maszyn wirtualnych.
Znajdowanie maszyny wirtualnej
Wykonaj te kroki:
Przejdź do witryny Azure Portal , aby znaleźć maszynę wirtualną. Wyszukaj i wybierz maszyny wirtualne.
Wybierz maszynę wirtualną, do której chcesz dołączyć dysk z listy.
Na stronie Maszyny wirtualne w obszarze Ustawienia wybierz pozycję Dyski.
Dołączanie nowego dysku
Wykonaj te kroki:
W okienku Dyski w obszarze Dyski wybierz pozycję Utwórz i dołącz nowy dysk.
Wprowadź nazwę dysku zarządzanego. Przejrzyj ustawienia domyślne i zaktualizuj w razie potrzeby typ magazynu, rozmiar (GiB),szyfrowanie i buforowanie hosta .

Po zakończeniu wybierz pozycję Zapisz w górnej części strony, aby utworzyć dysk zarządzany i zaktualizować konfigurację maszyny wirtualnej.

Dołączanie istniejącego dysku
Wykonaj te kroki:
W okienku Dyski w obszarze Dyski wybierz pozycję Dołącz istniejące dyski.
Wybierz menu rozwijane nazwa dysku i wybierz dysk z listy dostępnych dysków zarządzanych.
Wybierz pozycję Zapisz , aby dołączyć istniejący dysk zarządzany i zaktualizować konfigurację maszyny wirtualnej:
Nawiązywanie połączenia z maszyną wirtualną z systemem Linux w celu zainstalowania nowego dysku
Aby podzielić na partycje, sformatować i zainstalować nowy dysk, aby maszyna wirtualna z systemem Linux mogła z niego korzystać, użyj protokołu SSH na maszynie wirtualnej. Aby uzyskać więcej informacji, zobacz temat dotyczący korzystania z protokołu SSH systemu Linux na platformie Azure. Poniższy przykład łączy się z maszyną wirtualną z publicznym adresem IP 10.123.123.25 z nazwą użytkownika azureuser:
ssh azureuser@10.123.123.25
Znajdowanie dysku
Po nawiązaniu połączenia z maszyną wirtualną należy znaleźć dysk. W tym przykładzie używamy lsblk polecenia , aby wyświetlić listę dysków.
lsblk -o NAME,HCTL,SIZE,MOUNTPOINT | grep -i "sd"
Dane wyjściowe są podobne do poniższego przykładu:
sda     0:0:0:0      30G
├─sda1             29.9G /
├─sda14               4M
└─sda15             106M /boot/efi
sdb     1:0:1:0      14G
└─sdb1               14G /mnt
sdc     3:0:0:0       4G
W tym przykładzie dysk, który został dodany, to sdc. Jest to jednostka LUN 0 i jest 4 GB.
W bardziej złożonym przykładzie w portalu wygląda wiele dysków danych:
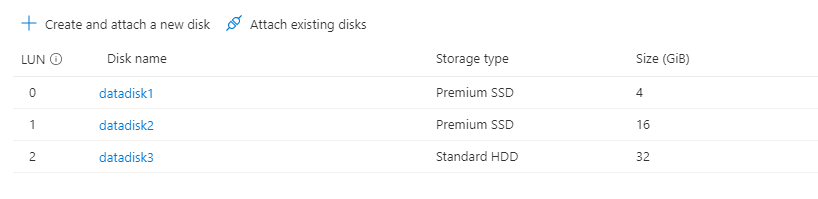
Na obrazie widać, że istnieją trzy dyski danych: 4 GB w numerze LUN 0, 16 GB przy numerze LUN 1 i 32G w numerze LUN 2.
Z danych wyjściowych lsblkprogramu widać, że dysk 4 GB w numerze LUN 0 to sdc, dysk 16 GB w numerze LUN 1 to sdd, a dysk 32G o numerze LUN 2 to sde.
sda     0:0:0:0      30G
├─sda1             29.9G /
├─sda14               4M
└─sda15             106M /boot/efi
sdb     1:0:1:0      14G
└─sdb1               14G /mnt
sdc     3:0:0:0       4G
sdd     3:0:0:1      16G
sde     3:0:0:2      32G
Przygotowywanie nowego pustego dysku
Ważne
Jeśli używasz istniejącego dysku zawierającego dane, przejdź do instalowania dysku. Poniższe instrukcje usuwają dane na dysku.
Jeśli dołączasz nowy dysk, musisz podzielić dysk na partycje.
Narzędzie parted może służyć do partycjonowania i formatowania dysku danych.
- Użyj najnowszej wersji
parteddostępnej dla dystrybucji. - Jeśli rozmiar dysku to 2 tebibajty (TiB) lub większy, należy użyć partycjonowania GPT. Jeśli rozmiar dysku wynosi poniżej 2 TiB, możesz użyć partycjonowania MBR lub GPT.
W poniższym przykładzie użyto parted na /dev/sdc, gdzie pierwszy dysk danych będzie się zwykle znajdować na większości maszyn wirtualnych. Zastąp sdc odpowiednią opcją dla dysku. Formatujemy go również przy użyciu systemu plików XFS .
partprobe Użyj narzędzia , aby upewnić się, że jądro jest świadome nowej partycji i systemu plików. Nie można użyć partprobe polecenia blkid lub lslbk, aby nie zwracać identyfikatora UUID dla nowego systemu plików natychmiast.
sudo parted /dev/sdc --script mklabel gpt mkpart xfspart xfs 0% 100%
sudo mkfs.xfs /dev/sdc1
sudo partprobe /dev/sdc1
Instalowanie dysku
Utwórz katalog, aby zainstalować system plików przy użyciu polecenia mkdir, a następnie użyj polecenia mount , aby zainstalować system plików. Następnie dodaj dysk do pliku /etc/fstab , aby upewnić się, że dysk zostanie automatycznie dodany po ponownym uruchomieniu.
Upewnij się, że identyfikator UUID (uniwersalny unikatowy identyfikator) jest używany w /etc/fstab , aby odwoływać się do dysku, a nie tylko nazwy urządzenia (na przykład /dev/sdc1). Jeśli system operacyjny wykryje błąd dysku podczas rozruchu, w przypadku używania identyfikatora UUID w danej lokalizacji nie zostanie zainstalowany nieprawidłowy dysk. Do pozostałych dysków danych zostałyby w takiej sytuacji przypisane te same identyfikatory urządzeń. Aby znaleźć identyfikator UUID nowego dysku, użyj blkid narzędzia .
sudo mkdir /datadrive
sudo mount /dev/sdc1 /datadrive
sudo blkid
/dev/sda1: LABEL="cloudimg-rootfs" UUID="11111111-1b1b-1c1c-1d1d-1e1e1e1e1e1e" TYPE="ext4" PARTUUID="1a1b1c1d-11aa-1234-1a1a1a1a1a1a"
/dev/sda15: LABEL="UEFI" UUID="BCD7-96A6" TYPE="vfat" PARTUUID="1e1g1cg1h-11aa-1234-1u1u1a1a1u1u"
/dev/sdb1: UUID="22222222-2b2b-2c2c-2d2d-2e2e2e2e2e2e" TYPE="ext4" TYPE="ext4" PARTUUID="1a2b3c4d-01"
/dev/sda14: PARTUUID="2e2g2cg2h-11aa-1234-1u1u1a1a1u1u"
/dev/sdc1: UUID="33333333-3b3b-3c3c-3d3d-3e3e3e3e3e3e" TYPE="xfs" PARTLABEL="xfspart" PARTUUID="c1c2c3c4-1234-cdef-asdf3456ghjk"
Edytowanie pliku fstab
Uwaga / Notatka
Nieprawidłowa edycja pliku /etc/fstab może spowodować, że system będzie niemożliwy do uruchomienia. Jeśli nie masz pewności, jak to zrobić, sprawdź informacje na temat prawidłowego edytowania tego pliku w dokumentacji dystrybucji. Przed edycją należy utworzyć kopię zapasową pliku /etc/fstab .
Następnie otwórz plik /etc/fstab w edytorze tekstów. Dodaj wiersz na końcu pliku, używając wartości UUID dla urządzenia /dev/sdc1, które zostało utworzone w poprzednich krokach, oraz punktu montowania /datadrive. Jeśli użyto przykładu z tego artykułu, nowy wiersz będzie wyglądać podobnie do poniższego przykładu.
Po zakończeniu edytowania pliku zapisz i zamknij edytor.
Uwaga / Notatka
Później usunięcie dysku danych bez edytowania fstab może spowodować niepowodzenie rozruchu maszyny wirtualnej. Większość dystrybucji zapewnia opcje nofail i/lub nobootwait fstab. Te opcje umożliwiają rozruch systemu nawet wtedy, gdy w trakcie uruchamiania nie można zamontować dysku. Aby uzyskać więcej informacji na temat tych parametrów, zapoznaj się z dokumentacją dystrybucji.
Opcja nofail gwarantuje, że maszyna wirtualna zostanie uruchomiona, nawet jeśli system plików jest uszkodzony lub dysk nie istnieje w czasie rozruchu. Bez tej opcji można napotkać zachowanie zgodnie z opisem w temacie Nie można nawiązać połączenia SSH z maszyną wirtualną z systemem Linux z powodu błędów FSTAB
UUID=33333333-3b3b-3c3c-3d3d-3e3e3e3e3e3e /datadrive xfs defaults,nofail 1 2
Weryfikowanie dysku
Teraz możesz ponownie użyć lsblk polecenia , aby wyświetlić dysk i punkt instalacji. Następnie dane wyjściowe powinny wyglądać podobnie do przykładu.
W poniższych przykładowych danych wyjściowych widać, że sdc jest teraz zainstalowany w pliku /datadrive.
lsblk -o NAME,HCTL,SIZE,MOUNTPOINT | grep -i "sd"
sda     0:0:0:0      30G
├─sda1             29.9G /
├─sda14               4M
└─sda15             106M /boot/efi
sdb     1:0:1:0      14G
└─sdb1               14G /mnt
sdc     3:0:0:0       4G
└─sdc1                4G /datadrive
Obsługa funkcji TRIM/UNMAP dla systemu Linux na platformie Azure
Niektóre jądra systemu Linux obsługują operacje TRIM/UNMAP w celu odrzucenia nieużywanych bloków na dysku. Ta funkcja jest przydatna przede wszystkim do informowania platformy Azure o tym, że usunięte strony nie są już prawidłowe i można je odrzucić. Ta funkcja może zaoszczędzić pieniądze na dyskach, które są rozliczane na podstawie ilości wykorzystanej przestrzeni dyskowej, takich jak niezarządzane dyski standardowe i migawki dysków.
Istnieją dwa sposoby, aby włączyć obsługę TRIM na maszynie wirtualnej z systemem Linux. Jak zwykle, skonsultuj się ze swoją dystrybucją, aby uzyskać zalecany sposób postępowania.
discardUżyj opcji instalacji w pliku /etc/fstab, na przykład:```config UUID=33333333-3b3b-3c3c-3d3d-3e3e3e3e3e3e /datadrive xfs defaults,discard 1 2 ```W niektórych przypadkach
discardopcja może mieć wpływ na wydajność. Alternatywnie możesz uruchomićfstrimpolecenie ręcznie z poziomu wiersza polecenia lub dodać je do narzędzia crontab w celu regularnego uruchamiania:Ubuntu
sudo apt-get install util-linux
sudo fstrim /datadrive
RHEL
sudo yum install util-linux
sudo fstrim /datadrive
SUSE
sudo zypper install util-linux
sudo fstrim /datadrive