Logowanie się przy użyciu firmy Apple w środowisku Xamarin.iOS
Zaloguj się przy użyciu firmy Apple to nowa usługa, która zapewnia ochronę tożsamości dla użytkowników usług uwierzytelniania innych firm. Począwszy od systemu iOS 13, firma Apple wymaga, aby każda nowa aplikacja korzystająca z usług uwierzytelniania innych firm również zapewniała logowanie apple. Istniejące aktualizowane aplikacje nie muszą dodawać funkcji Zaloguj się przy użyciu firmy Apple do kwietnia 2020 r.
W tym dokumencie przedstawiono sposób dodawania funkcji Logowania przy użyciu firmy Apple do aplikacji systemu iOS 13.
Konfiguracja dla deweloperów firmy Apple
Przed utworzeniem i uruchomieniem aplikacji przy użyciu usługi Sign In with Apple należy wykonać te kroki. W portalu Identyfikatory i profile dla deweloperów firmy Apple:
- Utwórz nowy identyfikator identyfikatorów aplikacji.
- Ustaw opis w polu Opis .
- Wybierz jawny identyfikator pakietu i ustaw
com.xamarin.AddingTheSignInWithAppleFlowToYourAppgo w polu. - Włącz logowanie przy użyciu funkcji firmy Apple i zarejestruj nową tożsamość.
- Utwórz nowy profil aprowizacji przy użyciu nowej tożsamości.
- Pobierz i zainstaluj go na urządzeniu.
- W programie Visual Studio włącz funkcję Zaloguj się przy użyciu firmy Apple w pliku Entitlements.plist .
Sprawdzanie stanu logowania
Po rozpoczęciu aplikacji lub w pierwszej kolejności należy sprawdzić stan uwierzytelniania użytkownika, utworzyć wystąpienie ASAuthorizationAppleIdProvider i sprawdzić bieżący stan:
var appleIdProvider = new ASAuthorizationAppleIdProvider ();
appleIdProvider.GetCredentialState (KeychainItem.CurrentUserIdentifier, (credentialState, error) => {
    switch (credentialState) {
    case ASAuthorizationAppleIdProviderCredentialState.Authorized:
        // The Apple ID credential is valid.
        break;
    case ASAuthorizationAppleIdProviderCredentialState.Revoked:
        // The Apple ID credential is revoked.
        break;
    case ASAuthorizationAppleIdProviderCredentialState.NotFound:
        // No credential was found, so show the sign-in UI.
        InvokeOnMainThread (() => {
            var storyboard = UIStoryboard.FromName ("Main", null);

            if (!(storyboard.InstantiateViewController (nameof (LoginViewController)) is LoginViewController viewController))
                return;

            viewController.ModalPresentationStyle = UIModalPresentationStyle.FormSheet;
            viewController.ModalInPresentation = true;
            Window?.RootViewController?.PresentViewController (viewController, true, null);
        });
        break;
    }
});
W tym kodzie, wywoływanym w pliku FinishedLaunching , aplikacja będzie obsługiwać NotFound stan i przedstawić LoginViewController użytkownikowi.AppDelegate.cs Jeśli stan zwrócił Authorized lub Revoked, może zostać wyświetlona inna akcja dla użytkownika.
Kontrolka LoginViewController na potrzeby logowania przy użyciu firmy Apple
Narzędzie UIViewController , które implementuje logikę logowania i oferuje logowanie przy użyciu firmy Apple, musi zaimplementować IASAuthorizationControllerDelegateIASAuthorizationControllerPresentationContextProviding i jak pokazano w poniższym przykładzie LoginViewController .
public partial class LoginViewController : UIViewController, IASAuthorizationControllerDelegate, IASAuthorizationControllerPresentationContextProviding {
    public LoginViewController (IntPtr handle) : base (handle)
    {
    }

    public override void ViewDidLoad ()
    {
        base.ViewDidLoad ();
        // Perform any additional setup after loading the view, typically from a nib.

        SetupProviderLoginView ();
    }

    public override void ViewDidAppear (bool animated)
    {
        base.ViewDidAppear (animated);

        PerformExistingAccountSetupFlows ();
    }

    void SetupProviderLoginView ()
    {
        var authorizationButton = new ASAuthorizationAppleIdButton (ASAuthorizationAppleIdButtonType.Default, ASAuthorizationAppleIdButtonStyle.White);
        authorizationButton.TouchUpInside += HandleAuthorizationAppleIDButtonPress;
        loginProviderStackView.AddArrangedSubview (authorizationButton);
    }

    // Prompts the user if an existing iCloud Keychain credential or Apple ID credential is found.
    void PerformExistingAccountSetupFlows ()
    {
        // Prepare requests for both Apple ID and password providers.
        ASAuthorizationRequest [] requests = {
            new ASAuthorizationAppleIdProvider ().CreateRequest (),
            new ASAuthorizationPasswordProvider ().CreateRequest ()
        };

        // Create an authorization controller with the given requests.
        var authorizationController = new ASAuthorizationController (requests);
        authorizationController.Delegate = this;
        authorizationController.PresentationContextProvider = this;
        authorizationController.PerformRequests ();
    }

    private void HandleAuthorizationAppleIDButtonPress (object sender, EventArgs e)
    {
        var appleIdProvider = new ASAuthorizationAppleIdProvider ();
        var request = appleIdProvider.CreateRequest ();
        request.RequestedScopes = new [] { ASAuthorizationScope.Email, ASAuthorizationScope.FullName };

        var authorizationController = new ASAuthorizationController (new [] { request });
        authorizationController.Delegate = this;
        authorizationController.PresentationContextProvider = this;
        authorizationController.PerformRequests ();
    }
}
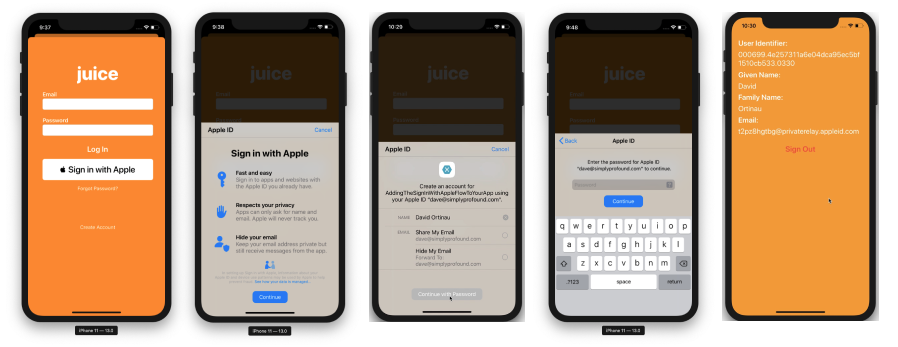
Ten przykładowy kod sprawdza bieżący stan logowania i PerformExistingAccountSetupFlows łączy się z bieżącym widokiem jako pełnomocnikiem. Jeśli zostanie znalezione istniejące poświadczenie pęku kluczy w usłudze iCloud lub poświadczenie identyfikatora Apple ID, zostanie wyświetlony monit o użycie tego poświadczenia.
Firma Apple udostępnia ASAuthorizationAppleIdButtonprzycisk , specjalnie do tego celu. Po naciśnięciu przycisku zostanie wyzwolony przepływ pracy obsługiwany w metodzie HandleAuthorizationAppleIDButtonPress.
Obsługa autoryzacji
W implementacji dowolnej logiki niestandardowej IASAuthorizationController do przechowywania konta użytkownika. W poniższym przykładzie konto użytkownika jest przechowywane w pęku kluczy, własnej usłudze magazynu firmy Apple.
#region IASAuthorizationController Delegate

[Export ("authorizationController:didCompleteWithAuthorization:")]
public void DidComplete (ASAuthorizationController controller, ASAuthorization authorization)
{
    if (authorization.GetCredential<ASAuthorizationAppleIdCredential> () is ASAuthorizationAppleIdCredential appleIdCredential) {
        var userIdentifier = appleIdCredential.User;
        var fullName = appleIdCredential.FullName;
        var email = appleIdCredential.Email;

        // Create an account in your system.
        // For the purpose of this demo app, store the userIdentifier in the keychain.
        try {
            new KeychainItem ("com.example.apple-samplecode.juice", "userIdentifier").SaveItem (userIdentifier);
        } catch (Exception) {
            Console.WriteLine ("Unable to save userIdentifier to keychain.");
        }

        // For the purpose of this demo app, show the Apple ID credential information in the ResultViewController.
        if (!(PresentingViewController is ResultViewController viewController))
            return;

        InvokeOnMainThread (() => {
            viewController.UserIdentifierText = userIdentifier;
            viewController.GivenNameText = fullName?.GivenName ?? "";
            viewController.FamilyNameText = fullName?.FamilyName ?? "";
            viewController.EmailText = email ?? "";

            DismissViewController (true, null);
        });
    } else if (authorization.GetCredential<ASPasswordCredential> () is ASPasswordCredential passwordCredential) {
        // Sign in using an existing iCloud Keychain credential.
        var username = passwordCredential.User;
        var password = passwordCredential.Password;

        // For the purpose of this demo app, show the password credential as an alert.
        InvokeOnMainThread (() => {
            var message = $"The app has received your selected credential from the keychain. \n\n Username: {username}\n Password: {password}";
            var alertController = UIAlertController.Create ("Keychain Credential Received", message, UIAlertControllerStyle.Alert);
            alertController.AddAction (UIAlertAction.Create ("Dismiss", UIAlertActionStyle.Cancel, null));

            PresentViewController (alertController, true, null);
        });
    }
}

[Export ("authorizationController:didCompleteWithError:")]
public void DidComplete (ASAuthorizationController controller, NSError error)
{
    Console.WriteLine (error);
}

#endregion
Kontroler autoryzacji
Ostatnim elementem w tej implementacji jest ASAuthorizationController zarządzanie żądaniami autoryzacji dla dostawcy.
#region IASAuthorizationControllerPresentation Context Providing

public UIWindow GetPresentationAnchor (ASAuthorizationController controller) => View.Window;

#endregion