Ćwiczenie — używanie pętli zmiennych i wyjściowych
W przypadku twojej firmy toy musisz wdrożyć sieci wirtualne w każdym kraju/regionie, w którym uruchamiasz niedźwiedź z teddy. Deweloperzy poprosili Cię również o nadanie im w pełni kwalifikowanych nazw domen (FQDN) poszczególnych wdrożonych regionalnych serwerów logicznych usługi Azure SQL.
W tym ćwiczeniu dodasz sieć wirtualną i jej konfigurację do kodu Bicep, a dane wyjściowe nazw FQDN serwera logicznego zostaną wyświetlone.
Podczas tego procesu wykonasz następujące czynności:
- Zaktualizuj kod Bicep, aby określić parametr dla podsieci każdej sieci wirtualnej.
- Dodaj pętlę zmiennej, aby utworzyć tablicę podsieci, która będzie używana w deklaracji zasobu sieci wirtualnej.
- Dodaj pętlę danych wyjściowych, aby utworzyć listę nazw FQDN serwera logicznego.
- Wdróż plik Bicep i zweryfikuj wdrożenie.
Dodawanie sieci wirtualnej do pliku Bicep
Otwórz plik main.bicep.
Poniżej deklaracji parametrów dodaj następujące parametry:
@description('The IP address range for all virtual networks to use.')
param virtualNetworkAddressPrefix string = '10.10.0.0/16'

@description('The name and IP address range for each subnet in the virtual networks.')
param subnets array = [
  {
    name: 'frontend'
    ipAddressRange: '10.10.5.0/24'
  }
  {
    name: 'backend'
    ipAddressRange: '10.10.10.0/24'
  }
]
Poniżej parametrów dodaj pusty wiersz, a następnie dodaj pętlę zmiennej
subnetProperties:var subnetProperties = [for subnet in subnets: { name: subnet.name properties: { addressPrefix: subnet.ipAddressRange } }]W dolnej części pliku poniżej pętli modułu
databasesdodaj następującą pętlę zasobów:resource virtualNetworks 'Microsoft.Network/virtualNetworks@2021-08-01' = [for location in locations: { name: 'teddybear-${location}' location: location properties:{ addressSpace:{ addressPrefixes:[ virtualNetworkAddressPrefix ] } subnets: subnetProperties } }]Uwaga
W tym przykładzie użyto tej samej przestrzeni adresowej dla wszystkich sieci wirtualnych. Zazwyczaj podczas tworzenia wielu sieci wirtualnych można nadać im różne przestrzenie adresowe w przypadku, gdy trzeba połączyć je ze sobą.
Zapisz zmiany w pliku.
Dodawanie danych wyjściowych do modułu bazy danych
Otwórz plik modules/database.bicep.
W dolnej części pliku dodaj następujące dane wyjściowe:
output serverName string = sqlServer.name output location string = location output serverFullyQualifiedDomainName string = sqlServer.properties.fullyQualifiedDomainNameZapisz zmiany w pliku.
Przepływ danych wyjściowych za pośrednictwem nadrzędnego pliku Bicep
Otwórz plik main.bicep.
W dolnej części pliku dodaj następującą pętlę danych wyjściowych:
output serverInfo array = [for i in range(0, length(locations)): { name: databases[i].outputs.serverName location: databases[i].outputs.location fullyQualifiedDomainName: databases[i].outputs.serverFullyQualifiedDomainName }]Zapisz zmiany w pliku.
Weryfikowanie pliku Bicep
Po zakończeniu wszystkich powyższych zmian plik main.bicep powinien wyglądać następująco:
@description('The Azure regions into which the resources should be deployed.')
param locations array = [
'westeurope'
'eastus2'
'eastasia'
]
@secure()
@description('The administrator login username for the SQL server.')
param sqlServerAdministratorLogin string
@secure()
@description('The administrator login password for the SQL server.')
param sqlServerAdministratorLoginPassword string
@description('The IP address range for all virtual networks to use.')
param virtualNetworkAddressPrefix string = '10.10.0.0/16'
@description('The name and IP address range for each subnet in the virtual networks.')
param subnets array = [
{
name: 'frontend'
ipAddressRange: '10.10.5.0/24'
}
{
name: 'backend'
ipAddressRange: '10.10.10.0/24'
}
]
var subnetProperties = [for subnet in subnets: {
  name: subnet.name
  properties: {
    addressPrefix: subnet.ipAddressRange
  }
}]
module databases 'modules/database.bicep' = [for location in locations: {
name: 'database-${location}'
params: {
location: location
sqlServerAdministratorLogin: sqlServerAdministratorLogin
sqlServerAdministratorLoginPassword: sqlServerAdministratorLoginPassword
}
}]
resource virtualNetworks 'Microsoft.Network/virtualNetworks@2021-08-01' = [for location in locations: {
  name: 'teddybear-${location}'
  location: location
  properties:{
    addressSpace:{
      addressPrefixes:[
        virtualNetworkAddressPrefix
      ]
    }
    subnets: subnetProperties
  }
}]
output serverInfo array = [for i in range(0, length(locations)): {
name: databases[i].outputs.serverName
location: databases[i].outputs.location
fullyQualifiedDomainName: databases[i].outputs.serverFullyQualifiedDomainName
}]
Plik database.bicep powinien wyglądać następująco:
@description('The Azure region into which the resources should be deployed.')
param location string
@secure()
@description('The administrator login username for the SQL server.')
param sqlServerAdministratorLogin string
@secure()
@description('The administrator login password for the SQL server.')
param sqlServerAdministratorLoginPassword string
@description('The name and tier of the SQL database SKU.')
param sqlDatabaseSku object = {
name: 'Standard'
tier: 'Standard'
}
@description('The name of the environment. This must be Development or Production.')
@allowed([
'Development'
'Production'
])
param environmentName string = 'Development'
@description('The name of the audit storage account SKU.')
param auditStorageAccountSkuName string = 'Standard_LRS'
var sqlServerName = 'teddy${location}${uniqueString(resourceGroup().id)}'
var sqlDatabaseName = 'TeddyBear'
var auditingEnabled = environmentName == 'Production'
var auditStorageAccountName = take('bearaudit${location}${uniqueString(resourceGroup().id)}', 24)
resource sqlServer 'Microsoft.Sql/servers@2021-11-01-preview' = {
name: sqlServerName
location: location
properties: {
administratorLogin: sqlServerAdministratorLogin
administratorLoginPassword: sqlServerAdministratorLoginPassword
}
}
resource sqlDatabase 'Microsoft.Sql/servers/databases@2021-11-01-preview' = {
parent: sqlServer
name: sqlDatabaseName
location: location
sku: sqlDatabaseSku
}
resource auditStorageAccount 'Microsoft.Storage/storageAccounts@2021-09-01' = if (auditingEnabled) {
name: auditStorageAccountName
location: location
sku: {
name: auditStorageAccountSkuName
}
kind: 'StorageV2'
}
resource sqlServerAudit 'Microsoft.Sql/servers/auditingSettings@2021-11-01-preview' = if (auditingEnabled) {
parent: sqlServer
name: 'default'
properties: {
state: 'Enabled'
storageEndpoint: environmentName == 'Production' ? auditStorageAccount.properties.primaryEndpoints.blob : ''
storageAccountAccessKey: environmentName == 'Production' ? listKeys(auditStorageAccount.id, auditStorageAccount.apiVersion).keys[0].value : ''
}
}
output serverName string = sqlServer.name
output location string = location
output serverFullyQualifiedDomainName string = sqlServer.properties.fullyQualifiedDomainName
Jeśli nie, skopiuj przykłady lub dostosuj szablony, aby były zgodne z przykładami.
Wdrażanie szablonu Bicep na platformie Azure
W terminalu programu Visual Studio Code wdróż szablon Bicep na platformie Azure, uruchamiając następujący kod. Ukończenie tego procesu może potrwać kilka minut, a następnie wdrożenie zakończy się pomyślnie.
az deployment group create --template-file main.bicep
W terminalu programu Visual Studio Code wdróż szablon Bicep na platformie Azure, uruchamiając następujące polecenie programu Azure PowerShell. Ukończenie tego procesu może potrwać kilka minut, a następnie wdrożenie zakończy się pomyślnie.
New-AzResourceGroupDeployment -TemplateFile main.bicep
Uwaga
Pamiętaj, aby użyć tego samego identyfikatora logowania i hasła, którego użyto wcześniej, lub wdrożenie nie zakończy się pomyślnie.
Poczekaj na zakończenie wdrożenia.
Weryfikowanie wdrożenia
Po zakończeniu wdrażania chcesz sprawdzić, czy nowe sieci wirtualne są wdrożone i czy mają skonfigurowane podsieci zgodnie z oczekiwaniami.
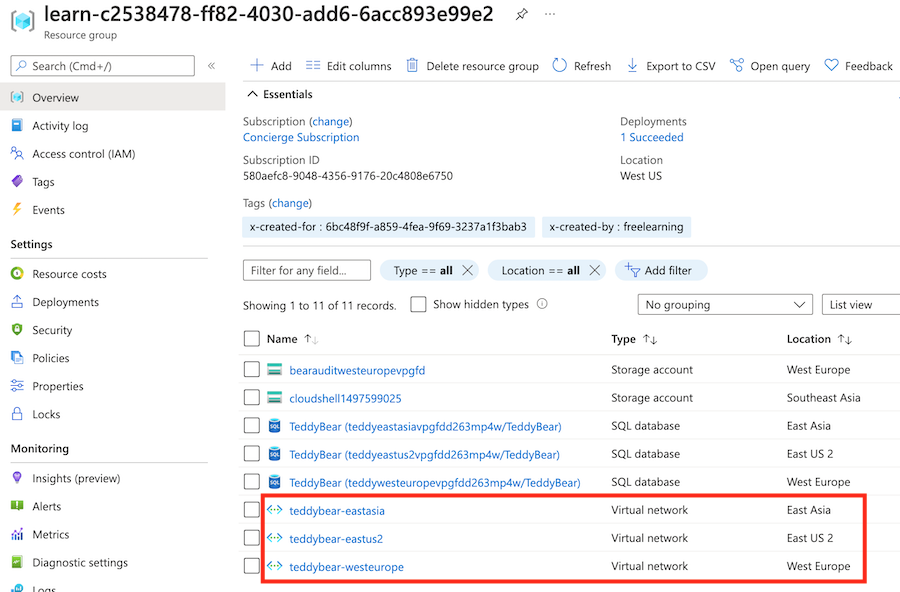
Przejdź do witryny Azure Portal i upewnij się, że jesteś w subskrypcji piaskownicy.
Wybierz pozycję
[nazwa grupy zasobów piaskownicy] .Sprawdź, czy sieci wirtualne zostały wdrożone w trzech lokalizacjach platformy Azure.
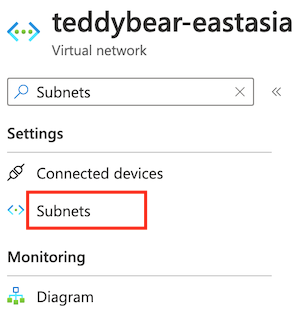
Wybierz sieć wirtualną o nazwie
teddybear-eastasia.Na pasku wyszukiwania wprowadź Podsieci. W obszarze Ustawienia wybierz pozycję Podsieci.
Sprawdź, czy wdrożone podsieci mają nazwy i adresy IP określone w wartości domyślnej parametru
subnets.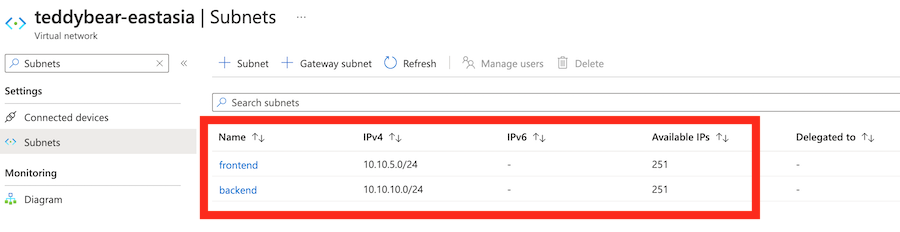
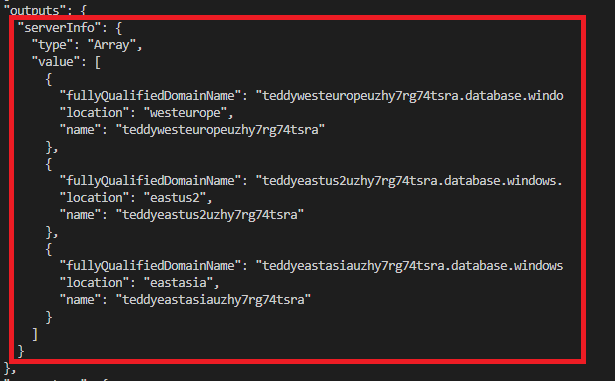
Sprawdź dane wyjściowe polecenia wdrożenia. Powinna ona zawierać nazwę i nazwę FQDN wszystkich trzech wdrożonych serwerów logicznych, jak pokazano poniżej:
Przejdź do witryny Azure Portal i upewnij się, że jesteś w subskrypcji piaskownicy.
Wybierz pozycję
[nazwa grupy zasobów piaskownicy] .Sprawdź, czy sieci wirtualne zostały wdrożone w trzech lokalizacjach platformy Azure.
Wybierz sieć wirtualną o nazwie
teddybear-eastasia.Na pasku wyszukiwania wprowadź Podsieci. W obszarze Ustawienia wybierz pozycję Podsieci.
Sprawdź, czy wdrożone podsieci mają nazwy i adresy IP określone w wartości domyślnej parametru
subnets.
Sprawdź dane wyjściowe polecenia wdrożenia. Powinna ona zawierać nazwę i nazwę FQDN wszystkich trzech wdrożonych serwerów logicznych, jak pokazano poniżej:
