Nuta
Dostęp do tej strony wymaga autoryzacji. Możesz spróbować się zalogować lub zmienić katalog.
Dostęp do tej strony wymaga autoryzacji. Możesz spróbować zmienić katalogi.
Secured-core to zbiór funkcji, które oferują wbudowane funkcje zabezpieczeń sprzętu, oprogramowania układowego, sterownika i systemu operacyjnego. W tym artykule przedstawiono sposób konfigurowania serwera z zabezpieczeniami rdzenia przy użyciu Centrum administracyjnego systemu Windows, środowiska pulpitu systemu Windows Server i zasad grupy.
Bezpieczny serwer podstawowy został zaprojektowany w celu zapewnienia bezpiecznej platformy dla krytycznych danych i aplikacji. Aby uzyskać więcej informacji, zobacz Co to jest serwer zabezpieczony-podstawowy?
Prerequisites
Przed skonfigurowaniem serwera typu secured-core należy mieć zainstalowane i włączone w BIOS następujące komponenty zabezpieczeń:
- Bezpieczny rozruch.
- Moduł TPM (Trusted Platform Module) 2.0.
- Oprogramowanie układowe systemu musi spełniać wymagania dotyczące ochrony DMA przed uruchomieniem i ustawiać odpowiednie flagi w tabelach ACPI, aby włączyć ochronę DMA jądra. Aby dowiedzieć się więcej na temat ochrony DMA jądra, zapoznaj się z ochrona DMA jądra (ochrona dostępu do pamięci) dla OEM-ów.
- Procesor z obsługą włączoną w ustawieniach BIOS:
- Rozszerzenia wirtualizacji.
- Jednostka zarządzania pamięcią wejściową/wyjściową (IOMMU).
- Dynamiczny korzeń zaufania dla pomiarów (DRTM).
- Funkcja Transparent Secure Memory Encryption jest również wymagana dla systemów opartych na technologii AMD.
Important
Włączenie każdej funkcji zabezpieczeń w systemie BIOS może się różnić w zależności od dostawcy sprzętu. Upewnij się, aby sprawdzić przewodnik producenta sprzętu dotyczący włączania serwera z zabezpieczonym rdzeniem.
Sprzęt certyfikowany dla serwera zabezpieczonego rdzenia można znaleźć w katalogu Windows Server, a serwery lokalne platformy Azure w katalogu lokalnym platformy Azure.
Włączanie funkcji zabezpieczeń
Aby skonfigurować serwer Zabezpieczony-core, należy włączyć określone funkcje zabezpieczeń systemu Windows Server, wybierz odpowiednią metodę i wykonaj kroki.
- GUI
- Windows Admin Center
- Zasady grupy
Poniżej przedstawiono sposób włączania serwera z zabezpieczonym rdzeniem przy użyciu interfejsu użytkownika.
- Na pulpicie systemu Windows otwórz menu Start , wybierz pozycję Narzędzia administracyjne systemu Windows, otwórz pozycję Zarządzanie komputerem.
- W obszarze Zarządzanie komputerem wybierz pozycję Menedżer urządzeń, w razie potrzeby rozwiąż wszelkie błędy urządzenia.
- W przypadku systemów opartych na amd przed kontynuowaniem upewnij się, że urządzenie sterownika rozruchu DRTM jest obecne
- Na pulpicie systemu Windows otwórz menu Start , wybierz pozycję Zabezpieczenia systemu Windows.
- Wybierz pozycję Zabezpieczenia urządzeń > Podstawowe szczegóły izolacji, a następnie włącz integralność pamięci i Firmware Protection. Nie można włączyć integralności pamięci do momentu włączenia ochrony oprogramowania układowego i ponownego uruchomienia serwera.
- Po wyświetleniu monitu uruchom ponownie serwer.
Po ponownym uruchomieniu Twój serwer został włączony jako serwer z zabezpieczonym rdzeniem.
Weryfikacja konfiguracji serwera z zabezpieczonym rdzeniem
Po skonfigurowaniu serwera z zabezpieczonym rdzeniem, wybierz odpowiednią metodę, aby zweryfikować jego konfigurację.
- GUI
- Windows Admin Center
- Zasady grupy
Poniżej przedstawiono sposób sprawdzenia, czy serwer z zabezpieczonym rdzeniem został skonfigurowany przy użyciu interfejsu użytkownika.
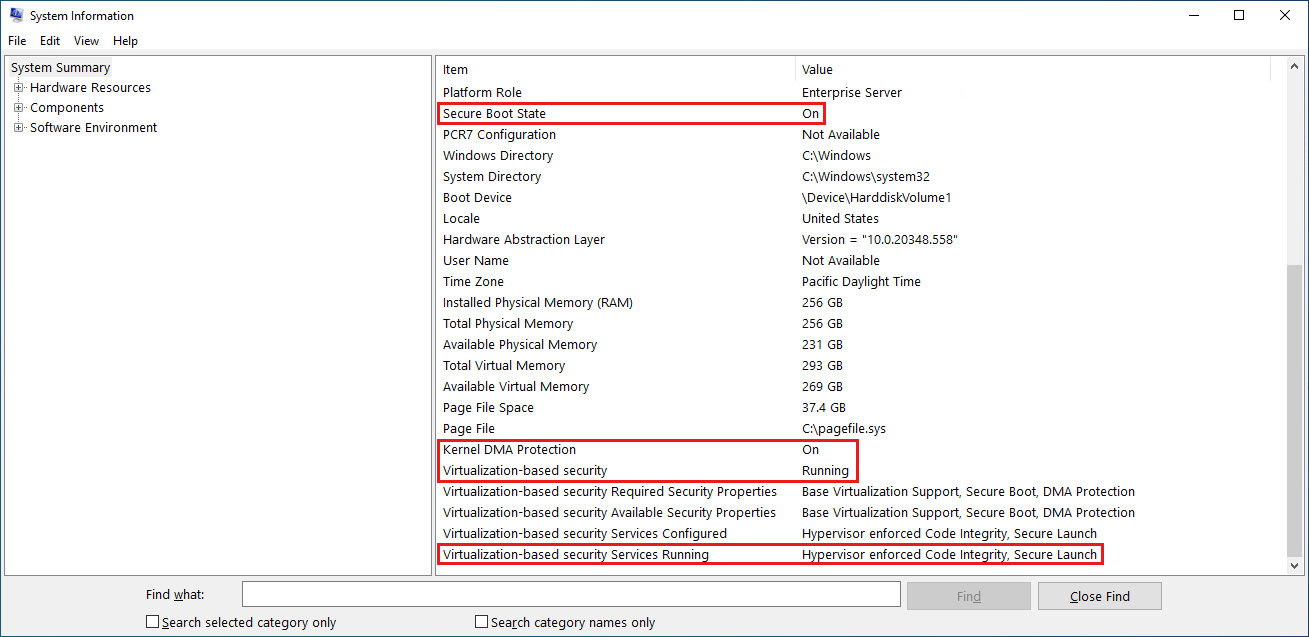
- Na pulpicie systemu Windows otwórz menu Start , wpisz
msinfo32.exepolecenie , aby otworzyć pozycję Informacje o systemie. Na stronie Podsumowanie systemu potwierdź:bezpieczny stan rozruchu i ochrona DMA jądra jest włączona.
Zabezpieczenia oparte na wirtualizacji są uruchomione.
Usługi zabezpieczeń opartych na wirtualizacji Uruchomione usługi pokazują Integralność kodu wymuszaną przez Hypervisora i Bezpieczne Uruchamianie.


Dalsze kroki
Teraz, po skonfigurowaniu serwera Zabezpieczone-core, oto kilka zasobów, aby dowiedzieć się więcej na temat:
- zabezpieczenia oparte na wirtualizacji (VBS)
- Integralność pamięci i włączenie zabezpieczeń wirtualizacji (VBS)
- System Guard Bezpieczne Uruchamianie