SMB over QUIC
Applies to: Windows Server 2022 Datacenter: Azure Edition, Windows 11
SMB over QUIC introduces an alternative to the TCP network transport, providing secure, reliable connectivity to edge file servers over untrusted networks like the Internet. QUIC is an IETF-standardized protocol with many benefits when compared with TCP:
- All packets are always encrypted and handshake is authenticated with TLS 1.3
- Parallel streams of reliable and unreliable application data
- Exchanges application data in the first round trip (0-RTT)
- Improved congestion control and loss recovery
- Survives a change in the clients IP address or port
SMB over QUIC offers an "SMB VPN" for telecommuters, mobile device users, and high security organizations. The server certificate creates a TLS 1.3-encrypted tunnel over the internet-friendly UDP port 443 instead of the legacy TCP port 445. All SMB traffic, including authentication and authorization within the tunnel is never exposed to the underlying network. SMB behaves normally within the QUIC tunnel, meaning the user experience doesn't change. SMB features like multichannel, signing, compression, continuous availability, directory leasing, and so on, work normally.
A file server administrator must opt in to enabling SMB over QUIC. It isn't on by default and a client can't force a file server to enable SMB over QUIC. Windows SMB clients still use TCP by default and will only attempt SMB over QUIC if the TCP attempt first fails or if intentionally requiring QUIC using NET USE /TRANSPORT:QUIC or New-SmbMapping -TransportType QUIC.
Prerequisites
To use SMB over QUIC, you need the following things:
- A file server running Windows Server 2022 Datacenter: Azure Edition (Microsoft Server Operating Systems) or later
- A Windows 11 device (Windows for business)
- Windows Admin Center (WAC) (Homepage)
- A Public Key Infrastructure (PKI) to issue certificates like Active Directory Certificate Server or access to a trusted third party certificate issuer like Verisign, Digicert, Let's Encrypt, etc.
Deploy SMB over QUIC
Step 1: Install a server certificate
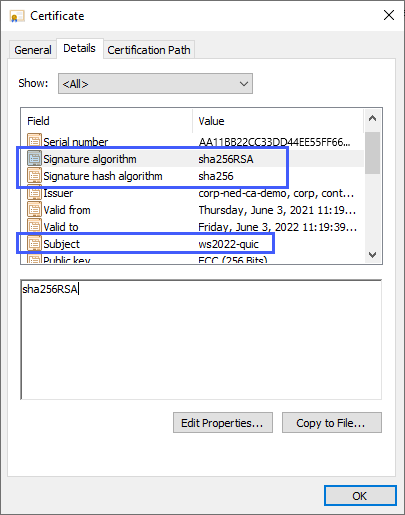
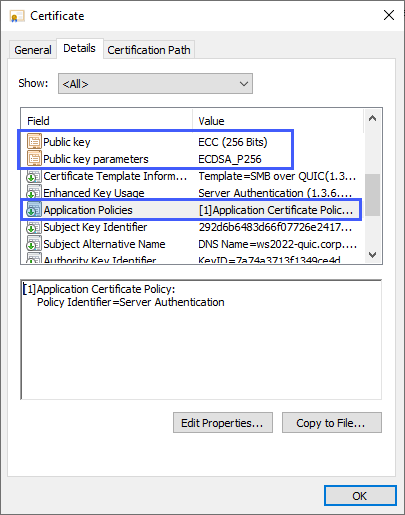
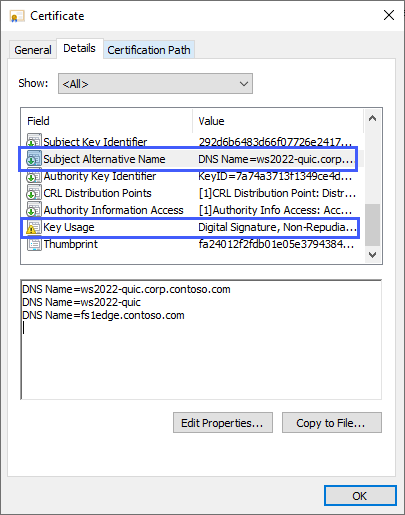
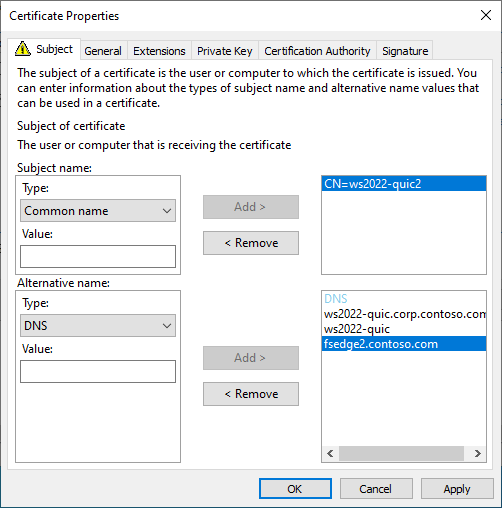
Create a Certificate Authority-issued certificate with the following properties:
- Key usage: digital signature
- Purpose: Server Authentication (EKU 1.3.6.1.5.5.7.3.1)
- Signature algorithm: SHA256RSA (or greater)
- Signature hash: SHA256 (or greater)
- Public key algorithm: ECDSA_P256 (or greater. Can also use RSA with at least 2048 length)
- Subject Alternative Name (SAN): (A DNS name entry for each fully qualified DNS name used to reach the SMB server)
- Subject: (CN= anything, but must exist)
- Private key included: yes
If using a Microsoft Enterprise Certificate Authority, you can create a certificate template and allow the file server administrator to supply the DNS names when requesting it. For more information on creating a certificate template, review Designing and Implementing a PKI: Part III Certificate Templates. For a demonstration of creating a certificate for SMB over QUIC using a Microsoft Enterprise Certificate Authority, watch this video:
For requesting a third-party certificate, consult your vendor documentation.
If using a Microsoft Enterprise Certificate Authority:
- Start MMC.EXE on the file server.
- Add the Certificates snap-in, and select the Computer account.
- Expand Certificates (Local Computer), Personal, then right-click Certificates and select Request New Certificate.
- Select Next
- Select Active Directory Enrollment Policy
- Select Next
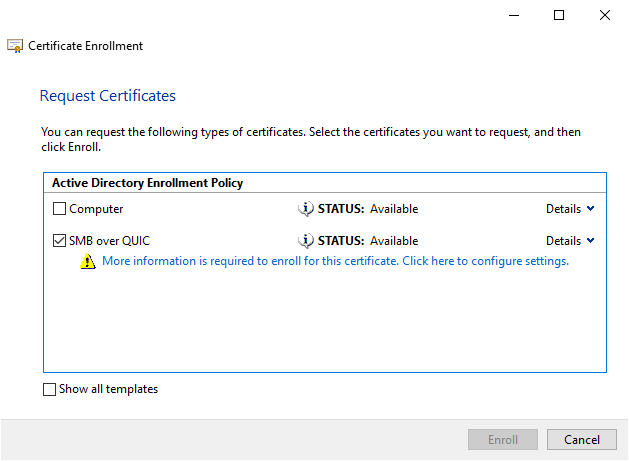
- Select the certificate template for SMB over QUIC that was published in Active Directory.
- Select More information is required to enroll for this certificate. Click here to configure settings.
- So users can use to locate the file server, fill in the value Subject with a common name and Subject Alternative Name with one or more DNS names.
- Select Ok and then select Enroll.

Note
Don't use IP addresses for SMB over QUIC server Subject Alternative Names.
- IP addresses will require the use of NTLM, even if Kerberos is available from a domain controller or through KDC Proxy.
- Azure IaaS VMs running SMB over QUIC use NAT for a public interface back to a private interface. SMB over QUIC does not support using the IP address for the server name through a NAT, you must use a fully qualified DNS name that resolves to the public interface IP address only in this case.
Note
If you're using a certificate file issued by a third party certificate authority, you can use the Certificates snap-in or WAC to import it.
Step 2: Configure SMB over QUIC
- Deploy a Windows Server 2022 Datacenter: Azure Edition server.
- Install the latest version of WAC on a management PC or the file server. You need the latest version of the Files & File Sharing extension. It's installed automatically by WAC if Automatically update extensions is enabled in Settings > Extensions.
- Join your Windows Server 2022 Datacenter: Azure Edition file server to your Active Directory domain and make it accessible to Windows Insider clients on the Azure public interface by adding a firewall allow rule for UDP/443 inbound. Do not allow TCP/445 inbound to the file server. The file server must have access to at least one domain controller for authentication, but no domain controller requires any internet access.
Note
We recommended using SMB over QUIC with Active Directory domains, however it isn't required. You can also use SMB over QUIC on a workgroup-joined server with local user credentials and NTLM.
Connect to the server with WAC and select the Settings icon in the lower left. In the File shares (SMB server) section, under File sharing across the internet with SMB over QUIC, select Configure.
Select a certificate under Select a computer certificate for this file server, select the server addresses clients can connect to or select Select all, and select Enable.
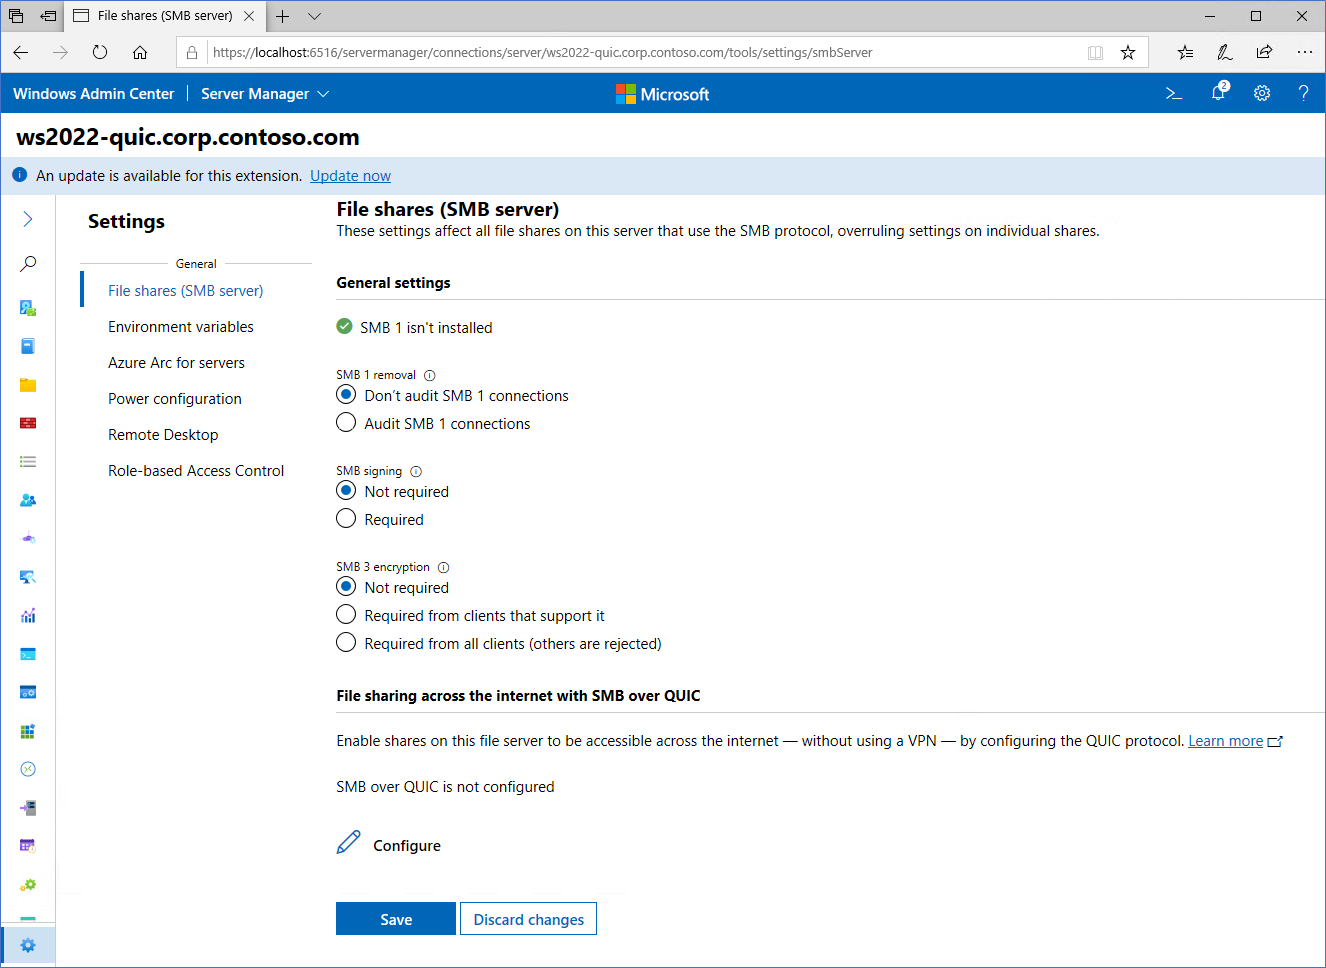
Ensure that the certificate and SMB over QUIC report are healthy.

Select the Files and File Sharing menu option. Note your existing SMB shares or create a new one.
For a demonstration of configuring and using SMB over QUIC, watch this video:
Step 3: Connect to SMB shares
Join your Windows 11 device to your domain. Be certain the names of the SMB over QUIC file server's certificate subject alternative names are published to DNS and are fully qualified or added to the HOST files for your Windows 11. Ensure that the server's certificate subject alternative names are published to DNS or added to the HOSTS files for your Windows 11.
Move your Windows 11 device to an external network where it no longer has any network access to domain controllers or the file server's internal IP addresses.
In Windows File Explorer, in the Address Bar, type the UNC path to a share on the file server and confirm you can access data in the share. Alternatively, you can use
NET USE /TRANSPORT:QUICorNew-SmbMapping -TransportType QUICwith a UNC path. Examples:REM Automatically tries TCP then QUIC NET USE * \\fsedge1.contoso.com\sales REM Tries only QUIC NET USE * \\fsedge1.contoso.com\sales /TRANSPORT:QUIC#Tries only QUIC New-SmbMapping -LocalPath 'Z:' -RemotePath '\\fsedge1.contoso.com\sales' -TransportType QUIC
SMB over QUIC client auditing
Auditing is used to track client connections for SMB over QUIC, with events being written to an event log. The Event Viewer captures this information for the QUIC transport protocol. This feature is available to SMB Client starting with Windows 11 Insider build 26090. To view these logs, follow these steps:
- Open the Event Viewer.
- Navigate to Applications and Services Logs\Microsoft\Windows\SMBClient\Connectivity.
- Monitor event ID 30832.
Configure the KDC Proxy (optional, but recommended)
By default, a Windows 11 device won't have access to an Active Directory domain controller when connecting to an SMB over QUIC file server. This means authentication uses NTLMv2, where the file server authenticates on behalf of the client. No NTLMv2 authentication or authorization occurs outside the TLS 1.3-encrypted QUIC tunnel. However, we still recommend using Kerberos as a general security best practice and don't recommend creating new NTLMv2 dependencies in deployments. To allow this, you can configure the KDC proxy to forward ticket requests on the user's behalf, all while using an internet-friendly HTTPS encrypted communication channel. The KDC Proxy is supported by SMB over QUIC and highly recommended.
Note
You cannot configure the WAC in gateway mode using TCP port 443 on a file server where you are configuring KDC Proxy. When configuring WAC on the file server, change the port to one that is not in use and is not 443. If you have already configured WAC on port 443, re-run the WAC setup MSI and choose a different port when prompted.
Windows Admin Center method
Ensure you're using at least WAC version 2110.
Configure SMB over QUIC normally. Starting in WAC 2110, the option to configure KDC proxy in SMB over QUIC is automatically enabled and you don't need to perform extra steps on the file servers. The default KDC proxy port is 443 and assigned automatically by WAC.
Note
You cannot configure an SMB over QUIC server joined to a Workgroup using WAC. You must join the server to an Active Directory domain or use the steps in Manual Method section.
Configure the following group policy setting to apply to the Windows 11 device:
Computer Configuration\Administrative Templates\System\Kerberos\Specify KDC proxy servers for Kerberos clients
The format of this group policy setting is a value name of your fully qualified Active Directory domain name and the value becomes the external name you specified for the QUIC server. For example, where the Active Directory domain is named
corp.contoso.comand the external DNS domain is namedcontoso.com:value name: corp.contoso.comvalue: <https fsedge1.contoso.com:443:kdcproxy />This Kerberos realm mapping means that if user ned@corp.contoso.com tried to connect to a file server name fs1edge.contoso.com, the KDC proxy knows to forward the kerberos tickets to a domain controller in the internal
corp.contoso.comdomain. The communication with the client will be over HTTPS on port 443 and user credentials aren't directly exposed on the client-file server network.Ensure that edge firewalls allow HTTPS on port 443 inbound to the file server.
Apply the group policy and restart the Windows 11 device.
Manual method
On the file server, in an elevated PowerShell prompt, run:
NETSH http add urlacl url=https://+:443/KdcProxy user="NT authority\Network Service"

Set-ItemProperty -Path "HKLM:\SYSTEM\CurrentControlSet\Services\KPSSVC\Settings" -Name "HttpsClientAuth" -Value 0 -Type DWord -Force

Set-ItemProperty -Path "HKLM:\SYSTEM\CurrentControlSet\Services\KPSSVC\Settings" -Name "DisallowUnprotectedPasswordAuth" -Value 0 -Type DWord -Force

Get-SmbServerCertificateMapping
Copy the thumbprint value from the certificate associated with SMB over QUIC certificate (there may be multiple lines but they'll all have the same thumbprint) and paste it as the Certhash value for the following command:
$guid = [Guid]::NewGuid()

Add-NetIPHttpsCertBinding -IPPort 0.0.0.0:443 -CertificateHash <thumbprint> -CertificateStoreName "My" -ApplicationId "{$guid}" -NullEncryption $false
Add the file server's SMB over QUIC names as SPNs in Active Directory for Kerberos. For example:
NETDOM computername ws2022-quic.corp.contoso.com /add fsedge1.contoso.com`Set the KDC Proxy service to automatic and start it:
Set-Service -Name kpssvc -StartupType Automatic

Start-Service -Name kpssvc
Configure the following group policy to apply to the Windows 11 device:
Computer Configuration\Administrative Templates\System\Kerberos\Specify KDC proxy servers for Kerberos clients
The format of this group policy setting is a value name of your fully qualified Active Directory domain name and the value becomes the external name you specified for the QUIC server. For example, where the Active Directory domain is named "corp.contoso.com" and the external DNS domain is named "contoso.com":
value name: corp.contoso.comvalue: <https fsedge1.contoso.com:443:kdcproxy />This Kerberos realm mapping means that if user
ned@corp.contoso.comtried to connect to a file server namefs1edge.contoso.com", the KDC proxy knows to forward the kerberos tickets to a domain controller in the internalcorp.contoso.comdomain. The communication with the client will be over HTTPS on port 443 and user credentials aren't directly exposed on the client-file server network.Create a Windows Defender Firewall rule that inbound-enables TCP port 443 for the KDC Proxy service to receive authentication requests.
Ensure that edge firewalls allow HTTPS on port 443 inbound to the file server.
Apply the group policy and restart the Windows 11 device.
Note
Automatic configuration of the KDC Proxy will come later in the SMB over QUIC and these server steps will not be necessary.
Certificate expiration and renewal
An expired SMB over QUIC certificate that you replace with a new certificate from the issuer will contain a new thumbprint. While you can automatically renew SMB over QUIC certificates when they expire using Active Directory Certificate Services, a renewed certificate gets a new thumbprint as well. This effectively means that SMB over QUIC must be reconfigured when the certificate expires, as a new thumbprint must be mapped. Select your new certificate in WAC for the existing SMB over QUIC configuration or use the Set-SMBServerCertificateMapping PowerShell command to update the mapping for the new certificate. You can use Azure Automanage for Windows Server to detect impending certificate expiration and prevent an outage. For more information, review Azure Automanage for Windows Server.
Notes
- For customers not using Azure public cloud, Windows Server 2022 Datacenter: Azure Edition is available on Azure Stack HCI beginning with version 22H2.
- We recommended using SMB over QUIC with Active Directory domains but isn't a requirement. You can also use SMB over QUIC on a workgroup-joined server with local user credentials and NTLM, or Azure IaaS with Microsoft Entra joined Windows Servers. Microsoft Entra joined Windows Servers for non-Azure IaaS based machines isn't supported. Microsoft Entra joined Windows Servers don't support credentials for remote Windows security operations because Microsoft Entra ID doesn't contain user or group SIDs. Microsoft Entra joined Windows Servers must use either a domain-based or local user account to access the SMB over QUIC share.
- You can't configure SMB over QUIC using WAC when the SMB server is in a workgroup (that is, not AD domain joined). Per this scenario, you must use the New-SMBServerCertificateMapping cmdlet.
- We recommend read-only domain controllers configured only with passwords of mobile users be made available to the file server.
- Users should have strong passwords or, ideally, be configured using a passwordless strategy with Windows Hello for Business MFA or smart cards. Configure an account lockout policy for mobile users through fine-grained password policy and you should deploy intrusion protection software to detect brute force or password spray attacks.
More references
Opinia
Dostępne już wkrótce: W 2024 r. będziemy stopniowo wycofywać zgłoszenia z serwisu GitHub jako mechanizm przesyłania opinii na temat zawartości i zastępować go nowym systemem opinii. Aby uzyskać więcej informacji, sprawdź: https://aka.ms/ContentUserFeedback.
Prześlij i wyświetl opinię dla