Nuta
Dostęp do tej strony wymaga autoryzacji. Możesz spróbować się zalogować lub zmienić katalog.
Dostęp do tej strony wymaga autoryzacji. Możesz spróbować zmienić katalogi.
Ten przewodnik krok po kroku pomoże Ci rozpocząć tworzenie za pomocą kontenerów zdalnych, konfigurując program Docker Desktop dla systemu Windows przy użyciu podsystemu WSL 2 (Podsystem Windows dla systemu Linux w wersji 2).
Program Docker Desktop dla systemu Windows udostępnia środowisko programistyczne do tworzenia, wysyłania i uruchamiania aplikacji dockerized. Włączając aparat oparty na protokole WSL 2, można uruchamiać zarówno kontenery systemu Linux, jak i Windows w programie Docker Desktop na tej samej maszynie. (Program Docker Desktop jest bezpłatny do użytku osobistego i małych firm, aby uzyskać informacje na temat cennika Pro, Team lub Business, zobacz często zadawane pytania dotyczące witryny platformy Docker).
Uwaga / Notatka
Zalecamy korzystanie z programu Docker Desktop ze względu na integrację z podsystemem Windows i Windows dla systemu Linux. Jednak program Docker Desktop obsługuje uruchamianie zarówno kontenerów systemu Linux, jak i Windows, nie można uruchamiać obu jednocześnie. Aby jednocześnie uruchamiać kontenery systemu Linux i Windows, należy zainstalować i uruchomić oddzielne wystąpienie platformy Docker w programie WSL. Jeśli musisz uruchamiać równoczesne kontenery lub po prostu wolisz zainstalować silnik kontenerów bezpośrednio w dystrybucji systemu Linux, postępuj zgodnie z instrukcjami instalacji dla tego systemu kontenerów, takimi jak Install Docker Engine on Ubuntu lub Instalowanie narzędzia Podman dla kontenerów Linuksa.
Omówienie kontenerów platformy Docker
Docker to narzędzie służące do tworzenia, wdrażania i uruchamiania aplikacji przy użyciu kontenerów. Kontenery umożliwiają deweloperom spakowywanie aplikacji ze wszystkimi potrzebnymi częściami (bibliotekami, strukturami, zależnościami itp.) i dostarczanie jej jako jednego pakietu. Użycie kontenera gwarantuje, że aplikacja będzie działać tak samo niezależnie od wszelkich dostosowanych ustawień lub wcześniej zainstalowanych bibliotek na komputerze z uruchomionym nim, które mogą różnić się od maszyny, która została użyta do pisania i testowania kodu aplikacji. Dzięki temu deweloperzy mogą skupić się na pisaniu kodu bez obaw o system, w ramach którego będzie uruchamiany kod.
Kontenery platformy Docker są podobne do maszyn wirtualnych, ale nie tworzą całego wirtualnego systemu operacyjnego. Zamiast tego platforma Docker umożliwia aplikacji używanie tego samego jądra systemu Linux co system, na którym działa. Dzięki temu pakiet aplikacji może wymagać tylko części, które nie są jeszcze na komputerze hosta, zmniejszając rozmiar pakietu i zwiększając wydajność.
Ciągła dostępność przy użyciu kontenerów platformy Docker z narzędziami takimi jak Kubernetes jest kolejnym powodem popularności kontenerów. Dzięki temu można utworzyć wiele wersji kontenera aplikacji w różnym czasie. Zamiast usuwać cały system na potrzeby aktualizacji lub konserwacji, każdy kontener (i jego konkretne mikrousługi) może zostać zastąpiony na bieżąco. Możesz przygotować nowy kontener ze wszystkimi aktualizacjami, skonfigurować kontener dla środowiska produkcyjnego i po prostu wskazać nowy kontener, gdy będzie gotowy. Możesz również zarchiwizować różne wersje aplikacji przy użyciu kontenerów i w razie potrzeby zachować ich działanie jako rezerwa bezpieczeństwa.
Aby dowiedzieć się więcej, zobacz Wprowadzenie do kontenerów platformy Docker.
Wymagania wstępne
Wersja WSL 1.1.3.0 lub nowsza.
Windows 11 Home and Pro lub Enterprise and Education, Windows 10 22H2 (kompilacja 19045) 64-bitowej wersji Home and Pro lub Enterprise and Education (zalecane).
Windows 10 21H2 (kompilacja 19044) 64-bitowa wersja Home and Pro lub Enterprise and Education (minimum). Aktualizowanie systemu Windows
64-bitowy procesor z translacją adresów drugiego poziomu (SLAT).
4 GB pamięci RAM lub więcej.
Włącz wirtualizację sprzętu w systemie BIOS.
Zainstaluj program Visual Studio Code(opcjonalnie). Zapewni to najlepsze środowisko, w tym możliwość kodowania i debugowania wewnątrz zdalnego kontenera platformy Docker i połączonego z dystrybucją systemu Linux.
Zainstaluj terminal systemu Windows(opcjonalnie). Zapewni to najlepsze środowisko, w tym możliwość dostosowywania i otwierania wielu terminali w tym samym interfejsie (w tym Ubuntu, Debian, PowerShell, interfejs wiersza polecenia platformy Azure lub cokolwiek wolisz używać).
Zarejestruj się, aby uzyskać identyfikator platformy Docker w usłudze Docker Hub(opcjonalnie).
Aby uzyskać aktualizacje warunków użytkowania, zobacz umowę licencyjną programu Docker Desktop .
Aby uzyskać więcej informacji, zobacz wymagania systemowe Docker dotyczące instalacji Docker Desktop w systemie Windows.
Aby dowiedzieć się, jak zainstalować platformę Docker w systemie Windows Server, zobacz Wprowadzenie: przygotowywanie systemu Windows dla kontenerów.
Uwaga / Notatka
WSL może uruchamiać dystrybucje zarówno w trybie WSL w wersji 1, jak i w WSL 2. Możesz to sprawdzić, otwierając program PowerShell i wprowadzając polecenie: wsl -l -v. Upewnij się, że dystrybucja jest ustawiona tak, aby korzystała z protokołu WSL 2, wprowadzając polecenie: wsl --set-version <Distro> 2. Zastąp element placeholder <Distro> nazwą dystrybucji (np. Ubuntu 18.04).
W WSL wersji 1, ze względu na podstawowe różnice między systemami Windows i Linux, silnik Docker nie mógł działać bezpośrednio w WSL, dlatego zespół Docker opracował alternatywne rozwiązanie przy użyciu maszyn wirtualnych Hyper-V i LinuxKit. Jednak ponieważ system WSL 2 działa teraz w jądrze systemu Linux z pełną pojemnością wywołań systemowych, platforma Docker może w pełni działać w programie WSL 2. Oznacza to, że kontenery systemu Linux mogą działać natywnie bez emulacji, co zapewnia lepszą wydajność i współdziałanie między narzędziami systemu Windows i Linux.
Instalowanie programu Docker Desktop
Za pomocą zaplecza WSL 2 obsługiwanego w programie Docker Desktop dla systemu Windows możesz pracować w środowisku deweloperskim opartym na systemie Linux i tworzyć kontenery oparte na systemie Linux, a jednocześnie używać programu Visual Studio Code do edytowania i debugowania kodu oraz uruchamiania kontenera w przeglądarce Microsoft Edge w systemie Windows.
Aby zainstalować platformę Docker (po zainstalowaniu programu WSL):
Pobierz program Docker Desktop i postępuj zgodnie z instrukcjami instalacji.
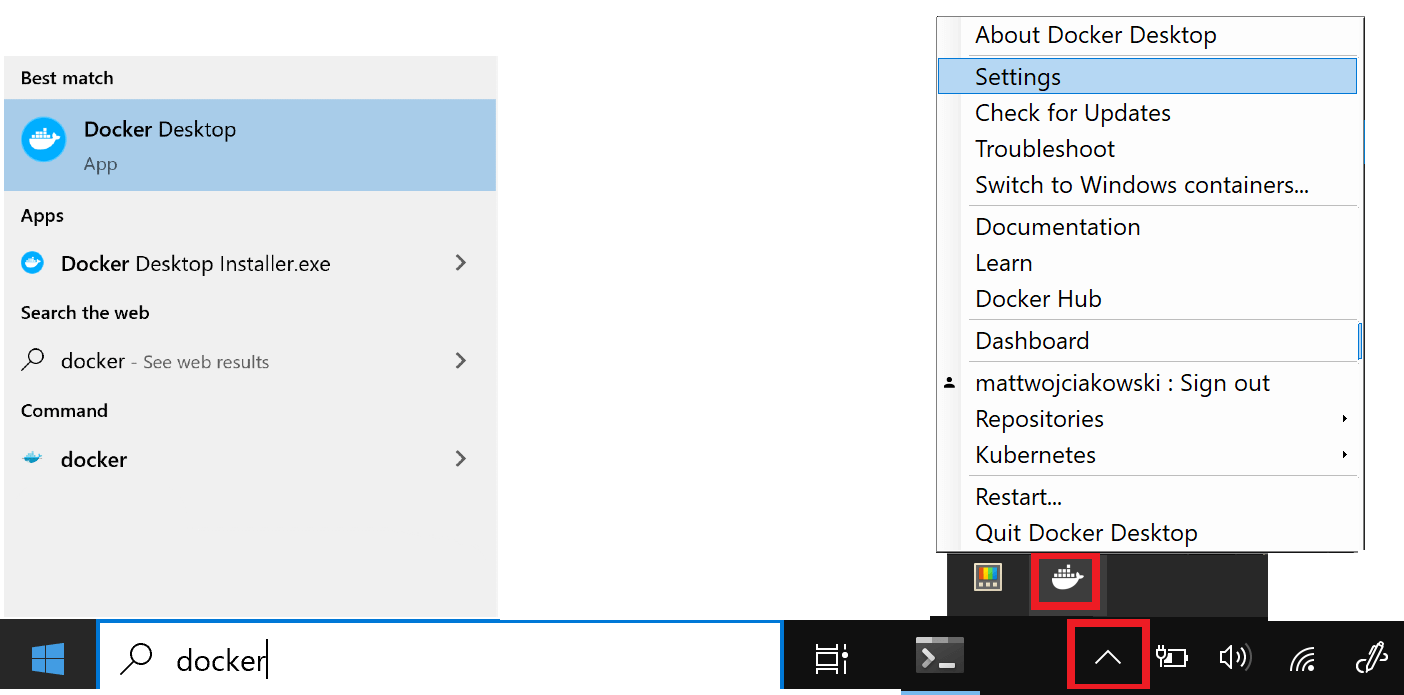
Po zainstalowaniu uruchom program Docker Desktop z menu Start systemu Windows, a następnie wybierz ikonę platformy Docker z menu ukrytych ikon paska zadań. Kliknij prawym przyciskiem myszy ikonę, aby wyświetlić menu poleceń platformy Docker i wybierz pozycję "Ustawienia".

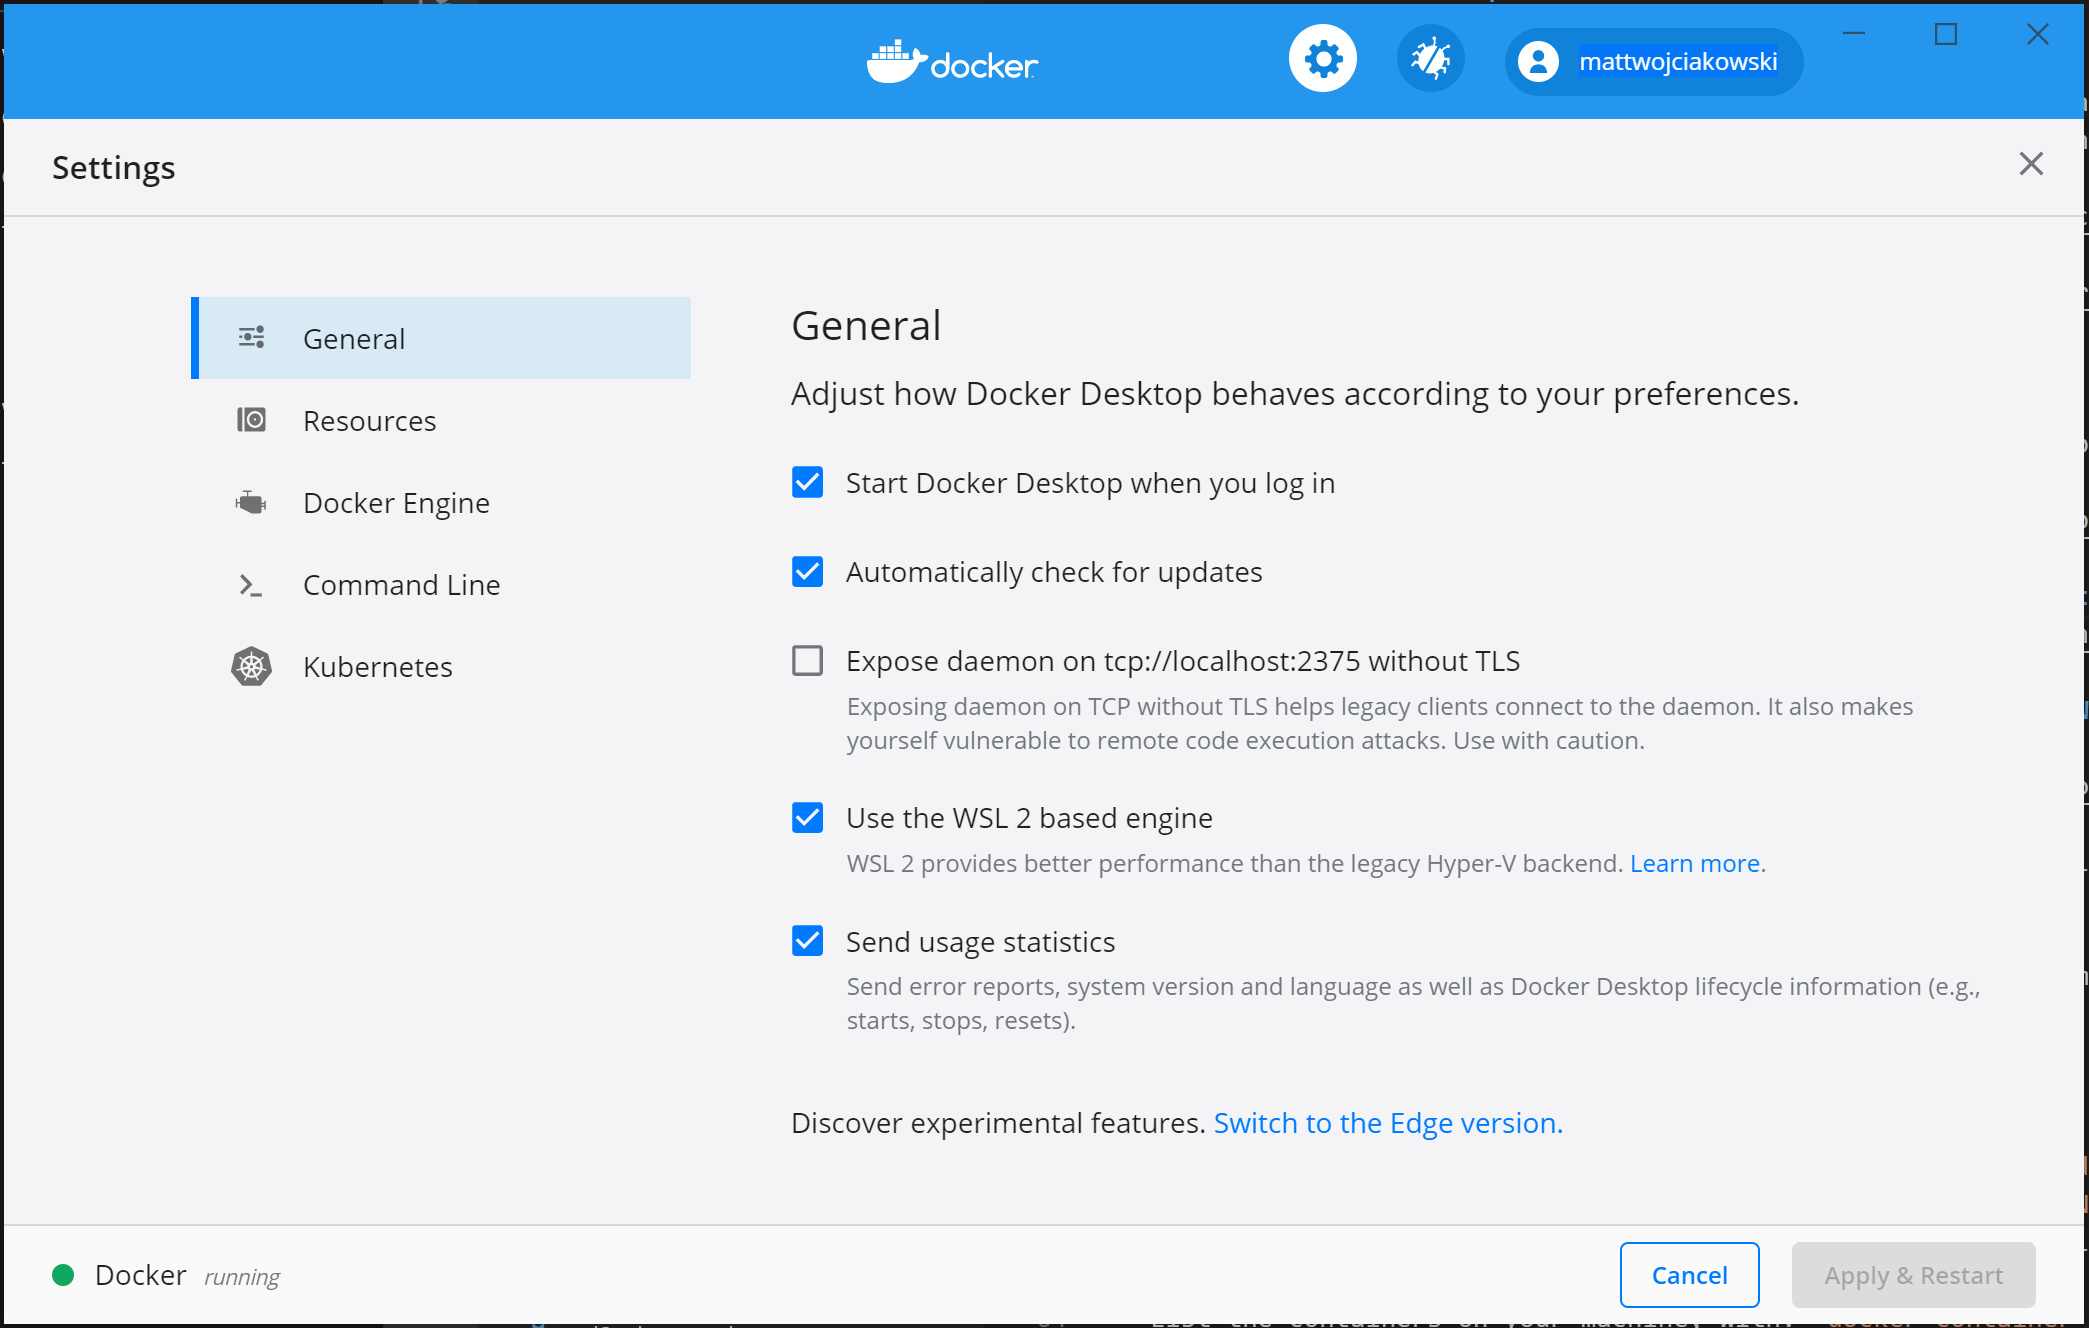
Upewnij się, że opcja "Użyj silnika opartego na WSL 2" jest zaznaczona w Ustawieniach>Ogólne.

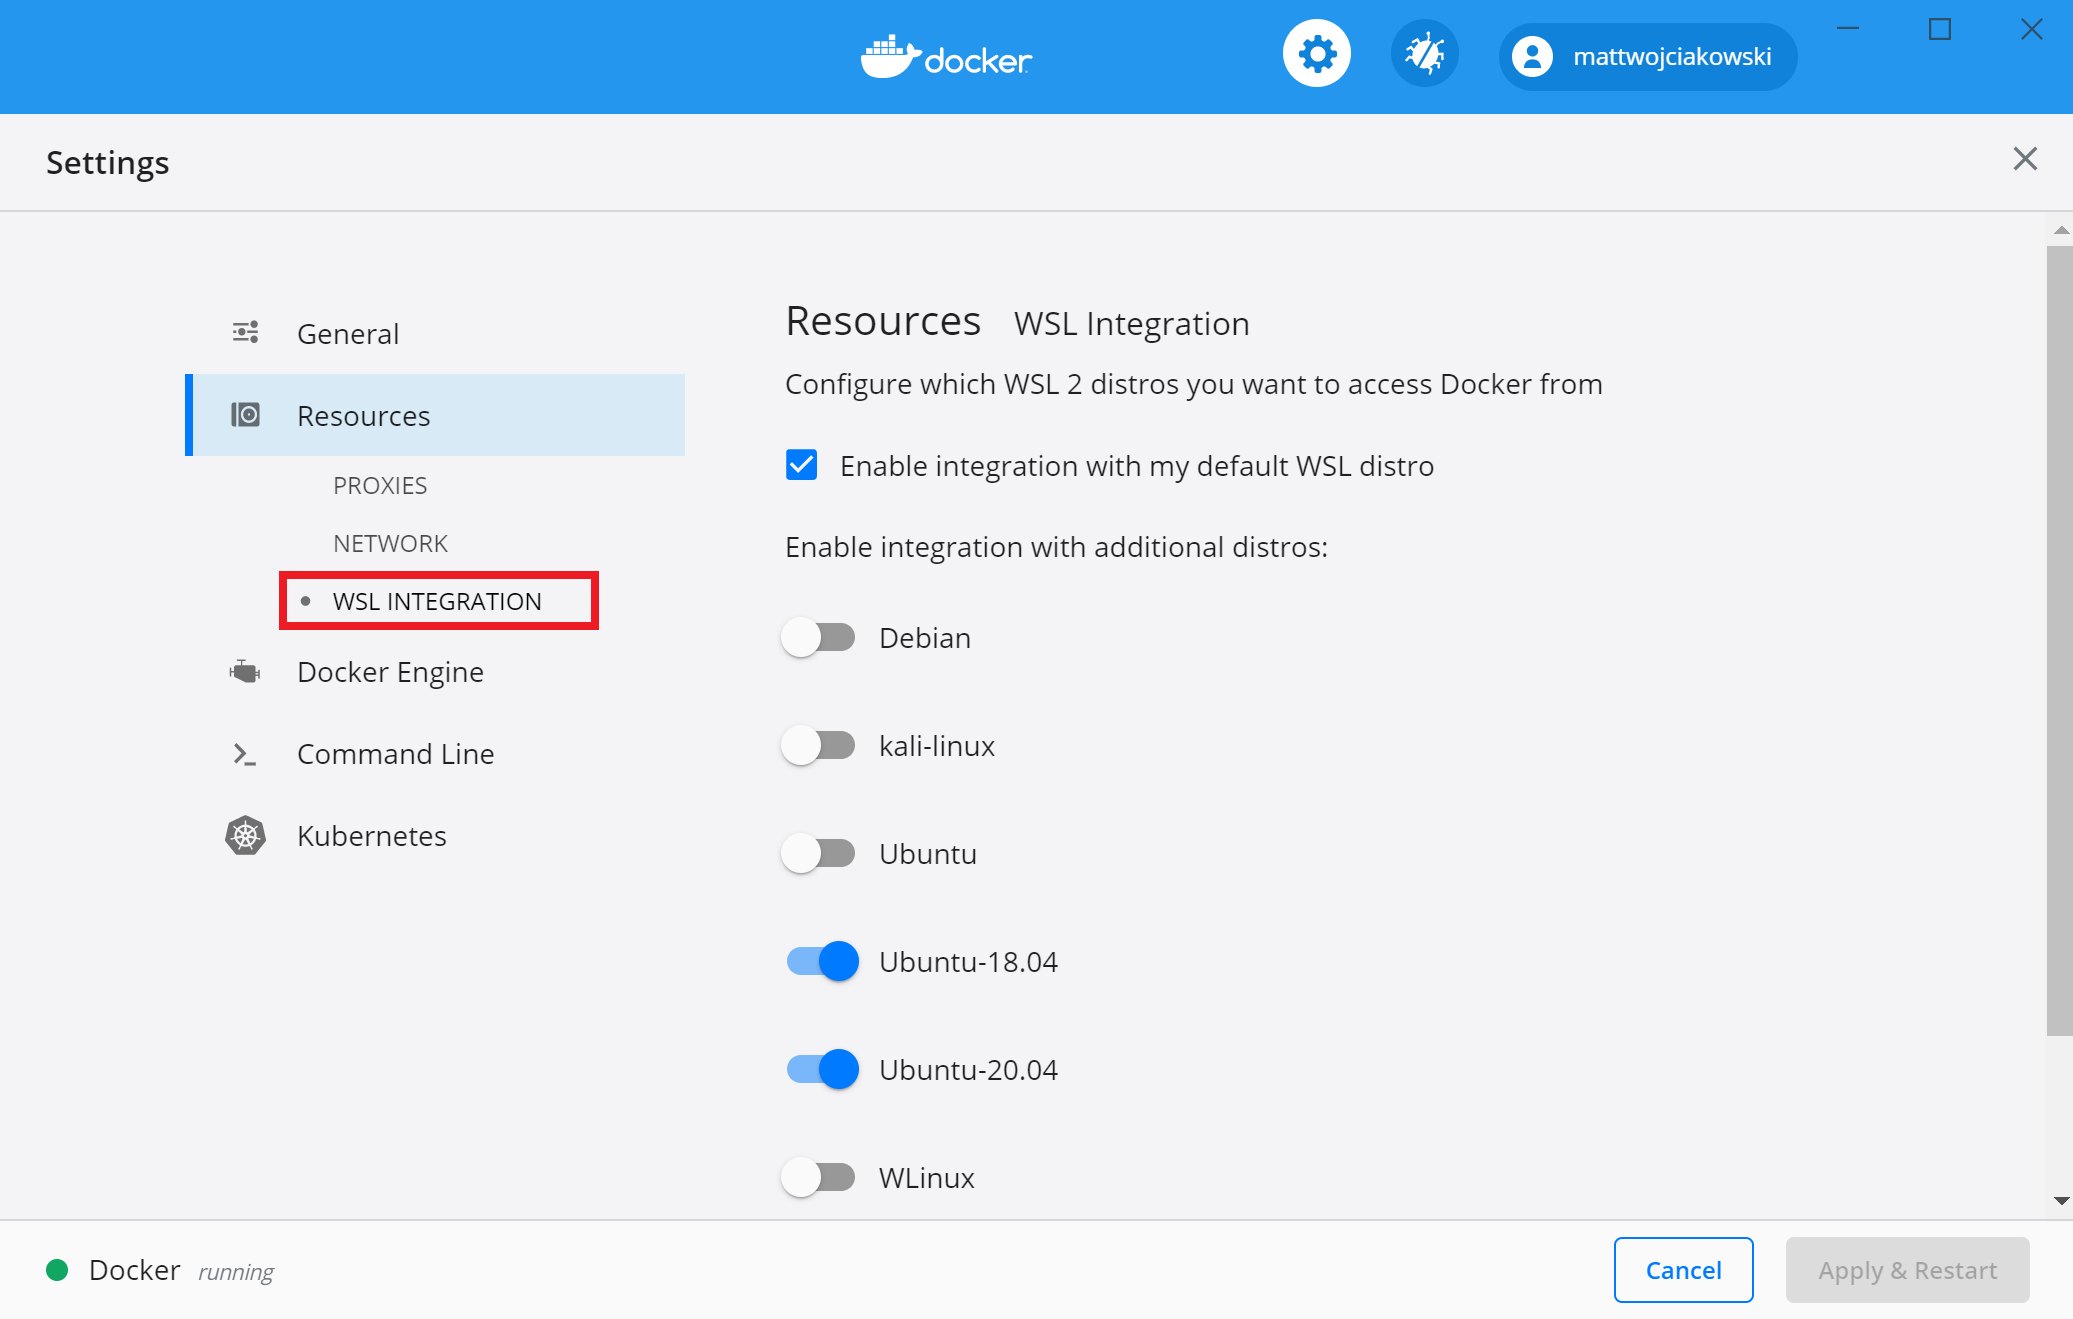
Wybierz z zainstalowanych dystrybucji WSL 2, na których chcesz włączyć integrację z Dockerem, przechodząc do: Ustawienia>Zasoby>Integracja WSL.

Aby potwierdzić, że platforma Docker została zainstalowana, otwórz dystrybucję WSL (np. Ubuntu) i wyświetl wersję i numer kompilacji, wprowadzając następujące polecenie:
docker --versionAby sprawdzić, czy twoja instalacja działa poprawnie, uruchom prosty wbudowany obraz Docker przy użyciu:
docker run hello-world
Wskazówka
Oto kilka przydatnych poleceń platformy Docker do poznania:
- Wyświetl listę poleceń dostępnych w interfejsie wiersza polecenia platformy Docker, wprowadzając następujące polecenie:
docker - Wyświetlanie listy informacji dotyczących określonego polecenia za pomocą polecenia:
docker <COMMAND> --help - Wyświetl listę obrazów platformy Docker na maszynie (co jest tylko obrazem hello-world w tym momencie), przy użyciu następujących elementów:
docker image ls --all - Wyświetl listę kontenerów na swojej maszynie, wykonując polecenie:
docker container ls --alllubdocker ps -a(bez flagi -a pokaże tylko uruchomione kontenery) - Wyświetl systemowe informacje dotyczące instalacji platformy Docker, w tym statystyki i zasoby (procesor CPU i pamięć) dostępne w kontekście WSL 2 z:
docker info
Programowanie w kontenerach zdalnych przy użyciu programu VS Code
Aby rozpocząć tworzenie aplikacji przy użyciu platformy Docker z usługą WSL 2, zalecamy używanie programu VS Code wraz z rozszerzeniami WSL, Dev Containers i Docker.
Zainstaluj rozszerzenie WSL programu VS Code. To rozszerzenie umożliwia otwarcie projektu systemu Linux uruchomionego w programie WSL w programie VS Code (nie trzeba martwić się o problemy ze ścieżkami, zgodność binarną lub inne wyzwania związane z systemem operacyjnym).
Zainstaluj rozszerzenie VS Code Dev Containers. To rozszerzenie umożliwia otwieranie folderu projektu lub repozytorium wewnątrz kontenera, korzystając z pełnego zestawu funkcji programu Visual Studio Code w celu wykonywania prac programistycznych w kontenerze.
Zainstaluj rozszerzenie platformy Docker programu VS Code. To rozszerzenie dodaje funkcje do kompilowania, zarządzania i wdrażania konteneryzowanych aplikacji z poziomu programu VS Code. (Aby faktycznie używać kontenera jako środowiska deweloperskiego, potrzebne jest rozszerzenie Dev Containers).
Użyjmy platformy Docker do utworzenia kontenera deweloperskiego dla istniejącego projektu aplikacji.
W tym przykładzie użyję kodu źródłowego z samouczka Hello World dla frameworka Django zawartego w dokumentacji konfiguracji środowiska programistycznego Python. Jeśli wolisz używać własnego kodu źródłowego projektu, możesz pominąć ten krok. Aby pobrać aplikację internetową HelloWorld-Django z usługi GitHub, otwórz terminal WSL (na przykład Ubuntu) i wprowadź następujące polecenie:
git clone https://github.com/<username>/helloworld-django.gitUwaga / Notatka
Zawsze przechowuj kod w tym samym systemie plików, w którym używasz narzędzi. Spowoduje to szybszą wydajność dostępu do plików. W tym przykładzie używamy dystrybucji systemu Linux (Ubuntu) i chcemy przechowywać pliki projektu w systemie
\\wsl\plików WSL. Przechowywanie plików projektu w systemie plików systemu Windows znacznie spowolniłoby korzystanie z narzędzi systemu Linux w programie WSL w celu uzyskania dostępu do tych plików.W terminalu programu WSL zmień katalogi na folder kodu źródłowego dla tego projektu:
cd helloworld-djangoOtwórz projekt w programie VS Code uruchomionym na lokalnym serwerze rozszerzenia WSL, wprowadzając następujące polecenie:
code .Upewnij się, że jesteś podłączony do swojej dystrybucji Linux WSL, sprawdzając zielony wskaźnik połączenia zdalnego w lewym dolnym rogu wystąpienia programu VS Code.

Z palety poleceń programu VS Code (Ctrl + Shift + P) wprowadź: Dev Containers: Otwórz ponownie w kontenerze, ponieważ korzystamy z folderu, który został już otwarty za pomocą rozszerzenia WSL. Alternatywnie użyj funkcji Dev Containers: Otwórz folder w kontenerze... , aby wybrać folder WSL przy użyciu udziału lokalnego
\\wsl$(po stronie systemu Windows). Aby uzyskać więcej informacji, zobacz Szybki start programu Visual Studio Code : otwieranie istniejącego folderu w kontenerze . Jeśli te polecenia nie są wyświetlane podczas wpisywania, sprawdź, czy zainstalowano rozszerzenie Dev Containers połączone powyżej.
Wybierz folder projektu, który chcesz konteneryzować. Będzie to wyglądać mniej więcej tak:
\\wsl\Ubuntu-20.04\home\<username>\repos\helloworld-django\
Zostanie wyświetlona lista definicji kontenerów, ponieważ nie ma jeszcze konfiguracji kontenera developerskiego w folderze projektu (repozytorium). Lista wyświetlanych definicji konfiguracji kontenera jest filtrowana na podstawie typu projektu. W przypadku mojego projektu Django wybierzę język Python 3.

Zostanie otwarte nowe wystąpienie programu VS Code, rozpocznie tworzenie nowego obrazu, a po zakończeniu kompilacji uruchomimy nasz kontener. Zobaczysz, że pojawił się nowy
.devcontainerfolder z informacjami o konfiguracji kontenera wewnątrz plikówDockerfileidevcontainer.json.
Aby potwierdzić, że projekt jest nadal połączony zarówno z usługą WSL, jak i w kontenerze, otwórz zintegrowany terminal programu VS Code (Ctrl + Shift + ~). Sprawdź system operacyjny, wprowadzając:
unamei wersję języka Python za pomocą polecenia:python3 --version. Widać, że uname wskazuje na "Linux", więc nadal jesteś połączony z silnikiem WSL 2, a wersja języka Python będzie oparta na konfiguracji kontenera, która może różnić się od wersji Pythona zainstalowanej w twojej dystrybucji WSL.Aby uruchomić i debugować aplikację wewnątrz kontenera przy użyciu programu Visual Studio Code, najpierw otwórz menu Uruchom (Ctrl+Shift+D lub wybierz kartę na pasku menu po lewej stronie). Następnie wybierz pozycję Uruchom i Debuguj , aby wybrać konfigurację debugowania i wybrać konfigurację najlepiej dopasowaną do projektu (w moim przykładzie będzie to "Django"). Spowoduje to utworzenie
launch.jsonpliku w.vscodefolderze projektu z instrukcjami dotyczącymi sposobu uruchamiania aplikacji.
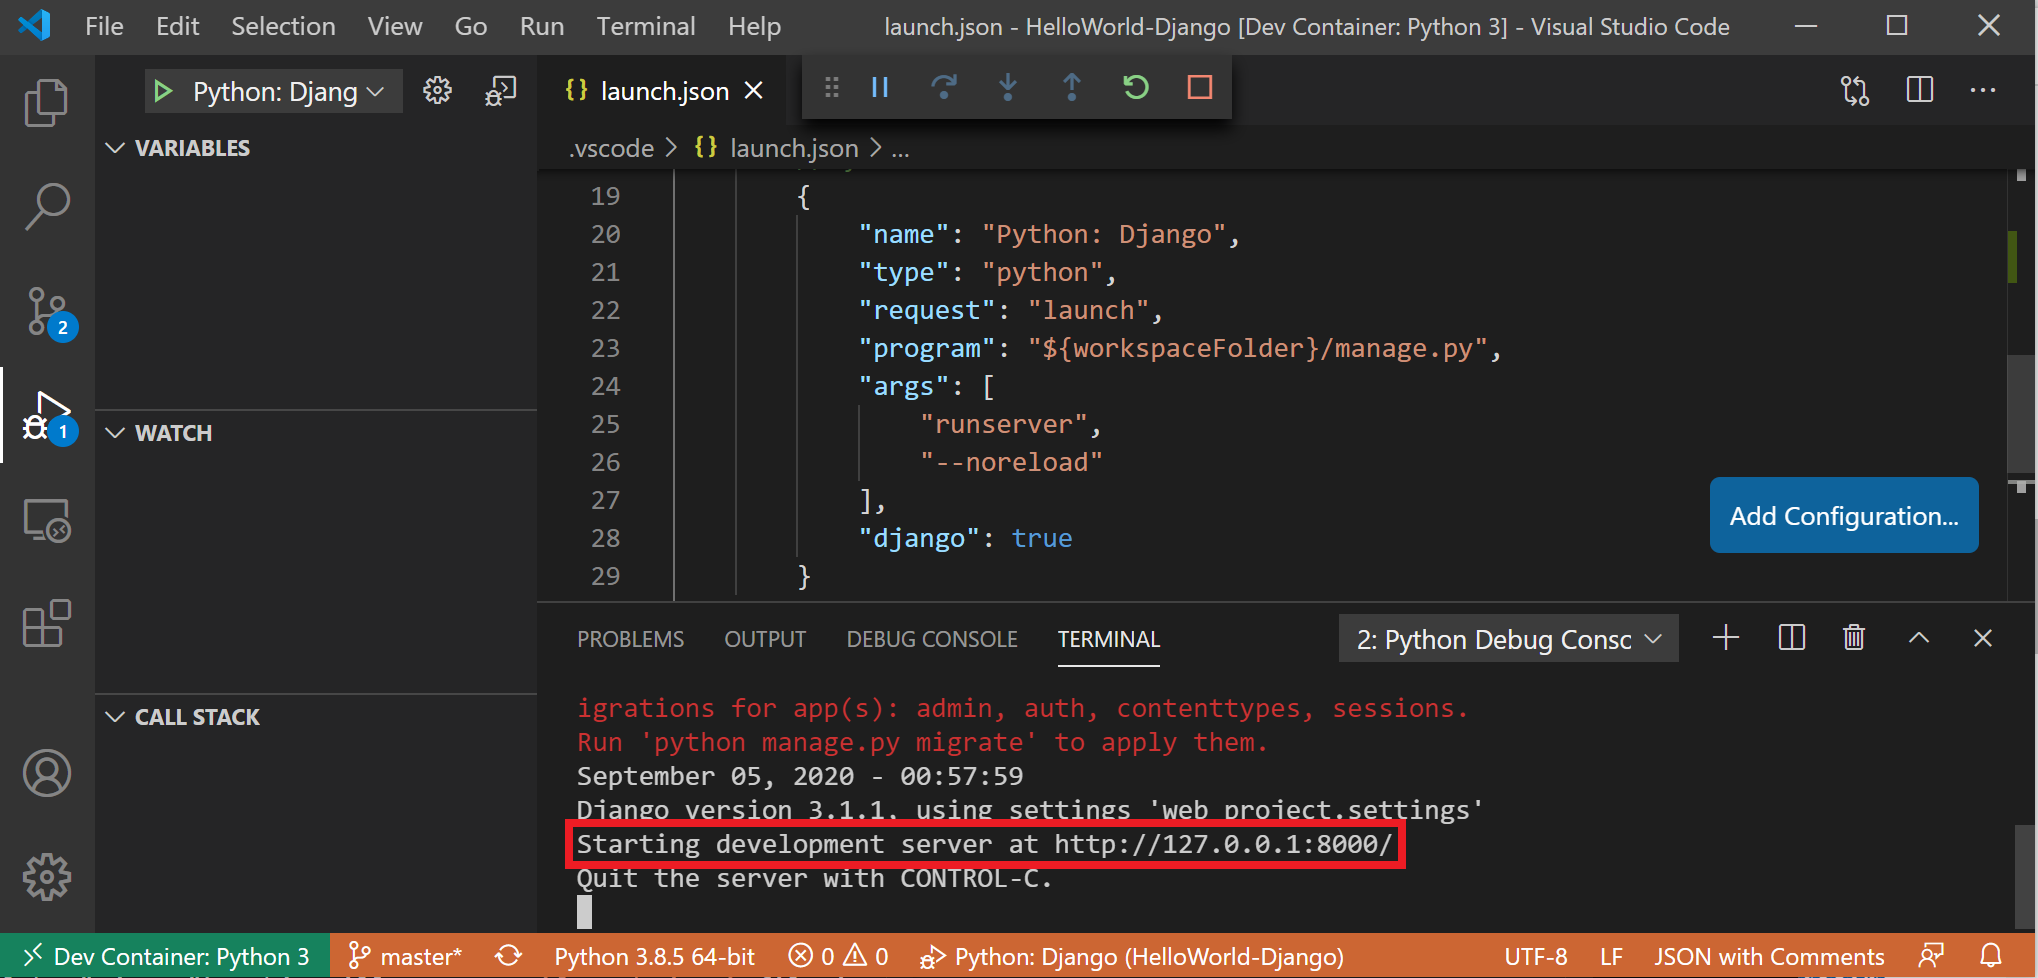
W programie VS Code wybierz pozycję Uruchom debugowanie> (lub naciśnij F5). Spowoduje to otwarcie terminala w VS Code i powinien zostać wyświetlony wynik podobny do następującego: "Uruchamia serwer programistyczny pod adresem
http://127.0.0.1:8000/Zamknij serwer, używając kombinacji klawiszy CONTROL-C." Przytrzymaj klawisz Control i wybierz wyświetlany adres, aby otworzyć aplikację w domyślnej przeglądarce internetowej i zobaczyć, jak projekt działa wewnątrz swojego kontenera.
Teraz pomyślnie skonfigurowano kontener tworzenia zdalnego przy użyciu programu Docker Desktop obsługiwanego przez zaplecze programu WSL 2, w którym można kodować, kompilować, uruchamiać, wdrażać lub debugować przy użyciu programu VS Code.
Rozwiązywanie problemów
Kontekst Docker dla WSL jest przestarzały
Jeśli używasz wczesnej wersji Tech Preview platformy Docker for WSL, być może masz kontekst platformy Docker o nazwie "wsl", który jest teraz przestarzały i nie jest już używany. Możesz sprawdzić za pomocą polecenia: docker context ls. Możesz usunąć ten kontekst "wsl", aby uniknąć błędów z poleceniem: docker context rm wsl, ponieważ chcesz używać domyślnego kontekstu dla systemów Windows i WSL2.
Możliwe błędy, które mogą wystąpić z tym przestarzałym kontekstem wsl, obejmują: "docker wsl open //./pipe/docker_wsl: System nie może odnaleźć określonego pliku." lub "błąd podczas nawiązywania połączenia: Get http://%2F%2F.%2Fpipe%2Fdocker_wsl/v1.40/images/json?all=1: open //./pipe/docker_wsl: System nie może odnaleźć określonego pliku."
Aby uzyskać więcej informacji na ten problem, zobacz Jak skonfigurować platformę Docker w systemie Windows dla systemu Linux (WSL2) w systemie Windows 10.
Problemy z znajdowaniem folderu magazynu obrazów platformy Docker
Platforma Docker tworzy dwa foldery dystrybucji do przechowywania danych:
- \wsl$\docker-desktop
- \wsl$\docker-desktop-data
Te foldery można znaleźć, otwierając dystrybucję systemu Linux WSL i wprowadzając polecenie: explorer.exe . w celu wyświetlenia folderu w Eksploratorze plików systemu Windows. Wprowadź: \\wsl\<Distro>\mnt\wsl zastąp <Distro> ciąg nazwą dystrybucji (np. Ubuntu-24.04), aby wyświetlić te foldery.
Aby dowiedzieć się więcej o lokalizowaniu miejsc przechowywania Dockera w WSL, zapoznaj się z tą kwestią w repozytorium WSL lub wpisem na StackOverflow.
Aby uzyskać więcej pomocy dotyczącej ogólnych problemów z rozwiązywaniem problemów w programie WSL, zobacz dokument dotyczący rozwiązywania problemów .
Dodatkowe zasoby
- Dokumentacja platformy Docker: najlepsze rozwiązania dotyczące programu Docker Desktop z usługą WSL 2
- Opinie dotyczące aplikacji Docker Desktop dla systemu Windows: Zgłoś problem
- Dokumentacja programu VS Code: wskazówki dotyczące wybierania środowiska deweloperskiego
- Blog programu VS Code: korzystanie z platformy Docker w programie WSL 2
- Blog programu VS Code: używanie kontenerów zdalnych w programie WSL 2
- Hanselminutes Podcast: Czynienie platformy Docker przyjazną dla deweloperów z Simonem Ferquelem
Windows Subsystem for Linux