Note
Access to this page requires authorization. You can try signing in or changing directories.
Access to this page requires authorization. You can try changing directories.
Virtual tables enable integrating data from external data sources by seamlessly representing that data as tables in Microsoft Dataverse, without data replication. Solutions, apps, flows, and more can use virtual tables as if they were native Dataverse tables. Virtual tables allow for full create, read, update, and delete privileges unless the data source they're connecting to specifically forbids it. More information about virtual tables: Create and edit virtual tables that contain data from an external data source.
This document covers the new experience using Power Apps (make.powerapps.com) to create virtual tables using the following virtual connector providers:
- SQL Server
- Microsoft SharePoint
- Microsoft Fabric (preview)
- Salesforce (preview)
- Oracle (preview)
- Snowflake (preview)
- PostgreSQL
These virtual connector providers use a Power Platform connector. More information: Connector reference for virtual connector providers used with virtual tables
You can create a virtual table for Excel using a legacy process with a virtual connector provider. More information: Create virtual tables using Excel in Microsoft Dataverse
Overview
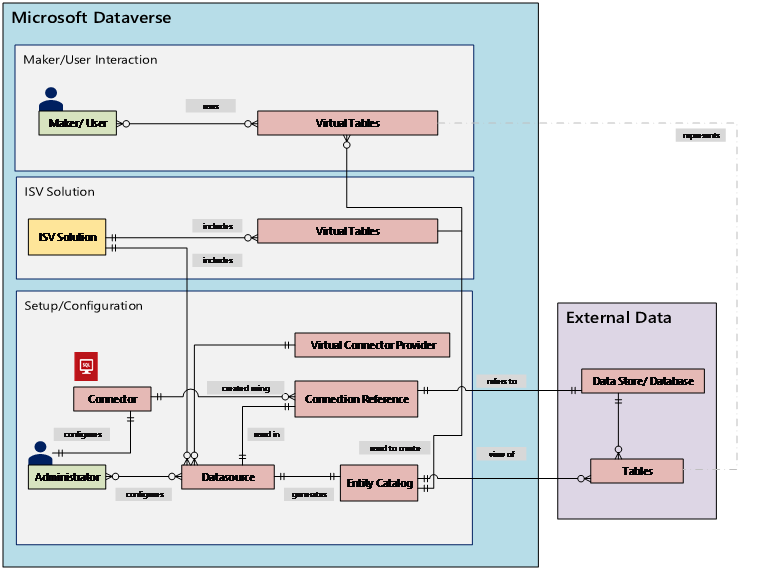
Virtual tables include the following components:

- Data Source – the location where the external data is stored.
- Data Provider – defines the behavior of the virtual table.
- Connection – sets up the ability to connect to the data source and authentication.
- Connection reference – provides a way for Dataverse to use the connection to the data source.
If you were to create a virtual table using a custom data provider, you need to write plugins that define how every Dataverse API would interact with the API on the system where the data is stored. This is a long process that requires knowledge of coding. Virtual connector providers streamline the creation experience by automating some of the creation for you and removing the need to use code to create the virtual tables.
When you establish a remote connection to an external source using a connector data source, the virtual connector provider automatically retrieves a list of all the available tables and lists by retrieving table definitions (metadata) from the external data source. You then select these tables and lists to generate the virtual table.
The underlying data source is key for allowing the provider to establish an authenticated remote connection to the external data. It uses a connection reference that stores pertinent details regarding the external source. The information stored in the connection reference is specific to the connector type and the connection it refers to.

When setting up the connection and connection reference for your data sources, specific information is needed. For example, the SQL Server connector needs server name, database name, the authentication method, username, password, and (optionally) gateway connection details. Each external data source needs a connection reference defined to create the virtual table. When using the Power Apps (make.powerapps.com) experience, the connection reference can be generated automatically for you unless you wish to provide custom naming.
The connector permissions enforce the ability for organizational users to access and operate on the virtual table. The connection can be shared with one user or can be shared with the entire organization. This allows users to access and operate virtual tables using a shared connection. By using security roles, virtual table access can be restricted to a specific set of users within your organization. You can even specify which roles have create, read, update, or delete privileges in this way.
Application lifecycle management (ALM) is supported for virtual tables created using the virtual connector provider. You can even create the virtual tables from directly within a solution when using Power Apps (make.powerapps.com). Virtual tables should be part of a managed solution along with the connection reference to distribute the solution. The solution can have other components, such as a model-driven app that uses virtual tables.
More information about application lifecycle management (ALM) and solutions:
Prerequisites
To create a virtual table, you must have a Microsoft Dataverse license through Power Apps or Microsoft Dynamics 365. Microsoft 365 or Teams licenses can't be used to create virtual tables.
Create a virtual table in Power Apps
Creating a virtual table in Power Apps (make.powerapps.com) using the virtual connector provider includes the following steps:
- Choose to create a table using an external data source
- Create the virtual table
- Create and select the connection reference (optional)
- Choose your connection details and select your data SQL or SharePoint.
- Configure your data
- Configure column and table names (optional)
- Complete the setup
Choose to create a table using an external data source
These steps describe how to create a virtual table from a solution. Use similar steps to create a virtual table by going to Data > Tables.
- Sign into Power Apps, and then select Solutions in the left navigation pane. If the item isn’t in the side panel pane, select …More and then select the item you want.
- Create a new solution or open an existing unmanaged solution.
- On the command bar, select New > Table > Virtual table.
Create the virtual table
Watch a short video showing how to create a virtual table with the virtual connector provider.
In the New table from external data wizard you can either select an existing connection if you have one or choose to Add connection.
- If you want to use an existing connection, select the connection you want, and then select Next.
- If you have an existing connection but wish to create a new one, select New connection on the command bar.
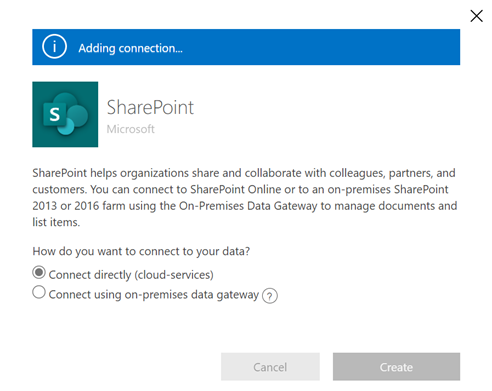
- If you have no connections and wish to create a new connection, select +Add Connection next to the connection type you want.
Important
Connections that are shared with you aren't available for use with this feature. Only connections created by the current user appear in the virtual table wizard.
You're directed to a new tab in your browser. Select your authentication method. Depending on the authentication method selected, you might be asked to provide credential information required to create the connection.
- SQL Server
- Microsoft SharePoint
- Microsoft Fabric (preview)
- Salesforce (preview)
- Oracle (preview)
- Snowflake (preview)
- PostgreSQL
Important
These will be the credentials used for all authentication for the virtual table so use credentials with the correct level of permissions with SQL Server.
- Microsoft Entra: Select and sign in with your credentials.
- SQL Server: Server name, database name, user name, password, gateway (on-premises deployments only).
Optionally, select Advanced options to use a connection reference and/or environment variable.
When you create a virtual table, a connection reference is automatically created for you with the virtual table. A connection reference is a solution component that contains information about the connector. However, you might want to create you own. To do this, select Manually configure connection reference. More information: Create and select a connection reference (optional)
You can associate a virtual table with its own environment variable. Select Use environment variables to link the environment variable directly to the virtual table provider, offering flexibility to modify data sources when importing the virtual table into a new environment. More information: Environment variable

Select Create.
After the connection is created, go back to your browser tab with the wizard and select Refresh, and then select your connection.
Connection references and environment variables
Create and select a connection reference (optional)
When you create a virtual table, a connection reference is automatically created for you with the virtual table. A connection reference is a solution component that contains information about the connector.
However, you might want to create your own connection reference for the virtual table.
Note
- The benefit of optionally naming your connection reference is because it can be easier to find later if you need details about it.
- If you're using an existing connection you can select an existing connection reference or create a new one. Creating a new connection reference is only used if you want to segment your virtual tables into completely unrelated solutions for use later.
To create a connection reference, when you're creating the connection for the virtual table, follow these steps:
Expand Advanced options and then select the Manually configure connection reference to create a connection reference for the virtual table.
On the Connection Reference page, select or name your connection reference, and then select Next.
- If you chose SQL and Microsoft Entra ID as your authentication method, you're asked for your SQL server name and database name. Provide these and select Next.
Environment variable
Environment variables play a key role in the application lifecycle management (ALM) process, allowing for seamless movement of applications across different Power Platform environments. When creating a virtual table, you can associate it with its own environment variable. To take advantage of this functionality, expand Advanced options, and then select Use environment variables when choosing a connection for your data source during a virtual table create.
Environment variables with virtual tables recommendations
- Create or update a virtual table in the context of a solution.
- If an existing virtual table with environment variable needs to be added to a solution, then the environment variable related to this virtual table needs to be explicitly added to the solution. From the Solutions area in Power Apps, select Add existing > Environment variable, and then select the environment variable related to the virtual table. After this step, select the environment variable and then select Advanced and add the required objects.
- If a virtual table is created without an environment variable specified, you must re-create the virtual table and select the environment variable option.
Environment variables with virtual tables limitation
- Environment variable support with virtual tables currently only work with SharePoint and SQL virtual connectors.
Configure your data
If you're creating a SharePoint virtual table, you're asked to enter the URL of your SharePoint site or select from your most recently used SharePoint sites. The most recently used list is populated by gathering information about your recently used sites using Microsoft Graph and your Microsoft Entra credentials. If you're pasting the SharePoint URL, only include the information up to the site name, such as https://microsoft.sharepoint.com/teams/Contoso.
A page is displayed where you can either search your data source for a specific table or list, or select a table or list from the provided list.
Select the check box if you want to configure the table name, column names, and primary field.
Select Next.
Configure table and column names (optional)
When you create a virtual table, by default you can choose to change the suggested table and column names. To do this, follow these steps:
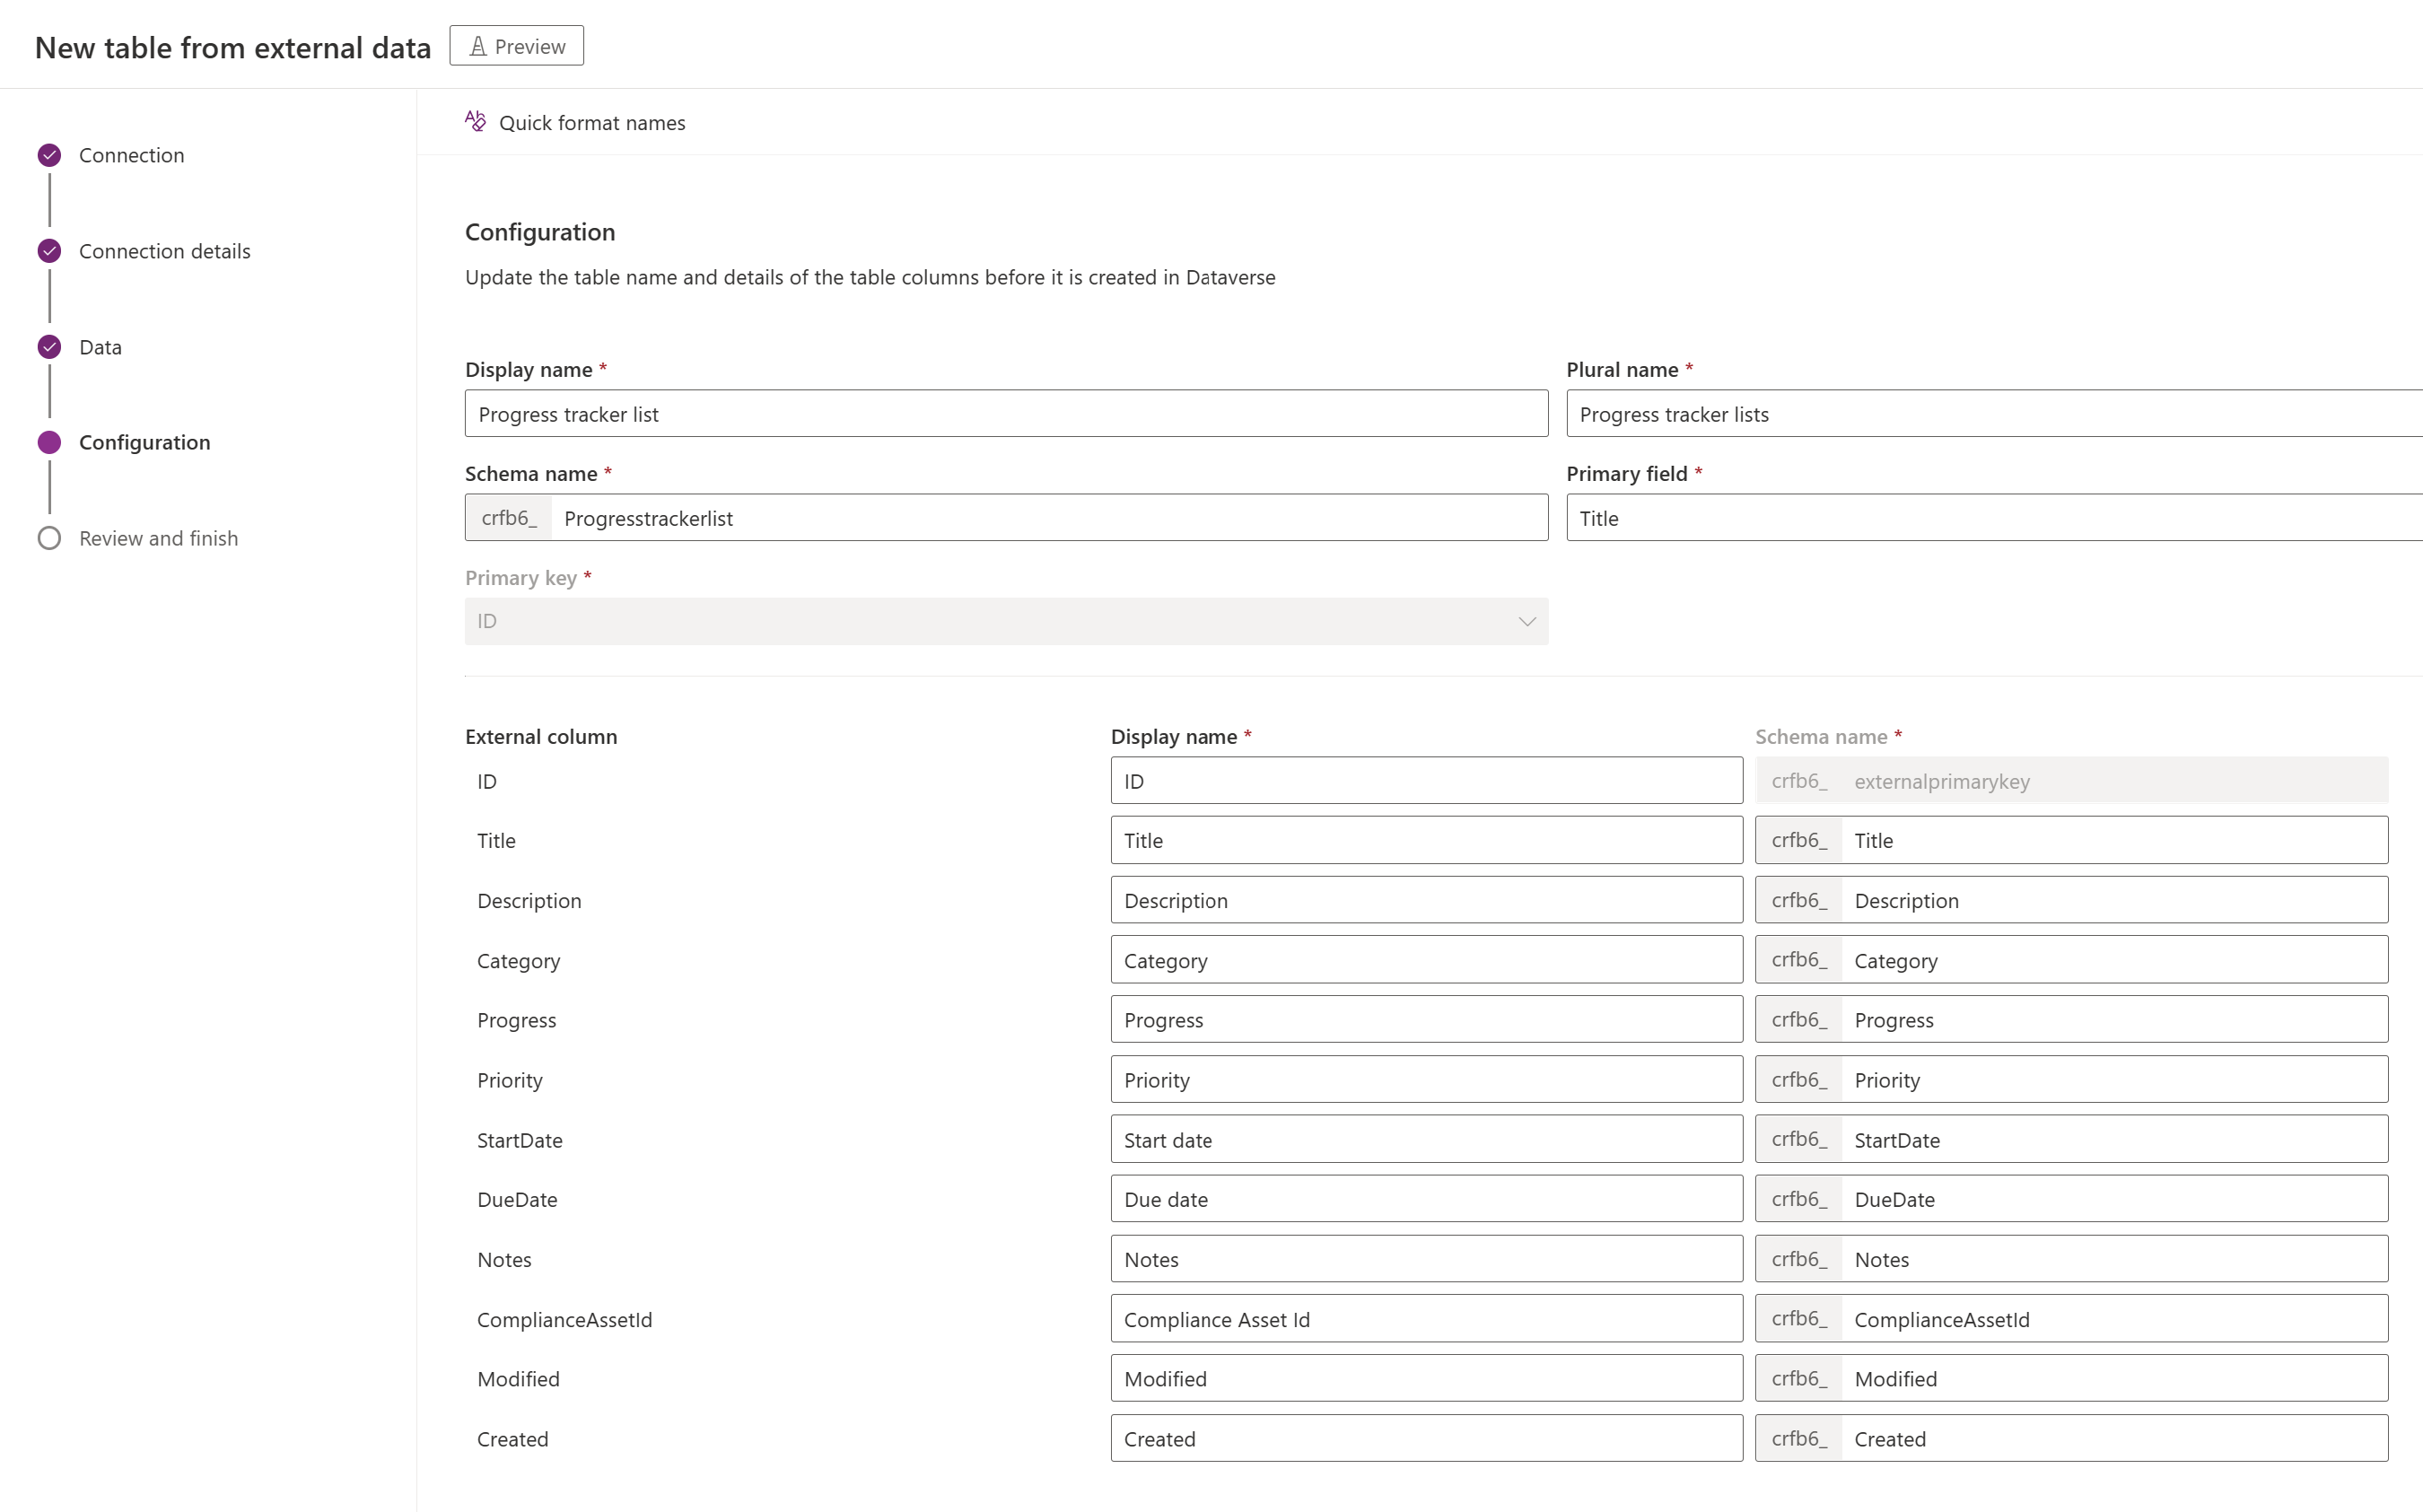
Select Configure table and column names that will be used in Dataverse, accept, or change the following Dataverse table properties:
- Display name: The name that is used to identify your virtual table.
- Plural name: The plural of the virtual table name, used in appropriate situations where you refer to one or more record from the table, such as Customer is the table for multiple records refereed to as Customers.
- Schema name: The logical name Dataverse uses for the virtual table, which includes the solution publisher prefix.
- Primary field: This is the text value to be used when looking up records on your virtual table. Only string fields can be selected. A primary key is a required field but will be chosen by Dataverse.
In the External column area, choose if you would like to rename any of your external columns from the data source. The following fields are provided:
- Schema name (read-only). This is the schema name of the column in the data source. This property is read only.
- Display name. The name that's used to identify your column.
- Schema name. The logical name Dataverse will use for the column that will include your solution publisher prefix. There's a Quick Format Names option on the page, this provides suggested name changes and can be useful if you have a large number of fields that include prefixed values from your SQL server such as <tablename>.<column name>. For example, Database12.Products would change to Products.
Tip
Instead of entering the information, the Quick format names command provides suggested name changes and can be useful if you have a large number of fields that include prefixed values from your SQL server, such as tablename.column name. For example, Database12.Products would change to Products.

Select Next
Complete the setup
- The Review and Finish page shows you the table you're connecting to in your data source, and the table that will be created in Dataverse.
Note
Select Choose a different table takes you back to the table selection screen. selecting Edit Configuration of Table takes you to the Configuration screen.
- If everything is correct, select Next.
Once the table is created, you're taken directly to your new virtual table where you can view your data and begin working with it.
Note
When you attempt to create a virtual table that already exists, you receive a message that the table already exists and that you will be re-creating it. You will not be able to change the primary field or schema name if this is the case. Re-creating the table will update any column changes that were made in the data source on the table.
Connector reference for virtual connector providers used with virtual tables
To learn more about supported actions and limitations with each connector, go to:
- Connector reference for the SQL Server connector
- Connector reference for the Microsoft Excel Online Business connector
- Connector reference for the SharePoint Online connector
- Connector reference for the Salesforce connector
- Connector reference for the Oracle connector
- Connector reference for the Snowflake connector
- Connection reference for PostgreSQL connector
See also
Setting up a virtual table relationship
Known limitations and troubleshooting with virtual tables
Developers Guide: Get started with virtual tables (entities)
