Note
Access to this page requires authorization. You can try signing in or changing directories.
Access to this page requires authorization. You can try changing directories.
[This topic is pre-release documentation and is subject to change.]
The goal of these example plug-ins is to help you get started by integrating them into your apps. You'll understand the authoring experience includes authoring Microsoft Dataverse custom APIs backed by Power Fx expressions, which can trigger actions internal or external to Dataverse.
Important
- Instant low-code plug-ins are deprioritized and aren't being delivered as a feature. Instant low-code plug-ins are replaced with functions. More information: Functions in Microsoft Dataverse (preview)
- This is a preview feature.
- Preview features aren’t meant for production use and may have restricted functionality. These features are available before an official release so that customers can get early access and provide feedback.
Prerequisite
To use one of the example plug-ins for the data event the Dataverse accelerator app must be installed in the environment. More information: Prerequisites for creating a low-code plug-in
Note
Email templates are only available for certain tables. More information: Create templates for email
Return a non-negative value
This example uses the Abs() function to return the non-negative value of its argument. If a number is negative, Abs returns the positive equivalent.
Play the Dataverse Accelerator app, on the command bar select New action > Instant plugin.
Provide a display name, such as the formula name, and description.
Create an
Outparameter to validate expected behavior that makes sense, such as a string Optionally use input parameters to make testing easier, that makes sense with the formula.In the formula editor, wrap the
Outparameter in curly brackets:{Out: "" }Enter an expression that tests the formula:
- Validate that intellisense accepts the formula (text turns light blue).
- Implement an expression that provides an output to help validate the result, for example.
{Out: "Abs(-5) = 5: " & Text( Abs(-5) = 5 ) }Select Next, and then select Save.
Select Test to test the formula. Use the output parameter to validate the result.
Input validation and custom errors
Duplicate detection
Implement server-side input validation, such as duplicate error detection that throws a custom error message.
- Play the Dataverse Accelerator app, on the command bar select New action > Automated plugin.
- In the Name box, enter Duplicate check.
- For Table, select Contact.
- For Run this plugin when the row is, select Created.
- In the Formula box, enter this formula:
 If( !IsBlank(LookUp([@Contacts],'Last Name'=ThisRecord.'Last Name' && 'First Name'=ThisRecord.'First Name')),
    Error("You have existing contacts with the same first name and last name")
)
- Select Save.
Test the plug-in
- To test the plug-in, create a canvas app using the contacts table by following the steps here: Specify a table.
- Create a contact row.
- Create another contact with the same name as in the previous step.
- A message is displayed indicating duplicate records found. Select Ignore and save on the error message prompt.
This custom error message is displayed: You have two contacts with the same first and last name.
Data validation
Display specific types of errors using the ErrorKind enumeration.
Create a new automated plug-in.
Provide the following values:
- Name: Input validation
- Description: Checks for valid date and throws an error if invalid
- Table: Appointment
- Run this plugin when the row is: Updated
Enter the formula below:
If(ThisRecord.'Due Date' < Now(),
 Error({ Kind: ErrorKind.Validation , Message: "The due date cannot be in the past" })
);
Under Advanced options, set When should this run to Pre-operation; you want to run this rule before data is saved to prevent invalid data.
Select Save.
Go to the Error() function to learn more about custom errors.
Send email based on a data event
Prerequisites:
- Server-side synchronization is set up for your environment. More information: Set up server-side synchronization of email, appointments, contacts, and tasks
- An email template.
Example email template
Here's an email template example that you can create for the SenMail based data event:
- Template type: Global
- Name: Order Thank You
- Description: Use this template to thank a customer for placing an order with you.
- Subject:
Thank you for your order <orderconfirmation-{!salesorder:Order Number; }> - Body: Use this code.
   Hello {!Sales Order:First Name;},
   Order Type: {! Sales Order: Order Type;},
   Location Type: {! Sales Order: Location Type;},
   Address1: {! Sales Order: Address 1;},
   Address2: {! Sales Order: Address 2;},
   Preferred Service Start Date 1: {! Sales Order: Preferred Service Start Date;},
   Next Step- We take upto 48 hrs to schedule an in-person and will notify you as soon as we have a In-person Technician allocated at your site. For any questions, please contact us at 1-800-CON-SOLAR
   Yours Sincerely,
   Contoso Sales
Create the automated plug-in
- Play the Dataverse Accelerator app, and then select +New plugin under Automated plugins.
- Enter the following information:
Name: SendEmailUponCreate
Table: Select the logical table name of the sales orders, which is SalesOrder. This event is based off of Sales Orders table.
Run this plugin with the row is: Created
Formula: Paste the code below into the Formula box. For more information abut the SendEmailFromTemplate function, to SendEmailFromTemplate Action.
XSendEmailFromTemplate(
    LookUp('Email Templates',StartsWith(title,"Order Thank You")).'Email Template',
ThisRecord,
LookUp(Users,'Primary Email'="sampleemail@sample.com"),[ThisRecord.Email]
)
- Select Advanced > Post-operation.
- Select Save.
The confirmation message Plugin successfully saved appears.
Send in-app notifications based on an instant action
In-app notifications enable makers to configure contextual, actionable notifications for users in model-driven apps.
Create the low-code plugin that sends an in-app notification
- Play the Dataverse accelerator app, and then select +New plugin under Instant plugins.
- Enter the following information, select Next:
- Name: NotifyTechnican1
- Description: This instant plug-in notifies the app user.
- On the Definitions page, create input parameters with these data types:
- OrderID: String
- TechnicianEmail: String
- Formula. Paste the following code in the Formula box. For more information about this function, go to SendAppNotification Action.
XSendAppNotification( "New service", LookUp(Users,'Primary Email'=TechnicianEmail), "You have a new solar panel installation scheduled on "& LookUp('Scheduling Results','OrderId'=OrderID).'ServiceDate'&" in "& LookUp('Service Orders','Order Number'=OrderID).City &". Contact the coordinator with any questions.", [ XCreateSidePaneActionForEntity( "View order", OrderID, "Sales Order", "cr8b8_serviceorder1", LookUp('Service Orders','Order Number'=OrderID).'Service Order' ) ] ) - Select Next.
- On the Summary page, select Save.
Invoke the in-app notification instant action
- Select a canvas app and then select Edit on the command bar (or create a new one).
- Select screen on the left navigation pane, or create a new one.
- On the Insert menu, add a Button to the page using the Text Notify technician.
- Select the button, and enter the following in the fx formula bar, where DataCardValue17 is the column that contains the Order ID, and DataCardValue15 is the column that contains the technician’s email address. In this example, a canvas app named Service Order App is used.
 Environment.cr8b8_Notifytechnician1({
       OrderID: DataCardValue17.Text,
    TechnicianEmail: DataCardValue15.Text
 });

   	Notify("The technician was notified!", NotificationType.Success, 2000);
- Save and Publish your changes.

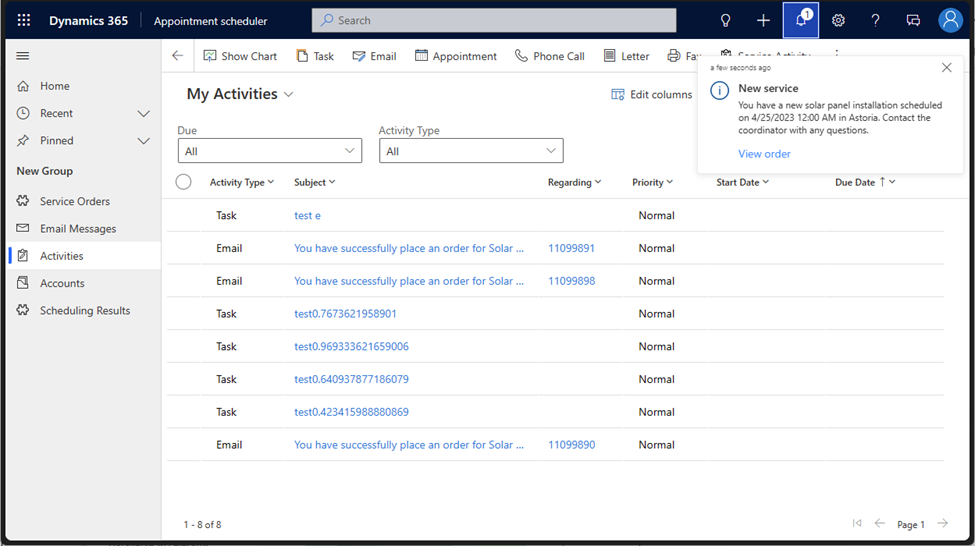
When the notify technician action is selected in the app, an in-app notification is sent to the technician who has been assigned to the service order. An action on the notification opens the service order details in a side pane.
Sample instant plug-in with MSN Weather connector
This plugin returns the current weather for a specific location using MSN Weather connector.
Prerequisites:
- Prerequisites for creating a low-code plug-in
- MSN Weather connector is allowed in the environment
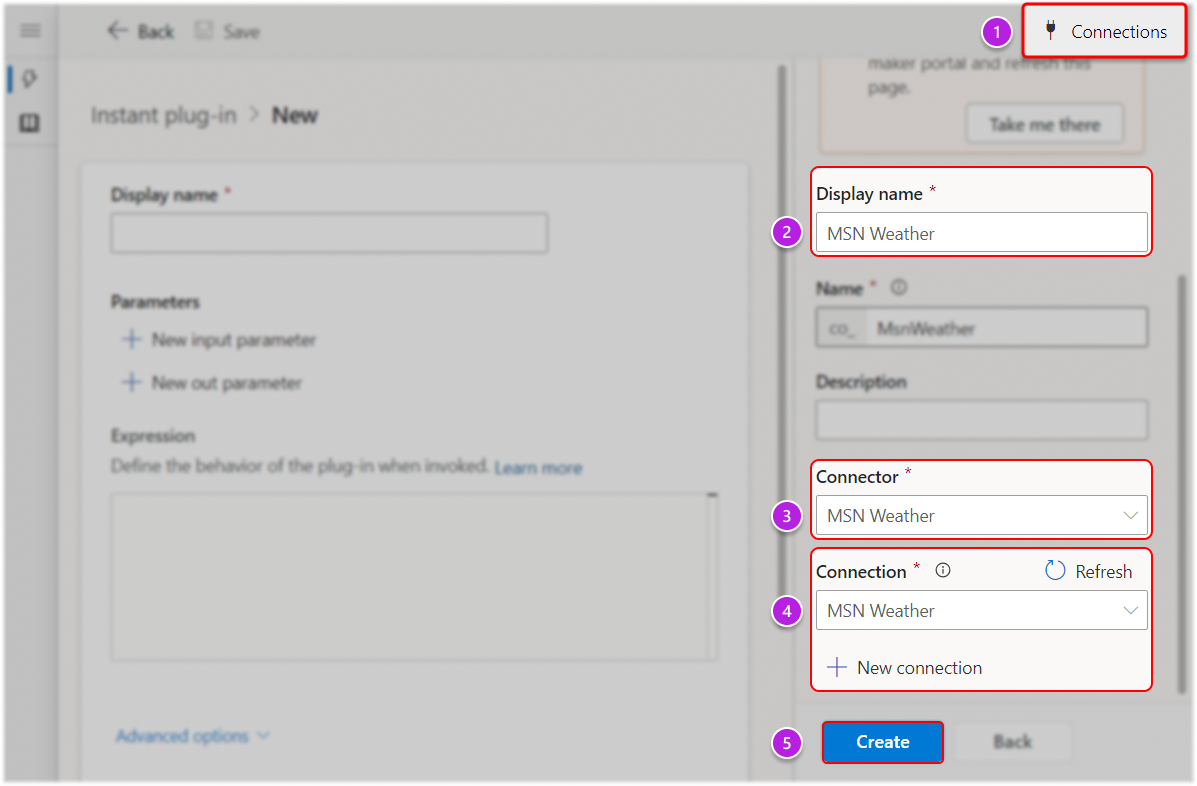
Create a connection reference for MSN Weather if not available yet in the environment:
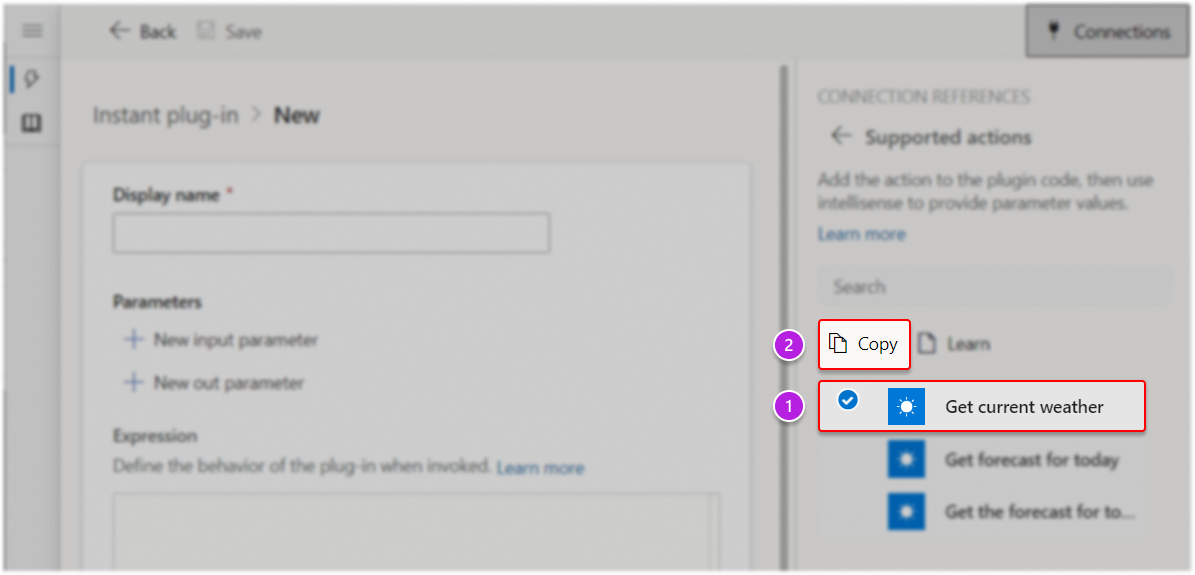
Copy snippet:
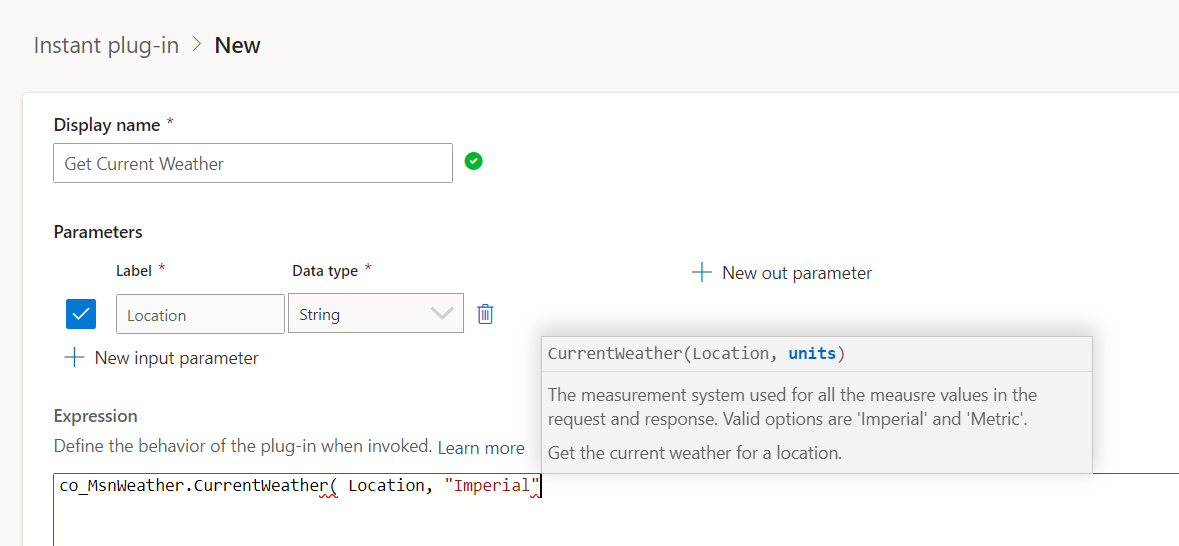
Finish editing the formula using intellisense and consume the connector response properties as needed:
Save
Tip
Use the With() function to capture the entire response from one action if you want to access different properties the response might have. In the example below, there's an input parameter Location (string) and an output parameter Out (string).
With({ /* Capture current weather response from connector */
c: new_MsnWeather.CurrentWeather( Location, "Imperial" ).responses.weather.current
},{	/* Return concatenated weather details */
Out: "Current temp: " & c.temp & " degrees. Feels like " & c.feels & " degrees. Wind speed is " & c.windSpd & " mph."
})
Best practices
Handling infinite loop errors in automated low-code plugins
Don't write a patch statement on an automated plugin upon 'Update' event, where the patch is happening on the same table as the plugin. This leads to infinite loops and plugin execution failures.
Problematic pattern: Using Patch() formula triggers another update.

Recommended pattern: Use the Set() formula instead to avoid this issue.
