Note
Access to this page requires authorization. You can try signing in or changing directories.
Access to this page requires authorization. You can try changing directories.
This article covers the various levels and methods of user deletion in Microsoft Power Platform that involves the following components: Microsoft 365 admin center, Microsoft Entra ID, and Power Platform admin center.
Watch this video for a detailed walkthrough of how to delete users from your environment:
Note
Before deleting a user from an environment, you must delete the user from Microsoft 365 admin center or Microsoft Entra ID.
Delete users in Microsoft 365 admin center
Admins must use the Microsoft 365 admin center to delete users:
Sign in to Microsoft 365 admin center.
Select Users > Active users page.
Select the names of the users you want to delete, and then select Delete user.
Although you deleted the user's account, you're still paying for the license. To stop paying for the license, follow the procedures in Delete a user from your organization. Or, you can assign the license to another user. It won't be assigned to anyone automatically.
About deleted users
When a user is deleted from the Microsoft 365 admin center, the user isn't removed from environments in which they're active. Instead, the user's status is set to Disabled in Power Platform.
The following lists the scenarios when a user is deleted:
- If the user is in the environment and has a status of Enabled, the status is updated to Disabled.
- If the user is in the environment and has a status of Disabled, the status remains as Disabled.
- If the user isn't present in the environment, no action is taken.
It can take from 30 minutes to 6 hours for a user's status to be updated in an environment after the user is deleted from the Microsoft 365 admin center. If you need to update the user status immediately, you can follow the steps in User diagnostics to see what needs to be done to restore the user.
Note
A user deleted from the Microsoft 365 admin center is put on the Deleted user list for thirty days and can be restored as mentioned in next section.
Restore deleted users
In the Microsoft 365 admin center, go to the Users > Deleted users page.
Select the name of the user you want to re-enable, select Restore user, and then proceed through various pages.
Reassign licenses as needed to the user in the Microsoft 365 admin center.
Note
You can restore deleted users up to 30 days after deletion. When a deleted user is restored and a license is reassigned, the user's status is set to Enabled in the respective Power Platform environments in which the user was disabled.
Permanently delete users in Microsoft Entra ID
After the thirty-day window from the date you delete users in the Microsoft 365 admin center, the user account is permanently deleted in Microsoft Entra by an automatic deletion process.
If you want to permanently delete the user manually without waiting for thirty days when the user account is automatically deleted, you can do so by using the Microsoft Entra option in the Azure portal by following the instructions here: Permanently delete a user.
Enable the Delete disabled users feature
Important
The Delete disabled users feature must be enabled in the environment where you want to delete users.
- Sign in to the Power Platform admin center and then select an environment.
- Select Manage in the navigation pane.
- In the Manage pane, select Environments.
- Select a specific environment.
- Select Settings > Product > Features.
- Scroll through the list and to find the Delete disabled users area.
- Set the Enable delete disabled users setting to On.
- Select Save to save your changes.
Note
This feature flag is to enable the Delete disabled users functionality for the environment on the Power Platform admin center. You don't need to enable this feature flag if you are using the client's User form.
Delete users in Power Platform
Users deleted from the Microsoft 365 admin center can remain in Power Platform environments with a Disabled status. These users can be deleted permanently from Power Platform environments. Deleting users from Power Platform environments goes through the similar deletion stages as in Microsoft Entra ID. When you first delete the user in the Power Platform environment, the disabled user is first soft deleted, and then you can permanently delete the user.
Important
Not all users with a Disabled status can be deleted. A user can be in a Disabled status in Power Platform environment and still be active in Microsoft Entra ID. The user can be in this disabled state when the license was removed or the user was removed from the security group of the environment. The user can also be disabled by updating the Status field. Customizing the User form by allowing the Status field to be updated is required.
View the list of disabled users
To view the list of disabled users in an environment, perform the following steps:
- Sign in to the Power Platform admin center and then select an environment.
- Select Manage in the navigation pane.
- In the Manage pane, select Environments.
- Select a specific environment.
- Select Settings > Users + permissions > Users.
- In the command bar, select Manage users in Dynamics 365.
- From the drop-down menu, select Disabled users.
Disabled Microsoft Entra user stages
| Stage | Microsoft 365 admin center | Power Platform admin center | ||||
|---|---|---|---|---|---|---|
| Action | State | User state | Action | User delete | Content | |
| 1a | Admin deletes user | Soft deleted | Disabled | User management process disables the user and updates the UPN, email, etc. | Not allowed - Delete button is hidden | User is soft deleted in Microsoft Entra and can be restored. Once restored, the user is automatically reactivated in Dataverse. |
| 1b | Admin restores user | Active | Active | User management process activates user and restores UPN | Not allowed - Delete button is hidden | N/A |
| 2 | Admin permanently deletes user | Hard deleted – user no longer exists in Microsoft Entra ID | Disabled | User Details should check if user exists in Microsoft Entra ID, and if user doesn’t exist, delete is allowed | Allowed – Delete button is visible | User is hard deleted in Microsoft Entra and can't be restored. User can now be soft deleted in Dataverse. |
| 3 | Admin permanently deletes user | Hard deleted – user no longer exists in Microsoft Entra ID | Disabled | Dataverse admin deletes the user | Allowed – Delete button is visible | User is soft deleted in Dataverse. User can now be permanently deleted in Dataverse. |
| 4 | Admin permanently deletes user | Hard deleted – user no longer exists in Microsoft Entra ID | Disabled | Dataverse admin permanently deletes the user | Allowed – Permanently Delete button is visible | User is deleted in Dataverse. User no longer exists in Dataverse, all references to the user in Dataverse in the Audit logs show ‘Not available’. |
Soft delete users in Power Platform
At the Microsoft Entra soft deleted stage, the user can't be deleted in Power Platform because the user can be restored from the Microsoft 365 admin center. When the user is restored, the user is automatically restored in Power Platform environments with an Enabled status and the above fields are reset back to its original state.
To soft delete a user in a Power Platform environment, the user must first be deleted permanently in Microsoft Entra ID. This applies to regular users and not the application users or stub users. Users deleted from the Microsoft 365 admin center are deleted permanently after 30-days or they can be permanently deleted manually.
There are two ways to soft delete users.
Option A: Soft delete users from the Disabled users view
- Sign in to the Power Platform admin center and then select an environment.
- Select Manage in the navigation pane.
- In the Manage pane, select Environments.
- Select a specific environment.
- Select Settings > Users + permissions > Users.
- In the command bar, select Manage users in Dynamics 365.
- From the drop-down menu, select Disabled users.
- Select a user from the list.
- On the User Form, choose the Delete button.
- Confirm the deletion by selecting Delete in the confirmation dialog.
The user still exists in the environment as disabled and continues to show in the Disabled Users list.
To permanently delete the user from the environment, go to Permanently delete users in Power Platform later in this article.
To permanently delete the user in Microsoft Entra ID, see Permanently delete users in Microsoft Entra ID earlier in this article.
Option B: View and soft delete disabled users who were permanently deleted from Microsoft Entra ID
Sign in to the Power Platform admin center and then select an environment.
Select Manage in the navigation pane.
In the Manage pane, select Environments.
Select a specific environment.
Select Settings > Users + permissions > Users.
From the command bar, select Filter.
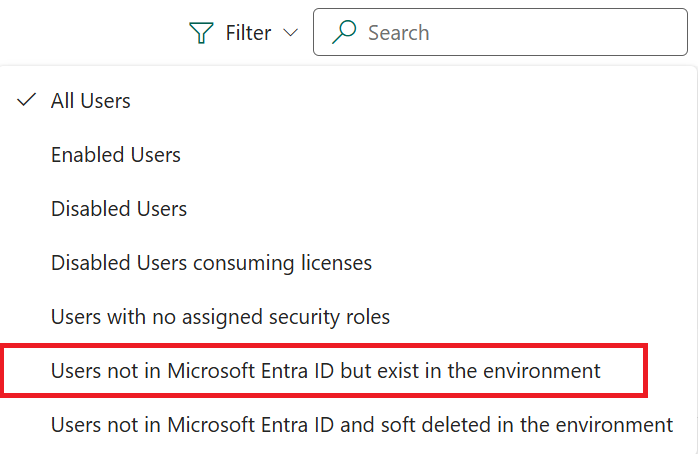
From the drop-down menu, select Users not in Microsoft Entra ID but exist in the environment.
Select the disabled user you want to delete.
On the User Form, select Delete.
Select Refresh list to update the list and confirm deletion.
Note
All records that are owned by the soft deleted user must first be reassigned to another user before the user record can be permanently deleted. You can reassign the records from the same User details panel under the Manager section.
What happens when a user is soft deleted?
- The user record still exists in the environment and continues to have a Disabled status.
- The user can't be restored.
- The user's security role is unassigned.
- The user is removed from all teams.
- The user's queue, profile, business unit entity map, shared records (principal object access), principal entity business unit map, and system user principal records are deleted.
Audit log after user is soft deleted
The name of the deleted user continues to show in the audit log records where the user was the creator or modifier of the record.
Permanently delete users in Power Platform
You can delete and remove users with disabled status in Power Platform. You may want to delete users with disabled status because of the following reasons:
- They are no longer active in the tenant
- They moved out of the environment’s security group
- They no longer have a license to use the application
- To comply with regulatory compliance, such as GDPR
Prerequisites
- The user must already be soft deleted. See Soft delete users in Power Platform earlier in this article.
- All records owned by the user must be reassigned to another user. User records can be reassigned from the User settings page.
- You must have turned on the Delete disabled users > Enable delete disabled users feature setting for your environment using the Power Platform admin center. Learn more: Manage feature settings
Permanently delete users
Sign in to the Power Platform admin center and then select an environment.
Select Manage in the navigation pane.
In the Manage pane, select Environments.
Select a specific environment.
Select Settings > Users + permissions > Users.
From the command bar, select Filter.
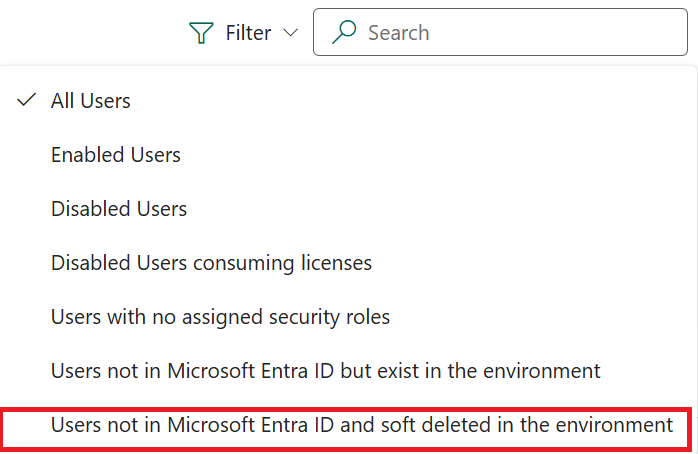
From the drop-down menu, select Users not in Microsoft Entra ID and soft deleted in the environment.
Select a soft deleted user to delete the user permanently in the Power Platform environment. Only users who were soft deleted can be deleted permanently.
On the user form, select Delete.
Select Refresh list to update the list and confirm deletion.
Note
After users are permanently deleted in Entra ID, any new user record created with the details of a deleted user is a new user object in Entra ID. Such user IDs can't be updated to gain access to the deleted user records in Dataverse. You can re-assign records from the deleted user to the new user.
Audit log after user is permanently deleted
Once permanently deleted, the name of the deleted user no longer shows in the audit log records when the user was the owner, creator, or modifier of the record. For the record owner, the name is replaced with Record Unavailable in these audit records. For the record creator or modifier, the name is replaced with No Name in these audit records.
Created by and Modified by name
Once permanently deleted, the name of the deleted user no longer shows in the Created by and the Modified by fields for records that the deleted user created and for records that the deleted user last modified. These fields will show No Name and if you clicked on it, you will see a message that the 'Record is unavailable'. The deleted user's systemuserid is still in these records.
Bulk delete users in Power Platform
Users with a disabled status can be deleted, in bulk, using the Remove a large amount of specific, targeted data with bulk deletion article. You can create bulk delete jobs to soft delete and to permanently delete users.
Note
In the video, it shows you how to use bulk delete through the bulk deletion process. This is replaced by a bulk delete action on the Settings > Users + permissions > Users page.
Soft delete users in Power Platform in bulk
- Sign in to the Power Platform admin center.
- Select Manage in the navigation pane.
- In the Manage pane, select Environments. Then select an environment.
- Select Settings > Users + permissions > Users.
- Select Bulk delete from the action bar.
- The Define search criteria pane opens. In the Use saved view field, select Users deleted in tenant but exist in the environment view.
- Select Next.
- Review the list of users and select Next.
- Enter a job name and select a date and time to schedule the deletion system job. Select Next.
- Select the email notification checkbox if you want to be notified when the job completes. Select Next.
- Verify the query and the number of records to be deleted, and then select Run bulk delete.
Note
You can create your own, equivalent view to meet your record retention policy. For example, you can add other filter conditions, such as the Azure Deleted On date and specify Older than X months with a value of 3 months to soft delete any users who were deleted from the tenant more than three months ago. Note that this Azure Deleted On date is a newer column created in 2022, which means that the value is null for users deleted in the tenant prior to 2022.
We recommend that you set a schedule to soft delete your users by setting the job frequency of 90 days. You save most of your storage costs by soft deleting disabled status users frequently.
Permanently delete users in Power Platform in bulk
Sign in to the Power Platform admin center.
Select Manage in the navigation pane.
In the Manage pane, select Environments. Then select an environment.
Select Settings > Users + permissions > Users.
Select Bulk delete from the action bar.
The Define search criteria pane opens. In the Use saved view field, select Soft Deleted Users view.
Note
You can create your own, equivalent view to meet your record retention policy.
Select Next and review the list of records to be permanently deleted.
Select Next again.
Enter a job name and select a data and time to schedule the deletion system job. Select Next.
Select the email notification checkbox if you want to be notified when the job completes. Select Next.
Verify the query and the number of records to be deleted, and then select Run bulk delete.
Note
We recommend that you set a schedule by setting the job frequency based on your record retention policy.
Review the status of bulk delete job
- Sign in to the Power Platform admin center and then select an environment.
- Select Manage in the navigation pane.
- In the Manage pane, select Environments.
- Select a specific environment.
- Select Settings > Audit and logs > System jobs.
- Select the bulk delete job and review the results. The results show records in the Successes row that should match the number of records from your previous system job that contained soft deletion. Review a deleted user in the audit log.
If you enabled Dataverse auditing in the environment and in the User table, you can see the list of deleted users in the Audit Summary view.
See also
Delete stub users from an environment
Delete unlicensed or removed Microsoft Entra group members
Delete a user from your organization
Troubleshooting: Common user access issues