Note
Access to this page requires authorization. You can try signing in or changing directories.
Access to this page requires authorization. You can try changing directories.
Note
The Power Platform CoE Starter Kit is no longer actively maintained. Its core capabilities are part of the Power Platform admin center.
Issues are no longer reviewed or addressed. If you identify a potential security issue, please report it to the Microsoft Security Response Center.
This article helps you set up the inventory components of the Core solution of the Center of Excellence (CoE) Starter Kit. The inventory is the heart of the CoE. Your Microsoft Power Platform journey is most beneficial when you understand your apps, flows, and makers, and can lay the foundation to monitor new apps and flows being created.
The flows and dataflows in this solution sync all your resources into tables. This solution helps you build admin apps, flows, and dashboards on top of inventory. This setup gives you a holistic overview into the apps, flows, and makers that exist in your environment. Apps like DLP Editor and Set App Permissions help with daily admin tasks.
Prerequisites
- Complete the CoE Starter Kit setup steps.
- Create your environments.
- Sign in with the correct identity.
Note
- If you try out Data Export for inventory, we recommend that you don't depend on this feature and test it in a dedicated test environment first. Trying out this feature helps us validate that the feature is what you need and that we're not introducing unintended side effects.
- Setting up the inventory components by using Data Export is only supported through the Setup Wizard. Manual setup instructions are available after the experimental preview.
Import the Creator Kit and make connections
Import the Creator Kit, establish required connections, and enable the core components solution in the CoE Starter Kit.
Import Creator Kit
The CoE Starter Kit requires the installation of the Creator Kit in the environment where you installed the CoE Starter Kit.
Install the Creator Kit before proceeding.
Create connections
Create these connections manually before installing the kit to ensure they're correctly configured.
Go to Power Automate.
Select your CoE environment and go to Data > Connections > + New connection.
Create a connection for HTTP with Microsoft Entra ID (preauthorized), and set Base Resource URL and Microsoft Entra ID Resource URI (Application ID URI) to
https://graph.microsoft.comfor commercial tenants.If your tenant is in GCC, GCC High, or DoD, check your service root endpoints for Microsoft Graph.
Import the core components solution
Download the CoE Starter Kit compressed file to your computer.
Extract the compressed file. The CoE Starter Kit compressed file contains all solution components in addition to the non–solution-aware components that make up the CoE Starter Kit.
Import the CenterOfExcellenceCoreComponents_x_x_x_xx_managed.zip solution file from the extracted folder.
For an environment in the commercial cloud, leave all environment variable values blank. For a GCC, GCC High, and DoD environment, check Microsoft Graph and Graph Explorer service root endpoints and enter the value for your cloud in the Graph URL Environment Variable environment variable.
The import can take up to an hour to complete, and upgrades can take up to two hours.
Note
After importing your solution, you might see this warning: Solution "Center of Excellence - Core components" imported successfully with warnings: Flow client error returned with status code Bad Request. You can ignore this warning message. Proceed with opening the Setup Wizard app to continue the setup and configuration of the solution.
Set up the Inventory components by using the Setup Wizard
Use the Setup Wizard to complete the configuration.
Open the Setup Wizard
After the solution import succeeds, open the Center of Excellence - Core Components solution.
Open the CoE Setup and Upgrade Wizard app.
Follow the steps to complete the configuration.

Troubleshooting
If you see an Error Loading Control warning on opening the Setup Wizard app, it means some of the flows required to run the wizard couldn't be turned on automatically.
Navigate to the solution and turn on the following flows manually:
- SetupWizard > GetCurrentEnvironment
- SetupWizard > GetTenantID
- SetupWizard > GetUserDetails
After you turn on these flows, return to the Setup Wizard to continue the setup.
Choose data source
You can choose your data source for inventory. Cloud flows is the default and currently recommended path for gathering your inventory.
However, you might want to experiment with the Data export (Preview) data source. To experiment, use the Data Export inventory setup instructions when you get to the Configure dataflows page.

Set up the CoE Admin Command Center app
Important
Only complete these steps if you want to review Power Platform–related Microsoft 365 Message center updates in the CoE Admin Command Center canvas app. You can use the CoE Admin Command Center app without this configuration.
Create a Microsoft Entra app registration to connect to Microsoft Graph
The CoE Admin Command Center connects to Microsoft Graph API to get Microsoft 365 Message center updates.
Use these steps to set up the Microsoft Entra app registration used in a cloud flow to connect to the Graph API. Learn more in Use the Microsoft Graph API.
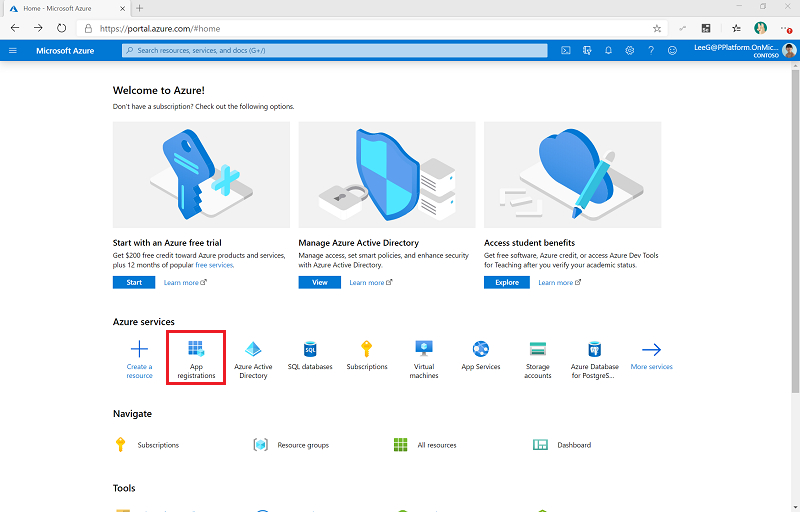
Sign in to the Azure portal.
Go to Microsoft Entra ID > App registrations.
Select + New Registration.
Enter a name. For example, use the CoE Command Center name. Don't change any other settings and select Register.
Select API permissions > + Add a permission.
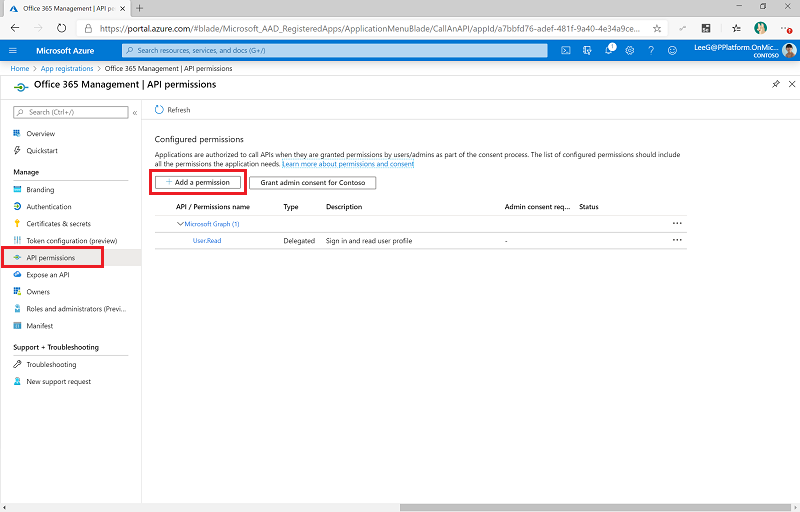
Select Microsoft Graph and configure permissions as follows:
- Select Application permissions, and then select ServiceMessage.Read.All.
- Select Add permissions.
Select Grant Admin Consent for (your organization).
Select Certificates and secrets.
Select + New client secret.
Add a description and expiration (in line with your organization's policies), and then select Add.
Copy and paste the Secret to a text document such as Notepad.
Select Overview and copy and paste the application (client) ID value to the same text document. Make sure you note which GUID corresponds to each value.


Update environment variables
Update the environment variables that hold the client ID and secret, as shown in the following table.
You can store the client secret either in plain text in the Command Center - Client Secret environment variable (not recommended) or store the client secret in Azure Key Vault and reference it in the Command Center - Client Azure Secret environment variable (recommended).
Review the required permissions to use Azure Key Vault secrets in environment variables.
Note
The flow using this environment variable is configured with a condition to expect either the Command Center - Client Secret or the Command Center - Client Azure Secret environment variable. You don't need to edit the flow or command center application to work with Azure Key Vault.
| Name | Description |
|---|---|
| Command Center - Application Client ID | The application client ID from the Create a Microsoft Entra app registration to connect to Microsoft Graph step. |
| Command Center - Client Secret | The application client secret from the Create a Microsoft Entra app registration to connect to Microsoft Graph step. Leave empty if you're using Azure Key Vault to store your client ID and secret. |
| Command Center - Client Azure Secret | The Azure Key Vault reference for the application client secret from the Create a Microsoft Entra app registration to connect to Microsoft Graph step. Leave empty if you're storing your client ID in plain text in the Command Center - Client Secret environment variable. This variable expects the Azure Key Vault reference, not the secret. Learn more in Environment variables for Power Platform overview. |
Modify the Command Center app for a GCC High or DoD tenant
Important
If your CoE Starter Kit is installed in a commercial or GCC tenant, you can skip this step.
If your CoE Starter Kit is installed in a GCC High or DoD tenant, update the Authority in HTTP action:
Go to make.powerautomate.com.
Select Solutions and open the Center of Excellence - Core Components solution to view the flows.
Edit the Command Center App > Get M365 Service Messages flow.
Update the List serviceAnnouncements from Graph action and change the Authority to
https://login.microsoftonline.usfor a GCC High or DoD tenant.Save this flow.
Set up Audit Logs solution
Note
Set up the Audit Log solution only if you chose cloud flows as the mechanism for inventory and telemetry.
The Audit Log Sync flow connects to the Microsoft 365 audit log to gather telemetry data (unique users and launches) for apps. The CoE Starter Kit works without this flow. However, usage information, such as app launches and unique users, in the Power BI dashboard is blank. Learn more in Collect audit logs by using the Office 365 Management API.
Set up the Power BI dashboard
The CoE Power BI dashboard provides a holistic view with visualizations and insights into resources in your tenant: environments, apps, Power Automate flows, connectors, connection references, makers, and audit logs. Telemetry from the audit log is stored from the moment you set up the CoE Starter Kit. Over time, you can identify trends longer than 28 days. Learn more in Set up the Power BI dashboard.
Share apps with other admins
The core components solution contains apps designed to give admins better visibility and an overview of resources and usage in their environments.
Share these apps with other Power Platform admins and assign them the Power Platform Admin SR security role:
Explore the CoE Admin Command Center app, your central hub for accessing all CoE Starter Kit apps.
Learn more in Share an app from a production environment.
Wait for flows to finish
After the sync flows finish running, you can start using many of the features of the CoE Starter Kit core solution.
The first inventory run might take several hours depending on the number of environments and resources in your tenants. Future runs are faster because they only check new and modified resources.
To check the status of a flow
Select Admin > Sync Template v4 (Driver).
A new tab opens to the Flow detail page.
View Runs.
All environment variables
This section includes the full list of environment variables that affect the inventory sync flows, including environment variables with default values. You might need to update environment variables after you import.
Important
You don't have to change the values during setup. However, you can change an environment variable that you configured during import or when you want to change a default value. To make sure the latest values are picked up, restart all flows after you change environment variables.
Use environment variables to store application and flow configuration data with data specific to your organization or environment.
| Name | Description | Default value |
|---|---|---|
| Admin eMail | CoE Admin email. Email address used in flows to send notifications to admins. This value should be either your email address or a distribution list. | Not applicable |
| Admin eMail Preferred Language | The preferred language for the emails sent to the admin email alias, which is specified in the Admin eMail environment variable. | en-US |
| Also Delete from CoE | When running the Admin: Sync Template v2 (Check Deleted) flow, delete the items from CoE (yes) or just mark deleted (no). | Yes |
| CoE System User ID | In the maker table, we store a user for a system with an ID. Storing the ID here gives you an easy reference, so you don't have to look up the ID often. | Not applicable |
| Command Center - Application Client ID | (optional) The application client ID from the Create a Microsoft Entra app registration to connect to Microsoft Graph step. Leave this ID empty if you want to use the Azure Key Vault to store your client ID and secret. | Not applicable |
| Command Center - Client Secret | (Optional) The application client secret from the Create a Microsoft Entra app registration to connect to Microsoft Graph step. Leave this secret empty if you want to use Azure Key Vault to store your client ID and secret. | Not applicable |
| Command Center - Client Azure Secret | The Azure Key Vault reference for the application client secret from the Create a Microsoft Entra app registration to connect to Microsoft Graph step. Leave this secret empty if you want to store your client ID in plain text in the Command Center - Client Secret environment variable. Learn more in Environment variables for Power Platform overview. | Not applicable |
| CompanyName | The name of the company to be displayed in various apps and emails. Currently, this name is only used by the Video hub app. | Not applicable |
| DelayInventory | If Yes, runs a delay step to assist with the Dataverse load balancing. Only set to No for debugging. | Yes |
| DelayObjectInventory | If Yes, runs a delay step in individual inventory flows to assist with data source throttling experienced by larger tenants. Set to Yes if you experience this type of throttling. | No |
| Disabled Users are Orphaned | If an AD user has property Account enabled as false, the user is orphaned. | No |
| eMail Header Style | The CSS / Style to use for emails. | Default CSS |
| eMail Body Start | Starting HTML format for emails. | Default style provided |
| eMail Body Stop | Ending HTML format for emails. | Default style provided |
| FullInventory | Determines whether you want to update only changed objects or all objects. Switching to Yes causes the flows to inventory every single app, flow, and bot in the tenant every day. The Yes setting isn't recommended for large tenants. | No |
| Graph URL Environment Variable | The URL used to connect to Microsoft Graph. For an environment in the commercial cloud: https://graph.microsoft.comFor a GCC, GCC High, and DoD environment, check Microsoft Graph and Graph Explorer service root endpoints. |
Not applicable |
| Host Domains | Domains to consider as local for cross domain identity reports. As a comma-separated string: myCo.onmicrosoft.com, partnerCo.onmicrosoft.com |
Not applicable |
| Individual Admin | Communications in the starter kit are sent to this email address. Communications can't be sent to a group. Learn more in What's the best way to communicate with admins, makers, and users? | Not applicable |
| Inventory and Telemetry in Azure Data Storage account | Sets up data export in the Power Platform admin center with your inventory and telemetry in an Azure Data Storage folder. This variable also represents a Bring your own Datalake / self-serve analytics feature. | No |
| InventoryFilter_DaysToLookBack | When not running a full inventory, we filter back a set number of days and see if the object needs to update. | 7 |
| is All Environments Inventory | If true (default), the CoE inventory tracks all environments. New environments added to the inventory have their Excuse from Inventory set to false. You can opt out of individual environments. If false, the CoE inventory tracks a subset of environments. New environments added to the inventory have their Excuse from Inventory set to true. You can opt in to individual environments. | Yes |
| Power Platform Maker Microsoft 365 Group | Get the ID of the Microsoft 365 group, which contains all your Power Platform makers. With this ID, you can communicate and share apps with makers. This ID is needed for the inventory setup in the Admin > Add Maker to Group flow. Learn more in What's the best way to communicate with admins, makers, and users? | Not applicable |
| Power Platform User Microsoft 365 Group | Get the ID of the Microsoft 365 group, which contains all your Power Platform users, such as end users with your shared apps. You use this ID to communicate and share apps with users. Learn more in What's the best way to communicate with admins, makers, and users?. | Not applicable |
| Power Automate environment variable | The URL used by Power Automate for your cloud. For an environment in the commercial cloud: https://make.powerautomate.com/environments For a GCC, GCC High, or DoD environment: Power Automate US government service URLs. |
Not applicable |
| PowerApp Maker environment variable | The URL used by the Power Apps maker portal for your cloud, including a trailing slash /. For an environment in the commercial cloud: https://make.powerapps.com For a GCC, GCC High, or DoD environment: Power Apps US Government service URLs. |
Not applicable |
| PowerApp Player environment variable | The URL used by the Power Apps player for your cloud, including a trailing slash /.For an environment in the commercial cloud: https://apps.powerapps.com For a GCC environment: https://apps.gov.powerapps.us For a GCC High environment: https://apps.gov.powerapps.us For a DoD environment: https://play.apps.appsplatform.us |
Not applicable |
| ProductionEnvironment | Set to No if you're creating a development/test environment. This variable allows some flows to set target users to the admin instead of resource owners. | Yes |
| Sync Flow Errors Delete After X Days | Number of days back to store sync flow error records. Deletes records older than this number of days. | 7 |
| TenantID | Your Azure Tenant ID. Learn more in Find tenant ID through the Azure portal. | Not applicable |
Default value for eMail Header Style environmental variable
Default CSS
<head> <style>
body {
    background-color: #efefef;
    font-family: Segoe UI;
    text-align: center;
}

#content {
    border: 1px solid #742774;
    background-color: #ffffff;
    width: 650px;
    margin-bottom: 50px;
    display: inline-block;
}

#logo {
    margin-left: 52px;
    margin-top: 40px;
    width: 60px;
    height: 12px;
}

#header {
    font-size: 24px;
    margin-left: 50px;
    margin-top: 20px;
    margin-bottom: 20px;
}

#ribbon {
    background-color: #742774;
}

#ribbonContent {
    font-size: 20px;
    padding-left: 30px;
    padding-top: 10px;
    padding-bottom: 20px;
    color: white;
    width: 100%;
    padding-right: 10px;
}

#message > td {
    font-size: 14px;
    padding-left: 60px;
    padding-right: 60px;
    padding-top: 20px;
    padding-bottom: 40px;
}

#footer > td {
    font-size: 12px;
    background-color: #cfcfcf;
    height: 40px;
    padding-top: 15px;
    padding-left: 40px;
    padding-bottom: 20px;
}

#form {
    width: 100%;
    border-collapse: collapse;
}

#app {
    width: 60%;
    font-size: 12px;
}

.label {
    color: #5f5f5f
}

table {
    border-collapse: collapse;
    width: 100%;
}

th, td {
    padding: 8px;
    text-align: left;
    border-bottom: 1px solid #ddd;
}

</style> </head>
What's next?
- Learn how to regularly upgrade and extend the CoE Starter Kit.
- Check out other components part of the core solution, and the governance and nurture solutions.