Shielded VMs: A conceptual review of the components and steps necessary to deploy a guarded fabric
[This post was authored by Dean Wells, Principal Program Manager on the Windows Server team]
If you're anything like me, you probably find it immensely helpful having an end-to-end conceptual view of what you're doing before actually doing it--that's the purpose of this blog.
Deploying a guarded fabric involves several new concepts so, in this blog, we'll describe each of the pieces including what it does, any specific requirements, their relative sequence, and point you to the cmdlet used to complete each step.
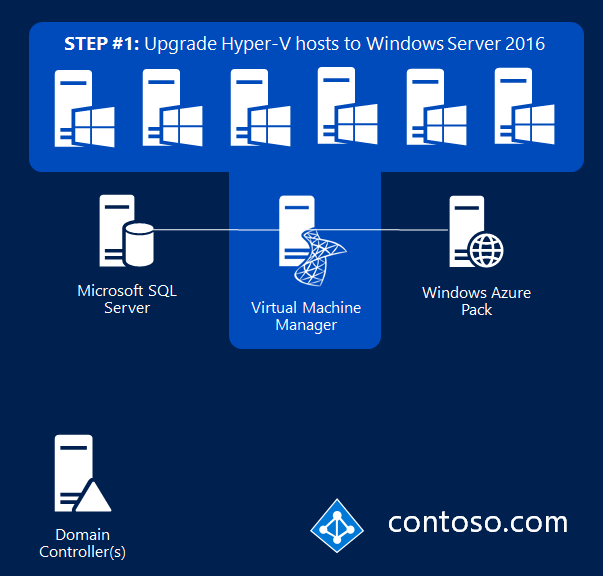
For simplicity, let's start with something we already understand: an existing Hyper-V fabric running on Windows Server 2012 R2. We'll walk through the process of converting (upgrading and augmenting) this into a Windows Server 2016 guarded fabric (note that guarded fabric is the term we use to describe a fabric that can run shielded VMs).
Step 1: Upgrade Hyper-V hosts to Windows Server 2016
At minimum, shielded VMs require that the Hyper-V hosts run Windows Server Datacenter edition. We recommend using Server Core, but you can also use the full desktop experience if you like. If you are upgrading hosts, it's also worth noting that you can upgrade from Standard edition to Datacenter edition.
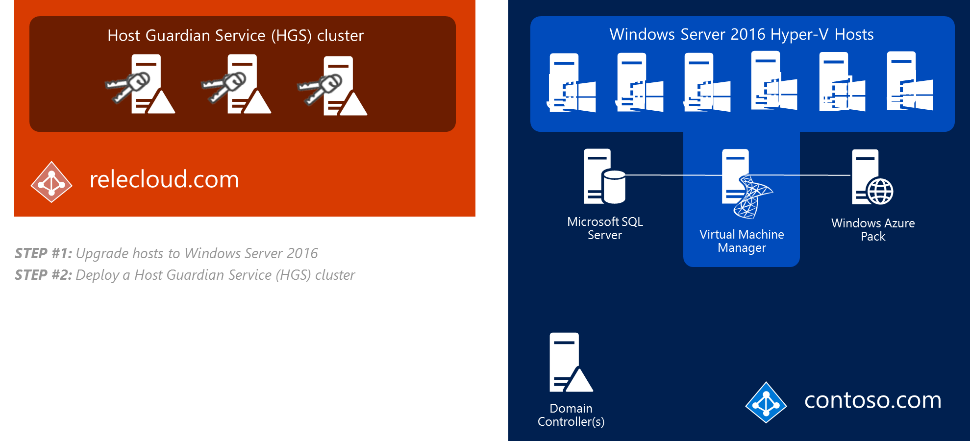
Step 2: Deploy and set up the Host Guardian Service (HGS)
The Host Guardian Service is a new role in Windows Server 2016 (both Standard and Datacenter editions). HGS remotely measures Hyper-V host health via a process known as attestation and releases keys based on that health assessment. HGS is typically deployed as a 3-node bare-metal cluster for high availability and scale purposes.
The keys needed by Hyper-V to work with shielded VMs are stored on HGS. Since the Hyper-V hosts don't persistently store these keys, they must ask HGS for them whenever a shielded VM is powered on or when receiving a shielded VM through live migration. For HGS to release a key to Hyper-V, the request must be accompanied by a trustworthy, non-expired certificate of health. Hyper-V obtains the health certificate upon successful completion of attestation. The health certificate lasts for up to 8 hours. The method used by HGS to determine a Hyper-V host's health is dependent upon HGS' attestation mode. There are exactly two mutually-exclusive modes which we'll discuss in the next section.
We begin by adding the HGS role and providing initial configuration information.
| Step | Cmdlet |
|---|---|
| Add the HGS role | Install-WindowsFeature (or use Server Manager) |
| Install and configure HGS | Install-HgsServer |
Step 3: Prepare and initialize HGS
The HGS role is now installed but it's not yet initialized. Initializing HGS is really all about two things: selecting the certificates used to protect shielded VMs and configuring HGS' attestation mode. As noted earlier, HGS supports precisely two attestation modes:
- TPM-based attestation
- AD-based attestation
TPM-based attestation is the preferred choice because it imposes stringent cryptographically-enforced health requirements on hosts before releasing the keys they need to work with shielded VMs. Specifically, we leverage a TPM-backed identity, UEFI secure & measured boot as well as our latest and greatest hypervisor-enforced code integrity policies. This mode of attestation requires that each Hyper-V host support UEFI 2.3.1 revision C or later and TPM v2. This hardware is readily available from most major OEMs. If you do not yet have hardware that supports UEFI 2.3.1c and TPM 2.0, you can still deploy shielded VMs using AD-based attestation.
AD-based attestation uses Active Directory security groups to assess health. A fabric admin creates or designates a group in the fabric Active Directory domain and adds each of the trusted Hyper-V hosts (the computer accounts) to that group. Finally, they tell HGS which security groups are deemed trustworthy. With this mode of attestation, HGS does not check for Secure Boot or code integrity policies on the host, instead, it simply examines the host's group membership. This mode provides encryption at rest and on the wire but offers no protection from malware or malicious administrators on the Hyper-V hosts.
Deploying a guarded fabric using AD-based attestation still offers a significant value in terms of security and compliance. In some cases, deploying sensitive workloads that are subject to regulatory controls in shielded VMs will allow you to meet compliance requirements with your existing server hardware.
Note: once suitable server hardware has been obtained, HGS permits you to switch from AD mode to TPM mode using a single command.
| Step | Cmdlet |
|---|---|
| Initialize the HGS server | Initialize-HgsServer |
| Switch from AD-based attestation to TPM-based attestation | Set-HgsServer -TrustTpm |
For the purposes of this blog, we'll continue to walk through a TPM-based attestation deployment.
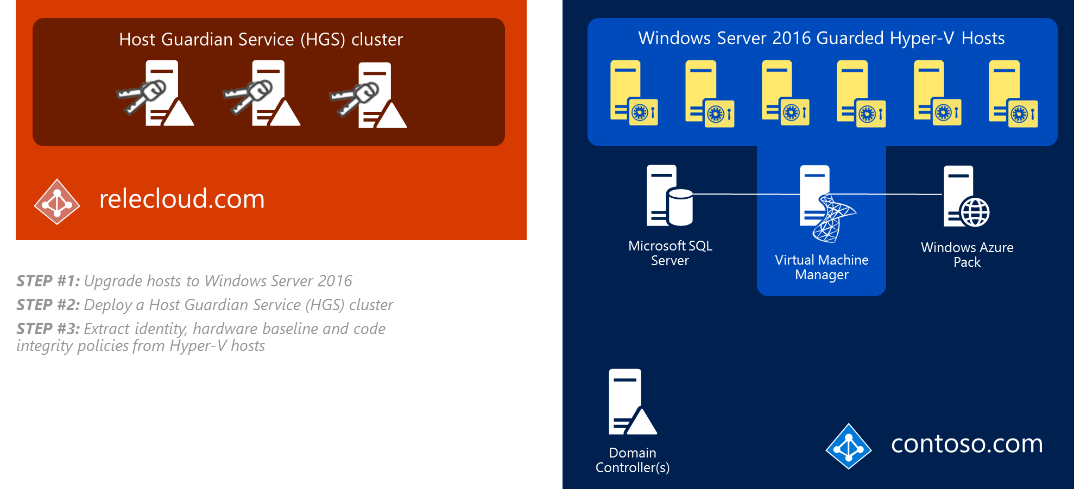
As we noted earlier, for TPM-based attestation, three things must be collected from Hyper-V hosts:
TPM identity. The public endorsement key (or EKpub) from the TPM 2.0 module on each Hyper-V host is used to uniquely identify each legitimate host.
Step Cmdlet Capture the EKpub Get-PlatformIdentifierAdd the captured EKpub to HGS Add-HgsAttestationTpmHost.
Hardware baseline. A baseline is recorded in the form of a Trusted Computing Group log file, or TCGlog. The TCGlog contains measurements representing anything security-sensitive that the host did or executed beginning with booting up from the UEFI firmare, on and up through drivers and the kernel until the host is all but ready to go. If each of your Hyper-V hosts are identical, then a single baseline is all you need. If they are not, then you'll need one for each class of hardware. To create the baseline, simply configure a Hyper-V host to your satisfaction (think golden image or a clean room setup) and extract the baseline from it. Ensure the Host Guardian Hyper-V Support feature is installed on your Hyper-V host before continuing.
Step Cmdlet Capture the hardware baseline Get-HgsAttestationBaselinePolicyAdd the baseline to HGS Add-HgsAttestationTpmPolicy.
Code integrity policy. Windows Server 2016 and Windows 10 both have a new form of enforcement for CI policies, called hypervisor-enforced code integrity (HVCI) . HVCI provides stronger enforcement and ensures that a host is only allowed to run binaries (including drivers and other kernel-mode components) that a trusted admin has allowed it to run. If each of your Hyper-V hosts are identical, then a single CI policy is all you need. If they are not, then you'll need one for each unique software configuration. To create the policy, configure the golden image host used in step 2 with all the software, agents, and updates you will use in production and extract a CI policy. You'll need to copy this file to a special folder and reboot each host in order for the policy to take effect.
Step Cmdlet Capture a CI policy from a golden image New-CIPolicyConvert the policy to a binary form consumed by HGS and Windows ConvertFrom-CIPolicyAdd the CI policy to HGS Add-HgsAttestationCIPolicy
In terms of the infrastructure required to run shielded VMs, you're done! HGS is now able to validate that each host's EKpub, TCGlog and CI policy match with its whitelisted inventory before issuing a health certificate.
Now let's briefly walk through creating a shielded VM template disk and a shielding data file so that we can provision shielded VMs simply and securely on the fabric we just built.
Step 4: Create a template for shielded VMs
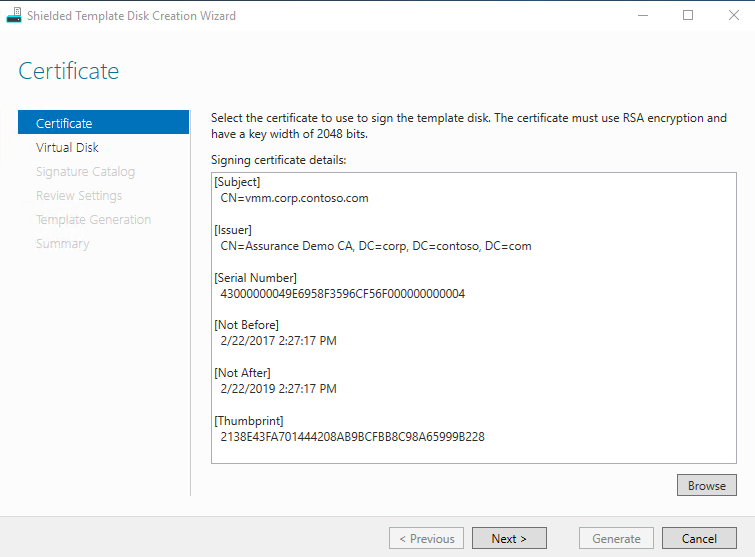
A shielded VM template protects template disks by creating a signature of the OS volume at a known trustworthy point in time. If the template disk is later infected by malware, its signature will differ and cause the shielded VM provisioning process to abort creation. Shielded template disks are created by running the Shielded Template Disk Creation Wizard against a regular template disk.
The wizard is included with the Shielded VM Tools feature in Windows Server 2016 Remote Server Administration Tools, and the Windows 10 Remote Server Administration Tools package.
A trustworthy administrator, such as the fabric administrator or VM owner, will need a signing certificate to create the disk signature. The disk signature is computed by hashing every sector of the OS volume on the template disk. If anything changes on the OS partition, the hash of the volume will also change. This process allows users creating shielded VMs on the fabric to place high levels of trust in the template disks and the shielded VMs that are born from them.
Step 5: Create a shielding data file
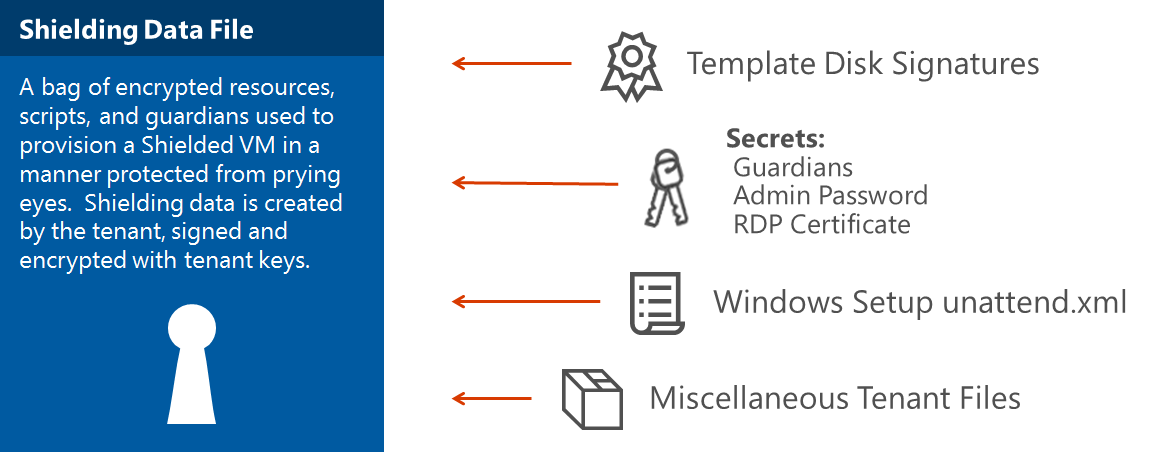
A shielding data file, sometimes called a PDK file after its file extension, stores and encrypts sensitive information used during shielded VM creation such as a collection of template disk signing certificates that the VM owner trusts, the administrator password of the new shielded VM, RDP certificates, and so on.
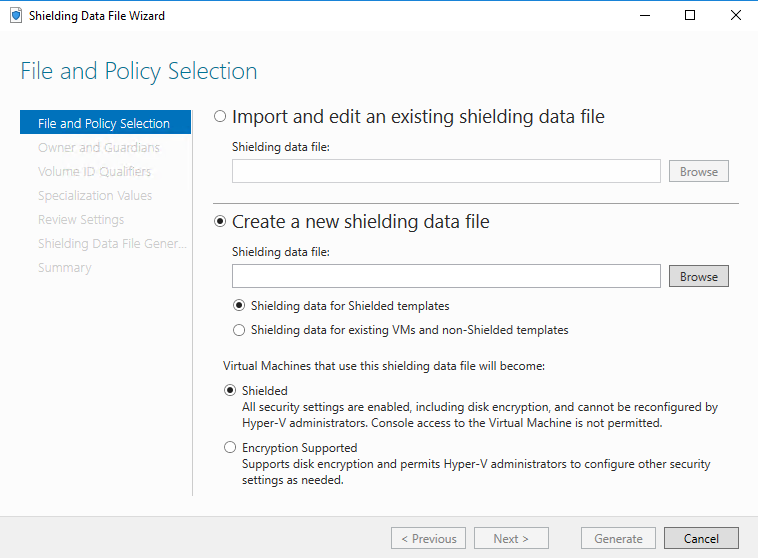
The shielding data file also includes the security policy setting for the shielded VM. You must choose one of two security policies when you create a shielding data file:
- Shielded: the most secure option, which eliminates many administrative attack vectors
- Encryption supported: a lesser level of protection that still provides the compliance benefits of being able to encrypt a VM, but allows Hyper-V admins to do things like using the VM console connection and PowerShell Direct.
At this stage, you can add optional management components like VMM or Windows Azure Pack. If you'd prefer not to, you can also create a shielded VM using PowerShell alone, as demonstrated in the Step by step - Creating shielded VMs without VMM blog. You're now ready to deploy your first shielded VM.
Step 6: Creating a shielded VM
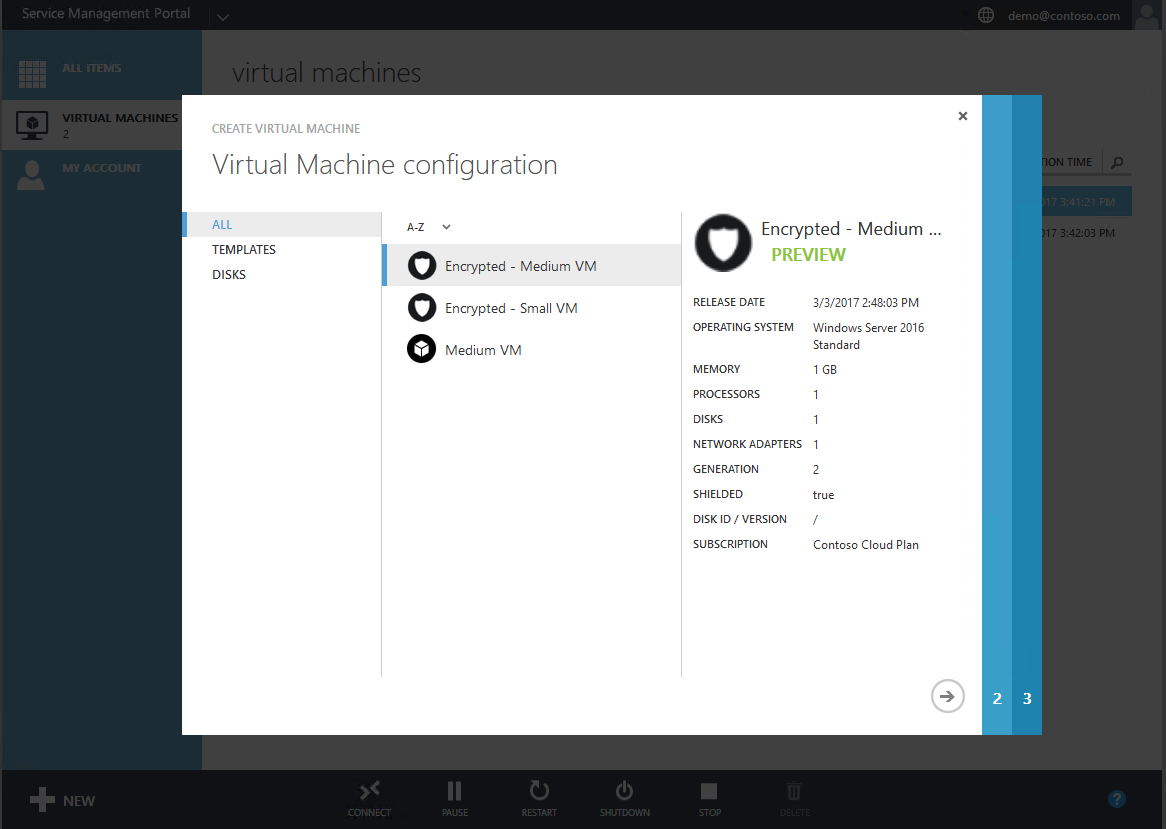
Creating shielded virtual machines differs very little from regular virtual machines. In Windows Azure Pack, the experience is even easier than creating a regular VM because you only need to supply a name, shielding data file (containing the rest of the specialization information), and the VM network.
Learn more
The steps discussed in this blog are also covered in a video that shows the required syntax of each step and concludes with deploying a shielded VM. You can find the video here: Deploying shielded VMs and a guarded fabric with Windows Server 2016.
To get started deploying shielded VMs in your own environment, check out our planning and deployment guides.
