Dados de ponto de clustering no SDK do Android
Ao visualizar muitos pontos de dados no mapa, eles poderão se sobrepor uns aos outros. A sobreposição pode fazer com que o mapa se torne ilegível e difícil de usar. O clustering de dados de ponto são o processo de combinar dados de ponto que estão próximos uns dos outros e os representar no mapa como um ponto de dados clusterizado individual. À medida que o usuário aplica zoom ao mapa, os clusters se dividem em seus pontos de dados individuais. Quando você trabalha com um grande número de pontos de dados, use os processos de clustering para melhorar a experiência do usuário.
Observação
Desativação do SDK do Android do Azure Mapas
O SDK Nativo do Azure Mapas para Android já foi preterido e será desativado em 31/03/25. Para evitar interrupções de serviço, migre para o SDK da Web do Azure Mapas até 31/03/25. Para obter mais informações, confira O guia de migração do SDK do Android do Azure Mapas.
Pré-requisitos
Conclua as etapas no documento Início Rápido: Criar um aplicativo Android. Os blocos de código neste artigo podem ser inseridos no manipulador de eventos onReady dos mapas.
Habilitar o clustering na fonte de dados
Habilite o clustering na classe DataSource definindo a opção cluster como true. Defina clusterRadius para selecionar pontos próximos e combiná-los em um cluster. O valor de clusterRadius está em pixels. Use clusterMaxZoom para especificar um nível de ampliação para o qual deseja desabilitar a lógica de clustering. Aqui está um exemplo de como habilitar o clustering em uma fonte de dados.
//Create a data source and enable clustering.
DataSource source = new DataSource(
    //Tell the data source to cluster point data.
    cluster(true),

    //The radius in pixels to cluster points together.
    clusterRadius(45),

    //The maximum zoom level in which clustering occurs.
    //If you zoom in more than this, all points are rendered as symbols.
    clusterMaxZoom(15)
);
 //Create a data source and enable clustering.
val source = DataSource(
    //Tell the data source to cluster point data.
    cluster(true),

    //The radius in pixels to cluster points together.
    clusterRadius(45),

    //The maximum zoom level in which clustering occurs.
    //If you zoom in more than this, all points are rendered as symbols.
    clusterMaxZoom(15)
)
Cuidado
O clustering só funciona com recursos Point. Se a fonte de dados contiver recursos de outros tipos de geometria, como LineString ou Polygon, ocorrerá um erro.
Dica
Se dois pontos de dados estiverem próximos no solo, possivelmente o cluster nunca será dividido, independentemente de quanto o usuário ampliar. Para resolver isso, você pode definir a opção clusterMaxZoom para desabilitar a lógica de clustering e simplesmente exibir tudo.
A classe DataSource também fornece os seguintes métodos relacionados ao clustering.
| Método | Tipo de retorno | Descrição |
|---|---|---|
getClusterChildren(Feature clusterFeature) |
FeatureCollection |
Recupera os filhos do cluster fornecido no próximo nível de zoom. Esses filhos podem ser uma combinação de formas e subclusters. Os subclusters serão recursos com propriedades correspondentes a ClusteredProperties. |
getClusterExpansionZoom(Feature clusterFeature) |
int |
Calcula um nível de zoom no qual o cluster começará a se expandir ou se separar. |
getClusterLeaves(Feature clusterFeature, long limit, long offset) |
FeatureCollection |
Recupera todos os pontos em um cluster. Defina o limit para retornar um subconjunto dos pontos e use offset para paginar os pontos. |
Exibir clusters usando uma camada de bolha
Uma camada de bolha é uma ótima maneira de renderizar os pontos clusterizados. Use as expressões para dimensionar o raio e alterar a cor com base no número de pontos no cluster. Se você exibir clusters usando uma camada de bolha, deverá usar uma camada separada para renderizar pontos de dados não clusterizados.
Para exibir o tamanho do cluster na parte superior da bolha, use uma camada de símbolo com texto e não use um ícone.
O código a seguir exibe os pontos clusterizados usando uma camada de bolhas e o número de pontos em cada cluster usando uma camada de símbolo. Uma segunda camada de símbolo é usada para exibir pontos individuais que não estão dentro de um cluster.
//Create a data source and add it to the map.
DataSource source = new DataSource(
    //Tell the data source to cluster point data.
    cluster(true),

    //The radius in pixels to cluster points together.
    clusterRadius(45),

    //The maximum zoom level in which clustering occurs.
    //If you zoom in more than this, all points are rendered as symbols.
    clusterMaxZoom(15)
);

//Import the geojson data and add it to the data source.
map.importDataFromUrl("https://earthquake.usgs.gov/earthquakes/feed/v1.0/summary/all_week.geojson");

//Add data source to the map.
map.sources.add(source);

//Create a bubble layer for rendering clustered data points.
map.layers.add(new BubbleLayer(source,
    //Scale the size of the clustered bubble based on the number of points in the cluster.
    bubbleRadius(
        step(
            get("point_count"),
            20,             //Default of 20 pixel radius.
            stop(100, 30),  //If point_count >= 100, radius is 30 pixels.
            stop(750, 40)   //If point_count >= 750, radius is 40 pixels.
        )
    ),

    //Change the color of the cluster based on the value on the point_cluster property of the cluster.
    bubbleColor(
        step(
            toNumber(get("point_count")),
            color(Color.GREEN),              //Default to lime green.
            stop(100, color(Color.YELLOW)),  //If the point_count >= 100, color is yellow.
            stop(750, color(Color.RED))      //If the point_count >= 100, color is red.
        )
    ),

    bubbleStrokeWidth(0f),

    //Only rendered data points which have a point_count property, which clusters do.
    BubbleLayerOptions.filter(has("point_count"))
));

//Create a symbol layer to render the count of locations in a cluster.
map.layers.add(new SymbolLayer(source,
    iconImage("none"),                //Hide the icon image.
    textField(get("point_count")),    //Display the point count as text.
    textOffset(new Float[]{ 0f, 0.4f }),

    //Allow clustered points in this layer.
    SymbolLayerOptions.filter(has("point_count"))
));

//Create a layer to render the individual locations.
map.layers.add(new SymbolLayer(source,
    //Filter out clustered points from this layer.
    SymbolLayerOptions.filter(not(has("point_count")))
));
//Create a data source and add it to the map.
val source = DataSource(
    //Tell the data source to cluster point data.
    cluster(true),

    //The radius in pixels to cluster points together.
    clusterRadius(45),

    //The maximum zoom level in which clustering occurs.
    //If you zoom in more than this, all points are rendered as symbols.
    clusterMaxZoom(15)
)

//Import the geojson data and add it to the data source.
map.importDataFromUrl("https://earthquake.usgs.gov/earthquakes/feed/v1.0/summary/all_week.geojson")

//Add data source to the map.
map.sources.add(source)

//Create a bubble layer for rendering clustered data points.
map.layers.add(
    BubbleLayer(
        source,

        //Scale the size of the clustered bubble based on the number of points in the cluster.
        bubbleRadius(
            step(
                get("point_count"),
                20,  //Default of 20 pixel radius.
                stop(100, 30),  //If point_count >= 100, radius is 30 pixels.
                stop(750, 40) //If point_count >= 750, radius is 40 pixels.
            )
        ),

        //Change the color of the cluster based on the value on the point_cluster property of the cluster.
        bubbleColor(
            step(
                toNumber(get("point_count")),
                color(Color.GREEN),  //Default to lime green.
                stop(100, color(Color.YELLOW)),  //If the point_count >= 100, color is yellow.
                stop(750, color(Color.RED)) //If the point_count >= 100, color is red.
            )
        ),
        bubbleStrokeWidth(0f),

        //Only rendered data points which have a point_count property, which clusters do.
        BubbleLayerOptions.filter(has("point_count"))
    )
)

//Create a symbol layer to render the count of locations in a cluster.
map.layers.add(
    SymbolLayer(
        source,
        iconImage("none"),  //Hide the icon image.
        textField(get("point_count")),  //Display the point count as text.
        textOffset(arrayOf(0f, 0.4f)),

        //Allow clustered points in this layer.
        SymbolLayerOptions.filter(has("point_count"))
    )
)

//Create a layer to render the individual locations.
map.layers.add(
    SymbolLayer(
        source,

        //Filter out clustered points from this layer.
        SymbolLayerOptions.filter(not(has("point_count")))
    )
)
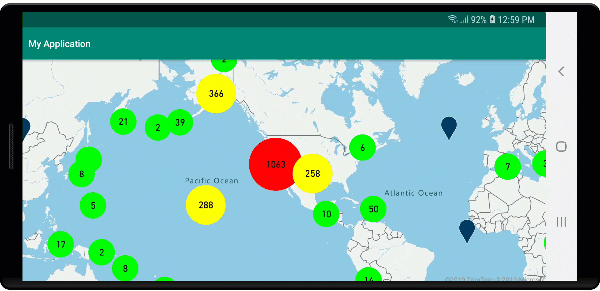
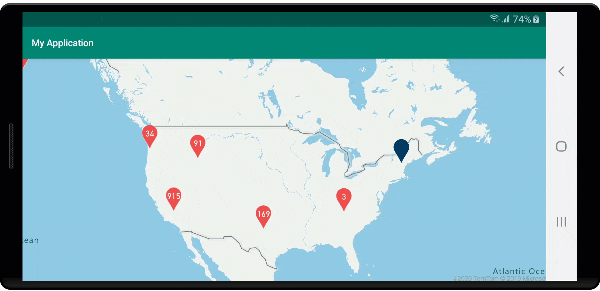
A imagem a seguir mostra o código acima exibir recursos de ponto clusterizado em uma camada de bolha, escalada e colorida com base no número de pontos no cluster. Os pontos não clusterizados são renderizados por meio de uma camada de símbolo.
Exibir clusters usando uma camada de símbolo
Ao visualizar pontos de dados, a camada de símbolo oculta automaticamente os símbolos que se sobrepõem para garantir uma interface do usuário mais limpa. Esse comportamento padrão poderá ser indesejável se você quiser mostrar a densidade dos pontos de dados no mapa. No entanto, a maioria dessas configurações pode ser alterada. Para ver todos os símbolos, defina a opção iconAllowOverlap da camadas de Símbolo como true.
Use o clustering para mostrar a densidade dos pontos de dados enquanto mantém uma interface do usuário limpa. A amostra a seguir mostra como adicionar símbolos personalizados e representar clusters e pontos de dados individuais usando a camada de símbolo.
//Load all the custom image icons into the map resources.
map.images.add("earthquake_icon", R.drawable.earthquake_icon);
map.images.add("warning_triangle_icon", R.drawable.warning_triangle_icon);

//Create a data source and add it to the map.
DataSource source = new DataSource(
    //Tell the data source to cluster point data.
    cluster(true)
);

//Import the geojson data and add it to the data source.
map.importDataFromUrl("https://earthquake.usgs.gov/earthquakes/feed/v1.0/summary/all_week.geojson");

//Add data source to the map.
map.sources.add(source);

//Create a symbol layer to render the clusters.
map.layers.add(new SymbolLayer(source,
    iconImage("warning_triangle_icon"),
    textField(get("point_count")),
    textOffset(new Float[]{ 0f, -0.4f }),

    //Allow clustered points in this layer.
    filter(has("point_count"))
));

//Create a layer to render the individual locations.
map.layers.add(new SymbolLayer(source,
    iconImage("earthquake_icon"),

    //Filter out clustered points from this layer.
    filter(not(has("point_count")))
));
//Load all the custom image icons into the map resources.
map.images.add("earthquake_icon", R.drawable.earthquake_icon)
map.images.add("warning_triangle_icon", R.drawable.warning_triangle_icon)

//Create a data source and add it to the map.
val source = DataSource(
    //Tell the data source to cluster point data.
    cluster(true)
)

//Import the geojson data and add it to the data source.
map.importDataFromUrl("https://earthquake.usgs.gov/earthquakes/feed/v1.0/summary/all_week.geojson")

//Add data source to the map.
map.sources.add(source)

//Create a symbol layer to render the clusters.
map.layers.add(
    SymbolLayer(
        source,
        iconImage("warning_triangle_icon"),
        textField(get("point_count")),
        textOffset(arrayOf(0f, -0.4f)),

        //Allow clustered points in this layer.
        filter(has("point_count"))
    )
)

//Create a layer to render the individual locations.
map.layers.add(
    SymbolLayer(
        source,
        iconImage("earthquake_icon"),

        //Filter out clustered points from this layer.
        filter(not(has("point_count")))
    )
)
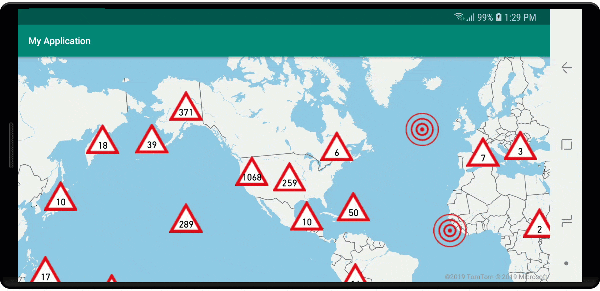
Neste exemplo, a imagem a seguir é carregada na pasta desenhável do aplicativo.
| earthquake_icon.png | warning_triangle_icon.png |
A imagem a seguir mostra o código acima renderizando os recursos de ponto clusterizado e não clusterizado usando ícones personalizados.
Clustering e a camada de mapas de calor
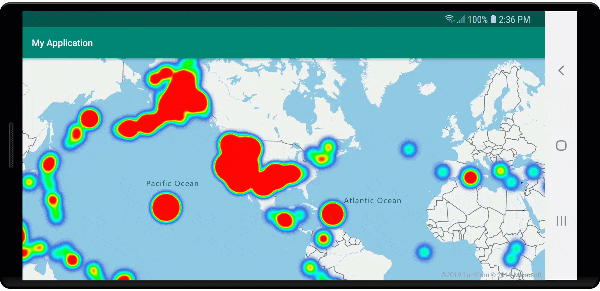
Mapas de calor são uma ótima maneira de exibir a densidade dos dados no mapa. Esse método de visualização processa um grande número de pontos de dados por conta própria. Se os pontos de dados forem clusterizados e o tamanho do cluster for usado como o peso do mapa de calor, o mapa de calor poderá lidar com ainda mais dados. Para obter essa opção, defina a opção heatmapWeight da camada do mapa de calor como get("point_count"). Quando o raio do cluster for pequeno, o mapa de calor será praticamente idêntico a um mapa de calor que usa os pontos de dados não clusterizados, mas ele terá um desempenho muito melhor. No entanto, quanto menor for o raio do cluster, mais preciso será o mapa de calor, mas com menos benefícios de desempenho.
//Create a data source and add it to the map.
DataSource source = new DataSource(
    //Tell the data source to cluster point data.
    cluster(true),

    //The radius in pixels to cluster points together.
    clusterRadius(10)
);

//Import the geojson data and add it to the data source.
map.importDataFromUrl("https://earthquake.usgs.gov/earthquakes/feed/v1.0/summary/all_week.geojson");

//Add data source to the map.
map.sources.add(source);

//Create a heat map and add it to the map.
map.layers.add(new HeatMapLayer(source,
    //Set the weight to the point_count property of the data points.
    heatmapWeight(get("point_count")),

    //Optionally adjust the radius of each heat point.
    heatmapRadius(20f)
), "labels");
//Create a data source and add it to the map.
val source = DataSource(
    //Tell the data source to cluster point data.
    cluster(true),

    //The radius in pixels to cluster points together.
    clusterRadius(10)
)

//Import the geojson data and add it to the data source.
map.importDataFromUrl("https://earthquake.usgs.gov/earthquakes/feed/v1.0/summary/all_week.geojson")

//Add data source to the map.
map.sources.add(source)

//Create a heat map and add it to the map.
map.layers.add(
    HeatMapLayer(
        source,

        //Set the weight to the point_count property of the data points.
        heatmapWeight(get("point_count")),

        //Optionally adjust the radius of each heat point.
        heatmapRadius(20f)
    ), "labels"
)
A imagem a seguir mostra o código acima exibindo um mapa de calor que é otimizado por meio de recursos de ponto clusterizado e a contagem de clusters como o peso no mapa de calor.
Eventos de mouse em pontos de dados clusterizados
Quando ocorrem eventos de mouse em uma camada que contém pontos de dados clusterizados, o ponto de dados clusterizado retorna ao evento como um objeto de recurso de ponto do GeoJSON. O recurso de ponto tem as seguintes propriedades:
| Nome da propriedade | Type | Descrição |
|---|---|---|
cluster |
booleano | Indica se o recurso representa um cluster. |
point_count |
número | O número de pontos que o cluster contém. |
point_count |
número | O número de pontos que o cluster contém. |
point_count_abbreviated |
string | Uma cadeia de caracteres que abreviará o valor point_count, se ele for longo. (por exemplo, 4.000 torna-se 4K) |
Este exemplo usa uma camada de bolha que renderiza pontos de cluster e adiciona um evento de clique. Quando o evento de clique é disparado, o código calcula e amplia o mapa para o próximo nível de zoom, no qual o cluster se separa. Essa funcionalidade é implementada usando o método getClusterExpansionZoom da classe DataSource e a propriedade cluster_id do ponto de dados clusterizado clicado.
//Create a data source and add it to the map.
DataSource source = new DataSource(
    //Tell the data source to cluster point data.
    cluster(true),

    //The radius in pixels to cluster points together.
    clusterRadius(45),

    //The maximum zoom level in which clustering occurs.
    //If you zoom in more than this, all points are rendered as symbols.
    clusterMaxZoom(15)
);

//Import the geojson data and add it to the data source.
source.importDataFromUrl("https://earthquake.usgs.gov/earthquakes/feed/v1.0/summary/all_week.geojson");

//Add data source to the map.
map.sources.add(source);

//Create a bubble layer for rendering clustered data points.
BubbleLayer clusterBubbleLayer = new BubbleLayer(source,
    //Scale the size of the clustered bubble based on the number of points in the cluster.
    bubbleRadius(
        step(
            get("point_count"),
            20f,    //Default of 20 pixel radius.
            stop(100, 30),   //If point_count >= 100, radius is 30 pixels.
            stop(750, 40)    //If point_count >= 750, radius is 40 pixels.
        )
    ),

    //Change the color of the cluster based on the value on the point_cluster property of the cluster.
    bubbleColor(
        step(
            get("point_count"),
            color(Color.GREEN),  //Default to green.
            stop(100, color(Color.YELLOW)), //If the point_count >= 100, color is yellow.
            stop(750, color(Color.RED))     //If the point_count >= 100, color is red.
        )
    ),

    bubbleStrokeWidth(0f),

    //Only rendered data points which have a point_count property, which clusters do.
    BubbleLayerOptions.filter(has("point_count"))
);

//Add the clusterBubbleLayer and two additional layers to the map.
map.layers.add(clusterBubbleLayer);

//Create a symbol layer to render the count of locations in a cluster.
map.layers.add(new SymbolLayer(source,
    //Hide the icon image.
    iconImage("none"),

    //Display the 'point_count_abbreviated' property value.
    textField(get("point_count_abbreviated")),

    //Offset the text position so that it's centered nicely.
    textOffset(new Float[] { 0f, 0.4f }),

    //Only rendered data points which have a point_count property, which clusters do.
    SymbolLayerOptions.filter(has("point_count"))
));

//Create a layer to render the individual locations.
map.layers.add(new SymbolLayer(source,
    //Filter out clustered points from this layer.
    SymbolLayerOptions.filter(not(has("point_count")))
));

//Add a click event to the cluster layer so we can zoom in when a user clicks a cluster.
map.events.add((OnFeatureClick) (features) -> {
    if(features.size() > 0) {
        //Get the clustered point from the event.
        Feature cluster = features.get(0);

        //Get the cluster expansion zoom level. This is the zoom level at which the cluster starts to break apart.
        int expansionZoom = source.getClusterExpansionZoom(cluster);

        //Update the map camera to be centered over the cluster.
        map.setCamera(
            //Center the map over the cluster points location.
            center((Point)cluster.geometry()),

            //Zoom to the clusters expansion zoom level.
            zoom(expansionZoom),

            //Animate the movement of the camera to the new position.
            animationType(AnimationType.EASE),
            animationDuration(200)
        );
    }

    //Return true indicating if event should be consumed and not passed further to other listeners registered afterwards, false otherwise.
    return true;
}, clusterBubbleLayer);
//Create a data source and add it to the map.
val source = DataSource( //Tell the data source to cluster point data.
    //The radius in pixels to cluster points together.
    cluster(true),

    //The maximum zoom level in which clustering occurs.
    clusterRadius(45),

    //If you zoom in more than this, all points are rendered as symbols.
    clusterMaxZoom(15)
)

//Import the geojson data and add it to the data source.
source.importDataFromUrl("https://earthquake.usgs.gov/earthquakes/feed/v1.0/summary/all_week.geojson")

//Add data source to the map.
map.sources.add(source)

//Create a bubble layer for rendering clustered data points.
val clusterBubbleLayer = BubbleLayer(
    source,

    //Scale the size of the clustered bubble based on the number of points in the cluster.
    bubbleRadius(
        step(
            get("point_count"),
            20f,  //Default of 20 pixel radius.
            stop(100, 30),  //If point_count >= 100, radius is 30 pixels.
            stop(750, 40) //If point_count >= 750, radius is 40 pixels.
        )
    ),

    //Change the color of the cluster based on the value on the point_cluster property of the cluster.
    bubbleColor(
        step(
            get("point_count"),
            color(Color.GREEN),  //Default to green.
            stop(
                100,
                color(Color.YELLOW)
            ),  //If the point_count >= 100, color is yellow.
            stop(750, color(Color.RED)) //If the point_count >= 100, color is red.
        )
    ),

    bubbleStrokeWidth(0f),

    //Only rendered data points which have a point_count property, which clusters do.
    BubbleLayerOptions.filter(has("point_count"))
)

//Add the clusterBubbleLayer and two additional layers to the map.
map.layers.add(clusterBubbleLayer)

//Create a symbol layer to render the count of locations in a cluster.
map.layers.add(
    SymbolLayer(
        source,

        //Hide the icon image.
        iconImage("none"),

        //Display the 'point_count_abbreviated' property value.
        textField(get("point_count_abbreviated")),

        //Offset the text position so that it's centered nicely.
        textOffset(
            arrayOf(
                0f,
                0.4f
            )
        ),

        //Only rendered data points which have a point_count property, which clusters do.
        SymbolLayerOptions.filter(has("point_count"))
    )
)

//Create a layer to render the individual locations.
map.layers.add(
    SymbolLayer(
        source,

        //Filter out clustered points from this layer.
        SymbolLayerOptions.filter(not(has("point_count")))
    )
)

//Add a click event to the cluster layer so we can zoom in when a user clicks a cluster.
map.events.add(OnFeatureClick { features: List<Feature?>? ->
    if (features.size() > 0) {
        //Get the clustered point from the event.
        val cluster: Feature = features.get(0)

        //Get the cluster expansion zoom level. This is the zoom level at which the cluster starts to break apart.
        val expansionZoom: Int = source.getClusterExpansionZoom(cluster)

        //Update the map camera to be centered over the cluster.
        map.setCamera(

            //Center the map over the cluster points location.
            center(cluster.geometry() as Point?),

            //Zoom to the clusters expansion zoom level.
            zoom(expansionZoom),

            //Animate the movement of the camera to the new position.
            animationType(AnimationType.EASE),
            animationDuration(200)
        )
    }
    true
}, clusterBubbleLayer)
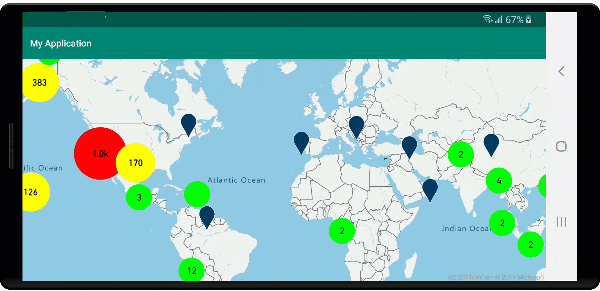
A imagem a seguir mostra o código acima exibindo pontos clusterizados em um mapa que, quando selecionado, amplia no próximo nível de zoom em que um cluster começa a se separar e expandir.
Exibir a área do cluster
Os dados de ponto que um cluster representa são distribuídos por uma área. Neste exemplo, ao passar o mouse sobre um cluster, ocorrem dois comportamentos principais. Primeiro, os pontos de dados individuais contidos no cluster serão usados para calcular uma envoltória convexa. Em seguida, a envoltória convexa será exibida no mapa para mostrar uma área. Uma envoltória convexa é um polígono que encapsula um conjunto de pontos como uma banda elástica e pode ser calculada usando o método atlas.math.getConvexHull. Todos os pontos contidos em um cluster podem ser recuperados da fonte de dados usando o método getClusterLeaves.
//Create a data source and add it to the map.
DataSource source = new DataSource(
    //Tell the data source to cluster point data.
    cluster(true)
);

//Import the geojson data and add it to the data source.
source.importDataFromUrl("https://earthquake.usgs.gov/earthquakes/feed/v1.0/summary/all_week.geojson");

//Add data source to the map.
map.sources.add(source);

//Create a data source for the convex hull polygon. Since this will be updated frequently it is more efficient to separate this into its own data source.
DataSource polygonDataSource = new DataSource();

//Add data source to the map.
map.sources.add(polygonDataSource);

//Add a polygon layer and a line layer to display the convex hull.
map.layers.add(new PolygonLayer(polygonDataSource));
map.layers.add(new LineLayer(polygonDataSource));

//Create a symbol layer to render the clusters.
SymbolLayer clusterLayer = new SymbolLayer(source,
    iconImage("marker-red"),
    textField(get("point_count_abbreviated")),
    textOffset(new Float[] { 0f, -1.2f }),
    textColor(Color.WHITE),
    textSize(14f),

    //Only rendered data points which have a point_count property, which clusters do.
    SymbolLayerOptions.filter(has("point_count"))
);
map.layers.add(clusterLayer);

//Create a layer to render the individual locations.
map.layers.add(new SymbolLayer(source,
    //Filter out clustered points from this layer.
    SymbolLayerOptions.filter(not(has("point_count")))
));

//Add a click event to the layer so we can calculate the convex hull of all the points within a cluster.
map.events.add((OnFeatureClick) (features) -> {
    if(features.size() > 0) {
        //Get the clustered point from the event.
        Feature cluster = features.get(0);

        //Get all points in the cluster. Set the offset to 0 and the max long value to return all points.
        FeatureCollection leaves = source.getClusterLeaves(cluster, Long.MAX_VALUE, 0);

        //Get the point features from the feature collection.
        List<Feature> childFeatures = leaves.features();

        //When only two points in a cluster. Render a line.
        if(childFeatures.size() == 2){
            //Extract the geometry points from the child features.
            List<Point> points = new ArrayList();

            childFeatures.forEach(f -> {
                points.add((Point)f.geometry());
            });

            //Create a line from the points.
            polygonDataSource.setShapes(LineString.fromLngLats(points));
        } else {
            Polygon hullPolygon = MapMath.getConvexHull(leaves);

            //Overwrite all data in the polygon data source with the newly calculated convex hull polygon.
            polygonDataSource.setShapes(hullPolygon);
        }
    }

    //Return true indicating if event should be consumed and not passed further to other listeners registered afterwards, false otherwise.
    return true;
}, clusterLayer);
//Create a data source and add it to the map.
val source = DataSource(
    //Tell the data source to cluster point data.
    cluster(true)
)

//Import the geojson data and add it to the data source.
source.importDataFromUrl("https://earthquake.usgs.gov/earthquakes/feed/v1.0/summary/all_week.geojson")

//Add data source to the map.
map.sources.add(source)

//Create a data source for the convex hull polygon. Since this will be updated frequently it is more efficient to separate this into its own data source.
val polygonDataSource = DataSource()

//Add data source to the map.
map.sources.add(polygonDataSource)

//Add a polygon layer and a line layer to display the convex hull.
map.layers.add(PolygonLayer(polygonDataSource))
map.layers.add(LineLayer(polygonDataSource))

//Create a symbol layer to render the clusters.
val clusterLayer = SymbolLayer(
    source,
    iconImage("marker-red"),
    textField(get("point_count_abbreviated")),
    textOffset(arrayOf(0f, -1.2f)),
    textColor(Color.WHITE),
    textSize(14f),

    //Only rendered data points which have a point_count property, which clusters do.
    SymbolLayerOptions.filter(has("point_count"))
)
map.layers.add(clusterLayer)

//Create a layer to render the individual locations.
map.layers.add(
    SymbolLayer(
        source,

        //Filter out clustered points from this layer.
        SymbolLayerOptions.filter(not(has("point_count")))
    )
)

//Add a click event to the layer so we can calculate the convex hull of all the points within a cluster.
map.events.add(OnFeatureClick { features: List<Feature?>? ->
    if (features.size() > 0) {
        //Get the clustered point from the event.
        val cluster: Feature = features.get(0)

        //Get all points in the cluster. Set the offset to 0 and the max long value to return all points.
        val leaves: FeatureCollection = source.getClusterLeaves(cluster, Long.MAX_VALUE, 0)

        //Get the point features from the feature collection.
        val childFeatures = leaves.features()

        //When only two points in a cluster. Render a line.
        if (childFeatures!!.size == 2) {
            //Extract the geometry points from the child features.
            val points: MutableList<Point?> = ArrayList()
            childFeatures!!.forEach(Consumer { f: Feature ->
                points.add(
                    f.geometry() as Point?
                )
            })

            //Create a line from the points.
            polygonDataSource.setShapes(LineString.fromLngLats(points))
        } else {
            val hullPolygon: Polygon = MapMath.getConvexHull(leaves)

            //Overwrite all data in the polygon data source with the newly calculated convex hull polygon.
            polygonDataSource.setShapes(hullPolygon)
        }
    }
    true
}, clusterLayer)
A imagem a seguir mostra o código acima exibindo a área de todos os pontos em um cluster que recebeu um clique.
Agregando dados em clusters
Geralmente, os clusters são representados usando um símbolo com o número de pontos que estão dentro do cluster. Mas, às vezes, é desejável personalizar o estilo dos clusters com métricas adicionais. Com as propriedades do cluster, as propriedades personalizadas podem ser criadas e iguais a um cálculo com base nas propriedades de cada ponto com um cluster. As agregações do cluster podem ser definidas na opção clusterProperties da DataSource.
O código a seguir calcula uma contagem com base na propriedade de tipo de entidade de cada ponto de dados em um cluster. Quando um usuário seleciona um cluster, um pop-up é exibido com informações adicionais sobre o cluster.
//An array of all entity type property names in features of the data set.
String[] entityTypes = new String[] { "Gas Station", "Grocery Store", "Restaurant", "School" };

//Create a popup and add it to the map.
Popup popup = new Popup();
map.popups.add(popup);

//Close the popup initially.
popup.close();

//Create a data source and add it to the map.
source = new DataSource(
    //Tell the data source to cluster point data.
    cluster(true),

    //The radius in pixels to cluster points together.
    clusterRadius(50),

    //Calculate counts for each entity type in a cluster as custom aggregate properties.
    clusterProperties(new ClusterProperty[]{
        new ClusterProperty("Gas Station", sum(accumulated(), get("Gas Station")), switchCase(eq(get("EntityType"), literal("Gas Station")), literal(1), literal(0))),
        new ClusterProperty("Grocery Store", sum(accumulated(), get("Grocery Store")), switchCase(eq(get("EntityType"), literal("Grocery Store")), literal(1), literal(0))),
        new ClusterProperty("Restaurant", sum(accumulated(), get("Restaurant")), switchCase(eq(get("EntityType"), literal("Restaurant")), literal(1), literal(0))),
        new ClusterProperty("School", sum(accumulated(), get("School")), switchCase(eq(get("EntityType"), literal("School")), literal(1), literal(0)))
    })
);

//Import the geojson data and add it to the data source.
source.importDataFromUrl("https://samples.azuremaps.com/data/geojson/SamplePoiDataSet.json");

//Add data source to the map.
map.sources.add(source);

//Create a bubble layer for rendering clustered data points.
BubbleLayer clusterBubbleLayer = new BubbleLayer(source,
    bubbleRadius(20f),
    bubbleColor("purple"),
    bubbleStrokeWidth(0f),

    //Only rendered data points which have a point_count property, which clusters do.
    BubbleLayerOptions.filter(has("point_count"))
);

//Add the clusterBubbleLayer and two additional layers to the map.
map.layers.add(clusterBubbleLayer);

//Create a symbol layer to render the count of locations in a cluster.
map.layers.add(new SymbolLayer(source,
    //Hide the icon image.
    iconImage("none"),

    //Display the 'point_count_abbreviated' property value.
    textField(get("point_count_abbreviated")),

    textColor(Color.WHITE),
    textOffset(new Float[] { 0f, 0.4f }),

    //Only rendered data points which have a point_count property, which clusters do.
    SymbolLayerOptions.filter(has("point_count"))
));

//Create a layer to render the individual locations.
map.layers.add(new SymbolLayer(source,
    //Filter out clustered points from this layer.
    SymbolLayerOptions.filter(not(has("point_count")))
));

//Add a click event to the cluster layer and display the aggregate details of the cluster.
map.events.add((OnFeatureClick) (features) -> {
    if(features.size() > 0) {
        //Get the clustered point from the event.
        Feature cluster = features.get(0);

        //Create a number formatter that removes decimal places.
        NumberFormat nf = DecimalFormat.getInstance();
        nf.setMaximumFractionDigits(0);

        //Create the popup's content.
        StringBuilder sb = new StringBuilder();

        sb.append("Cluster size: ");
        sb.append(nf.format(cluster.getNumberProperty("point_count")));
        sb.append(" entities\n");

        for(int i = 0; i < entityTypes.length; i++) {
            sb.append("\n");

            //Get the entity type name.
            sb.append(entityTypes[i]);
            sb.append(": ");

            //Get the aggregated entity type count from the properties of the cluster by name.
            sb.append(nf.format(cluster.getNumberProperty(entityTypes[i])));
        }

        //Retrieve the custom layout for the popup.
        View customView = LayoutInflater.from(this).inflate(R.layout.popup_text, null);

        //Access the text view within the custom view and set the text to the title property of the feature.
        TextView tv = customView.findViewById(R.id.message);
        tv.setText(sb.toString());

        //Get the position of the cluster.
        Position pos = MapMath.getPosition((Point)cluster.geometry());

        //Set the options on the popup.
        popup.setOptions(
            //Set the popups position.
            position(pos),

            //Set the anchor point of the popup content.
            anchor(AnchorType.BOTTOM),

            //Set the content of the popup.
            content(customView)
        );

        //Open the popup.
        popup.open();
    }

    //Return a boolean indicating if event should be consumed or continue bubble up.
    return true;
}, clusterBubbleLayer);
//An array of all entity type property names in features of the data set.
val entityTypes = arrayOf("Gas Station", "Grocery Store", "Restaurant", "School")

//Create a popup and add it to the map.
val popup = Popup()
map.popups.add(popup)

//Close the popup initially.
popup.close()

//Create a data source and add it to the map.
val source = DataSource(
    //Tell the data source to cluster point data.
    cluster(true),

    //The radius in pixels to cluster points together.
    clusterRadius(50),

    //Calculate counts for each entity type in a cluster as custom aggregate properties.
    clusterProperties(
        arrayOf<ClusterProperty>(
            ClusterProperty("Gas Station", sum(accumulated(), get("Gas Station")), switchCase(eq(get("EntityType"), literal("Gas Station")), literal(1), literal(0))),
            ClusterProperty("Grocery Store", sum(accumulated(), get("Grocery Store")), switchCase(eq(get("EntityType"), literal("Grocery Store")), literal(1), literal(0))),
            ClusterProperty("Restaurant", sum(accumulated(), get("Restaurant")), switchCase(eq(get("EntityType"), literal("Restaurant")), literal(1), literal(0))),
            ClusterProperty("School", sum(accumulated(), get("School")), switchCase(eq(get("EntityType"), literal("School")), literal(1), literal(0)))
        )
    )
)

//Import the geojson data and add it to the data source.
source.importDataFromUrl("https://samples.azuremaps.com/data/geojson/SamplePoiDataSet.json")

//Add data source to the map.
map.sources.add(source)

//Create a bubble layer for rendering clustered data points.
val clusterBubbleLayer = BubbleLayer(
    source,
    bubbleRadius(20f),
    bubbleColor("purple"),
    bubbleStrokeWidth(0f),

    //Only rendered data points which have a point_count property, which clusters do.
    BubbleLayerOptions.filter(has("point_count"))
)

//Add the clusterBubbleLayer and two additional layers to the map.
map.layers.add(clusterBubbleLayer)

//Create a symbol layer to render the count of locations in a cluster.
map.layers.add(
    SymbolLayer(
        source,

        //Hide the icon image.
        iconImage("none"),

        //Display the 'point_count_abbreviated' property value.
        textField(get("point_count_abbreviated")),

        textColor(Color.WHITE),
        textOffset(arrayOf(0f, 0.4f)),

        //Only rendered data points which have a point_count property, which clusters do.
        SymbolLayerOptions.filter(has("point_count"))
    )
)

//Create a layer to render the individual locations.
map.layers.add(
    SymbolLayer(
        source,

        //Filter out clustered points from this layer.
        SymbolLayerOptions.filter(not(has("point_count")))
    )
)

//Add a click event to the cluster layer and display the aggregate details of the cluster.
map.events.add(OnFeatureClick { features: List<Feature> ->
    if (features.size > 0) {
        //Get the clustered point from the event.
        val cluster = features[0]

        //Create a number formatter that removes decimal places.
        val nf: NumberFormat = DecimalFormat.getInstance()
        nf.setMaximumFractionDigits(0)

        //Create the popup's content.
        val sb = StringBuilder()

        sb.append("Cluster size: ")
        sb.append(nf.format(cluster.getNumberProperty("point_count")))
        sb.append(" entities\n")

        for (i in entityTypes.indices) {
            sb.append("\n")

            //Get the entity type name.
            sb.append(entityTypes[i])
            sb.append(": ")

            //Get the aggregated entity type count from the properties of the cluster by name.
            sb.append(nf.format(cluster.getNumberProperty(entityTypes[i])))
        }

        //Retrieve the custom layout for the popup.
        val customView: View = LayoutInflater.from(this).inflate(R.layout.popup_text, null)

        //Access the text view within the custom view and set the text to the title property of the feature.
        val tv: TextView = customView.findViewById(R.id.message)
        tv.text = sb.toString()

        //Get the position of the cluster.
        val pos: Position = MapMath.getPosition(cluster.geometry() as Point?)

        //Set the options on the popup.
        popup.setOptions(
            //Set the popups position.
            position(pos),

            //Set the anchor point of the popup content.
            anchor(AnchorType.BOTTOM),

            //Set the content of the popup.
            content(customView)
        )

        //Open the popup.
        popup.open()
    }

    //Return a boolean indicating if event should be consumed or continue bubble up.
    true
} as OnFeatureClick, clusterBubbleLayer)
O pop-up segue as etapas descritas no documento Exibir um pop-up.
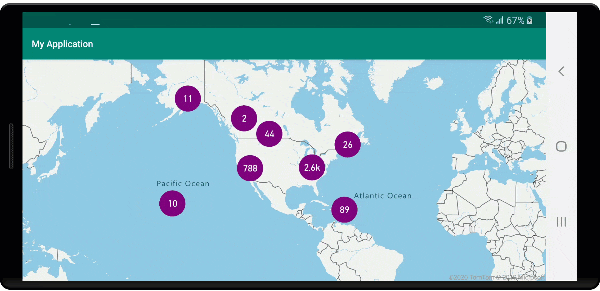
A imagem a seguir mostra o código acima exibindo um pop-up com as contagens agregadas de cada tipo de valor de entidade para todos os pontos no ponto clusterizado que recebeu um clique.
Próximas etapas
Para adicionar mais dados ao seu mapa: