Tutorial: Refinar materiais, iluminação e efeitos
Neste tutorial, você aprenderá como:
- Realçar e contornar modelos e componentes de modelo
- Aplicar materiais diferentes a modelos
- Fatiar modelos com planos de recorte
- Adicionar animações simples para objetos renderizados remotamente
Pré-requisitos
- Este tutorial é baseado no Tutorial: Manipular modelos.
Realce e contorno
Fornecer feedback visual para o usuário é uma parte importante da experiência do usuário em qualquer aplicativo. A Azure Remote Rendering oferece mecanismos de feedback visual por meio de Substituições de estado hierárquicas. As substituições de estado hierárquicas são implementadas com componentes anexados a instâncias locais de modelos. Aprendemos a criar essas instâncias locais em Sincronização do grafo de objetos remoto na hierarquia do Unity.
Primeiro, criaremos um wrapper em torno do componente HierarchicalStateOverrideComponent. O HierarchicalStateOverrideComponent é o script local que controla as substituições na entidade remota. Os Ativos do Tutorial incluem uma classe base abstrata chamada BaseEntityOverrideController, que estenderemos para criar o wrapper.
Crie um script chamado EntityOverrideController e substitua seu conteúdo pelo seguinte código:
// Copyright (c) Microsoft Corporation. All rights reserved.
// Licensed under the MIT License. See LICENSE in the project root for license information.

using Microsoft.Azure.RemoteRendering;
using Microsoft.Azure.RemoteRendering.Unity;
using System;
using UnityEngine;

public class EntityOverrideController : BaseEntityOverrideController
{
    public override event Action<HierarchicalStates> FeatureOverrideChange;

    private ARRHierarchicalStateOverrideComponent localOverride;
    public override ARRHierarchicalStateOverrideComponent LocalOverride
    {
        get
        {
            if (localOverride == null)
            {
                localOverride = gameObject.GetComponent<ARRHierarchicalStateOverrideComponent>();
                if (localOverride == null)
                {
                    localOverride = gameObject.AddComponent<ARRHierarchicalStateOverrideComponent>();
                }

                var remoteStateOverride = TargetEntity.Entity.FindComponentOfType<HierarchicalStateOverrideComponent>();

                if (remoteStateOverride == null)
                {
                    // if there is no HierarchicalStateOverrideComponent on the remote side yet, create one
                    localOverride.Create(RemoteManagerUnity.CurrentSession);
                }
                else
                {
                    // otherwise, bind our local stateOverride component to the remote component
                    localOverride.Bind(remoteStateOverride);

                }
            }
            return localOverride;
        }
    }

    private RemoteEntitySyncObject targetEntity;
    public override RemoteEntitySyncObject TargetEntity
    {
        get
        {
            if (targetEntity == null)
                targetEntity = gameObject.GetComponent<RemoteEntitySyncObject>();
            return targetEntity;
        }
    }

    private HierarchicalEnableState ToggleState(HierarchicalStates feature)
    {
        HierarchicalEnableState setToState = HierarchicalEnableState.InheritFromParent;
        switch (LocalOverride.RemoteComponent.GetState(feature))
        {
            case HierarchicalEnableState.ForceOff:
            case HierarchicalEnableState.InheritFromParent:
                setToState = HierarchicalEnableState.ForceOn;
                break;
            case HierarchicalEnableState.ForceOn:
                setToState = HierarchicalEnableState.InheritFromParent;
                break;
        }

        return SetState(feature, setToState);
    }

    private HierarchicalEnableState SetState(HierarchicalStates feature, HierarchicalEnableState enableState)
    {
        if (GetState(feature) != enableState) //if this is actually different from the current state, act on it
        {
            LocalOverride.RemoteComponent.SetState(feature, enableState);
            FeatureOverrideChange?.Invoke(feature);
        }

        return enableState;
    }

    public override HierarchicalEnableState GetState(HierarchicalStates feature) => LocalOverride.RemoteComponent.GetState(feature);

    public override void ToggleHidden() => ToggleState(HierarchicalStates.Hidden);

    public override void ToggleSelect() => ToggleState(HierarchicalStates.Selected);

    public override void ToggleSeeThrough() => ToggleState(HierarchicalStates.SeeThrough);

    public override void ToggleTint(Color tintColor = default)
    {
        if (tintColor != default) LocalOverride.RemoteComponent.TintColor = tintColor.toRemote();
        ToggleState(HierarchicalStates.UseTintColor);
    }

    public override void ToggleDisabledCollision() => ToggleState(HierarchicalStates.DisableCollision);

    public override void RemoveOverride()
    {
        var remoteStateOverride = TargetEntity.Entity.FindComponentOfType<HierarchicalStateOverrideComponent>();
        if (remoteStateOverride != null)
        {
            remoteStateOverride.Destroy();
        }

        if (localOverride == null)
            localOverride = gameObject.GetComponent<ARRHierarchicalStateOverrideComponent>();

        if (localOverride != null)
        {
            Destroy(localOverride);
        }
    }
}
O trabalho principal do LocalOverride é criar um vínculo entre si mesmo e seu RemoteComponent. Assim, o LocalOverride nos permite definir sinalizadores de estado no componente local, que são associados à entidade remota. As substituições e seus estados são descritos na página Substituições de estado hierárquicas.
Essa implementação apenas alterna um estado de cada vez. No entanto, é totalmente possível combinar várias substituições em entidades únicas e criar combinações em diferentes níveis na hierarquia. Por exemplo, a combinação de Selected e SeeThrough em um componente lhe daria um contorno e o tornaria transparente. Ou, definir a entidade raiz Hidden em substituição a ForceOn e fazer com que a Hidden da entidade filho seja substituída por ForceOff ocultaria tudo, exceto o filho com a substituição.
Para aplicar estados às entidades, podemos modificar a RemoteEntityHelper criada anteriormente.
Modifique a classe RemoteEntityHelper para implementar a classe abstrata BaseRemoteEntityHelper. Essa modificação permitirá o uso de um controlador de exibição fornecido nos Ativos do tutorial. Ele deve ter a seguinte aparência quando modificado:
public class RemoteEntityHelper : BaseRemoteEntityHelperSubstitua os métodos abstratos usando o seguinte código:
public override BaseEntityOverrideController EnsureOverrideComponent(Entity entity)
{
    var entityGameObject = entity.GetOrCreateGameObject(UnityCreationMode.DoNotCreateUnityComponents);
    var overrideComponent = entityGameObject.GetComponent<EntityOverrideController>();
    if (overrideComponent == null)
        overrideComponent = entityGameObject.AddComponent<EntityOverrideController>();
    return overrideComponent;
}

public override HierarchicalEnableState GetState(Entity entity, HierarchicalStates feature)
{
    var overrideComponent = EnsureOverrideComponent(entity);
    return overrideComponent.GetState(feature);
}

public override void ToggleHidden(Entity entity)
{
    var overrideComponent = EnsureOverrideComponent(entity);
    overrideComponent.ToggleHidden();
}

public override void ToggleSelect(Entity entity)
{
    var overrideComponent = EnsureOverrideComponent(entity);
    overrideComponent.ToggleSelect();
}

public override void ToggleSeeThrough(Entity entity)
{
    var overrideComponent = EnsureOverrideComponent(entity);
    overrideComponent.ToggleSeeThrough();
}

public Color TintColor = new Color(0.0f, 1.0f, 0.0f, 0.1f);
public override void ToggleTint(Entity entity)
{
    var overrideComponent = EnsureOverrideComponent(entity);
    overrideComponent.ToggleTint(TintColor);
}

public override void ToggleDisableCollision(Entity entity)
{
    var overrideComponent = EnsureOverrideComponent(entity);
    overrideComponent.ToggleHidden();
}

public override void RemoveOverrides(Entity entity)
{
    var entityGameObject = entity.GetOrCreateGameObject(UnityCreationMode.DoNotCreateUnityComponents);
    var overrideComponent = entityGameObject.GetComponent<EntityOverrideController>();
    if (overrideComponent != null)
    {
        overrideComponent.RemoveOverride();
        Destroy(overrideComponent);
    }
}
Esse código garante que um componente EntityOverrideController seja adicionado à entidade de destino e chame um dos métodos de alternância. Se desejado, no GameObject TestModel, a chamada desses métodos auxiliares pode ser feita adicionando a RemoteEntityHelper como um retorno de chamada ao evento OnRemoteEntityClicked no componente RemoteRayCastPointerHandler.
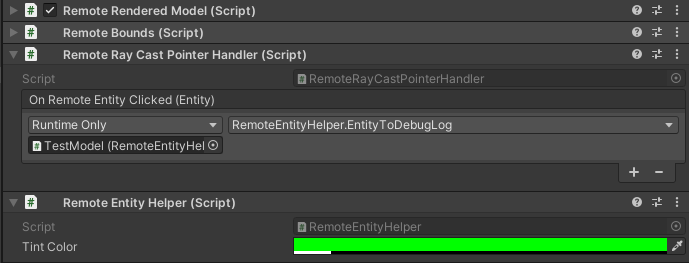
Agora que esses scripts foram adicionados ao modelo, uma vez conectados ao runtime, o controlador de exibição AppMenu deve ter interfaces adicionais habilitadas para interagir com o script EntityOverrideController. Confira o menu Ferramentas do Modelo para ver os controladores de exibição desbloqueados.
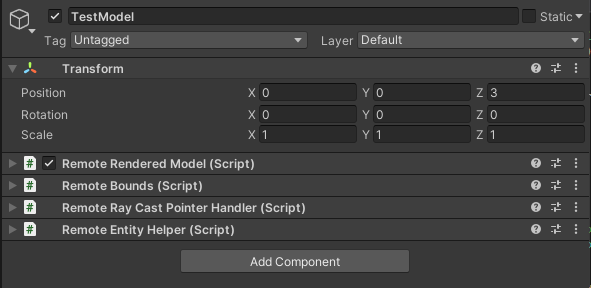
Neste ponto, os componentes TestModel do GameObject devem ficar assim:
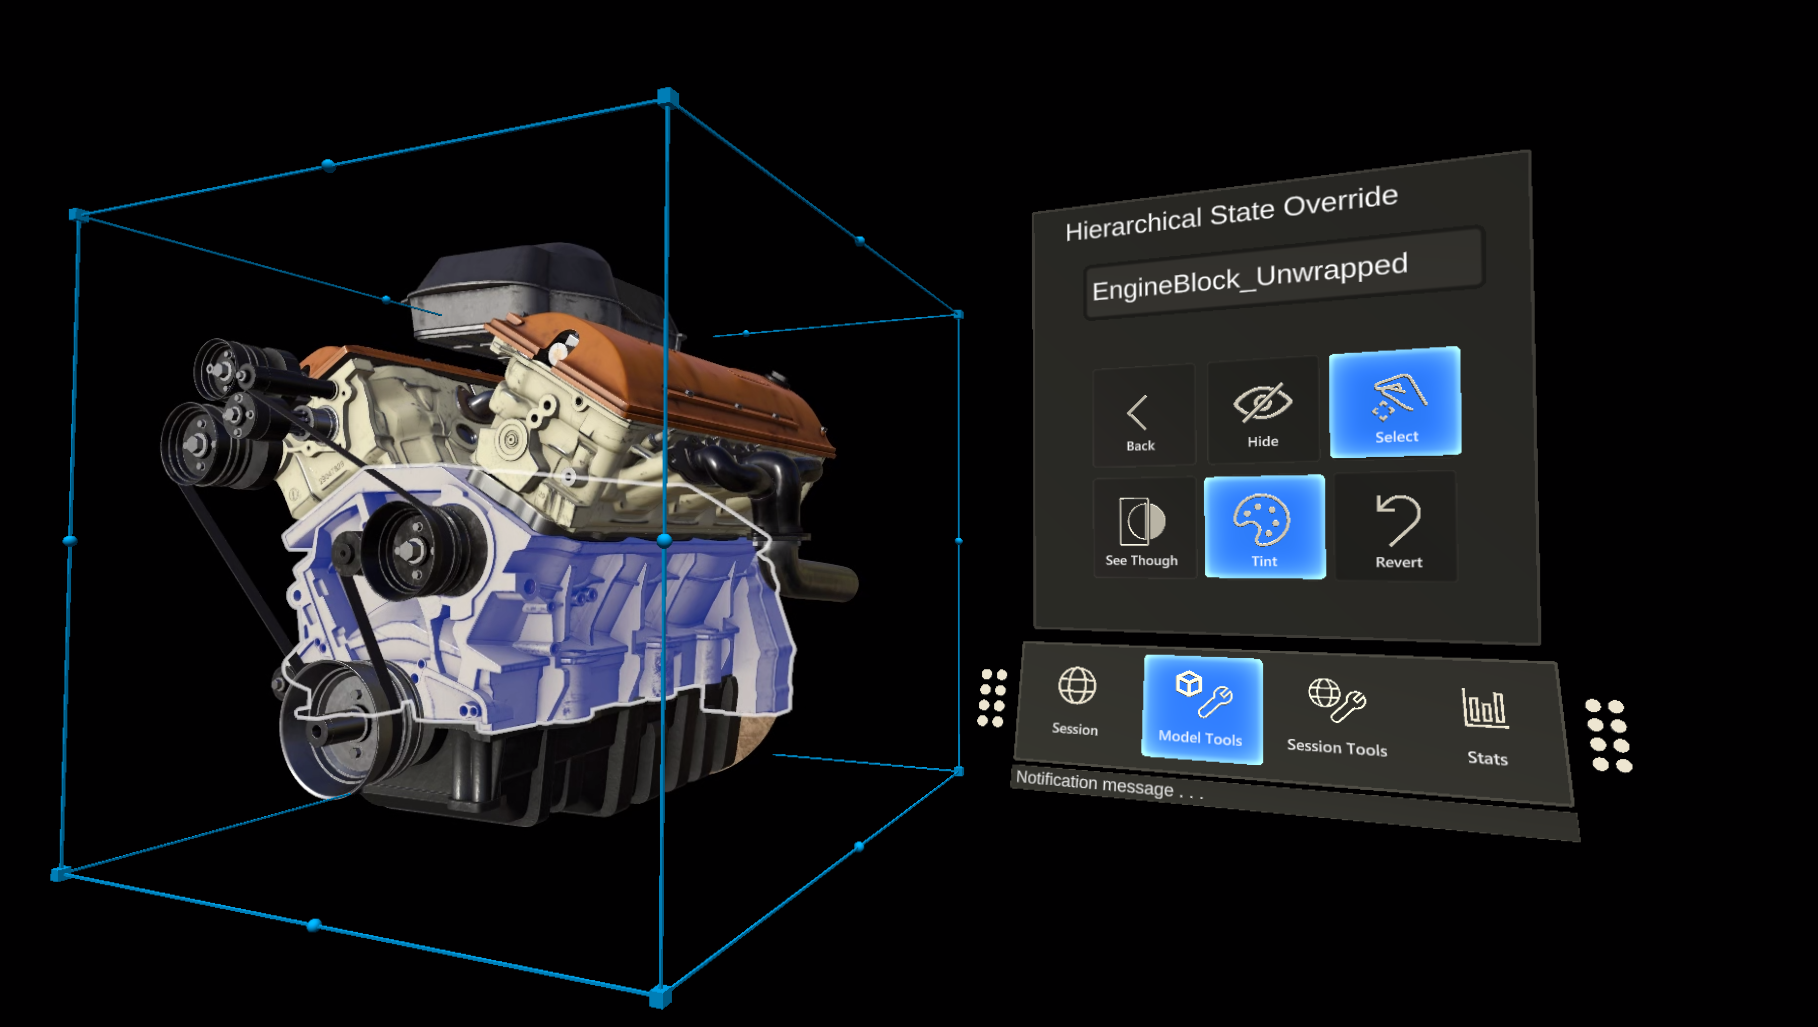
Aqui está um exemplo de empilhamento de substituições em uma entidade. Usamos Select e Tint para fornecer um contorno e uma cor:
Recortar planos
Os planos de corte são recursos que podem ser adicionados a qualquer entidade remota. Normalmente, você cria uma entidade remota que não está associada a nenhum dado de malha para conter o componente do plano de corte. A posição e a orientação do plano de corte são determinadas pela posição e orientação da entidade remota à qual ele está anexado.
Vamos elaborar um script que cria automaticamente uma entidade remota, adiciona um componente de plano de corte e sincroniza a transformação de um objeto local com a entidade do plano de corte. Em seguida, podemos usar o CutPlaneViewController para encapsular o plano de corte em uma interface que nos permitirá manipulá-lo.
Crie um script chamado RemoteCutPlane e substitua seu código pelo código abaixo:
// Copyright (c) Microsoft Corporation. All rights reserved.
// Licensed under the MIT License. See LICENSE in the project root for license information.

using Microsoft.Azure.RemoteRendering;
using Microsoft.Azure.RemoteRendering.Unity;
using System;
using UnityEngine;

public class RemoteCutPlane : BaseRemoteCutPlane
{
    public Color SliceColor = new Color(0.5f, 0f, 0f, .5f);
    public float FadeLength = 0.01f;
    public Axis SliceNormal = Axis.NegativeY;

    public bool AutomaticallyCreate = true;

    private CutPlaneComponent remoteCutPlaneComponent;
    private bool cutPlaneReady = false;

    public override bool CutPlaneReady
    {
        get => cutPlaneReady;
        set
        {
            cutPlaneReady = value;
            CutPlaneReadyChanged?.Invoke(cutPlaneReady);
        }
    }

    public override event Action<bool> CutPlaneReadyChanged;

    public UnityBoolEvent OnCutPlaneReadyChanged = new UnityBoolEvent();

    public void Start()
    {
        // Hook up the event to the Unity event
        CutPlaneReadyChanged += (ready) => OnCutPlaneReadyChanged?.Invoke(ready);

        RemoteRenderingCoordinator.CoordinatorStateChange += RemoteRenderingCoordinator_CoordinatorStateChange;
        RemoteRenderingCoordinator_CoordinatorStateChange(RemoteRenderingCoordinator.instance.CurrentCoordinatorState);
    }

    private void RemoteRenderingCoordinator_CoordinatorStateChange(RemoteRenderingCoordinator.RemoteRenderingState state)
    {
        switch (state)
        {
            case RemoteRenderingCoordinator.RemoteRenderingState.RuntimeConnected:
                if (AutomaticallyCreate)
                    CreateCutPlane();
                break;
            default:
                DestroyCutPlane();
                break;
        }
    }

    public override void CreateCutPlane()
    {
        //Implement me
    }

    public override void DestroyCutPlane()
    {
        //Implement me
    }
}
Esse código estende a classe BaseRemoteCutPlane incluída nos Ativos do tutorial. Da mesma forma que o modelo renderizado remotamente, esse script anexa e escuta alterações de
RemoteRenderingStatedo coordenador remoto. Quando o coordenador alcança o estadoRuntimeConnected, ele tentará se conectar automaticamente se isso for o esperado. Também há uma variávelCutPlaneComponentque vamos acompanhar. Este é o componente do Azure Remote Rendering que se sincroniza com o plano de corte na sessão remota. Vejamos o que precisamos fazer para criar o plano de corte.Substitua o método
CreateCutPlane()pela versão concluída abaixo:public override void CreateCutPlane() { if (remoteCutPlaneComponent != null) return; //Nothing to do! //Create a root object for the cut plane var cutEntity = RemoteRenderingCoordinator.CurrentSession.Connection.CreateEntity(); //Bind the remote entity to this game object cutEntity.BindToUnityGameObject(this.gameObject); //Sync the transform of this object so we can move the cut plane var syncComponent = this.gameObject.GetComponent<RemoteEntitySyncObject>(); syncComponent.SyncEveryFrame = true; //Add a cut plane to the entity remoteCutPlaneComponent = RemoteRenderingCoordinator.CurrentSession.Connection.CreateComponent(ObjectType.CutPlaneComponent, cutEntity) as CutPlaneComponent; //Configure the cut plane remoteCutPlaneComponent.Normal = SliceNormal; remoteCutPlaneComponent.FadeColor = SliceColor.toRemote(); remoteCutPlaneComponent.FadeLength = FadeLength; CutPlaneReady = true; }Aqui, estamos criando uma entidade remota e associando-a a um GameObject local. Temos que garantir que a entidade remota terá sua transformação sincronizada com a transformação local definindo
SyncEveryFramecomotrue. Em seguida, usamos a chamadaCreateComponentpara adicionar umCutPlaneComponentao objeto remoto. Por fim, configuramos o plano de corte com as configurações definidas na parte superior do MonoBehaviour. Vejamos o que é necessário para limpar um plano de corte por meio da implementação do métodoDestroyCutPlane().Substitua o método
DestroyCutPlane()pela versão concluída abaixo:public override void DestroyCutPlane() { if (remoteCutPlaneComponent == null) return; //Nothing to do! remoteCutPlaneComponent.Owner.Destroy(); remoteCutPlaneComponent = null; CutPlaneReady = false; }
Como o objeto remoto é bastante simples e estamos apenas limpando a extremidade remota (e mantendo nosso objeto local), basta chamar Destroy no objeto remoto e limpar nossa referência a ele.
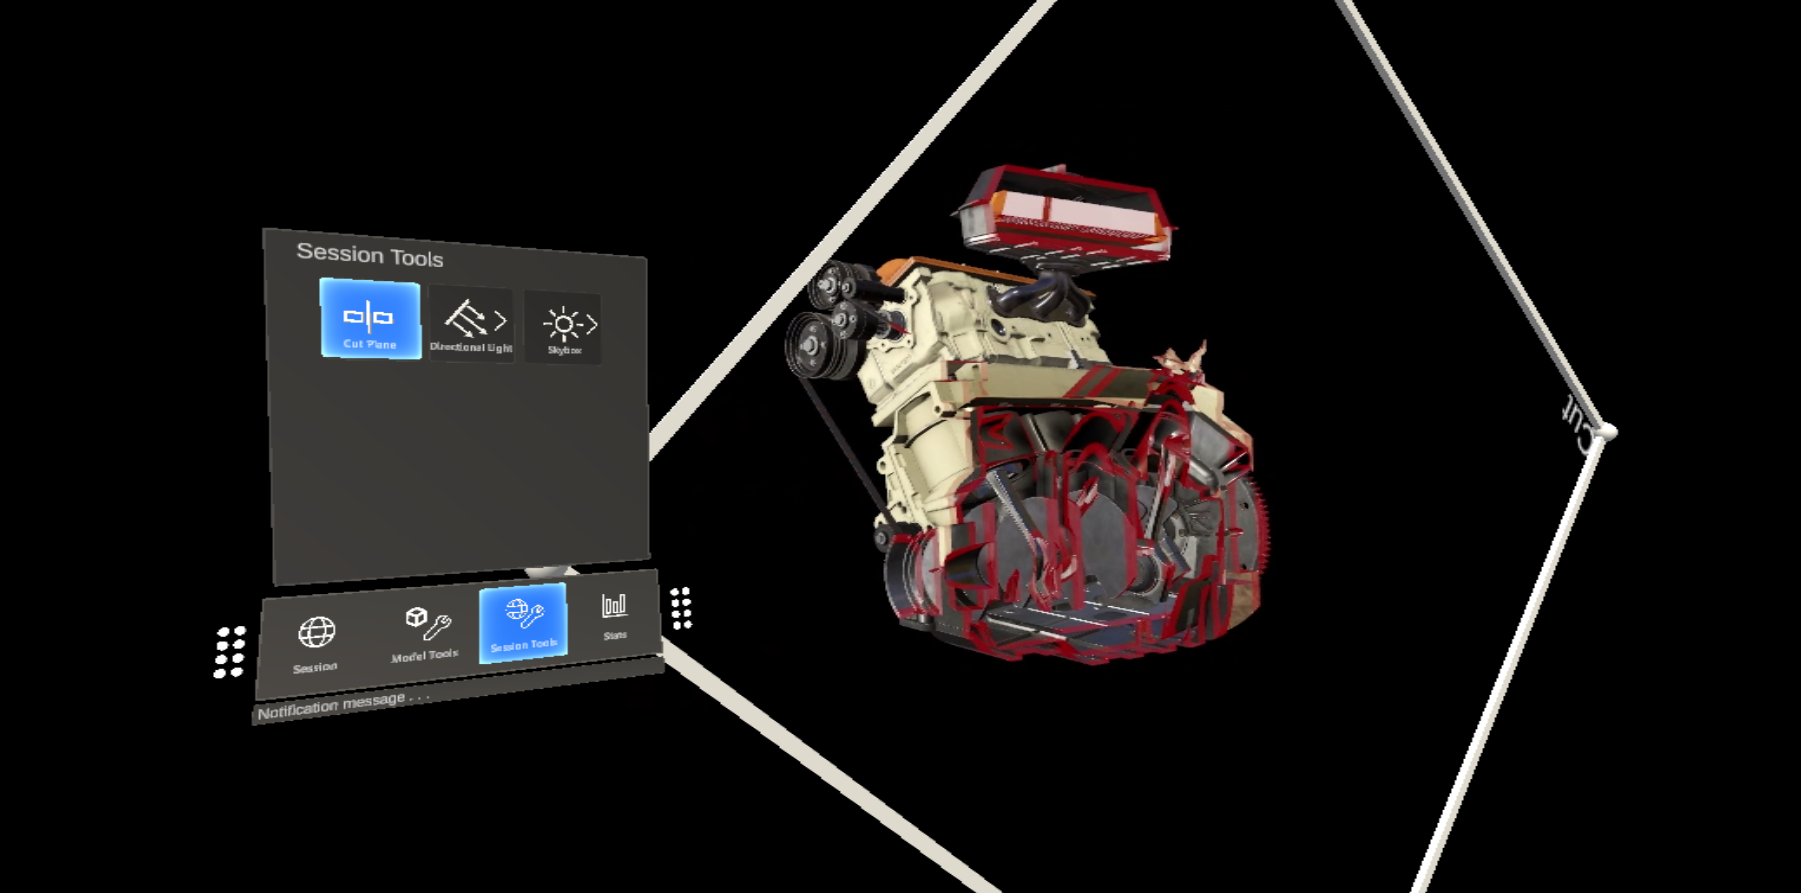
O AppMenu inclui um controlador de exibição que será anexado automaticamente ao plano de corte e permitirá que você interaja com ele. Não é necessário usar o AppMenu nem qualquer um dos controladores de exibição, mas eles permitem uma melhor experiência. Agora teste o plano de corte e seu controlador de exibição.
Crie um GameObject vazio na cena e nomeie-o CutPlane.
Adicione o componente RemoteCutPlane ao GameObject do CutPlane.
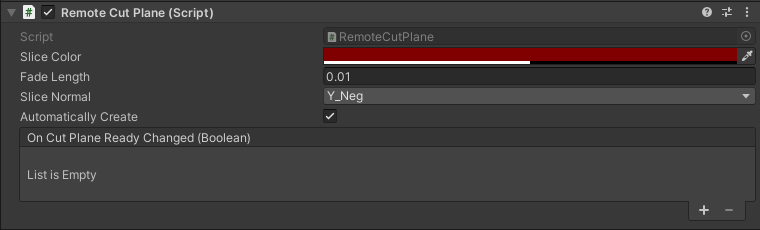
Pressione Executar no editor do Unity para carregar e conectar-se a uma sessão remota.
Usando a simulação de mão do MRTK, pegue e gire (mantenha CTRL pressionada para girar) o CutPlane para movê-lo na cena. Observe-o fatiar no TestModel para revelar os componentes internos.
Configuração da iluminação remota
A sessão de Remote Rendering é compatível com um espectro completo de opções de iluminação. Criaremos scripts para a Textura do Céu e um mapa simples para dois tipos de luz do Unity a serem usados com Remote Rendering.
Textura do céu
Há diversos Cubemaps internos para escolher ao alterar a textura do céu. Eles são carregados na sessão e aplicados à textura do céu. Também é possível carregar suas texturas para usar como luz do céu.
Criaremos um script RemoteSky que tem uma lista dos Cubemaps internos disponíveis na forma de parâmetros de carregamento. Em seguida, permitiremos que o usuário selecione e carregue uma das opções.
Crie um script chamado RemoteSky e substitua todo o seu conteúdo pelo código abaixo:
// Copyright (c) Microsoft Corporation. All rights reserved.
// Licensed under the MIT License. See LICENSE in the project root for license information.

using Microsoft.Azure.RemoteRendering;
using System;
using System.Collections.Generic;
using UnityEngine;

public class RemoteSky : BaseRemoteSky
{
    public override Dictionary<string, LoadTextureFromSasOptions> AvailableCubemaps => builtInTextures;

    private bool canSetSky;
    public override bool CanSetSky
    {
        get => canSetSky;
        set
        {
            canSetSky = value;
            CanSetSkyChanged?.Invoke(canSetSky);
        }
    }

    private string currentSky = "DefaultSky";
    public override string CurrentSky
    {
        get => currentSky;
        protected set
        {
            currentSky = value;
            SkyChanged?.Invoke(value);
        }
    }

    private Dictionary<string, LoadTextureFromSasOptions> builtInTextures = new Dictionary<string, LoadTextureFromSasOptions>()
    {
        {"Autoshop",new LoadTextureFromSasOptions("builtin://Autoshop", TextureType.CubeMap)},
        {"BoilerRoom",new LoadTextureFromSasOptions("builtin://BoilerRoom", TextureType.CubeMap)},
        {"ColorfulStudio",new LoadTextureFromSasOptions("builtin://ColorfulStudio", TextureType.CubeMap)},
        {"Hangar",new LoadTextureFromSasOptions("builtin://Hangar", TextureType.CubeMap)},
        {"IndustrialPipeAndValve",new LoadTextureFromSasOptions("builtin://IndustrialPipeAndValve", TextureType.CubeMap)},
        {"Lebombo",new LoadTextureFromSasOptions("builtin://Lebombo", TextureType.CubeMap)},
        {"SataraNight",new LoadTextureFromSasOptions("builtin://SataraNight", TextureType.CubeMap)},
        {"SunnyVondelpark",new LoadTextureFromSasOptions("builtin://SunnyVondelpark", TextureType.CubeMap)},
        {"Syferfontein",new LoadTextureFromSasOptions("builtin://Syferfontein", TextureType.CubeMap)},
        {"TearsOfSteelBridge",new LoadTextureFromSasOptions("builtin://TearsOfSteelBridge", TextureType.CubeMap)},
        {"VeniceSunset",new LoadTextureFromSasOptions("builtin://VeniceSunset", TextureType.CubeMap)},
        {"WhippleCreekRegionalPark",new LoadTextureFromSasOptions("builtin://WhippleCreekRegionalPark", TextureType.CubeMap)},
        {"WinterRiver",new LoadTextureFromSasOptions("builtin://WinterRiver", TextureType.CubeMap)},
        {"DefaultSky",new LoadTextureFromSasOptions("builtin://DefaultSky", TextureType.CubeMap)}
    };

    public UnityBoolEvent OnCanSetSkyChanged;
    public override event Action<bool> CanSetSkyChanged;

    public UnityStringEvent OnSkyChanged;
    public override event Action<string> SkyChanged;

    public void Start()
    {
        // Hook up the event to the Unity event
        CanSetSkyChanged += (canSet) => OnCanSetSkyChanged?.Invoke(canSet);
        SkyChanged += (key) => OnSkyChanged?.Invoke(key);

        RemoteRenderingCoordinator.CoordinatorStateChange += ApplyStateToView;
        ApplyStateToView(RemoteRenderingCoordinator.instance.CurrentCoordinatorState);
    }

    private void ApplyStateToView(RemoteRenderingCoordinator.RemoteRenderingState state)
    {
        switch (state)
        {
            case RemoteRenderingCoordinator.RemoteRenderingState.RuntimeConnected:
                CanSetSky = true;
                break;
            default:
                CanSetSky = false;
                break;
        }
    }

    public override async void SetSky(string skyKey)
    {
        if (!CanSetSky)
        {
            Debug.Log("Unable to set sky right now");
            return;
        }

        if (AvailableCubemaps.ContainsKey(skyKey))
        {
            Debug.Log("Setting sky to " + skyKey);
            //Load the texture into the session
            var texture = await RemoteRenderingCoordinator.CurrentSession.Connection.LoadTextureFromSasAsync(AvailableCubemaps[skyKey]);

            //Apply the texture to the SkyReflectionSettings
            RemoteRenderingCoordinator.CurrentSession.Connection.SkyReflectionSettings.SkyReflectionTexture = texture;
            SkyChanged?.Invoke(skyKey);
        }
        else
        {
            Debug.Log("Invalid sky key");
        }
    }
}
A parte mais importante desse código está apenas em algumas linhas:
//Load the texture into the session
var texture = await RemoteRenderingCoordinator.CurrentSession.Connection.LoadTextureFromSasAsync(AvailableCubemaps[skyKey]);

//Apply the texture to the SkyReflectionSettings
RemoteRenderingCoordinator.CurrentSession.Connection.SkyReflectionSettings.SkyReflectionTexture = texture;
Aqui, obtemos uma referência à textura a ser usada que está no Armazenamento de Blobs interno, carregando-a na sessão. Em seguida, basta atribuir essa textura à
SkyReflectionTextureda sessão para aplicá-la.Crie um GameObject vazio em sua cena e nomeie-o SkyLight.
Adicione o script RemoteSky ao seu GameObject SkyLight.
A alternância entre as luzes do céu pode ser feita chamando
SetSkycom uma das chaves de cadeia de caracteres definidas emAvailableCubemaps. O controlador de exibição interno do AppMenu cria automaticamente botões e conecta seus eventos para chamarSetSkycom a respectiva chave.Pressione Executar no editor do Unity e autorize uma conexão.
Depois de conectar o runtime local a uma sessão remota, navegue até AppMenu -> Ferramentas de Sessão -> Céu Remoto para explorar as diferentes opções de céu e ver como elas afetam o TestModel.
Luzes de cena
As luzes de cena remotas incluem: ponto, spot e direcional. Assim como no plano de corte que criamos acima, essas luzes de cena são entidades remotas com componentes anexados a elas. Uma consideração importante ao iluminar a cena remota é tentar corresponder à iluminação da cena local. Essa estratégia nem sempre é possível porque muitos aplicativos do Unity para o HoloLens 2 não usam renderização com base física em objetos renderizados localmente. No entanto, em um determinado nível, podemos simular uma iluminação padrão mais simples do Unity.
Crie um script chamado RemoteLight e substitua seu código pelo código abaixo:
// Copyright (c) Microsoft Corporation. All rights reserved.
// Licensed under the MIT License. See LICENSE in the project root for license information.

using Microsoft.Azure.RemoteRendering;
using Microsoft.Azure.RemoteRendering.Unity;
using System;
using UnityEngine;

[RequireComponent(typeof(Light))]
public class RemoteLight : BaseRemoteLight
{
    public bool AutomaticallyCreate = true;

    private bool lightReady = false;
    public override bool LightReady
    {
        get => lightReady;
        set
        {
            lightReady = value;
            LightReadyChanged?.Invoke(lightReady);
        }
    }

    private ObjectType remoteLightType = ObjectType.Invalid;
    public override ObjectType RemoteLightType => remoteLightType;

    public UnityBoolEvent OnLightReadyChanged;

    public override event Action<bool> LightReadyChanged;

    private Light localLight; //Unity Light

    private Entity lightEntity;
    private LightComponentBase remoteLightComponent; //Remote Rendering Light

    private void Awake()
    {
        localLight = GetComponent<Light>();
        switch (localLight.type)
        {
            case LightType.Directional:
                remoteLightType = ObjectType.DirectionalLightComponent;
                break;
            case LightType.Point:
                remoteLightType = ObjectType.PointLightComponent;
                break;
            case LightType.Spot:
            case LightType.Area:
                //Not supported in tutorial
            case LightType.Disc:
                // No direct analog in remote rendering
                remoteLightType = ObjectType.Invalid;
                break;
        }
    }

    public void Start()
    {
        // Hook up the event to the Unity event
        LightReadyChanged += (ready) => OnLightReadyChanged?.Invoke(ready);

        RemoteRenderingCoordinator.CoordinatorStateChange += RemoteRenderingCoordinator_CoordinatorStateChange;
        RemoteRenderingCoordinator_CoordinatorStateChange(RemoteRenderingCoordinator.instance.CurrentCoordinatorState);
    }

    public void OnDestroy()
    {
        lightEntity?.Destroy();
    }

    private void RemoteRenderingCoordinator_CoordinatorStateChange(RemoteRenderingCoordinator.RemoteRenderingState state)
    {
        switch (state)
        {
            case RemoteRenderingCoordinator.RemoteRenderingState.RuntimeConnected:
                if (AutomaticallyCreate)
                    CreateLight();
                break;
            default:
                DestroyLight();
                break;
        }
    }

    public override void CreateLight()
    {
        if (remoteLightComponent != null)
            return; //Nothing to do!

        //Create a root object for the light
        if(lightEntity == null)
            lightEntity = RemoteRenderingCoordinator.CurrentSession.Connection.CreateEntity();

        //Bind the remote entity to this game object
        lightEntity.BindToUnityGameObject(this.gameObject);

        //Sync the transform of this object so we can move the light
        var syncComponent = this.gameObject.GetComponent<RemoteEntitySyncObject>();
        syncComponent.SyncEveryFrame = true;

        //Add a light to the entity
        switch (RemoteLightType)
        {
            case ObjectType.DirectionalLightComponent:
                var remoteDirectional = RemoteRenderingCoordinator.CurrentSession.Connection.CreateComponent(ObjectType.DirectionalLightComponent, lightEntity) as DirectionalLightComponent;
                //No additional properties
                remoteLightComponent = remoteDirectional;
                break;

            case ObjectType.PointLightComponent:
                var remotePoint = RemoteRenderingCoordinator.CurrentSession.Connection.CreateComponent(ObjectType.PointLightComponent, lightEntity) as PointLightComponent;
                remotePoint.Radius = 0;
                remotePoint.Length = localLight.range;
                //remotePoint.AttenuationCutoff = //No direct analog in Unity legacy lights
                //remotePoint.ProjectedCubeMap = //No direct analog in Unity legacy lights

                remoteLightComponent = remotePoint;
                break;
            default:
                LightReady = false;
                return;
        }

        // Set the common values for all light types
        UpdateRemoteLightSettings();

        LightReady = true;
    }

    public override void UpdateRemoteLightSettings()
    {
        remoteLightComponent.Color = localLight.color.toRemote();
        remoteLightComponent.Intensity = localLight.intensity;
    }

    public override void DestroyLight()
    {
        if (remoteLightComponent == null)
            return; //Nothing to do!

        remoteLightComponent.Destroy();
        remoteLightComponent = null;
        LightReady = false;
    }

    [ContextMenu("Sync Remote Light Configuration")]
    public override void RecreateLight()
    {
        DestroyLight();
        CreateLight();
    }

    public override void SetIntensity(float intensity)
    {
        localLight.intensity = Mathf.Clamp(intensity, 0, 1);
        UpdateRemoteLightSettings();
    }

    public override void SetColor(Color color)
    {
        localLight.color = color;
        UpdateRemoteLightSettings();
    }
}
Esse script cria tipos diferentes de luzes remotas dependendo do tipo de luz local do Unity ao qual o script está anexado. A luz remota duplicará a luz local em: posição, rotação, cor e intensidade. Sempre que possível, a luz remota também definirá outras configurações. Essa não é uma correspondência perfeita, pois as luzes do Unity não são luzes PBR.
Localize o GameObject DirectionalLight em sua cena. Se você tiver removido o DirectionalLight padrão de sua cena: na barra de menus superior, selecione GameObject -> Luz -> DirectionalLight para criar uma luz em sua cena.
Selecione o GameObject DirectionalLight e, usando o botão Adicionar Componente, adicione o script RemoteLight.
Como esse script implementa a classe base
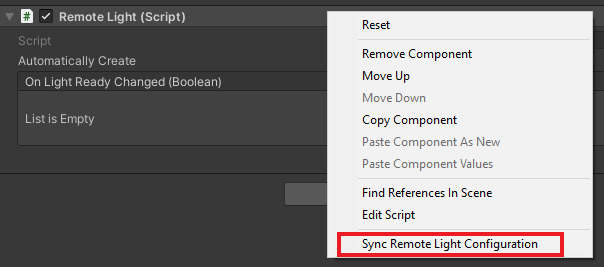
BaseRemoteLight, você pode usar o controlador de exibição fornecido do AppMenu para interagir com a luz remota. Navegue até AppMenu - > Ferramentas de Sessão - > Luz Direcional.Observação
A interface do usuário no AppMenu foi limitada a uma luz direcional por questões de simplicidade. No entanto, é possível e incentivamos a adição de luzes pontuais para anexar o script RemoteLight a elas. Essas luzes adicionais podem ser modificadas editando as propriedades da luz do Unity no editor. Você precisará sincronizar manualmente as alterações locais feitas à luz remota usando o menu de contexto do RemoteLight no inspetor:
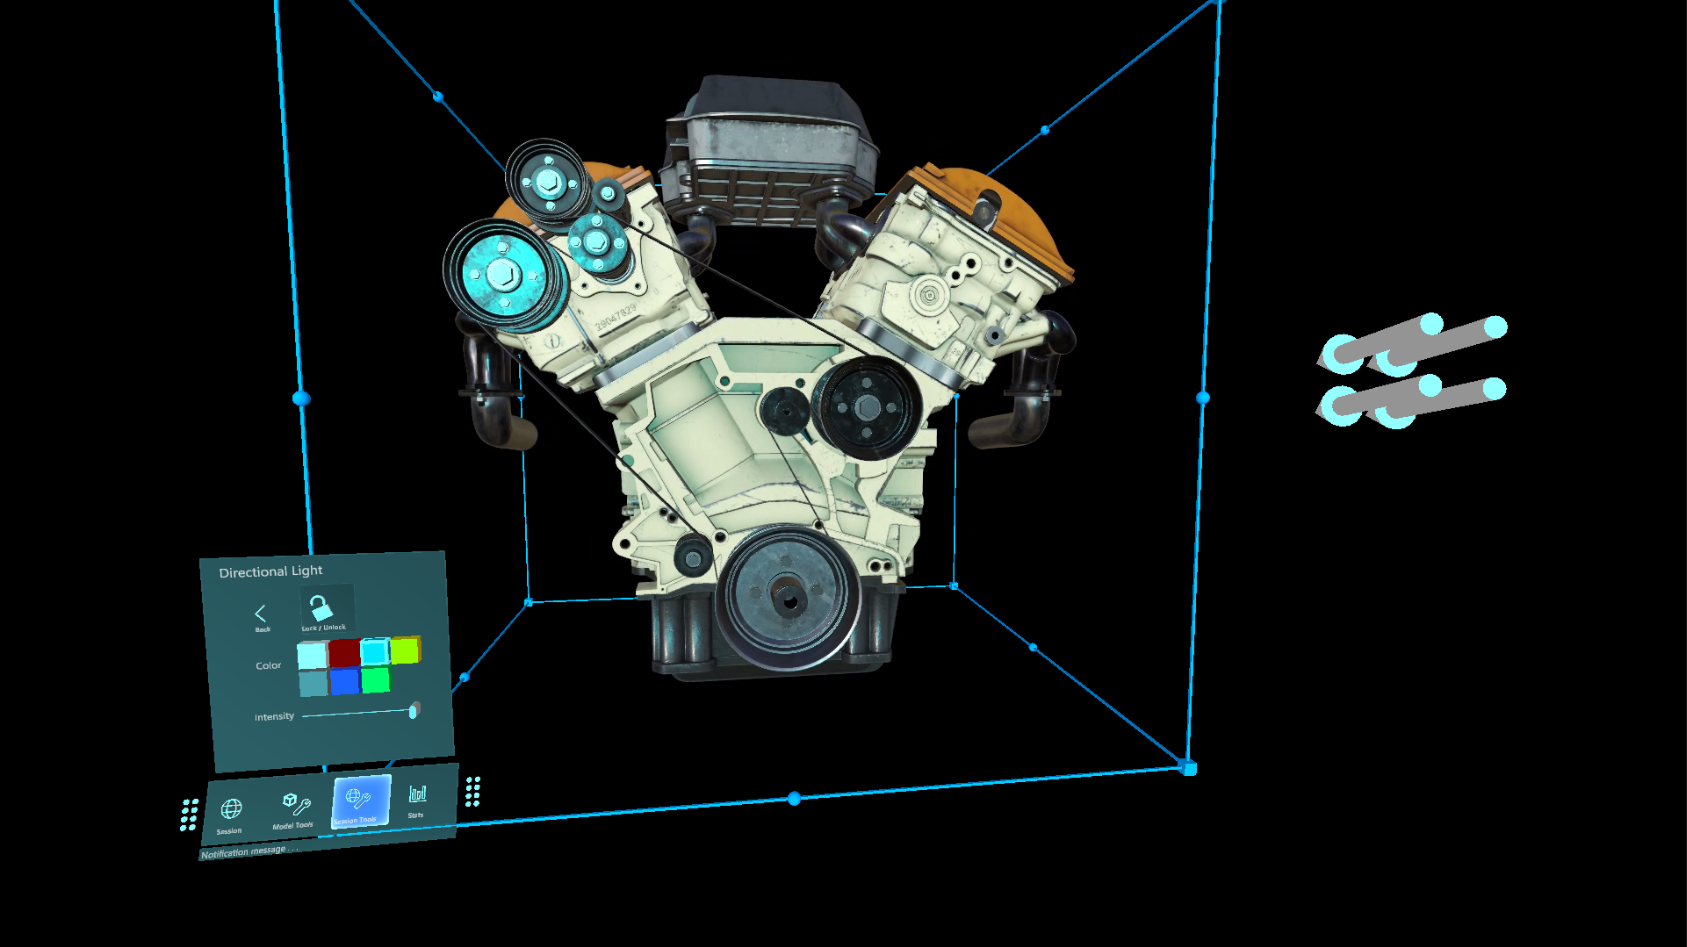
Pressione Executar no editor do Unity e autorize uma conexão.
Depois de conectar o runtime a uma sessão remota, posicione e direcione sua câmera (use WASD e clique com o botão direito do mouse + movimentação do mouse) para ter o controlador de exibição da luz direcional na exibição.
Use o controlador de exibição de luz remota para modificar as propriedades da luz. Usando a simulação de mão do MRTK, pegue e gire (mantenha CTRL pressionada para girar) a luz direcional para ver o efeito na iluminação da cena.
Edição de materiais
Os materiais renderizados remotamente podem ser modificados para proporcionar efeitos visuais adicionais, para ajustar os visuais de modelos renderizados ou para fornecer feedbacks adicionais aos usuários. Há muitas maneiras e muitos motivos para modificar um material. Aqui, mostraremos como alterar a cor do albedo de um material e como alterar a rugosidade e a aparência metálica de um material PBR.
Observação
Em muitos casos, se um recurso ou efeito puder ser implementado usando um HierarchicalStateOverrideComponent, o ideal será usá-lo em vez de modificar o material.
Criaremos um script que aceite uma entidade de destino e configure alguns objetos OverrideMaterialProperty para alterar as propriedades do material da entidade de destino. Começamos obtendo o MeshComponent da entidade de destino, que contém uma lista de materiais usados na malha. Para simplificar, vamos usar o primeiro material encontrado. Essa estratégia simples pode falhar facilmente, dependendo de como o conteúdo foi criado, portanto, você pode usar uma abordagem mais complexa para selecionar o material apropriado.
No material, podemos acessar valores comuns como o albedo. Primeiro, os materiais precisam ser convertidos em seu tipo apropriado, PbrMaterial ou ColorMaterial, para recuperar seus valores, como visto no método GetMaterialColor. Assim que tivermos uma referência ao material desejado, basta definir os valores e o ARR fará a sincronização entre as propriedades do material local e o material remoto.
Crie um script chamado EntityMaterialController e substitua seu conteúdo pelo seguinte código:
// Copyright (c) Microsoft Corporation. All rights reserved.
// Licensed under the MIT License. See LICENSE in the project root for license information.

using Microsoft.Azure.RemoteRendering;
using Microsoft.Azure.RemoteRendering.Unity;
using System;
using System.Linq;
using UnityEngine;
// to prevent namespace conflicts
using ARRMaterial = Microsoft.Azure.RemoteRendering.Material;

public class EntityMaterialController : BaseEntityMaterialController
{
    public override bool RevertOnEntityChange { get; set; } = true;

    public override OverrideMaterialProperty<Color> ColorOverride { get; set; }
    public override OverrideMaterialProperty<float> RoughnessOverride { get; set; }
    public override OverrideMaterialProperty<float> MetalnessOverride { get; set; }

    private Entity targetEntity;
    public override Entity TargetEntity
    {
        get => targetEntity;
        set
        {
            if (targetEntity != value)
            {
                if (targetEntity != null && RevertOnEntityChange)
                {
                    Revert();
                }

                targetEntity = value;
                ConfigureTargetEntity();
                TargetEntityChanged?.Invoke(value);
            }
        }
    }

    private ARRMaterial targetMaterial;
    private ARRMeshComponent meshComponent;

    public override event Action<Entity> TargetEntityChanged;
    public UnityRemoteEntityEvent OnTargetEntityChanged;

    public void Start()
    {
        // Forward events to Unity events
        TargetEntityChanged += (entity) => OnTargetEntityChanged?.Invoke(entity);

        // If there happens to be a remote RayCaster on this object, assume we should listen for events from it
        if (GetComponent<BaseRemoteRayCastPointerHandler>() != null)
            GetComponent<BaseRemoteRayCastPointerHandler>().RemoteEntityClicked += (entity) => TargetEntity = entity;
    }

    protected override void ConfigureTargetEntity()
    {
        //Get the Unity object, to get the sync object, to get the mesh component, to get the material.
        var targetEntityGameObject = TargetEntity.GetOrCreateGameObject(UnityCreationMode.DoNotCreateUnityComponents);

        var localSyncObject = targetEntityGameObject.GetComponent<RemoteEntitySyncObject>();
        meshComponent = targetEntityGameObject.GetComponent<ARRMeshComponent>();
        if (meshComponent == null)
        {
            var mesh = localSyncObject.Entity.FindComponentOfType<MeshComponent>();
            if (mesh != null)
            {
                targetEntityGameObject.BindArrComponent<ARRMeshComponent>(mesh);
                meshComponent = targetEntityGameObject.GetComponent<ARRMeshComponent>();
            }
        }

        meshComponent.enabled = true;

        targetMaterial = meshComponent.RemoteComponent.Mesh.Materials.FirstOrDefault();
        if (targetMaterial == default)
        {
            return;
        }

        ColorOverride = new OverrideMaterialProperty<Color>(
            GetMaterialColor(targetMaterial), //The original value
            targetMaterial, //The target material
            ApplyMaterialColor); //The action to take to apply the override

        //If the material is a PBR material, we can override some additional values
        if (targetMaterial.MaterialSubType == MaterialType.Pbr)
        {
            var firstPBRMaterial = (PbrMaterial)targetMaterial;

            RoughnessOverride = new OverrideMaterialProperty<float>(
                firstPBRMaterial.Roughness, //The original value
                targetMaterial, //The target material
                ApplyRoughnessValue); //The action to take to apply the override

            MetalnessOverride = new OverrideMaterialProperty<float>(
                firstPBRMaterial.Metalness, //The original value
                targetMaterial, //The target material
                ApplyMetalnessValue); //The action to take to apply the override
        }
        else //otherwise, ensure the overrides are cleared out from any previous entity
        {
            RoughnessOverride = null;
            MetalnessOverride = null;
        }
    }

    public override void Revert()
    {
        if (ColorOverride != null)
            ColorOverride.OverrideActive = false;

        if (RoughnessOverride != null)
            RoughnessOverride.OverrideActive = false;

        if (MetalnessOverride != null)
            MetalnessOverride.OverrideActive = false;
    }

    private Color GetMaterialColor(ARRMaterial material)
    {
        if (material == null)
            return default;

        if (material.MaterialSubType == MaterialType.Color)
            return ((ColorMaterial)material).AlbedoColor.toUnity();
        else
            return ((PbrMaterial)material).AlbedoColor.toUnity();
    }

    private void ApplyMaterialColor(ARRMaterial material, Color color)
    {
        if (material == null)
            return;

        if (material.MaterialSubType == MaterialType.Color)
            ((ColorMaterial)material).AlbedoColor = color.toRemoteColor4();
        else
            ((PbrMaterial)material).AlbedoColor = color.toRemoteColor4();
    }

    private void ApplyRoughnessValue(ARRMaterial material, float value)
    {
        if (material == null)
            return;

        if (material.MaterialSubType == MaterialType.Pbr) //Only PBR has Roughness
            ((PbrMaterial)material).Roughness = value;
    }

    private void ApplyMetalnessValue(ARRMaterial material, float value)
    {
        if (material == null)
            return;

        if (material.MaterialSubType == MaterialType.Pbr) //Only PBR has Metalness
            ((PbrMaterial)material).Metalness = value;
    }
}
O tipo OverrideMaterialProperty deverá ser flexível o suficiente para permitir que outros valores de material sejam alterados, se desejado. O tipo OverrideMaterialProperty rastreia o estado de uma substituição, mantém o valor antigo e o valor novo e usa um delegado para definir a substituição. Por exemplo, examine o ColorOverride:
ColorOverride = new OverrideMaterialProperty<Color>(
    GetMaterialColor(targetMaterial), //The original value
    targetMaterial, //The target material
    ApplyMaterialColor); //The action to take to apply the override
Ele está criando um OverrideMaterialProperty em que a substituição encapsulará o tipo Color. Fornecemos a cor atual ou original no momento em que a substituição for criada. Também daremos a ele um material do ARR para atuar. Por fim, será fornecido um delegado que aplicará a substituição. O delegado é um método que aceita um material do ARR e o tipo que a substituição encapsula. Esse método é a parte mais importante para entender como o ARR ajusta os valores de materiais.
O ColorOverride usa o método ApplyMaterialColor para fazer seu trabalho:
private void ApplyMaterialColor(ARRMaterial material, Color color)
{
    if (material.MaterialSubType == MaterialType.Color)
        ((ColorMaterial)material).AlbedoColor = color.toRemoteColor4();
    else
        ((PbrMaterial)material).AlbedoColor = color.toRemoteColor4();
}
Esse código aceita um material e uma cor. Ele verifica para ver qual é o tipo de material e faz uma conversão do material para aplicar a cor.
O RoughnessOverride e o MetalnessOverride funcionam de maneira semelhante, usando os métodos ApplyRoughnessValue e ApplyMetalnessValue para realizar seu trabalho.
Agora vamos testar o controlador de material.
- Adicione o script EntityMaterialController ao GameObject TestModel.
- Pressione Executar no Unity para iniciar a cena e conectar-se ao ARR.
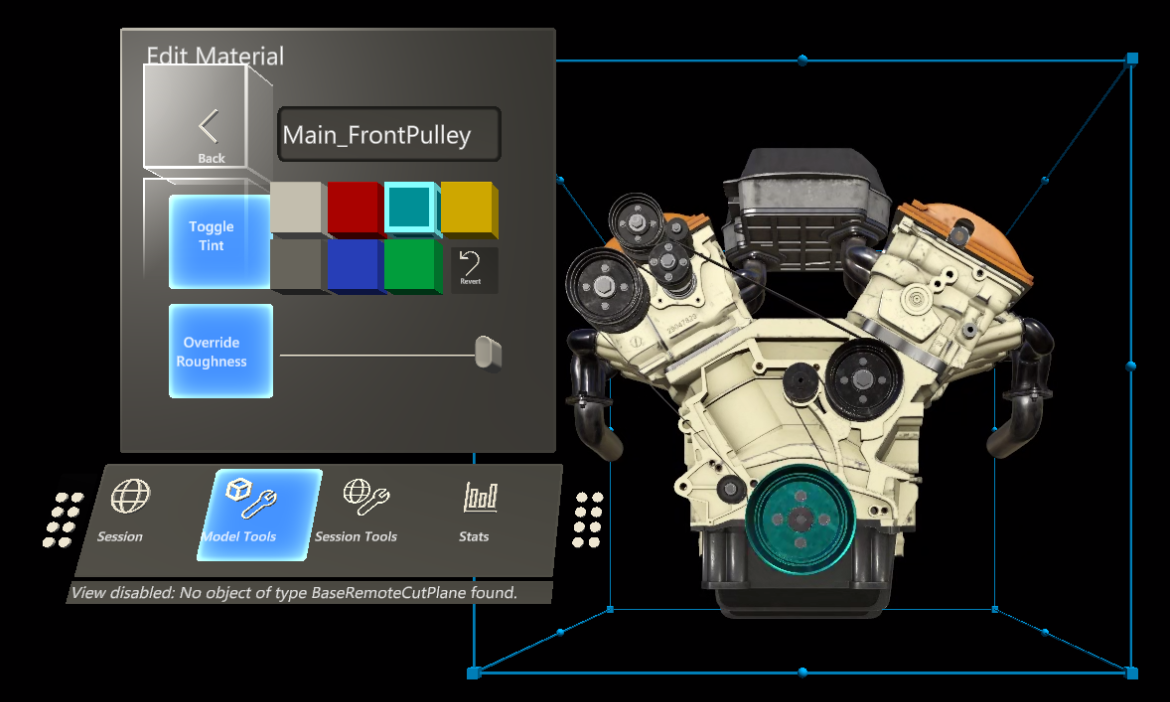
- Depois de conectar o runtime a uma sessão remota e carregar o modelo, navegue até AppMenu - > Ferramentas de Modelo - > Editar Material
- Selecione uma entidade do modelo usando as mãos simuladas para clicar no TestModel.
- Confirme se o controlador de exibição do material (AppMenu->Ferramentas de Modelo->Editar Material) foi atualizado de acordo com a entidade de destino.
- Use o controlador de exibição de material para ajustar o material na entidade de destino.
Como estamos modificando apenas o primeiro material da malha, talvez você não veja o material sendo alterado. Use a substituição hierárquica SeeThrough para ver se o material que você está alterando está dentro da malha.
Próximas etapas
Parabéns! Agora você implementou toda as funcionalidades principais do Azure Remote Rendering. No próximo capítulo, aprenderemos a proteger o Azure Remote Rendering e o Armazenamento de Blobs. Essas serão as primeiras etapas para lançar um aplicativo comercial que usa o Azure Remote Rendering.