Observação
O acesso a essa página exige autorização. Você pode tentar entrar ou alterar diretórios.
O acesso a essa página exige autorização. Você pode tentar alterar os diretórios.
Continue a criar seu site habilitado para pesquisa seguindo estas etapas:
- Criar um índice
- Carregar dados
O programa usa Azure.Search.Documents no SDK do Azure para .NET:
Antes de começar, certifique-se de ter espaço em seu serviço de pesquisa para um novo índice. O limite do nível gratuito é de três índices. O limite do nível Básico é 15.
Preparar o script de importação em massa para a Pesquisa
No Visual Studio Code, abra o arquivo
Program.csno subdiretório,azure-search-static-web-app/bulk-insert, e substitua as variáveis a seguir pelos seus próprios valores para autenticar com o SDK do Azure Search.- YOUR-SEARCH-SERVICE-NAME (não o URL completo)
- YOUR-SEARCH-ADMIN-API-KEY (veja Encontrar chaves de API)
using Azure;
using Azure.Search.Documents;
using Azure.Search.Documents.Indexes;
using Azure.Search.Documents.Indexes.Models;
using AzureSearch.BulkInsert;
using ServiceStack;

const string BOOKS_URL = "https://raw.githubusercontent.com/Azure-Samples/azure-search-sample-data/main/good-books/books.csv";
const string SEARCH_ENDPOINT = "https://YOUR-SEARCH-RESOURCE-NAME.search.windows.net";
const string SEARCH_KEY = "YOUR-SEARCH-ADMIN-KEY";
const string SEARCH_INDEX_NAME = "good-books";

Uri searchEndpointUri = new(SEARCH_ENDPOINT);

SearchClient client = new(
    searchEndpointUri,
    SEARCH_INDEX_NAME,
    new AzureKeyCredential(SEARCH_KEY));

SearchIndexClient clientIndex = new(
    searchEndpointUri,
    new AzureKeyCredential(SEARCH_KEY));

await CreateIndexAsync(clientIndex);
await BulkInsertAsync(client);

static async Task CreateIndexAsync(SearchIndexClient clientIndex)
{
    Console.WriteLine("Creating (or updating) search index");
    SearchIndex index = new BookSearchIndex(SEARCH_INDEX_NAME);
    var result = await clientIndex.CreateOrUpdateIndexAsync(index);

    Console.WriteLine(result);
}

static async Task BulkInsertAsync(SearchClient client)
{
    Console.WriteLine("Download data file");
    using HttpClient httpClient = new();

    var csv = await httpClient.GetStringAsync(BOOKS_URL);

    Console.WriteLine("Reading and parsing raw CSV data");
    var books =
        csv.ReplaceFirst("book_id", "id").FromCsv<List<BookModel>>();

    Console.WriteLine("Uploading bulk book data");
    _ = await client.UploadDocumentsAsync(books);

    Console.WriteLine("Finished bulk inserting book data");
}
Abra um terminal integrado no Visual Studio Code para o subdiretório do diretório do projeto,
azure-search-static-web-app/bulk-insert.Execute o seguinte comando para instalar as dependências.
dotnet restore
Executar o script de importação em massa para a Pesquisa
Ainda no mesmo subdiretório (
azure-search-static-web-app/bulk-insert), execute o programa:dotnet runÀ medida que o código é executado, o console exibe o progresso. A saída a seguir será exibida.
 Creating (or updating) search index
 Status: 201, Value: Azure.Search.Documents.Indexes.Models.SearchIndex
 Download data file
 Reading and parsing raw CSV data
 Uploading bulk book data
 Finished bulk inserting book data
Examinar o novo índice de pesquisa
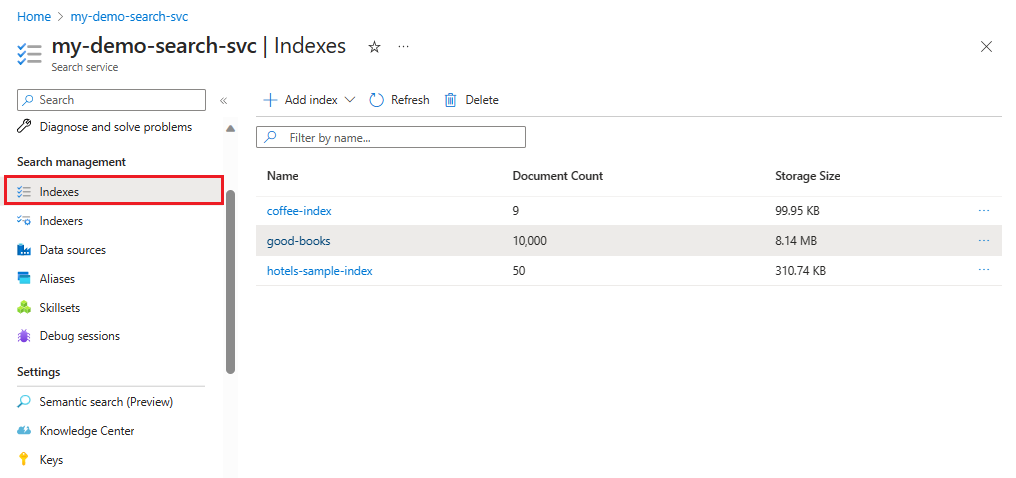
Quando o upload for concluído, o índice de pesquisa estará pronto para uso. Examine seu novo índice no portal do Azure.
No portal do Azure, encontre seu serviço de pesquisa.
À esquerda, selecione Gerenciamento de pesquisa > Índices e, a seguir, selecione o índice de bons livros.
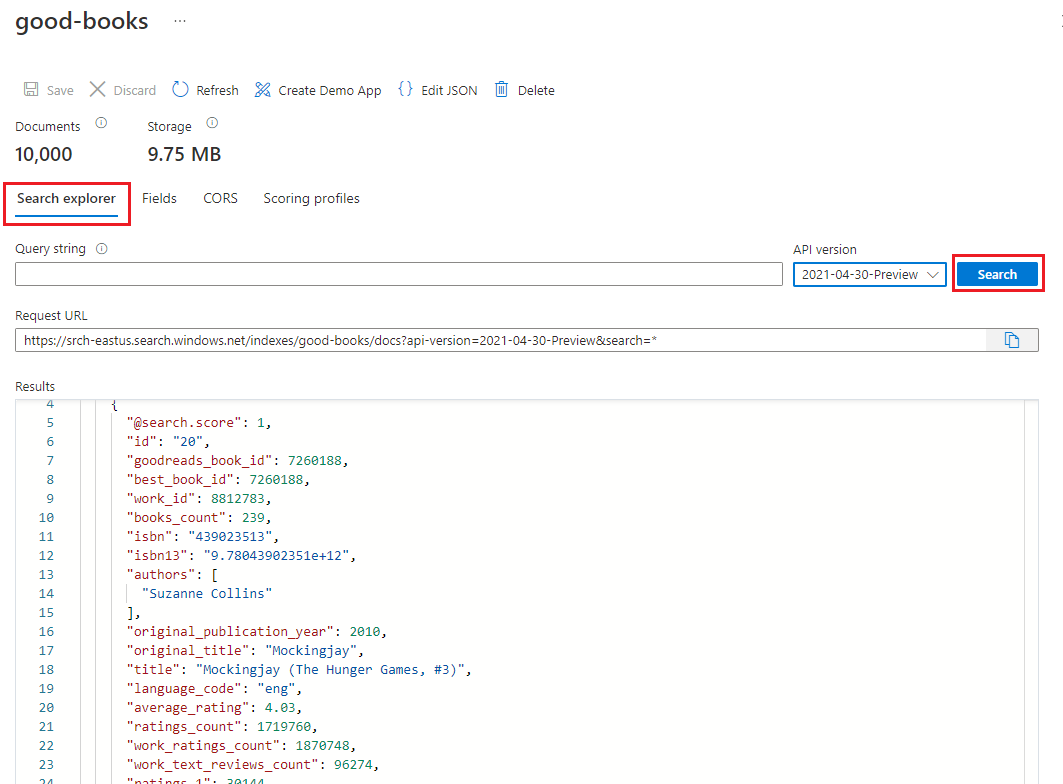
Por padrão, o índice abre na guia Search Explorer. Selecione Pesquisar para retornar documentos do índice.
Reverter alterações de arquivo de importação em massa
Use o seguinte comando git no terminal integrado do Visual Studio Code no diretório bulk-insert para reverter as alterações no arquivo Program.cs. Eles não são necessários para continuar o tutorial e você não deve salvar ou enviar por push suas chaves de API ou o nome do serviço de pesquisa para seu repositório.
git checkout .

