Observação
O acesso a essa página exige autorização. Você pode tentar entrar ou alterar diretórios.
O acesso a essa página exige autorização. Você pode tentar alterar os diretórios.
Esta visão geral descreve como usar as classes do WPF (Windows Presentation Foundation) Geometry para descrever formas. Este tópico também contrasta as diferenças entre Geometry objetos e Shape elementos.
O que é uma geometria?
A Geometry classe e as classes que derivam dela, como EllipseGeometry, PathGeometrye CombinedGeometry, permitem descrever a geometria de uma forma 2D. Essas descrições geométricas têm muitos usos, como definir uma forma para pintar na tela ou definir regiões de teste de colisão e recorte. Você pode até mesmo usar uma geometria para definir um caminho de animação.
Geometry objetos podem ser simples, como retângulos e círculos, ou composição, criados a partir de dois ou mais objetos de geometria. Geometrias mais complexas podem ser criadas usando as classes PathGeometry e StreamGeometry, que permitem descrever arcos e curvas.
Um Geometry é um tipo de Freezable, portanto objetos Geometry fornecem vários recursos especiais: eles podem ser declarados como recursos, compartilhados entre vários objetos, feitos somente leitura para melhorar o desempenho, clonados e tornados thread-safe. Para obter mais informações sobre os diferentes recursos fornecidos pelos Freezable objetos, consulte a Visão geral dos objetos freezable.
Geometrias vs. Formas
As Geometry classes e as classes Shape parecem semelhantes, pois ambas descrevem formas 2D (comparar EllipseGeometry e Ellipse , por exemplo), mas há diferenças importantes.
Por exemplo, a Geometry classe herda da Freezable classe enquanto a Shape classe herda de FrameworkElement. Como são elementos, Shape os objetos podem se renderizar e participar do sistema de layout, enquanto Geometry os objetos não podem.
Embora os Shape objetos sejam mais facilmente utilizáveis do que Geometry os objetos, Geometry os objetos são mais versáteis. Embora um Shape objeto seja usado para renderizar gráficos 2D, um Geometry objeto pode ser usado para definir a região geométrica para gráficos 2D, definir uma região para recorte ou definir uma região para teste de ocorrência, por exemplo.
A forma do caminho
Um Shape, a classe Path, na verdade usa um Geometry para descrever o seu conteúdo. Definindo a propriedade Data de Path com um Geometry e configurando suas propriedades Fill e Stroke, você pode renderizar um Geometry.
Propriedades comuns que assumem uma geometria
As seções anteriores mencionaram que os objetos Geometry podem ser usados com outros objetos para diferentes finalidades, como desenho de formas, animação e recorte. A tabela a seguir lista várias classes que têm propriedades que aceitam um Geometry objeto.
| Tipo | Propriedade |
|---|---|
| DoubleAnimationUsingPath | PathGeometry |
| DrawingGroup | ClipGeometry |
| GeometryDrawing | Geometry |
| Path | Data |
| UIElement | Clip |
Tipos de geometria simples
A classe base para todas as geometrias é a classe Geometryabstrata. As classes que derivam da Geometry classe podem ser agrupadas aproximadamente em três categorias: geometrias simples, geometrias de caminho e geometrias compostas.
Classes de geometria simples incluem LineGeometry, RectangleGeometrye EllipseGeometry são usadas para criar formas geométricas básicas, como linhas, retângulos e círculos.
Um LineGeometry é definido especificando o ponto inicial da linha e o ponto final.
Um RectangleGeometry é definido com uma Rect estrutura que especifica sua posição relativa e sua altura e largura. Você pode criar um retângulo arredondado definindo as propriedades RadiusX e RadiusY.
Um EllipseGeometry é definido por um ponto central, um raio x e um raio y. Os exemplos a seguir mostram como criar geometrias simples para renderização e recorte.
Essas mesmas formas, bem como formas mais complexas, podem ser criadas usando um PathGeometry ou combinando objetos de geometria juntos, mas essas classes fornecem um meio mais simples para produzir essas formas geométricas básicas.
O exemplo a seguir mostra como criar e renderizar um LineGeometry. Como observado anteriormente, um Geometry objeto não consegue desenhar a si mesmo, portanto, o exemplo usa uma Path forma para renderizar a linha. Como uma linha não tem área, definir a propriedade Fill do Path não teria efeito; em vez disso, somente as propriedades Stroke e StrokeThickness são especificadas. A ilustração a seguir mostra a saída do exemplo.

Um LineGeometry extraído de (10,20) para (100.130)
<Path Stroke="Black" StrokeThickness="1" >
  <Path.Data>
    <LineGeometry StartPoint="10,20" EndPoint="100,130" />
  </Path.Data>
</Path>
LineGeometry myLineGeometry = new LineGeometry();
myLineGeometry.StartPoint = new Point(10,20);
myLineGeometry.EndPoint = new Point(100,130);

Path myPath = new Path();
myPath.Stroke = Brushes.Black;
myPath.StrokeThickness = 1;
myPath.Data = myLineGeometry;
Dim myLineGeometry As New LineGeometry()
myLineGeometry.StartPoint = New Point(10,20)
myLineGeometry.EndPoint = New Point(100,130)

Dim myPath As New Path()
myPath.Stroke = Brushes.Black
myPath.StrokeThickness = 1
myPath.Data = myLineGeometry
O exemplo a seguir mostra como criar e renderizar um EllipseGeometry. O exemplo define que o Center do EllipseGeometry é definido como o ponto 50,50 e que o raio-x e o raio-y são ambos definidos como 50, o que cria um círculo com um diâmetro de 100 unidades. O interior da elipse é pintado atribuindo um valor à propriedade Fill do elemento Path, nesse caso Gold. A ilustração a seguir mostra a saída do exemplo.
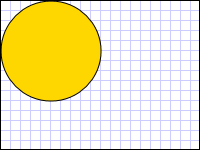
Um EllipseGeometry desenhado em (50,50)
<Path Fill="Gold" Stroke="Black" StrokeThickness="1">
  <Path.Data>
    <EllipseGeometry Center="50,50" RadiusX="50" RadiusY="50" />
  </Path.Data>
</Path>
EllipseGeometry myEllipseGeometry = new EllipseGeometry();
myEllipseGeometry.Center = new Point(50, 50);
myEllipseGeometry.RadiusX = 50;
myEllipseGeometry.RadiusY = 50;

Path myPath = new Path();
myPath.Fill = Brushes.Gold;
myPath.Stroke = Brushes.Black;
myPath.StrokeThickness = 1;
myPath.Data = myEllipseGeometry;
Dim myEllipseGeometry As New EllipseGeometry()
myEllipseGeometry.Center = New Point(50, 50)
myEllipseGeometry.RadiusX = 50
myEllipseGeometry.RadiusY = 50

Dim myPath As New Path()
myPath.Fill = Brushes.Gold
myPath.Stroke = Brushes.Black
myPath.StrokeThickness = 1
myPath.Data = myEllipseGeometry
O exemplo a seguir mostra como criar e renderizar um RectangleGeometry. A posição e as dimensões do retângulo são definidas por uma Rect estrutura. A posição é 50,50 e a altura e a largura são ambas 25, o que cria um quadrado. A ilustração a seguir mostra a saída do exemplo.

Um RectangleGeometry desenhado em 50,50
<Path Fill="LemonChiffon" Stroke="Black" StrokeThickness="1">
  <Path.Data>
    <RectangleGeometry Rect="50,50,25,25" />
  </Path.Data>
</Path>
RectangleGeometry myRectangleGeometry = new RectangleGeometry();
myRectangleGeometry.Rect = new Rect(50,50,25,25);

Path myPath = new Path();
myPath.Fill = Brushes.LemonChiffon;
myPath.Stroke = Brushes.Black;
myPath.StrokeThickness = 1;
myPath.Data = myRectangleGeometry;
Dim myRectangleGeometry As New RectangleGeometry()
myRectangleGeometry.Rect = New Rect(50,50,25,25)

Dim myPath As New Path()
myPath.Fill = Brushes.LemonChiffon
myPath.Stroke = Brushes.Black
myPath.StrokeThickness = 1
myPath.Data = myRectangleGeometry
O exemplo a seguir mostra como usar uma EllipseGeometry região de clipe para uma imagem. Um Image objeto é definido com um Width de 200 e um Height de 150. Um EllipseGeometry com um RadiusX valor de 100, um RadiusY valor de 75 e um Center valor de 100,75 é definido como a Clip propriedade da imagem. Somente a parte da imagem que está dentro da área da elipse será exibida. A ilustração a seguir mostra a saída do exemplo.

Um EllipseGeometry usado para recortar um Controle de Imagem
<Image
  Source="sampleImages\Waterlilies.jpg"
  Width="200" Height="150" HorizontalAlignment="Left">
  <Image.Clip>
    <EllipseGeometry
      RadiusX="100"
      RadiusY="75"
      Center="100,75"/>
  </Image.Clip>
</Image>
// Create the image to clip.
Image myImage = new Image();
Uri imageUri =
    new Uri(@"C:\\Documents and Settings\\All Users\\Documents\My Pictures\\Sample Pictures\\Water lilies.jpg", UriKind.Relative);
myImage.Source = new BitmapImage(imageUri);
myImage.Width = 200;
myImage.Height = 150;
myImage.HorizontalAlignment = HorizontalAlignment.Left;

// Use an EllipseGeometry to define the clip region.
EllipseGeometry myEllipseGeometry = new EllipseGeometry();
myEllipseGeometry.Center = new Point(100, 75);
myEllipseGeometry.RadiusX = 100;
myEllipseGeometry.RadiusY = 75;
myImage.Clip = myEllipseGeometry;
' Create the image to clip.
Dim myImage As New Image()
Dim imageUri As New Uri("C:\\Documents and Settings\\All Users\\Documents\My Pictures\\Sample Pictures\\Water lilies.jpg", UriKind.Relative)
myImage.Source = New BitmapImage(imageUri)
myImage.Width = 200
myImage.Height = 150
myImage.HorizontalAlignment = HorizontalAlignment.Left

' Use an EllipseGeometry to define the clip region.
Dim myEllipseGeometry As New EllipseGeometry()
myEllipseGeometry.Center = New Point(100, 75)
myEllipseGeometry.RadiusX = 100
myEllipseGeometry.RadiusY = 75
myImage.Clip = myEllipseGeometry
Geometrias de Trajetos
A PathGeometry classe e seu equivalente leve, a StreamGeometry classe, fornecem os meios para descrever várias figuras complexas compostas por arcos, curvas e linhas.
No coração de uma PathGeometry, há uma coleção de objetos PathFigure, assim denominada porque cada figura descreve uma forma discreta no PathGeometry. Cada PathFigure é composto por um ou mais PathSegment objetos, cada um descreve um segmento da figura.
Há muitos tipos de segmentos.
| Tipo de Segmento | Descrição | Exemplo |
|---|---|---|
| ArcSegment | Cria um arco elíptico entre dois pontos. | Crie um Arco Elíptico. |
| BezierSegment | Cria uma curva de Bezier cúbica entre dois pontos. | Criar uma curva de bézier cúbica. |
| LineSegment | Cria uma linha entre dois pontos. | Criar um LineSegment em um PathGeometry |
| PolyBezierSegment | Cria uma série de curvas de Bézier cúbicas. | Veja a página de tipo PolyBezierSegment. |
| PolyLineSegment | Cria uma série de linhas. | Veja a página de tipo PolyLineSegment. |
| PolyQuadraticBezierSegment | Cria uma série de curvas quadráticas de Bezier. | Visitar a página PolyQuadraticBezierSegment. |
| QuadraticBezierSegment | Cria uma curva quadrática de Bezier. | Crie uma curva de Bézier Quadrático. |
Os segmentos dentro de um PathFigure são combinados em uma única forma geométrica com o ponto final de cada segmento sendo o ponto inicial do próximo segmento. A StartPoint propriedade de um PathFigure especifica o ponto do qual o primeiro segmento é desenhado. Cada segmento subsequente começa no ponto final do segmento anterior. Por exemplo, uma linha vertical de 10,50 a 10,150 pode ser definida ao definir a propriedade StartPoint para 10,50 e criar um LineSegment com a configuração da propriedade Point para 10,150.
O exemplo a seguir cria um simples PathGeometry composto por um único PathFigure com um LineSegment e o exibe usando um Path elemento. O PathFigure do objeto é definido para StartPoint e um 10,20 é definido com um ponto de extremidade em LineSegment. A ilustração a seguir mostra o PathGeometry criado por este exemplo.
Um PathGeometry que contém um único LineSegment
<Path Stroke="Black" StrokeThickness="1">
  <Path.Data>
    <PathGeometry>
      <PathGeometry.Figures>
        <PathFigure StartPoint="10,20">
          <PathFigure.Segments>
            <LineSegment Point="100,130"/>
          </PathFigure.Segments>
        </PathFigure>
      </PathGeometry.Figures>
    </PathGeometry>
  </Path.Data>
</Path>
// Create a figure that describes a
// line from (10,20) to (100,130).
PathFigure myPathFigure = new PathFigure();
myPathFigure.StartPoint = new Point(10,20);
myPathFigure.Segments.Add(
    new LineSegment(new Point(100,130),
    true /* IsStroked */ ));

/// Create a PathGeometry to contain the figure.
PathGeometry myPathGeometry = new PathGeometry();
myPathGeometry.Figures.Add(myPathFigure);

// Display the PathGeometry.
Path myPath = new Path();
myPath.Stroke = Brushes.Black;
myPath.StrokeThickness = 1;
myPath.Data = myPathGeometry;
' Create a figure that describes a
' line from (10,20) to (100,130).
Dim myPathFigure As New PathFigure()
myPathFigure.StartPoint = New Point(10,20)
myPathFigure.Segments.Add(New LineSegment(New Point(100,130), True)) ' IsStroked

''' Create a PathGeometry to contain the figure.
Dim myPathGeometry As New PathGeometry()
myPathGeometry.Figures.Add(myPathFigure)

' Display the PathGeometry.
Dim myPath As New Path()
myPath.Stroke = Brushes.Black
myPath.StrokeThickness = 1
myPath.Data = myPathGeometry
Vale a pena contrastar este exemplo com o exemplo anterior LineGeometry . A sintaxe usada para um PathGeometry é muito mais detalhada do que a usada para um simples LineGeometry, e pode fazer mais sentido usar a LineGeometry classe nesse caso, mas a sintaxe detalhada das PathGeometry permite regiões geométricas extremamente complexas e complexas.
Geometrias mais complexas podem ser criadas usando uma combinação de PathSegment objetos.
O exemplo a seguir usa um BezierSegment, um LineSegmente um ArcSegment para criar forma. O exemplo primeiro cria uma curva de Bezier cúbica definindo quatro pontos: um ponto inicial, que é o ponto final do segmento anterior, um ponto de extremidade (Point3) e dois pontos de controle (Point1 e Point2). Os dois pontos de controle de uma curva bezier cúbica se comportam como ímãs, atraindo partes do que de outra forma seria uma linha reta em direção a si mesmos, produzindo uma curva. O primeiro ponto de controle, Point1afeta a parte inicial da curva; o segundo ponto de controle, Point2afeta a parte final da curva.
Em seguida, o exemplo adiciona um LineSegment, que é desenhado entre o ponto final do anterior BezierSegment ao ponto especificado pela sua propriedade LineSegment.
Em seguida, o exemplo adiciona um ArcSegment, que vai do ponto final do LineSegment anterior ao ponto especificado por sua propriedade Point. O exemplo também especifica o raio x e y do arco (Size), um ângulo de rotação (RotationAngle), um sinalizador que indica o tamanho do ângulo do arco resultante (IsLargeArc) e um valor que indica em qual direção o arco é desenhado (SweepDirection). A ilustração a seguir mostra a forma criada por este exemplo.

Um PathGeometry
<Path Stroke="Black" StrokeThickness="1" >
  <Path.Data>
    <PathGeometry>
      <PathGeometry.Figures>
        <PathFigure StartPoint="10,50">
          <PathFigure.Segments>
            <BezierSegment
              Point1="100,0"
              Point2="200,200"
              Point3="300,100"/>
            <LineSegment Point="400,100" />
            <ArcSegment
              Size="50,50" RotationAngle="45"
              IsLargeArc="True" SweepDirection="Clockwise"
              Point="200,100"/>
          </PathFigure.Segments>
        </PathFigure>
      </PathGeometry.Figures>
    </PathGeometry>
  </Path.Data>
</Path>
// Create a figure.
PathFigure myPathFigure = new PathFigure();
myPathFigure.StartPoint = new Point(10,50);
myPathFigure.Segments.Add(
    new BezierSegment(
        new Point(100,0),
        new Point(200,200),
        new Point(300,100),
        true /* IsStroked */  ));
myPathFigure.Segments.Add(
    new LineSegment(
        new Point(400,100),
        true /* IsStroked */ ));
myPathFigure.Segments.Add(
    new ArcSegment(
        new Point(200,100),
        new Size(50,50),
        45,
        true, /* IsLargeArc */
        SweepDirection.Clockwise,
        true /* IsStroked */ ));

/// Create a PathGeometry to contain the figure.
PathGeometry myPathGeometry = new PathGeometry();
myPathGeometry.Figures.Add(myPathFigure);

// Display the PathGeometry.
Path myPath = new Path();
myPath.Stroke = Brushes.Black;
myPath.StrokeThickness = 1;
myPath.Data = myPathGeometry;
' Create a figure.
Dim myPathFigure As New PathFigure()
myPathFigure.StartPoint = New Point(10,50)
myPathFigure.Segments.Add(New BezierSegment(New Point(100,0), New Point(200,200), New Point(300,100), True)) ' IsStroked
myPathFigure.Segments.Add(New LineSegment(New Point(400,100), True)) ' IsStroked
myPathFigure.Segments.Add(New ArcSegment(New Point(200,100), New Size(50,50), 45, True, SweepDirection.Clockwise, True)) ' IsStroked  -  IsLargeArc

''' Create a PathGeometry to contain the figure.
Dim myPathGeometry As New PathGeometry()
myPathGeometry.Figures.Add(myPathFigure)

' Display the PathGeometry.
Dim myPath As New Path()
myPath.Stroke = Brushes.Black
myPath.StrokeThickness = 1
myPath.Data = myPathGeometry
Geometrias ainda mais complexas podem ser criadas usando vários PathFigure objetos dentro de um PathGeometry.
O exemplo a seguir cria um PathGeometry com dois objetos PathFigure, cada um dos quais contém vários objetos PathSegment. O PathFigure do exemplo acima e PathFigure com PolyLineSegment e QuadraticBezierSegment são usados. Um PolyLineSegment é definido com uma matriz de pontos e o QuadraticBezierSegment é definido com um ponto de controle e um ponto de extremidade. A ilustração a seguir mostra a forma criada por este exemplo.

Um PathGeometry com várias figuras
<Path Stroke="Black" StrokeThickness="1" >
  <Path.Data>
    <PathGeometry>
      <PathGeometry.Figures>
        <PathFigure StartPoint="10,50">
          <PathFigure.Segments>
            <BezierSegment
              Point1="100,0"
              Point2="200,200"
              Point3="300,100"/>
            <LineSegment Point="400,100" />
            <ArcSegment
              Size="50,50" RotationAngle="45"
              IsLargeArc="True" SweepDirection="Clockwise"
              Point="200,100"/>
          </PathFigure.Segments>
        </PathFigure>

        <PathFigure StartPoint="10,100">
          <PathFigure.Segments>
            <PolyLineSegment Points="50,100 50,150" />
            <QuadraticBezierSegment Point1="200,200" Point2="300,100"/>
          </PathFigure.Segments>
        </PathFigure>
      </PathGeometry.Figures>
    </PathGeometry>
  </Path.Data>
</Path>
PathGeometry myPathGeometry = new PathGeometry();

// Create a figure.
PathFigure pathFigure1 = new PathFigure();
pathFigure1.StartPoint = new Point(10,50);
pathFigure1.Segments.Add(
    new BezierSegment(
        new Point(100,0),
        new Point(200,200),
        new Point(300,100),
        true /* IsStroked */ ));
pathFigure1.Segments.Add(
    new LineSegment(
        new Point(400,100),
        true /* IsStroked */ ));
pathFigure1.Segments.Add(
    new ArcSegment(
        new Point(200,100),
        new Size(50,50),
        45,
        true, /* IsLargeArc */
        SweepDirection.Clockwise,
        true /* IsStroked */ ));
myPathGeometry.Figures.Add(pathFigure1);

// Create another figure.
PathFigure pathFigure2 = new PathFigure();
pathFigure2.StartPoint = new Point(10,100);
Point[] polyLinePointArray =
    new Point[]{ new Point(50, 100), new Point(50, 150)};
PolyLineSegment myPolyLineSegment = new PolyLineSegment();
myPolyLineSegment.Points =
    new PointCollection(polyLinePointArray);
pathFigure2.Segments.Add(myPolyLineSegment);
pathFigure2.Segments.Add(
    new QuadraticBezierSegment(
        new Point(200,200),
        new Point(300,100),
        true /* IsStroked */ ));
myPathGeometry.Figures.Add(pathFigure2);

// Display the PathGeometry.
Path myPath = new Path();
myPath.Stroke = Brushes.Black;
myPath.StrokeThickness = 1;
myPath.Data = myPathGeometry;
Dim myPathGeometry As New PathGeometry()

' Create a figure.
Dim pathFigure1 As New PathFigure()
pathFigure1.StartPoint = New Point(10,50)
pathFigure1.Segments.Add(New BezierSegment(New Point(100,0), New Point(200,200), New Point(300,100), True)) ' IsStroked
pathFigure1.Segments.Add(New LineSegment(New Point(400,100), True)) ' IsStroked
pathFigure1.Segments.Add(New ArcSegment(New Point(200,100), New Size(50,50), 45, True, SweepDirection.Clockwise, True)) ' IsStroked  -  IsLargeArc
myPathGeometry.Figures.Add(pathFigure1)

' Create another figure.
Dim pathFigure2 As New PathFigure()
pathFigure2.StartPoint = New Point(10,100)
Dim polyLinePointArray() As Point = { New Point(50, 100), New Point(50, 150)}
Dim myPolyLineSegment As New PolyLineSegment()
myPolyLineSegment.Points = New PointCollection(polyLinePointArray)
pathFigure2.Segments.Add(myPolyLineSegment)
pathFigure2.Segments.Add(New QuadraticBezierSegment(New Point(200,200), New Point(300,100), True)) ' IsStroked
myPathGeometry.Figures.Add(pathFigure2)

' Display the PathGeometry.
Dim myPath As New Path()
myPath.Stroke = Brushes.Black
myPath.StrokeThickness = 1
myPath.Data = myPathGeometry
StreamGeometry
Assim como a PathGeometry classe, uma StreamGeometry define uma forma geométrica complexa que pode conter curvas, arcos e linhas. Ao contrário de um PathGeometry, o conteúdo de um StreamGeometry não dá suporte à associação de dados, animação ou modificação. Use um StreamGeometry quando precisar descrever uma geometria complexa, mas não quiser a sobrecarga de dar suporte à associação de dados, animação ou modificação. Devido à sua eficiência, a classe StreamGeometry é uma boa escolha para descrever decoradores.
Para obter um exemplo, consulte Criar uma forma usando um StreamGeometry.
Sintaxe de marcação de caminho
Os tipos PathGeometry e StreamGeometry dão suporte a uma sintaxe de atributo XAML (Extensible Application Markup Language) usando uma série especial de comandos de movimento e desenho. Para obter mais informações, consulte Sintaxe de Marcação de Caminho.
Geometrias compostas
Objetos de geometria composta podem ser criados usando um GeometryGroup, um CombinedGeometry ou chamando o método estático GeometryCombine.
O CombinedGeometry objeto e o Combine método executam uma operação booliana para combinar a área definida por duas geometrias. Geometry os objetos que não têm área são descartados. Somente dois Geometry objetos podem ser combinados (embora essas duas geometrias também possam ser geometrias compostas).
A GeometryGroup classe cria uma amálgama dos Geometry objetos que contém sem combinar sua área. Qualquer número de Geometry objetos pode ser adicionado a um GeometryGroup. Para obter um exemplo, consulte Criar uma forma composta.
Como eles não executam uma operação de combinação, usar objetos GeometryGroup oferece benefícios de desempenho em comparação com o uso de objetos CombinedGeometry ou do método Combine.
Geometrias Combinadas
A seção anterior mencionava o CombinedGeometry objeto e o Combine método combinam a área definida pelas geometrias que contêm. A GeometryCombineMode enumeração especifica como as geometrias são combinadas. Os valores possíveis para a GeometryCombineMode propriedade são: Union, , Intersecte ExcludeXor.
No exemplo a seguir, um CombinedGeometry é definido com um modo de combinação de União. Ambos Geometry1 e os Geometry2 são definidos como círculos do mesmo raio, mas com centros deslocados em 50.
<Path Stroke="Black" StrokeThickness="1" Fill="#CCCCFF">
  <Path.Data>

    <!-- Combines two geometries using the union combine mode. -->
    <CombinedGeometry GeometryCombineMode="Union">
      <CombinedGeometry.Geometry1>
        <EllipseGeometry RadiusX="50" RadiusY="50" Center="75,75" />
      </CombinedGeometry.Geometry1>
      <CombinedGeometry.Geometry2>
        <EllipseGeometry RadiusX="50" RadiusY="50" Center="125,75" />
      </CombinedGeometry.Geometry2>
    </CombinedGeometry>
  </Path.Data>
</Path>

No exemplo a seguir, um CombinedGeometry é definido com um modo de combinação de Xor. Ambos Geometry1 e os Geometry2 são definidos como círculos do mesmo raio, mas com centros deslocados em 50.
<Path Stroke="Black" StrokeThickness="1" Fill="#CCCCFF">
  <Path.Data>

    <!-- Combines two geometries using the XOR combine mode. -->
    <CombinedGeometry GeometryCombineMode="Xor">
      <CombinedGeometry.Geometry1>
        <EllipseGeometry RadiusX="50" RadiusY="50" Center="75,75" />
      </CombinedGeometry.Geometry1>
      <CombinedGeometry.Geometry2>
        <EllipseGeometry RadiusX="50" RadiusY="50" Center="125,75" />
      </CombinedGeometry.Geometry2>
    </CombinedGeometry>
  </Path.Data>
</Path>

Para obter exemplos adicionais, consulte Criar uma forma composta e criar uma geometria combinada.
Recursos congeláveis
Como herda da Freezable classe, a Geometry classe fornece vários recursos especiais: Geometry os objetos podem ser declarados como Recursos XAML, compartilhados entre vários objetos, feitos somente leitura para melhorar o desempenho, clonados e tornados thread-safe. Para obter mais informações sobre os diferentes recursos fornecidos pelos Freezable objetos, consulte a Visão geral dos objetos freezable.
Outros recursos de geometria
A Geometry classe também fornece métodos úteis de utilitário, como o seguinte:
FillContains - Determina se a Geometria contém outra Geometry.
StrokeContains - Determina se o traço de um Geometry contém um ponto especificado.
Consulte a Geometry classe para obter uma listagem completa de seus métodos.
Consulte também
Colaborar conosco no GitHub
A fonte deste conteúdo pode ser encontrada no GitHub, onde você também pode criar e revisar problemas e solicitações de pull. Para obter mais informações, confira o nosso guia para colaboradores.
.NET Desktop feedback