Criar aplicativos de página única do Angular com o Microsoft Graph
Este tutorial ensina como criar um aplicativo de página Angular página única que usa o Microsoft Graph para recuperar informações de calendário para um usuário.
Dica
Se você preferir apenas baixar o tutorial concluído, poderá baixar ou clonar o GitHub repositório.
Pré-requisitos
Antes de iniciar este tutorial, você deve terNode.js instalado em sua máquina de desenvolvimento. Se você não tiver Node.js, visite o link anterior para opções de download.
Você também deve ter uma conta pessoal da Microsoft com uma caixa de correio em Outlook.com, ou uma conta de trabalho ou de estudante da Microsoft. Se você não tiver uma conta da Microsoft, há algumas opções para obter uma conta gratuita:
- Você pode se inscrever em uma nova conta pessoal da Microsoft.
- Você pode se inscrever no programa de desenvolvedor Microsoft 365 para obter uma assinatura Office 365 gratuita.
Observação
Este tutorial foi escrito com o Nó versão 14.15.0. As etapas neste guia podem funcionar com outras versões, mas que não foram testadas.
Comentários
Forneça qualquer comentário sobre este tutorial no repositório GitHub.
Criar um aplicativo de página única Angular
Nesta seção, você criará um novo Angular projeto.
Abra sua interface de linha de comando (CLI), navegue até um diretório no qual você tem direitos para criar arquivos e execute os seguintes comandos para instalar a ferramenta CLI do Angular e criar um novo aplicativo Angular.
npm install -g @angular/cli
ng new graph-tutorial
A Angular CLI solicitará mais informações. Responda aos prompts da seguinte forma.
? Would you like to add Angular routing? Yes
? Which stylesheet format would you like to use? CSS
Depois que o comando terminar, altere
graph-tutorialpara o diretório em sua CLI e execute o seguinte comando para iniciar um servidor Web local.ng serve --openSeu navegador padrão é aberto com https://localhost:4200/ uma página Angular padrão. Se o navegador não abrir, abra-o e navegue https://localhost:4200/ até verificar se o novo aplicativo funciona.
Adicionar pacotes de nó
Antes de continuar, instale alguns pacotes adicionais que você usará posteriormente:
- ng-bootstrap para usar componentes Bootstrap Angular.
- momento para formatação de datas e horas.
- windows-iana
- msal-angular para autenticação para Azure Active Directory e recuperação de tokens de acesso.
- microsoft-graph-client para fazer chamadas para o Microsoft Graph.
Execute os seguintes comandos em sua CLI.
ng add @ng-bootstrap/ng-bootstrap
npm install @azure/msal-browser@2.16.1 @azure/msal-angular@2.0.2
npm install date-fns@2.23.0 date-fns-tz@1.1.6 windows-iana@5.0.2
npm install @microsoft/microsoft-graph-client@3.0.0
npm install @microsoft/microsoft-graph-types --save-dev
Design do aplicativo
Nesta seção, você criará a interface do usuário para o aplicativo.
Abra ./src/styles.css e adicione as seguintes linhas.
@import "~bootstrap/dist/css/bootstrap.css";

/* Add padding for the nav bar */
body {
  padding-top: 4.5rem;
}

/* Style debug info in alerts */
.alert-pre {
  word-wrap: break-word;
  word-break: break-all;
  white-space: pre-wrap;
}

/* Add padding to user avatar link */
.avatar-link {
  padding-top: .25em;
  padding-bottom: .25em;
}
Crie um novo arquivo na pasta ./src/app chamada user.ts e adicione o código a seguir.
export class User {
  displayName!: string;
  email!: string;
  avatar!: string;
  timeZone!: string;
}
Gere um Angular para a navegação superior na página. Em sua CLI, execute o seguinte comando.
ng generate component nav-barDepois que o comando é concluído, abra ./src/app/nav-bar/nav-bar.component.ts e substitua seu conteúdo pelo seguinte.
import { Component, OnInit } from '@angular/core';

import { User } from '../user';

@Component({
  selector: 'app-nav-bar',
  templateUrl: './nav-bar.component.html',
  styleUrls: ['./nav-bar.component.css']
})
export class NavBarComponent implements OnInit {

  // Should the collapsed nav show?
  showNav: boolean = false;
  // Is a user logged in?
  authenticated: boolean = false;
  // The user
  user?: User = undefined;

  constructor() { }

  ngOnInit() { }

  // Used by the Bootstrap navbar-toggler button to hide/show
  // the nav in a collapsed state
  toggleNavBar(): void {
    this.showNav = !this.showNav;
  }

  signIn(): void {
    // Temporary
    this.authenticated = true;
    this.user = {
      displayName: 'Adele Vance',
      email: 'AdeleV@contoso.com',
      avatar: '/assets/no-profile-photo.png',
      timeZone: ''
    };
  }

  signOut(): void {
    // Temporary
    this.authenticated = false;
    this.user = undefined;
  }
}
Abra ./src/app/nav-bar/nav-bar.component.html e substitua seu conteúdo pelo seguinte.
<nav class="navbar navbar-expand-md navbar-dark fixed-top bg-dark">
  <div class="container">
    <a routerLink="/" class="navbar-brand">Angular Graph Tutorial</a>
    <button class="navbar-toggler" type="button" (click)="toggleNavBar()" [attr.aria-expanded]="showNav"
    aria-controls="navbarCollapse" aria-expanded="false" aria-label="Toggle navigation">
      <span class="navbar-toggler-icon"></span>
    </button>
    <div class="collapse navbar-collapse" [class.show]="showNav" id="navbarCollapse">
      <ul class="navbar-nav mr-auto">
        <li class="nav-item">
          <a routerLink="/" class="nav-link" routerLinkActive="active">Home</a>
        </li>
        <li *ngIf="authenticated" class="nav-item">
          <a routerLink="/calendar" class="nav-link" routerLinkActive="active">Calendar</a>
        </li>
      </ul>
      <ul class="navbar-nav justify-content-end">
        <li class="nav-item">
          <a class="nav-link" href="https://docs.microsoft.com/graph/overview" target="_blank">Docs</a>
        </li>
        <li *ngIf="authenticated" ngbDropdown placement="bottom-right" class="nav-item">
          <a ngbDropdownToggle id="userMenu" class="nav-link avatar-link" role="button" aria-haspopup="true"
            aria-expanded="false">
            <img src="{{user != null ? user.avatar : ''}}" class="rounded-circle align-self-center mr-2" style="width: 32px;">
          </a>
          <div ngbDropdownMenu aria-labelledby="userMenu" class="dropdown-menu-right">
            <h5 class="dropdown-item-text mb-0">{{user != null ? user.displayName : ''}}</h5>
            <p class="dropdown-item-text text-muted mb-0">{{user != null ? user.email : ''}}</p>
            <div class="dropdown-divider"></div>
            <button class="dropdown-item" role="button" (click)="signOut()">Sign Out</button>
          </div>
        </li>
        <li *ngIf="!authenticated" class="nav-item">
          <button class="btn btn-link nav-link border-0" role="button" (click)="signIn()">Sign In</button>
        </li>
      </ul>
    </div>
  </div>
</nav>
Crie uma home page para o aplicativo. Execute o seguinte comando em sua CLI.
ng generate component homeDepois que o comando é concluído, abra ./src/app/home/home.component.ts e substitua seu conteúdo pelo seguinte.
import { Component, OnInit } from '@angular/core';

import { User } from '../user';

@Component({
  selector: 'app-home',
  templateUrl: './home.component.html',
  styleUrls: ['./home.component.css']
})
export class HomeComponent implements OnInit {

  // Is a user logged in?
  authenticated: boolean = false;
  // The user
  user?: User = undefined;

  constructor() { }

  ngOnInit() { }

  signIn(): void {
    // Temporary
    this.authenticated = true;
    this.user = {
      displayName: 'Adele Vance',
      email: 'AdeleV@contoso.com',
      avatar: '',
      timeZone: ''
    };
  }
}
Abra ./src/app/home/home.component.html e substitua seu conteúdo pelo seguinte.
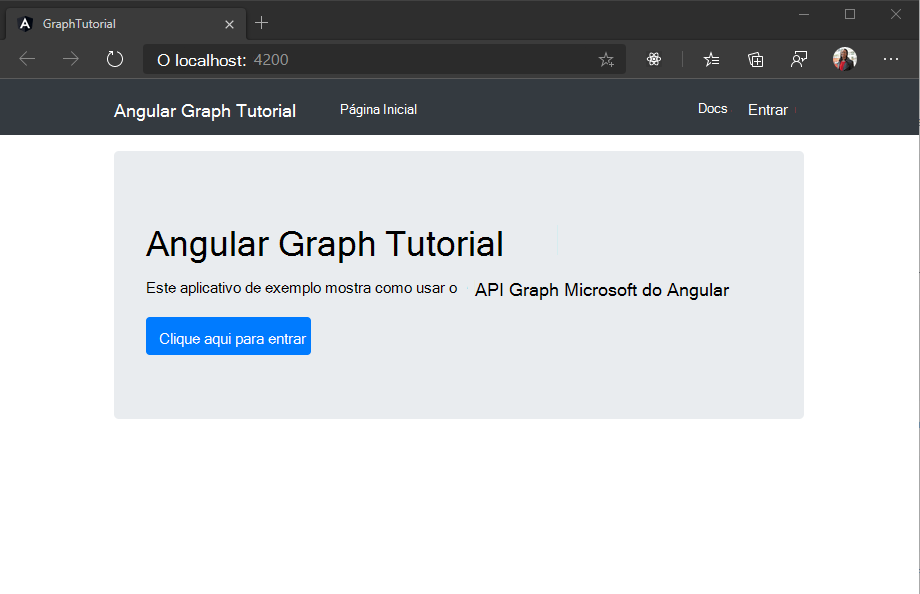
<div class="jumbotron">
  <h1>Angular Graph Tutorial</h1>
  <p class="lead">This sample app shows how to use the Microsoft Graph API from Angular</p>
  <div *ngIf="authenticated; then welcomeUser else signInPrompt"></div>
  <ng-template #welcomeUser>
    <h4>Welcome {{ user != null ? user.displayName : '' }}!</h4>
    <p>Use the navigation bar at the top of the page to get started.</p>
  </ng-template>
  <ng-template #signInPrompt>
    <button class="btn btn-primary btn-large" role="button" (click)="signIn()">Click here to sign in</button>
  </ng-template>
</div>
Crie uma classe
Alertsimples. Crie um novo arquivo no diretório ./src/app chamado alert.ts e adicione o código a seguir.export class Alert { type!: string; message!: string; debug!: string; }Crie um serviço de alerta que o aplicativo pode usar para exibir mensagens para o usuário. Em sua CLI, execute o seguinte comando.
ng generate service alertsAbra ./src/app/alerts.service.ts e substitua seu conteúdo pelo seguinte.
import { Injectable } from '@angular/core';
import { Alert } from './alert';

@Injectable({
  providedIn: 'root'
})

export class AlertsService {

  alerts: Alert[] = [];

  addError(message: string, debug?: string) {
    this.alerts.push({message: message, debug: debug ?? '', type: 'danger'});
  }

  addSuccess(message: string, debug?: string) {
    this.alerts.push({message: message, debug: debug ?? '', type: 'success'});
  }

  remove(alert: Alert) {
    this.alerts.splice(this.alerts.indexOf(alert), 1);
  }
}
Gere um componente de alertas para exibir alertas. Em sua CLI, execute o seguinte comando.
ng generate component alertsDepois que o comando é concluído, abra ./src/app/alerts/alerts.component.ts e substitua seu conteúdo pelo seguinte.
import { Component, OnInit } from '@angular/core';
import { AlertsService } from '../alerts.service';
import { Alert } from '../alert';

@Component({
  selector: 'app-alerts',
  templateUrl: './alerts.component.html',
  styleUrls: ['./alerts.component.css']
})
export class AlertsComponent implements OnInit {

  constructor(public alertsService: AlertsService) { }

  ngOnInit() {
  }

  close(alert: Alert) {
    this.alertsService.remove(alert);
  }
}
Abra ./src/app/alerts/alerts.component.html e substitua seu conteúdo pelo seguinte.
<div *ngFor="let alert of alertsService.alerts">
  <ngb-alert type="{{alert.type}}" (close)="close(alert)">
    {{alert.message}}
    <pre *ngIf="alert.debug" class="alert-pre border bg-light p-2 mt-2"><code>{{alert.debug}}</code></pre>
  </ngb-alert>
</div>
Abra ./src/app/app-routing.module.ts e substitua
const routes: Routes = [];a linha pelo código a seguir.import { HomeComponent } from './home/home.component'; const routes: Routes = [ { path: '', component: HomeComponent }, ];Abra ./src/app/app.component.html e substitua todo o conteúdo pelo seguinte.
<app-nav-bar></app-nav-bar>
<main role="main" class="container">
  <app-alerts></app-alerts>
  <router-outlet></router-outlet>
</main>
Adicione um arquivo de imagem de sua escolhano-profile-photo.pngno diretório ./src/assets . Essa imagem será usada como a foto do usuário quando o usuário não tiver nenhuma foto no Microsoft Graph.
Salve todas as alterações e atualize a página. Agora, o aplicativo deve ter uma aparência muito diferente.
Registrar o aplicativo no portal
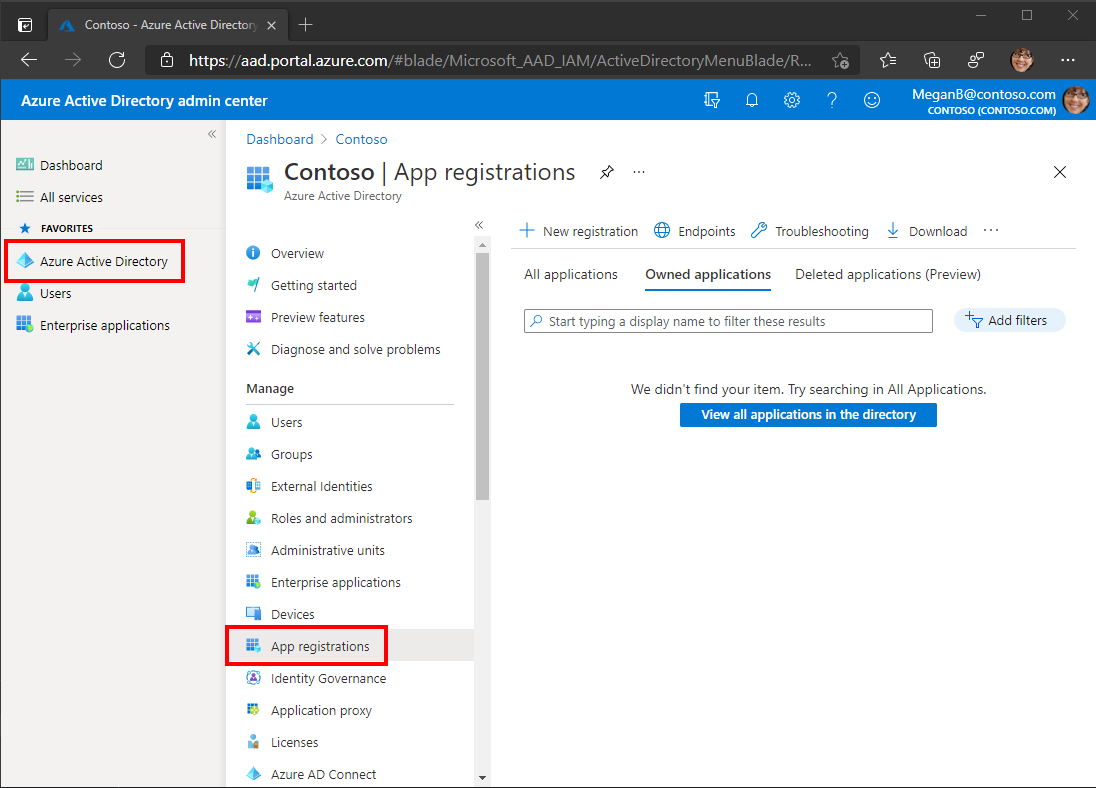
Neste exercício, você criará um novo registro de aplicativo Web do Azure AD usando o Azure Active Directory de administração.
Abra um navegador e navegue até o centro de administração do Azure Active Directory. Faça logon usando uma conta pessoal (também conhecida como Conta da Microsoft) ou Conta Corporativa ou de Estudante.
Selecione Azure Active Directory na navegação esquerda e selecione Registros de aplicativos em Gerenciar.
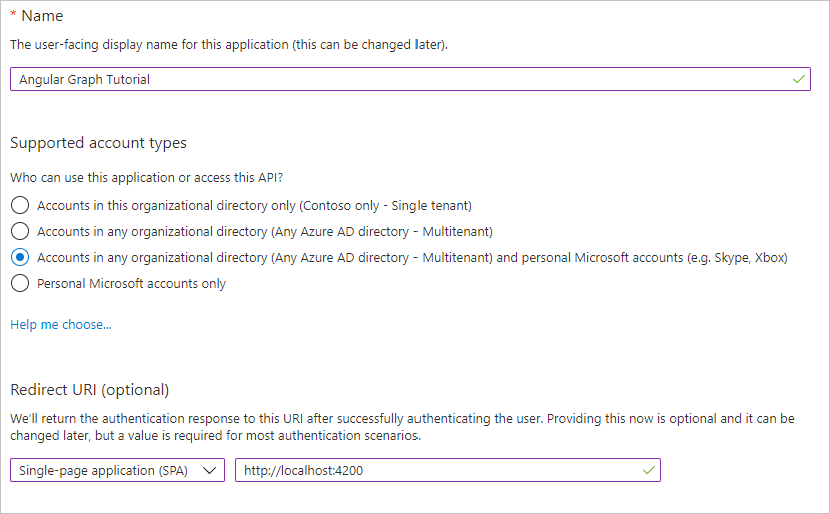
Selecione Novo registro. Na página Registrar um aplicativo, defina os valores da seguinte forma.
- Defina Nome para
Angular Graph Tutorial. - Defina Tipos de conta com suporte para Contas em qualquer diretório organizacional e contas pessoais da Microsoft.
- Em URI de Redirecionamento, defina o primeiro menu suspenso para
Single-page application (SPA)e defina o valor comohttp://localhost:4200.
- Defina Nome para
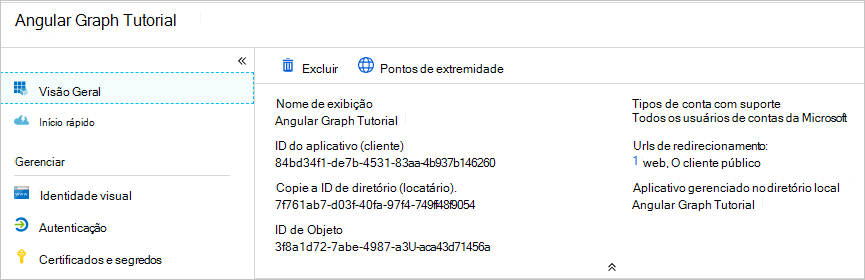
Selecione Registrar. Na página Angular Graph Tutorial, copie o valor da ID do Aplicativo (cliente) e salve-a, você precisará dela na próxima etapa.
Adicionar autenticação do Azure AD
Neste exercício, você estenderá o aplicativo do exercício anterior para dar suporte à autenticação com o Azure AD. Isso é necessário para obter o token de acesso OAuth necessário para chamar o microsoft Graph. Nesta etapa, você integrará a Biblioteca de Autenticação da Microsoft para Angular no aplicativo.
Crie um novo arquivo no diretório ./src chamado oauth.ts e adicione o código a seguir.
export const OAuthSettings = {
  appId: 'YOUR_APP_ID_HERE',
  redirectUri: 'http://localhost:4200',
  scopes: [
    "user.read",
    "mailboxsettings.read",
    "calendars.readwrite"
  ]
};
Substitua
YOUR_APP_ID_HEREpela ID do aplicativo no Portal de Registro de Aplicativos.Importante
Se você estiver usando o controle de origem, como git, agora seria um bom momento para excluir o arquivo oauth.ts do controle de origem para evitar o vazamento inadvertida da ID do aplicativo.
Abra ./src/app/app.module.ts e adicione as instruções
importa seguir à parte superior do arquivo.import { FormsModule } from '@angular/forms'; import { IPublicClientApplication, PublicClientApplication, BrowserCacheLocation } from '@azure/msal-browser'; import { MsalModule, MsalService, MSAL_INSTANCE } from '@azure/msal-angular'; import { OAuthSettings } from '../oauth';Adicione a seguinte função abaixo das instruções
import.let msalInstance: IPublicClientApplication | undefined = undefined; export function MSALInstanceFactory(): IPublicClientApplication { msalInstance = msalInstance ?? new PublicClientApplication({ auth: { clientId: OAuthSettings.appId, redirectUri: OAuthSettings.redirectUri, postLogoutRedirectUri: OAuthSettings.redirectUri }, cache: { cacheLocation: BrowserCacheLocation.LocalStorage, } }); return msalInstance; }Adicione
MsalModuleeFormsModuleà matrizimportsdentro da@NgModuledeclaração.imports: [ BrowserModule, FormsModule, AppRoutingModule, NgbModule, MsalModule ],Adicione e
MSALInstanceFactoryàMsalServicematrizprovidersdentro da@NgModuledeclaração.providers: [ { provide: MSAL_INSTANCE, useFactory: MSALInstanceFactory }, MsalService ],
Implementar login
Nesta seção, você criará um serviço de autenticação e implementará a assinatura e a saída.
Execute o seguinte comando em sua CLI.
ng generate service authAo criar um serviço para isso, você pode injetá-lo facilmente em todos os componentes que precisem de acesso aos métodos de autenticação.
Depois que o comando terminar, abra ./src/app/auth.service.ts e substitua seu conteúdo pelo código a seguir.
import { Injectable } from '@angular/core';
import { MsalService } from '@azure/msal-angular';
import { InteractionType, PublicClientApplication } from '@azure/msal-browser';

import { AlertsService } from './alerts.service';
import { OAuthSettings } from '../oauth';
import { User } from './user';

@Injectable({
  providedIn: 'root'
})

export class AuthService {
  public authenticated: boolean;
  public user?: User;

  constructor(
    private msalService: MsalService,
    private alertsService: AlertsService) {

    this.authenticated = false;
    this.user = undefined;
  }

  // Prompt the user to sign in and
  // grant consent to the requested permission scopes
  async signIn(): Promise<void> {
    const result = await this.msalService
      .loginPopup(OAuthSettings)
      .toPromise()
      .catch((reason) => {
        this.alertsService.addError('Login failed',
          JSON.stringify(reason, null, 2));
      });

    if (result) {
      this.msalService.instance.setActiveAccount(result.account);
      this.authenticated = true;
      // Temporary placeholder
      this.user = new User();
      this.user.displayName = 'Adele Vance';
      this.user.email = 'AdeleV@contoso.com';
      this.user.avatar = '/assets/no-profile-photo.png';

      // Temporary to display token in an error box
      this.alertsService.addSuccess('Token acquired', result.accessToken);
    }
  }

  // Sign out
  async signOut(): Promise<void> {
    await this.msalService.logout().toPromise();
    this.user = undefined;
    this.authenticated = false;
  }
}
Abra ./src/app/nav-bar/nav-bar.component.ts e substitua seu conteúdo pelo seguinte.
import { Component, OnInit } from '@angular/core';

import { AuthService } from '../auth.service';
import { User } from '../user';

@Component({
  selector: 'app-nav-bar',
  templateUrl: './nav-bar.component.html',
  styleUrls: ['./nav-bar.component.css']
})
export class NavBarComponent implements OnInit {

  // Should the collapsed nav show?
  showNav: boolean = false;
  // Is a user logged in?
  get authenticated(): boolean {
    return this.authService.authenticated;
  }
  // The user
  get user(): User | undefined {
    return this.authService.user;
  }

  constructor(private authService: AuthService) { }

  ngOnInit() { }

  // Used by the Bootstrap navbar-toggler button to hide/show
  // the nav in a collapsed state
  toggleNavBar(): void {
    this.showNav = !this.showNav;
  }

  async signIn(): Promise<void> {
    await this.authService.signIn();
  }

  signOut(): void {
    this.authService.signOut();
  }
}
Abra ./src/app/home/home.component.ts e substitua seu conteúdo pelo seguinte.
Salve suas alterações e atualize o navegador. Clique no botão Clique aqui para entrar e você deve ser redirecionado para https://login.microsoftonline.com. Faça logon com sua conta da Microsoft e consenta com as permissões solicitadas. A página do aplicativo deve ser atualizada, mostrando o token.
Obter detalhes do usuário
No momento, o serviço de autenticação define valores constantes para o nome de exibição e o endereço de email do usuário. Agora que você tem um token de acesso, você pode obter detalhes do usuário da Microsoft Graph para que esses valores correspondam ao usuário atual.
Abra ./src/app/auth.service.ts
importe adicione as instruções a seguir à parte superior do arquivo.import { Client } from '@microsoft/microsoft-graph-client'; import { AuthCodeMSALBrowserAuthenticationProvider } from '@microsoft/microsoft-graph-client/authProviders/authCodeMsalBrowser'; import * as MicrosoftGraph from '@microsoft/microsoft-graph-types';Adicione uma propriedade à classe
AuthServicechamadagraphClient.public graphClient?: Client;Adicione uma nova função à classe
AuthServicechamadagetUser.private async getUser(): Promise<User | undefined> { if (!this.authenticated) return undefined; const graphClient = Client.init({ // Initialize the Graph client with an auth // provider that requests the token from the // auth service authProvider: async(done) => { const token = await this.getAccessToken() .catch((reason) => { done(reason, null); }); if (token) { done(null, token); } else { done("Could not get an access token", null); } } }); // Get the user from Graph (GET /me) const graphUser: MicrosoftGraph.User = await graphClient .api('/me') .select('displayName,mail,mailboxSettings,userPrincipalName') .get(); const user = new User(); user.displayName = graphUser.displayName ?? ''; // Prefer the mail property, but fall back to userPrincipalName user.email = graphUser.mail ?? graphUser.userPrincipalName ?? ''; user.timeZone = graphUser.mailboxSettings?.timeZone ?? 'UTC'; // Use default avatar user.avatar = '/assets/no-profile-photo.png'; return user; }Localize e remova o código a seguir do
signInmétodo.// Temporary placeholder this.user = new User(); this.user.displayName = "Adele Vance"; this.user.email = "AdeleV@contoso.com"; this.user.avatar = '/assets/no-profile-photo.png'; // Temporary to display token in an error box this.alertsService.addSuccess('Token acquired', result);Em seu lugar, adicione o código a seguir.
this.user = await this.getUser();Esse novo código usa o Microsoft Graph SDK para obter os detalhes do usuário e, em seguida,
Usercria um objeto usando valores retornados pela chamada de API.Altere
constructoro para aAuthServiceclasse para verificar se o usuário já está conectado e carregar seus detalhes em caso afirmado. Substitua o existente peloconstructorseguinte.constructor( private msalService: MsalService, private alertsService: AlertsService) { this.authenticated = this.msalService.instance .getAllAccounts().length > 0; this.getUser().then((user) => {this.user = user}); }
Agora, se você salvar suas alterações e iniciar o aplicativo, depois de entrar, você deve terminar de volta na home page, mas a interface do usuário deve mudar para indicar que você está in-loco.
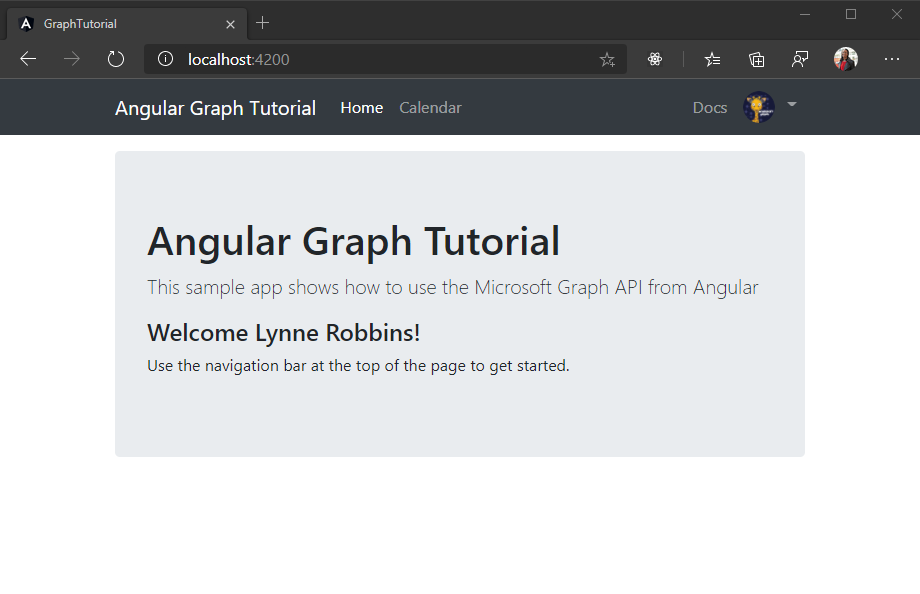
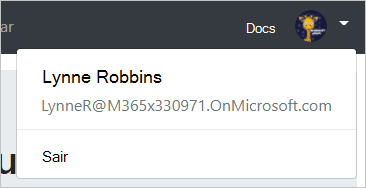
Clique no avatar do usuário no canto superior direito para acessar o link Sair . Clicar em Sair redefine a sessão e retorna você para a home page.
Armazenar e atualizar tokens
Neste ponto, seu aplicativo tem um token de acesso, que é enviado no Authorization header de chamadas da API. Esse é o token que permite que o aplicativo acesse o microsoft Graph em nome do usuário.
No entanto, esse token tem vida curta. O token expira uma hora após a emissão. Como o aplicativo está usando a biblioteca MSAL, você não precisa implementar nenhum armazenamento de token ou lógica de atualização. O MsalService cache do token no armazenamento do navegador. O acquireTokenSilent método primeiro verifica o token armazenado em cache e, se não estiver expirado, ele o retornará. Se expirar, ele fará uma solicitação silenciosa para obter um novo.
Obter exibição de calendário
Neste exercício, você incorporará o microsoft Graph no aplicativo. Para esse aplicativo, você usará a biblioteca microsoft-graph-client para fazer chamadas para o Microsoft Graph.
Obtenha eventos de calendário do Outlook
Adicione um novo serviço para manter todas as chamadas de Graph. Execute o seguinte comando em sua CLI.
ng generate service graphAssim como com o serviço de autenticação criado anteriormente, criar um serviço para isso permite injetá-lo em todos os componentes que precisem de acesso ao Microsoft Graph.
Depois que o comando é concluído, abra ./src/app/graph.service.ts e substitua seu conteúdo pelo seguinte.
import { Injectable } from '@angular/core';
import * as MicrosoftGraph from '@microsoft/microsoft-graph-types';

import { AuthService } from './auth.service';
import { AlertsService } from './alerts.service';

@Injectable({
  providedIn: 'root'
})

export class GraphService {

  constructor(
    private authService: AuthService,
    private alertsService: AlertsService) {}

  async getCalendarView(start: string, end: string, timeZone: string): Promise<MicrosoftGraph.Event[] | undefined> {
    if (!this.authService.graphClient) {
      this.alertsService.addError('Graph client is not initialized.');
      return undefined;
    }

    try {
      // GET /me/calendarview?startDateTime=''&endDateTime=''
      // &$select=subject,organizer,start,end
      // &$orderby=start/dateTime
      // &$top=50
      const result =  await this.authService.graphClient
        .api('/me/calendarview')
        .header('Prefer', `outlook.timezone="${timeZone}"`)
        .query({
          startDateTime: start,
          endDateTime: end
        })
        .select('subject,organizer,start,end')
        .orderby('start/dateTime')
        .top(50)
        .get();

      return result.value;
    } catch (error) {
      this.alertsService.addError('Could not get events', JSON.stringify(error, null, 2));
    }
    return undefined;
  }
}
Considere o que este código está fazendo.
- Ele inicializa um cliente Graph no construtor do serviço.
- Ele implementa uma função
getCalendarViewque usa o Graph cliente da seguinte maneira:- O URL que será chamado é
/me/calendarview. - O
headermétodo inclui oPrefer: outlook.timezoneheader, que faz com que os horários de início e término dos eventos retornados sejam no fuso horário preferencial do usuário. - O
querymétodo adiciona osstartDateTimeparâmetros eendDateTime, definindo a janela de tempo para o modo de exibição de calendário. - O
selectmétodo limita os campos retornados para cada evento para apenas aqueles que o modo de exibição realmente usará. - O
orderbymétodo classifica os resultados por hora de início.
- O URL que será chamado é
Crie um Angular para chamar esse novo método e exibir os resultados da chamada. Execute o seguinte comando em sua CLI.
ng generate component calendarDepois que o comando é concluído, adicione
routeso componente à matriz em ./src/app/app-routing.module.ts.import { CalendarComponent } from './calendar/calendar.component'; const routes: Routes = [ { path: '', component: HomeComponent }, { path: 'calendar', component: CalendarComponent }, ];Abra ./src/app/calendar/calendar.component.ts e substitua seu conteúdo pelo seguinte.
import { Component, OnInit } from '@angular/core';
import { parseISO } from 'date-fns';
import { endOfWeek, startOfWeek } from 'date-fns/esm';
import { zonedTimeToUtc } from 'date-fns-tz';
import { findIana } from 'windows-iana';
import * as MicrosoftGraph from '@microsoft/microsoft-graph-types';

import { AuthService } from '../auth.service';
import { GraphService } from '../graph.service';
import { AlertsService } from '../alerts.service';

@Component({
  selector: 'app-calendar',
  templateUrl: './calendar.component.html',
  styleUrls: ['./calendar.component.css']
})
export class CalendarComponent implements OnInit {

  public events?: MicrosoftGraph.Event[];

  constructor(
    private authService: AuthService,
    private graphService: GraphService,
    private alertsService: AlertsService) { }

  async ngOnInit() {
    // Convert the user's timezone to IANA format
    const ianaName = findIana(this.authService.user?.timeZone ?? 'UTC');
    const timeZone = ianaName![0].valueOf() || this.authService.user?.timeZone || 'UTC';

    // Get midnight on the start of the current week in the user's timezone,
    // but in UTC. For example, for Pacific Standard Time, the time value would be
    // 07:00:00Z
    const now = new Date();
    const weekStart = zonedTimeToUtc(startOfWeek(now), timeZone);
    const weekEnd = zonedTimeToUtc(endOfWeek(now), timeZone);

    this.events = await this.graphService.getCalendarView(
      weekStart.toISOString(),
      weekEnd.toISOString(),
      this.authService.user?.timeZone ?? 'UTC');

      // Temporary to display raw results
      this.alertsService.addSuccess('Events from Graph', JSON.stringify(events, null, 2));
  }
}
Por enquanto, isso apenas renderiza a matriz de eventos no JSON na página. Salve suas alterações e reinicie o aplicativo. Entre e clique no link Calendário na barra de nav. Se tudo funcionar, você deverá ver um despejo JSON de eventos no calendário do usuário.
Exibir os resultados
Agora você pode atualizar o componente CalendarComponent para exibir os eventos de maneira mais fácil de usar.
Remova o código temporário que adiciona um alerta da
ngOnInitfunção. Sua função atualizada deve ter esta aparência.ngOnInit() { // Convert the user's timezone to IANA format const ianaName = findIana(this.authService.user?.timeZone ?? 'UTC'); const timeZone = ianaName![0].valueOf() || this.authService.user?.timeZone || 'UTC'; // Get midnight on the start of the current week in the user's timezone, // but in UTC. For example, for Pacific Standard Time, the time value would be // 07:00:00Z var startOfWeek = moment.tz(timeZone).startOf('week').utc(); var endOfWeek = moment(startOfWeek).add(7, 'day'); this.graphService.getCalendarView( startOfWeek.format(), endOfWeek.format(), this.authService.user?.timeZone ?? 'UTC') .then((events) => { this.events = events; }); }Adicione uma função à classe
CalendarComponentpara formatar um objetoDateTimeTimeZoneem uma cadeia de caracteres ISO.formatDateTimeTimeZone(dateTime: MicrosoftGraph.DateTimeTimeZone | undefined | null): string { if (dateTime == undefined || dateTime == null) { return ''; } try { // Pass UTC for the time zone because the value // is already adjusted to the user's time zone return moment.tz(dateTime.dateTime, 'UTC').format(); } catch(error) { this.alertsService.addError('DateTimeTimeZone conversion error', JSON.stringify(error)); return ''; } }Abra ./src/app/calendar/calendar.component.html e substitua seu conteúdo pelo seguinte.
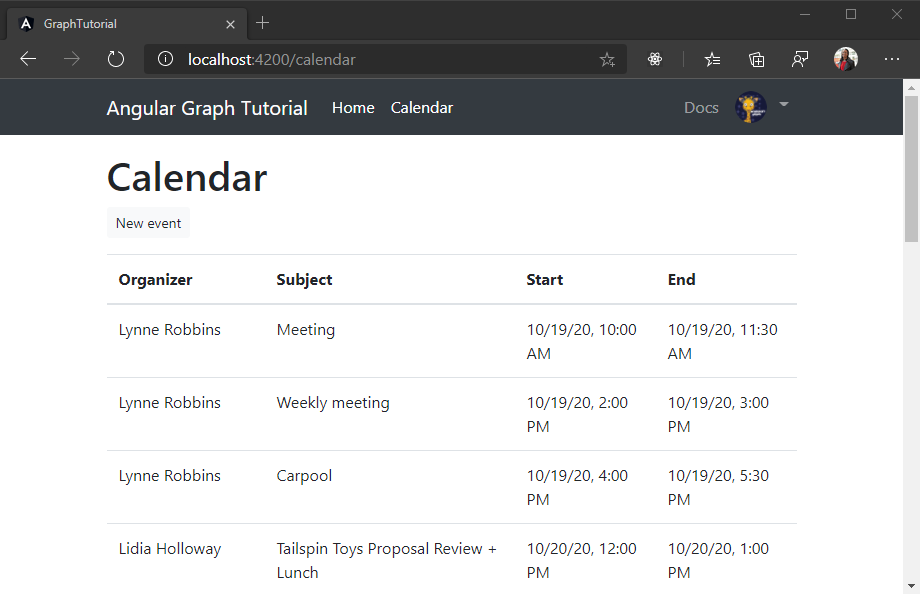
<h1>Calendar</h1>
<a class="btn btn-light btn-sm mb-3" routerLink="/newevent">New event</a>
<table class="table">
  <thead>
    <th scope="col">Organizer</th>
    <th scope="col">Subject</th>
    <th scope="col">Start</th>
    <th scope="col">End</th>
  </thead>
  <tbody>
    <tr *ngFor="let event of events">
      <td>{{event.organizer?.emailAddress?.name}}</td>
      <td>{{event.subject}}</td>
      <!-- Use 'UTC' in the pipe to date so Angular will not convert the
            already converted time to local time. See
            https://angular.io/api/common/DatePipe -->
      <td>{{formatDateTimeTimeZone(event.start) | date:'short' : 'UTC' }}</td>
      <td>{{formatDateTimeTimeZone(event.end) | date: 'short' : 'UTC' }}</td>
    </tr>
  </tbody>
</table>
Isso faz um loop pela coleção de eventos e adiciona uma linha de tabela para cada um deles. Salve as alterações e reinicie o aplicativo. Clique no link Calendário e o aplicativo deve renderizar uma tabela de eventos.
Criar um novo evento
Nesta seção, você adicionará a capacidade de criar eventos no calendário do usuário.
Abra ./src/app/graph.service.ts e adicione a seguinte função à
GraphServiceclasse.async addEventToCalendar(newEvent: MicrosoftGraph.Event): Promise<void> { try { // POST /me/events await this.graphClient .api('/me/events') .post(newEvent); } catch (error) { throw Error(JSON.stringify(error, null, 2)); } }
Criar um novo formulário de evento
Crie um Angular para exibir um formulário e chamar essa nova função. Execute o seguinte comando em sua CLI.
ng generate component new-eventDepois que o comando é concluído, adicione
routeso componente à matriz em ./src/app/app-routing.module.ts.import { NewEventComponent } from './new-event/new-event.component'; const routes: Routes = [ { path: '', component: HomeComponent }, { path: 'calendar', component: CalendarComponent }, { path: 'newevent', component: NewEventComponent }, ];Crie um novo arquivo no diretório ./src/app/new-event denominado new-event.ts e adicione o código a seguir.
import * as MicrosoftGraph from '@microsoft/microsoft-graph-types';

// Model for the new event form
export class NewEvent {
  subject?: string;
  attendees?: string;
  start?: string;
  end?: string;
  body?: string;

  // Generate a MicrosoftGraph.Event from the model
  getGraphEvent(timeZone: string): MicrosoftGraph.Event {
    const graphEvent: MicrosoftGraph.Event = {
      subject: this.subject,
      start: {
        dateTime: this.start,
        timeZone: timeZone
      },
      end: {
        dateTime: this.end,
        timeZone: timeZone
      }
    };

    // If there are attendees, convert to array
    // and add them
    if (this.attendees && this.attendees.length > 0) {
      graphEvent.attendees = [];

      const emails = this.attendees.split(';');
      emails.forEach(email => {
        graphEvent.attendees?.push({
          type: 'required',
          emailAddress: {
            address: email
          }
        });
      });
    }

    // If there is a body, add it as plain text
    if (this.body && this.body.length > 0) {
      graphEvent.body = {
        contentType: 'text',
        content: this.body
      };
    }

    return graphEvent;
  }
}
Essa classe servirá como o modelo para o novo formulário de evento.
Abra ./src/app/new-event/new-event.component.ts e substitua seu conteúdo pelo código a seguir.
import { Component, OnInit } from '@angular/core';

import { AuthService } from '../auth.service';
import { GraphService } from '../graph.service';
import { AlertsService } from '../alerts.service';
import { NewEvent } from './new-event';

@Component({
  selector: 'app-new-event',
  templateUrl: './new-event.component.html',
  styleUrls: ['./new-event.component.css']
})
export class NewEventComponent implements OnInit {

  model = new NewEvent();

  constructor(
    private authService: AuthService,
    private graphService: GraphService,
    private alertsService: AlertsService) { }

  ngOnInit(): void {
  }

  onSubmit(): void {
    const timeZone = this.authService.user?.timeZone ?? 'UTC';
    const graphEvent = this.model.getGraphEvent(timeZone);

    this.graphService.addEventToCalendar(graphEvent)
      .then(() => {
        this.alertsService.addSuccess('Event created.');
      }).catch(error => {
        this.alertsService.addError('Error creating event.', error.message);
      });
  }
}
Abra ./src/app/new-event/new-event.component.html e substitua seu conteúdo pelo código a seguir.
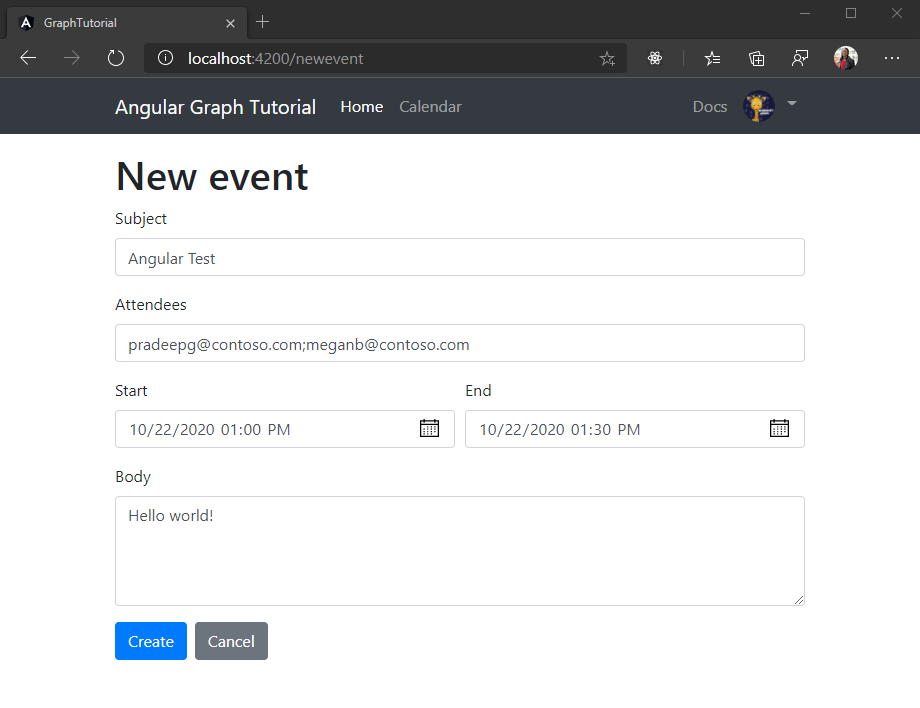
<h1>New event</h1>
<form (ngSubmit)="onSubmit()" #newEventForm="ngForm">
  <div class="form-group">
    <label for="subject">Subject</label>
    <input type="text" class="form-control" id="subject"
           required
           [(ngModel)]="model.subject" name="subject"
           #name="ngModel">
    <div [hidden]="name.valid || name.pristine"
          class="alert alert-danger">Subject is required</div>
  </div>
  <div class="form-group">
    <label for="attendees">Attendees</label>
    <input type="text" class="form-control" id="attendees"
           placeholder="Enter one or more email addresses (separated with a ;) to add attendees"
           [(ngModel)]="model.attendees" name="attendees"
           #name="ngModel">
  </div>
  <div class="form-row">
    <div class="col">
      <div class="form-group">
        <label for="start">Start</label>
        <input type="datetime-local" class="form-control" id="start"
               required
               [(ngModel)]="model.start" name="start"
               #name="ngModel">
        <div [hidden]="name.valid || name.pristine"
             class="alert alert-danger">Start is required</div>
      </div>
    </div>
    <div class="col">
      <div class="form-group">
        <label for="end">End</label>
        <input type="datetime-local" class="form-control" id="end"
               required
               [(ngModel)]="model.end" name="end"
               #name="ngModel">
        <div [hidden]="name.valid || name.pristine"
             class="alert alert-danger">End is required</div>
      </div>
    </div>
  </div>
  <div class="form-group">
    <label for="body">Body</label>
    <textarea class="form-control" id="body" rows="4"
              [(ngModel)]="model.body" name="body"
              #name="ngModel"></textarea>
  </div>
  <button type="submit" class="btn btn-primary mr-2"
          [disabled]="!newEventForm.form.valid">Create</button>
  <a class="btn btn-secondary" routerLink="/calendar">Cancel</a>
</form>
Salve as alterações e atualize o aplicativo. Selecione o botão Novo evento na página de calendário e use o formulário para criar um evento no calendário do usuário.
Parabéns!
Você concluiu o tutorial Angular microsoft Graph. Agora que você tem um aplicativo de trabalho que chama a Microsoft Graph, você pode experimentar e adicionar novos recursos. Visite a visão geral do microsoft Graph para ver todos os dados que você pode acessar com o Microsoft Graph.
Comentários
Forneça qualquer comentário sobre este tutorial no repositório GitHub.
Tem algum problema com essa seção? Se tiver, envie seus comentários para que possamos melhorar esta seção.