Notificações locais em Xamarin.Forms
 Baixar o exemplo
As notificações locais são alertas enviados por aplicativos instalados em um dispositivo móvel. As notificações locais geralmente são usadas para recursos como:
- Eventos do calendário
- Lembretes
- Gatilhos baseados em localização
Cada plataforma lida com a criação, a exibição e o consumo de notificações locais de maneira diferente. Este artigo explica como criar uma abstração multiplataforma para enviar, agendar e receber notificações locais com Xamarin.Forms.

Criar uma interface multiplataforma
O Xamarin.Forms aplicativo deve criar e consumir notificações sem se preocupar com as implementações de plataforma subjacentes. A interface a seguir INotificationManager é implementada na biblioteca de códigos compartilhados e define uma API multiplataforma que o aplicativo pode usar para interagir com as notificações:
public interface INotificationManager
{
    event EventHandler NotificationReceived;
    void Initialize();
    void SendNotification(string title, string message, DateTime? notifyTime = null);
    void ReceiveNotification(string title, string message);
}
Essa interface será implementada em cada projeto de plataforma. O NotificationReceived evento permite que o aplicativo manipule as notificações de entrada. O Initialize método deve executar qualquer lógica de plataforma nativa necessária para preparar o sistema de notificação. O SendNotification método deve enviar uma notificação, em um opcional DateTime. O ReceiveNotification método deve ser chamado pela plataforma subjacente quando uma mensagem é recebida.
Consumir a interface em Xamarin.Forms
Depois que uma interface tiver sido criada, ela poderá ser consumida no projeto compartilhado Xamarin.Forms , mesmo que as implementações de plataforma ainda não tenham sido criadas. O aplicativo de exemplo contém um ContentPage chamado MainPage.xaml com o seguinte conteúdo:
<StackLayout Margin="0,35,0,0"
             x:Name="stackLayout">
    <Label Text="Click the button below to create a local notification."
           TextColor="Red"
           HorizontalOptions="Center"
           VerticalOptions="Start" />
    <Button Text="Create Notification"
            HorizontalOptions="Center"
            VerticalOptions="Start"
            Clicked="OnSendClick" />
    <Label Text="Click the button below to schedule a local notification for in 10 seconds time."
           TextColor="Red"
           HorizontalOptions="Center"
           VerticalOptions="Start" />
    <Button Text="Create Notification"
            HorizontalOptions="Center"
            VerticalOptions="Start"
            Clicked="OnScheduleClick" />
</StackLayout>
O layout contém elementos que explicam Label instruções e Button elementos que enviam ou agendam uma notificação quando tocados.
O MainPage code-behind de classe manipula o envio e o recebimento de notificações:
public partial class MainPage : ContentPage
{
    INotificationManager notificationManager;
    int notificationNumber = 0;

    public MainPage()
    {
        InitializeComponent();

        notificationManager = DependencyService.Get<INotificationManager>();
        notificationManager.NotificationReceived += (sender, eventArgs) =>
        {
            var evtData = (NotificationEventArgs)eventArgs;
            ShowNotification(evtData.Title, evtData.Message);
        };
    }

    void OnSendClick(object sender, EventArgs e)
    {
        notificationNumber++;
        string title = $"Local Notification #{notificationNumber}";
        string message = $"You have now received {notificationNumber} notifications!";
        notificationManager.SendNotification(title, message);
    }

    void OnScheduleClick(object sender, EventArgs e)
    {
        notificationNumber++;
        string title = $"Local Notification #{notificationNumber}";
        string message = $"You have now received {notificationNumber} notifications!";
        notificationManager.SendNotification(title, message, DateTime.Now.AddSeconds(10));
    }

    void ShowNotification(string title, string message)
    {
        Device.BeginInvokeOnMainThread(() =>
        {
            var msg = new Label()
            {
                Text = $"Notification Received:\nTitle: {title}\nMessage: {message}"
            };
            stackLayout.Children.Add(msg);
        });
    }
}
O MainPage construtor de classe usa o Xamarin.FormsDependencyService para recuperar uma instância específica da plataforma do INotificationManager. Os OnSendClick métodos e OnScheduleClicked usam a INotificationManager instância para enviar e agendar novas notificações. O ShowNotification método é chamado do manipulador de eventos anexado ao NotificationReceived evento e inserirá um novo Label na página quando o evento for invocado.
O NotificationReceived manipulador de eventos converte seus argumentos de evento em NotificationEventArgs. Esse tipo é definido no projeto compartilhado Xamarin.Forms :
public class NotificationEventArgs : EventArgs
{
    public string Title { get; set; }
    public string Message { get; set; }
}
Para obter mais informações sobre o Xamarin.FormsDependencyService, consulte Xamarin.Forms DependencyService.
Criar a implementação da interface do Android
Para que o Xamarin.Forms aplicativo envie e receba notificações no Android, o aplicativo deve fornecer uma implementação da INotificationManager interface .
Criar a classe AndroidNotificationManager
A AndroidNotificationManager classe implementa a INotificationManager interface :
using System;
using Android.App;
using Android.Content;
using Android.Graphics;
using Android.OS;
using AndroidX.Core.App;
using Xamarin.Forms;
using AndroidApp = Android.App.Application;

[assembly: Dependency(typeof(LocalNotifications.Droid.AndroidNotificationManager))]
namespace LocalNotifications.Droid
{
    public class AndroidNotificationManager : INotificationManager
    {
        const string channelId = "default";
        const string channelName = "Default";
        const string channelDescription = "The default channel for notifications.";

        public const string TitleKey = "title";
        public const string MessageKey = "message";

        bool channelInitialized = false;
        int messageId = 0;
        int pendingIntentId = 0;

        NotificationManager manager;

        public event EventHandler NotificationReceived;

        public static AndroidNotificationManager Instance { get; private set; }

        public AndroidNotificationManager() => Initialize();

        public void Initialize()
        {
            if (Instance == null)
            {
                CreateNotificationChannel();
                Instance = this;
            }
        }

        public void SendNotification(string title, string message, DateTime? notifyTime = null)
        {
            if (!channelInitialized)
            {
                CreateNotificationChannel();
            }

            if (notifyTime != null)
            {
                Intent intent = new Intent(AndroidApp.Context, typeof(AlarmHandler));
                intent.PutExtra(TitleKey, title);
                intent.PutExtra(MessageKey, message);

                PendingIntent pendingIntent = PendingIntent.GetBroadcast(AndroidApp.Context, pendingIntentId++, intent, PendingIntentFlags.CancelCurrent);
                long triggerTime = GetNotifyTime(notifyTime.Value);
                AlarmManager alarmManager = AndroidApp.Context.GetSystemService(Context.AlarmService) as AlarmManager;
                alarmManager.Set(AlarmType.RtcWakeup, triggerTime, pendingIntent);
            }
            else
            {
                Show(title, message);
            }
        }

        public void ReceiveNotification(string title, string message)
        {
            var args = new NotificationEventArgs()
            {
                Title = title,
                Message = message,
            };
            NotificationReceived?.Invoke(null, args);
        }

        public void Show(string title, string message)
        {
            Intent intent = new Intent(AndroidApp.Context, typeof(MainActivity));
            intent.PutExtra(TitleKey, title);
            intent.PutExtra(MessageKey, message);

            PendingIntent pendingIntent = PendingIntent.GetActivity(AndroidApp.Context, pendingIntentId++, intent, PendingIntentFlags.UpdateCurrent);

            NotificationCompat.Builder builder = new NotificationCompat.Builder(AndroidApp.Context, channelId)
                .SetContentIntent(pendingIntent)
                .SetContentTitle(title)
                .SetContentText(message)
                .SetLargeIcon(BitmapFactory.DecodeResource(AndroidApp.Context.Resources, Resource.Drawable.xamagonBlue))
                .SetSmallIcon(Resource.Drawable.xamagonBlue)
                .SetDefaults((int)NotificationDefaults.Sound | (int)NotificationDefaults.Vibrate);

            Notification notification = builder.Build();
            manager.Notify(messageId++, notification);
        }

        void CreateNotificationChannel()
        {
            manager = (NotificationManager)AndroidApp.Context.GetSystemService(AndroidApp.NotificationService);

            if (Build.VERSION.SdkInt >= BuildVersionCodes.O)
            {
                var channelNameJava = new Java.Lang.String(channelName);
                var channel = new NotificationChannel(channelId, channelNameJava, NotificationImportance.Default)
                {
                    Description = channelDescription
                };
                manager.CreateNotificationChannel(channel);
            }

            channelInitialized = true;
        }

        long GetNotifyTime(DateTime notifyTime)
        {
            DateTime utcTime = TimeZoneInfo.ConvertTimeToUtc(notifyTime);
            double epochDiff = (new DateTime(1970, 1, 1) - DateTime.MinValue).TotalSeconds;
            long utcAlarmTime = utcTime.AddSeconds(-epochDiff).Ticks / 10000;
            return utcAlarmTime; // milliseconds
        }
    }
}
O assembly atributo acima do namespace registra a implementação da INotificationManager interface com o DependencyService.
O Android permite que os aplicativos definam vários canais para notificações. O Initialize método cria um canal básico que o aplicativo de exemplo usa para enviar notificações. O SendNotification método define a lógica específica da plataforma necessária para criar e enviar uma notificação. O ReceiveNotification método é chamado pelo sistema operacional Android quando uma mensagem é recebida e invoca o manipulador de eventos.
O SendNotification método cria uma notificação local imediatamente ou em um exato DateTime. Uma notificação pode ser agendada para um exato DateTime usando a AlarmManager classe e a notificação será recebida por um objeto que deriva da BroadcastReceiver classe :
[BroadcastReceiver(Enabled = true, Label = "Local Notifications Broadcast Receiver")]
public class AlarmHandler : BroadcastReceiver
{
    public override void OnReceive(Context context, Intent intent)
    {
        if (intent?.Extras != null)
        {
            string title = intent.GetStringExtra(AndroidNotificationManager.TitleKey);
            string message = intent.GetStringExtra(AndroidNotificationManager.MessageKey);

            AndroidNotificationManager manager = AndroidNotificationManager.Instance ?? new AndroidNotificationManager();
            manager.Show(title, message);
        }
    }
}
Importante
Por padrão, as notificações agendadas usando a AlarmManager classe não sobreviverão à reinicialização do dispositivo. No entanto, você pode projetar seu aplicativo para reagendar automaticamente as notificações se o dispositivo for reiniciado. Para obter mais informações, inicie um alarme quando o dispositivo for reiniciado em Agendar alarmes repetidos no developer.android.com e o exemplo. Para obter informações sobre o processamento em segundo plano no Android, consulte Guia para processamento em segundo plano em developer.android.com.
Para obter mais informações sobre receptores de difusão, consulte Receptores de difusão no Xamarin.Android.
Manipular notificações de entrada no Android
A MainActivity classe deve detectar notificações de entrada e notificar a AndroidNotificationManager instância. O Activity atributo na MainActivity classe deve especificar um LaunchMode valor de LaunchMode.SingleTop:
[Activity(
        //...
        LaunchMode = LaunchMode.SingleTop]
    public class MainActivity : global::Xamarin.Forms.Platform.Android.FormsAppCompatActivity
    {
        // ...
    }
O SingleTop modo impede que várias instâncias de um Activity sejam iniciadas enquanto o aplicativo está em primeiro plano. Isso LaunchMode pode não ser apropriado para aplicativos que iniciam várias atividades em cenários de notificação mais complexos. Para obter mais informações sobre LaunchMode valores de enumeração, consulte Android Activity LaunchMode.
MainActivity Na classe é modificada para receber notificações de entrada:
protected override void OnCreate(Bundle savedInstanceState)
{
    // ...

    global::Xamarin.Forms.Forms.Init(this, savedInstanceState);
    LoadApplication(new App());
    CreateNotificationFromIntent(Intent);
}

protected override void OnNewIntent(Intent intent)
{
    CreateNotificationFromIntent(intent);
}

void CreateNotificationFromIntent(Intent intent)
{
    if (intent?.Extras != null)
    {
        string title = intent.GetStringExtra(AndroidNotificationManager.TitleKey);
        string message = intent.GetStringExtra(AndroidNotificationManager.MessageKey);
        DependencyService.Get<INotificationManager>().ReceiveNotification(title, message);
    }
}
O CreateNotificationFromIntent método extrai dados de notificação do intent argumento e fornece-os para o AndroidNotificationManager usando o ReceiveNotification método . O CreateNotificationFromIntent método é chamado do OnCreate método e do OnNewIntent método :
- Quando o aplicativo for iniciado por dados de notificação, os
Intentdados serão passados para oOnCreatemétodo . - Se o aplicativo já estiver em primeiro plano, os
Intentdados serão passados para oOnNewIntentmétodo .
O Android oferece muitas opções avançadas para notificações. Para obter mais informações, consulte Notificações no Xamarin.Android.
Criar a implementação da interface do iOS
Para que o Xamarin.Forms aplicativo envie e receba notificações no iOS, o aplicativo deve fornecer uma implementação do INotificationManager.
Criar a classe iOSNotificationManager
A iOSNotificationManager classe implementa a INotificationManager interface :
using System;
using Foundation;
using UserNotifications;
using Xamarin.Forms;

[assembly: Dependency(typeof(LocalNotifications.iOS.iOSNotificationManager))]
namespace LocalNotifications.iOS
{
    public class iOSNotificationManager : INotificationManager
    {
        int messageId = 0;
        bool hasNotificationsPermission;
        public event EventHandler NotificationReceived;

        public void Initialize()
        {
            // request the permission to use local notifications
            UNUserNotificationCenter.Current.RequestAuthorization(UNAuthorizationOptions.Alert, (approved, err) =>
            {
                hasNotificationsPermission = approved;
            });
        }

        public void SendNotification(string title, string message, DateTime? notifyTime = null)
        {
            // EARLY OUT: app doesn't have permissions
            if (!hasNotificationsPermission)
            {
                return;
            }

            messageId++;

            var content = new UNMutableNotificationContent()
            {
                Title = title,
                Subtitle = "",
                Body = message,
                Badge = 1
            };

            UNNotificationTrigger trigger;
            if (notifyTime != null)
            {
                // Create a calendar-based trigger.
                trigger = UNCalendarNotificationTrigger.CreateTrigger(GetNSDateComponents(notifyTime.Value), false);
            }
            else
            {
                // Create a time-based trigger, interval is in seconds and must be greater than 0.
                trigger = UNTimeIntervalNotificationTrigger.CreateTrigger(0.25, false);
            }

            var request = UNNotificationRequest.FromIdentifier(messageId.ToString(), content, trigger);
            UNUserNotificationCenter.Current.AddNotificationRequest(request, (err) =>
            {
                if (err != null)
                {
                    throw new Exception($"Failed to schedule notification: {err}");
                }
            });
        }

        public void ReceiveNotification(string title, string message)
        {
            var args = new NotificationEventArgs()
            {
                Title = title,
                Message = message
            };
            NotificationReceived?.Invoke(null, args);
        }

        NSDateComponents GetNSDateComponents(DateTime dateTime)
        {
            return new NSDateComponents
            {
                Month = dateTime.Month,
                Day = dateTime.Day,
                Year = dateTime.Year,
                Hour = dateTime.Hour,
                Minute = dateTime.Minute,
                Second = dateTime.Second
            };
        }
    }
}
O assembly atributo acima do namespace registra a implementação da INotificationManager interface com o DependencyService.
No iOS, você deve solicitar permissão para usar notificações antes de tentar agendar uma notificação. O Initialize método solicita autorização para usar notificações locais. O SendNotification método define a lógica necessária para criar e enviar uma notificação. O ReceiveNotification método será chamado pelo iOS quando uma mensagem for recebida e invocará o manipulador de eventos.
Observação
O SendNotification método cria uma notificação local imediatamente, usando um UNTimeIntervalNotificationTrigger objeto ou exatamente DateTime usando um UNCalendarNotificationTrigger objeto .
Manipular notificações de entrada no iOS
No iOS, você deve criar um delegado que subclasse UNUserNotificationCenterDelegate para lidar com mensagens de entrada. O aplicativo de exemplo define uma iOSNotificationReceiver classe:
public class iOSNotificationReceiver : UNUserNotificationCenterDelegate
{
    public override void WillPresentNotification(UNUserNotificationCenter center, UNNotification notification, Action<UNNotificationPresentationOptions> completionHandler)
    {
        ProcessNotification(notification);
        completionHandler(UNNotificationPresentationOptions.Alert);
    }

    void ProcessNotification(UNNotification notification)
    {
        string title = notification.Request.Content.Title;
        string message = notification.Request.Content.Body;

        DependencyService.Get<INotificationManager>().ReceiveNotification(title, message);
    }
}
Essa classe usa o DependencyService para obter uma instância da iOSNotificationManager classe e fornece dados de notificação de entrada para o ReceiveNotification método .
A AppDelegate classe deve especificar um iOSNotificationReceiver objeto como o delegado durante a UNUserNotificationCenter inicialização do aplicativo. Isso ocorre no FinishedLaunching método :
public override bool FinishedLaunching(UIApplication app, NSDictionary options)
{
    global::Xamarin.Forms.Forms.Init();

    UNUserNotificationCenter.Current.Delegate = new iOSNotificationReceiver();

    LoadApplication(new App());
    return base.FinishedLaunching(app, options);
}
O iOS oferece muitas opções avançadas para notificações. Para obter mais informações, consulte Notificações no Xamarin.iOS.
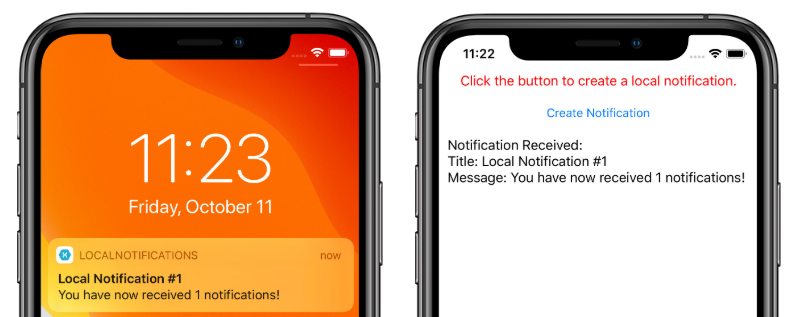
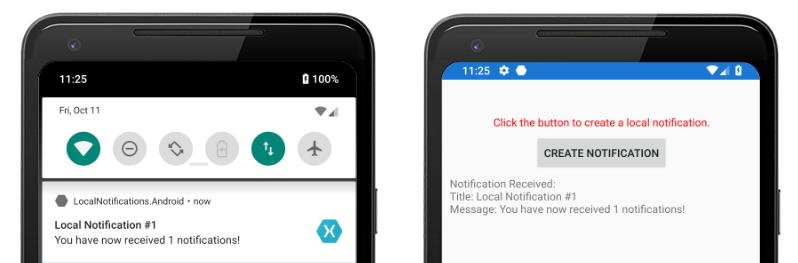
Testar o aplicativo
Depois que os projetos de plataforma contiverem uma implementação registrada da INotificationManager interface, o aplicativo poderá ser testado em ambas as plataformas. Execute o aplicativo e clique em um dos botões Criar Notificação para criar uma notificação.
No Android, as notificações serão exibidas na área de notificação. Quando a notificação é tocada, o aplicativo recebe a notificação e exibe uma mensagem:
No iOS, as notificações de entrada são recebidas automaticamente pelo aplicativo sem a necessidade de entrada do usuário. O aplicativo recebe a notificação e exibe uma mensagem: