Nota
O acesso a esta página requer autorização. Pode tentar iniciar sessão ou alterar os diretórios.
O acesso a esta página requer autorização. Pode tentar alterar os diretórios.
This tutorial describes how to cable, connect, and turn on your Azure Data Box.
Neste tutorial, você aprenderá a:
- Cable your Data Box
- Connect to your Data Box
Pré-requisitos
Antes de começar, certifique-se de que:
- Fez o pedido para o Azure Data Box.
- Para obter uma ordem de importação, consulte Tutorial: Solicitar o Azure Data Box.
- For an export order, see Tutorial: Order Azure Data Box
- You have received your Data Box and the order status in the portal is Delivered.
- There is a shipping label in the clear pouch affixed to the device under the current label. Keep this label safe as you will use it for return shipment.
- Some regions in Europe may receive the device packaged in a box. Ensure that you unpack the device and save the box for return shipment.
- You have reviewed the Data Box safety guidelines.
- You have received one grounded power cord to use with your 120 TB or 525 TB storage device.
- Tem um computador host que contém os dados que pretende copiar para a Data Box. Your host computer must
- Executar um sistema operativo suportado.
- Estar ligado a uma rede de alta velocidade. Recomendamos que você tenha pelo menos uma conexão de 100 GbE. If a 100-GbE connection isn't available, you can use a 10-GbE or 1-GbE data link, though copy speeds are impacted.
- É necessário ter acesso a uma superfície plana onde possa colocar o Data Box. Se pretende colocar o dispositivo numa prateleira de rack padrão, precisará de um bloco de 7U no rack do datacenter. Pode colocar o dispositivo na horizontal ou na vertical na prateleira.
- You have the following cables to connect your Data Box to the host computer. These cables are recommended, however, the next generation devices will work with 10G cables too.
- 2 x 10G-BaseT RJ-45 cabos (CAT-5e ou CAT6)
- 2 x 100-GbE QSFP28 passive direct attached cable (use with DATA 1, DATA 2 network interfaces)
Important
Data Box Next Gen 120TB e 525TB dispositivos usam cabos QSFP28. Os cabos SFP+/SFP28 usados com os dispositivos originais de 80TB não podem ser inseridos diretamente em dispositivos Data Box Next Gen sem um adaptador apropriado.


Cable your device
Perform the following steps to cable your device.
Inspect the device for any evidence of tampering, or any other obvious damage. If the device is tampered or severely damaged, do not proceed. Contact Microsoft Support immediately to help you assess whether the device is in good working order and if they need to ship you a replacement.
Transport the device to the location where you wish to power it on. Place the device on a flat surface. The device can also be placed on a standard rack shelf.
Connect the power and network cables. The backplane of a connected device for a common configuration is shown below. Depending on your environment, you could choose from other cabling options.
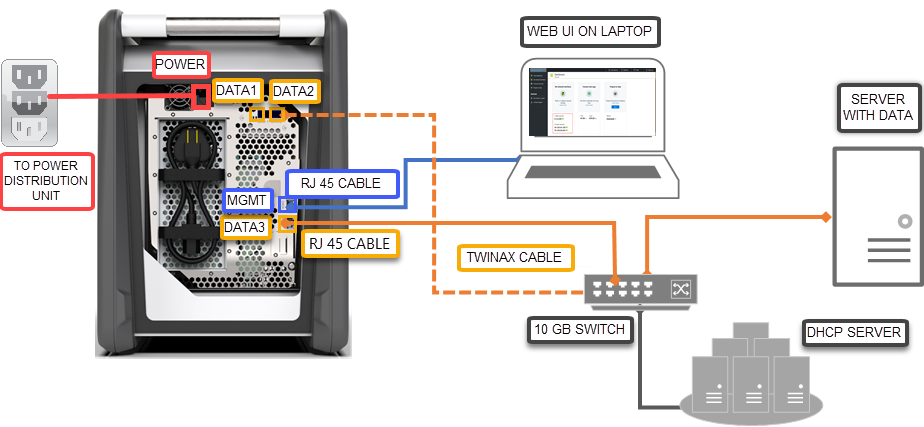
- Connect the power cable to the labeled power input location. The other end of the power cable should be connected to a power distribution unit.
- Use the RJ-45 CAT 6 cable to connect the MGMT port on one end and a laptop on the other end.
- Use the RJ-45 CAT 6A cable to connect to DATA 3 port on one end. DATA 3 is configured as 100 GbE if you connect via RJ-45 CAT 6A cable and as 10/1 GbE if you connect via RJ-45 CAT 6 cable.
- Depending on the network interfaces you want to connect for data transfer, use up to two 100-GbE QSFP28 cables to connect the DATA 1 and DATA 2 ports respectively.
- The other ends of the cables from the data ports are connected to the host computer via a 100-GbE switch.
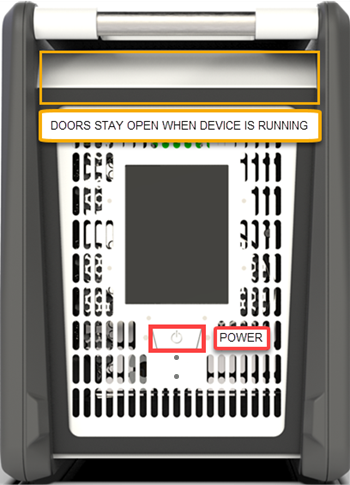
Locate the power button on the front operating panel of the device. Ligue o dispositivo.
- Fez o pedido para o Azure Data Box.
- Para obter uma ordem de importação, consulte Tutorial: Solicitar o Azure Data Box.
- For an export order, see Tutorial: Order Azure Data Box
- You have received your Data Box and the order status in the portal is Delivered.
- There is a shipping label in the clear pouch affixed to the device under the current label. Keep this label safe as you will use it for return shipment.
- Some regions in Europe may receive the device packaged in a box. Ensure that you unpack the device and save the box for return shipment.
- You have reviewed the Data Box safety guidelines.
- You have received one grounded power cord to use with your 100-TB storage device.
- You have a host computer that is used to copy data (import order) to or copy data from (export order) your Data Box. Your host computer must
- Executar um sistema operativo suportado.
- Estar ligado a uma rede de alta velocidade. Recomendamos vivamente que tenha, pelo menos, uma ligação de 10 GbE. Se uma conexão de 10 GbE não estiver disponível, um link de dados de 1 GbE poderá ser usado, mas as velocidades de cópia serão afetadas.
- É necessário ter acesso a uma superfície plana onde possa colocar o Data Box. Se pretende colocar o dispositivo numa prateleira de rack padrão, precisará de um bloco de 7U no rack do datacenter. Pode colocar o dispositivo na horizontal ou na vertical na prateleira.
- You have procured the following cables to connect your Data Box to the host computer.
- One or more 10-GbE SFP+ Twinax copper or SFP+ fiber optic cables (use with DATA 1, DATA 2 network interfaces). Data Box has the Mellanox ConnectX®-3 Pro EN Dual-Port 10GBASE-T Adapters w/ PCI Express 3.0 network interface, so cables that are compatible with this interface should work. For example, a CISCO SFP-H10GB-CU3M 10GBASE-CU TWINAX SFP +3M cable was used for in-house testing. For more information, see the list of supported cables and switches from Mellanox.
- One RJ-45 CAT 6 network cable (use with MGMT network interface)
- Um cabo de rede RJ-45 CAT 6A OU um cabo de rede RJ-45 CAT 6 (use com interface de rede DATA 3 configurada como 10 Gbps ou 1 Gbps, respectivamente)
Cable your device
Perform the following steps to cable your device.
Inspect the device for any evidence of tampering, or any other obvious damage. If the device is tampered or severely damaged, do not proceed. Contact Microsoft Support immediately to help you assess whether the device is in good working order and if they need to ship you a replacement.
Transport the device to the location where you wish to power it on. Place the device on a flat surface. The device can also be placed on a standard rack shelf.
Connect the power and network cables. The backplane of a connected device for a common configuration is shown below. Depending on your environment, you could choose from other cabling options.
- Connect the power cable to the labeled power input location. The other end of the power cable should be connected to a power distribution unit.
- Use the RJ-45 CAT 6 cable to connect the MGMT port on one end and a laptop on the other end.
- Use the RJ-45 CAT 6A cable to connect to DATA 3 port on one end. DATA 3 is configured as 10 GbE if you connect via RJ-45 CAT 6A cable and as 1 GbE if you connect via RJ-45 CAT 6 cable.
- Depending on the network interfaces you want to connect for data transfer, use up to two 10-GbE SFP+ Twinax copper or SFP+ fiber optic cables to connect the DATA 1 and DATA 2 ports respectively.
- The other ends of the cables from the data ports are connected to the host computer via a 10-GbE switch.
Locate the power button on the front operating panel of the device. Ligue o dispositivo.
Connect to your device
After following the steps to download and import certificate, perform the following steps to set up your device using the local web UI and the portal UI. The certificate downloaded from the Azure portal is used for connecting to the Web UI and Azure Blob storage REST APIs.
Configure the Ethernet adapter on the laptop you are using to connect to the device with a static IP address of 192.168.100.5 and subnet 255.255.255.0.
Connect to MGMT port of your device and access its local web UI at https://192.168.100.10. This may take up to 5 minutes after you turned on the device.
You see a Sign in page for the local web UI. Ensure that the device serial number matches across both the portal UI and the local web UI. The device is locked at this point.
-
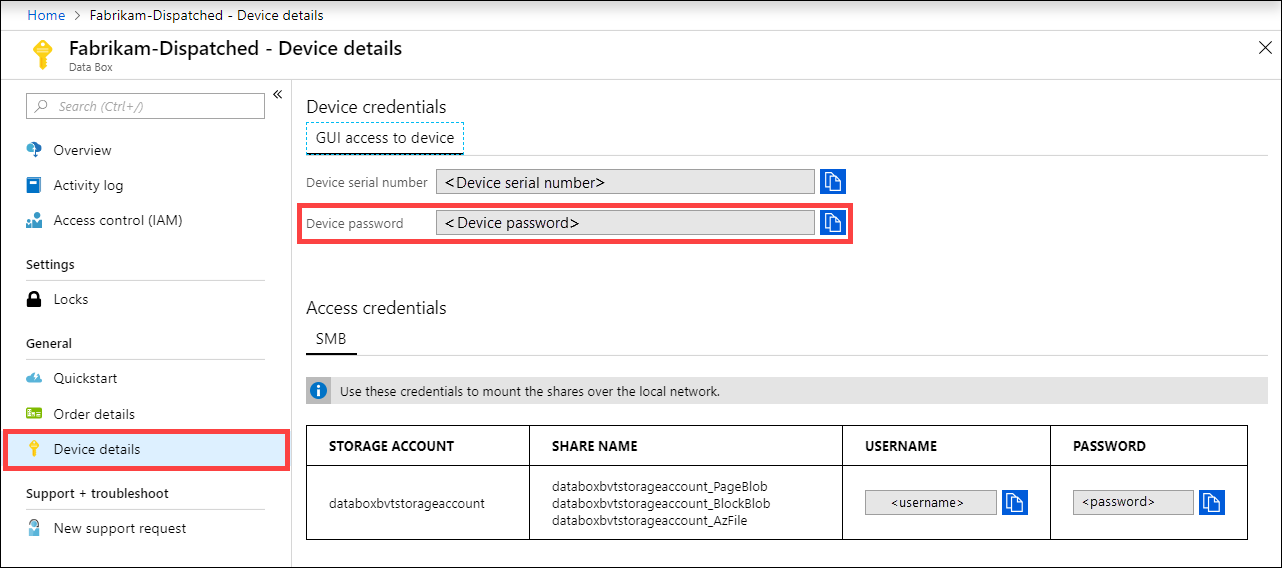
Para obter a palavra-passe do dispositivo, inicie sessão no portal do Azure e abra a sua encomenda. Vá para Detalhes gerais > do dispositivo. Copie a Palavra-passe do dispositivo.
Provide the device password that you got from the Azure portal in the previous step to sign into the local web UI of the device. Click Sign in.
On the Dashboard, ensure that the network interfaces are configured.
Se o DHCP estiver habilitado em seu ambiente, as interfaces de rede serão configuradas automaticamente.
If DHCP is not enabled, go to Set network interfaces, and assign static IPs if needed.
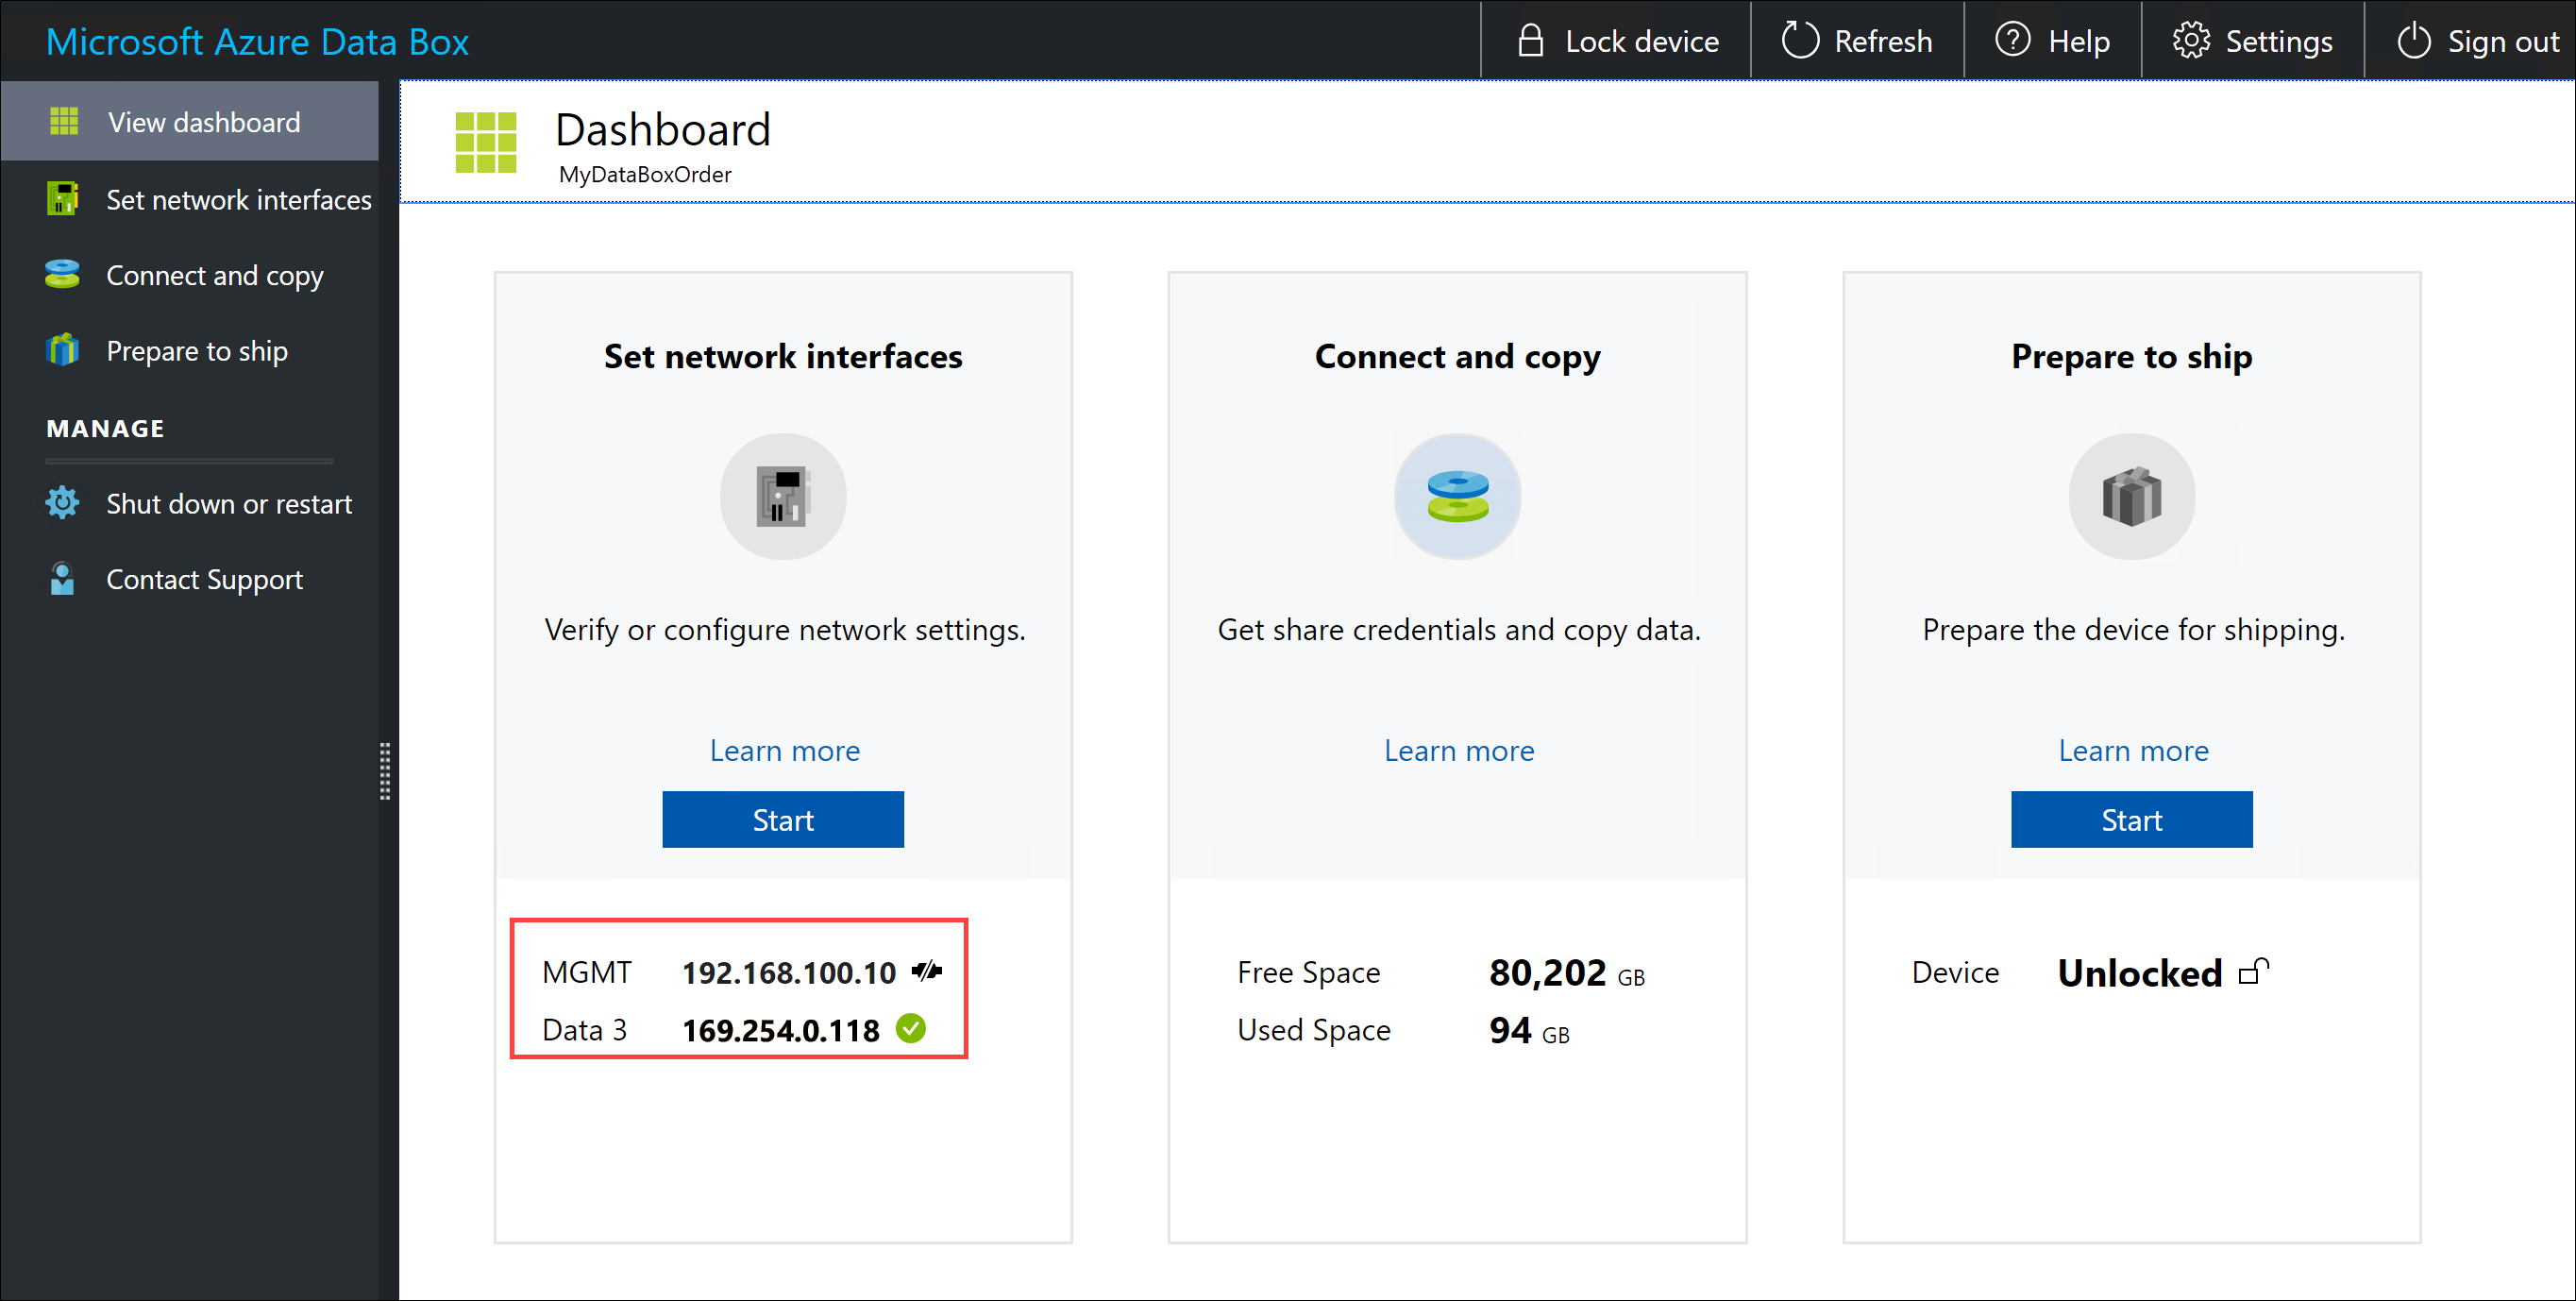
Once the data network interfaces are configured, you can also use the IP address of any of the DATA 1 - DATA 3 interfaces to access the local web UI at https://<IP address of a data network interface>.
After the device setup is complete, you can connect to the device shares and copy the data.
Próximos passos
Neste tutorial, ficou a conhecer tópicos do Azure Data Box, como:
- Cable your Data Box
- Connect to your Data Box
Advance to the next tutorial to learn how to copy data.
Or