Hosting a TFS Build Controller on Windows Azure and connecting to Visual Studio Online
The Visual Studio Online Hosted Build Controller will serve you well for 90% of scenarios, but there are occasions when you’ll want to use your own Build Controller. Examples include complex build scenarios such as SharePoint or BizTalk, or where you have a large development team (or lots of smaller ones on the same Team Project Collection (TPC)). Whilst you can set up your own build server on premises, if you want to stay in the cloud, then the best answer is to create a Windows Azure VM and run your Build Controller from there.
It’s pretty simple to set this up too, especially if you have an MSDN Subscription.
Creating The VM
First of all, navigate to the Windows Azure Portal and select the ‘Virtual Machines’ tab. From there click ‘New’
You will then be presented with a choice of ‘Quick Create’ or ‘From Gallery’. Choose ‘From Gallery. (You could also choose ‘Quick Create’ and then upload your own VHD if you already have a build server definition of your own).
If you have an MSDN Subscription then filter the displayed images by ‘MSDN’ and select ‘Visual Studio Ultimate 2013’. If you don’t then choose ‘Windows Server’. Note that if you go for the ‘Windows Server’ option then you will need to install Visual Studio and all of the pre and post-requisites yourself.
Click through the rest of the wizard to start the provisioning process.
The reason I like to use the Visual Studio image is because it has pre-installed Visual Studio Ultimate 2013, SharePoint 2013 Trial, SQL Server 2012 Developer edition, Windows Azure SDK for .NET 2.2 as well as configuration scripts to quickly create a development environment for Web, SQL and SharePoint 2013 development. These are the products I find I most need when setting up a build environment.
Once your VM is provisioned, select it and click ‘Connect’ to start a Remote Desktop session.
Setting up Visual Studio and Team Foundation Server
Once you are connected to your VM there are few things you'll need to do.
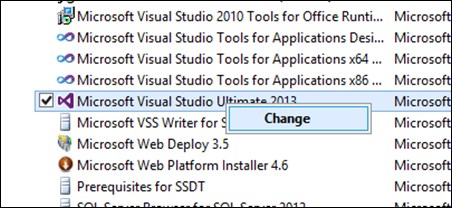
If you are wanting to build Windows Store or Windows 8 apps then you’ll need to change the installed configuration of Visual Studio. So go to ‘Programs and Features’, right-click on ‘Visual Studio 2013’ and click ‘Change’
From the Visual Studio 2013 dialog select ‘Modify’
Make sure that ‘Tools for Maintaining Store Apps for Windows 8’ and ‘Windows Phone 8.0 SDK’ are selected. Then click ‘Update’.
After you’ve done this you’ll need to install Team Foundation Server. The easiest way of doing this is to download the ISO directly from MSDN Subscriber Downloads or Volume License Downloads, if you have the product on DVD then your best option is to upload the ISO to Windows Azure Blob Storage and then download to your VM.
N.B. To allow installation of the MSDN Download Manager, go to Internet Settings, select the ‘Security’ tab, ensure that ‘Trusted Sites’ is selected, click ‘Sites’ and add ‘<https://msdn.microsoft.com’> to the list of trusted sites.
Once you have the ISO, mount it and run the setup, accept the license and click ‘Install Now’
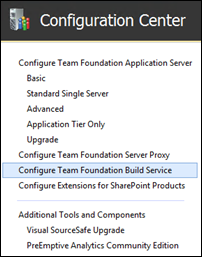
When the install has completed and Configuration Center has launched, select the ‘Configure Team Foundation Build Service’ wizard and click ‘Start Wizard’
Optionally participate in the TFS improvement program and click Next.
On the ‘Select a Team Project Collection’ wizard page, click ‘Browse’, then ‘Servers…’, the ‘Add…’
Enter the name of your Visual Studio Online TPC and click OK
At this point you will be asked to sign in using a Microsoft Account. In my experience the best thing to do here is to have a separate Microsoft Account that you can use for your build service. Either way, sign in and select the ‘DefaultCollection’ from the Team Project Collection dialog.
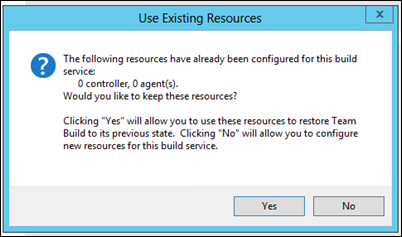
If you have existing Build Controllers set up you will be presented with a dialog asking you to ‘Use Existing Resources’, select ‘No’ and continue to the next step.
The next wizard page will ask you how many agents you want to run. It will recommend 4, this is because the default VM size for the Gallery image we used is ‘Large’ (with 4 CPUs), if you don’t intent to use this VM size then select the number of build agents to match the number of CPUs you will eventually have running and click next.
The next wizard page asks you which user to run the Build Service as, choose either an existing local user or the ‘NT AUTHORITY\LOCAL SERVICE’ account. Before you continue to the next page, expand the ‘Advanced Configuration’ section and click ‘Test’ to check that you are connected to the Visual Studio Online Account Service.
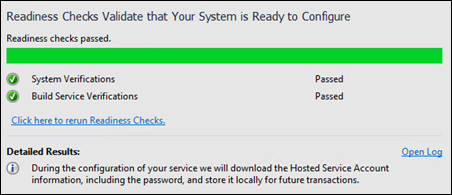
If this is successful, click next to review your configuration and if you are happy click ‘Verify’.
If successful, click ‘Configure’
And you are done!
Configuring Build Definition to use new Build Controller
Start Visual Studio and ensure you are connected to your Visual Studio Online project.
From Team Explorer, select the ‘Builds’ page.
Right click on the build you want to change and select ‘Edit Build Definition’
Select the ‘Build Defaults’ tab and from the ‘Build Controller’ drop down, change the selected build controller from ‘Hosted Build Controller’ to your newly defined build controller.
Optionally, select ‘Copy build output to the following Source Control folder…’ so that you are able to easily get access to the drops after your build runs.
And that, as they say, is that.
Written by Simon Middlemiss
del.icio.us Tags: VSO,Visual Studio Online,TFS,Team Foundation Server,Build,Build Controller,Build Agent,Azure,VM
Comments
Anonymous
August 21, 2014
Great article! Just what I needed to get my own build server going!Anonymous
October 21, 2014
Thanks for the great article. I have finished all steps, the new controller could be found, but after I queue a new build, it just hangs at start and never ends. There was no log at all. Do I need to add the 9191 endpoint for the Azure VM so that visual studio online can communicate with the controller? I have tried added the 9191 port, but the issue is still the same. Thanks.Anonymous
October 08, 2015
I had difficulty going past the 'Hosted Team Foundation Server Service Account'. Finally figured out that the user user to authenticate to visual studio online should be part of Build Administrators group and the Service Account was named 'Elastic Build' for me.


