Getting Started with the SQL Server “Denali” CTP3 Image
Head on over and download the VHD from here. The VHD is quite large but has all the pieces you need to quick start your CTP3 experience (what, you mean you haven’t done this already?).
Once you’ve downloaded all the files, you’ll need to UNRAR the files to extract the Hyper-V image. Use your favorite RAR program to accomplish this. You should be left with the following file structure.
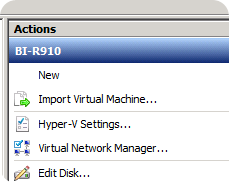
Launch Hyper-V manager and let’s bring this image in. If you have not already done so, you’ll need to create an Internal network in Hyper-V Manager. Under actions click on Virtual Network Manager…
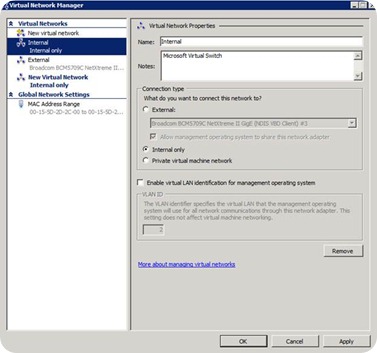
In the Create Virtual Network, select Internal and click Add. You can give your Internal network a name. I keep things simple and call it Internal. Under Connection type, the radio button should be on Internal only. You should have something like this.
Go ahead and click OK. Now import the image like you normally would, by selecting Import Virtual Machine… from Actions, browsing to the location where you extracted the files, and selecting Copy the virtual machine (create a unique ID) import settings. Click Import and it should begin the process. You can dismiss any errors you receive. Once imported, you should now see a new image called SQLServerCodeNameDenaliCTP3. The first thing you want to do is inspect the settings and ensure they meet your hardware requirements. Things to check include:
Memory |
Recommend you run this VHD on hardware with at least 16GB or more of RAM. The current setting is 10240 MB |
Processor |
Ensure you have right number of logical processors and adjust this accordingly. The current setting is 2 |
Network |
Add the Internal network adapter you have (or if you just created it using the steps above). |
Once you’ve modified the settings to reflect the hardware system you have, as well as other images you have running, you can start the image. You’ll need to hit OK to accept the EULA and then login with the following credentials:
Username |
CONTOSO\Administrator |
Password |
pass@word1 |
Let’s ensure the image has the right IP address configured and network card is working. Click on Start (Windows logo) -> Right click on Network and select Properties.
From the Network & Sharing Center click on Change adapter settings and then right click on Local Area Connection -> Properties.
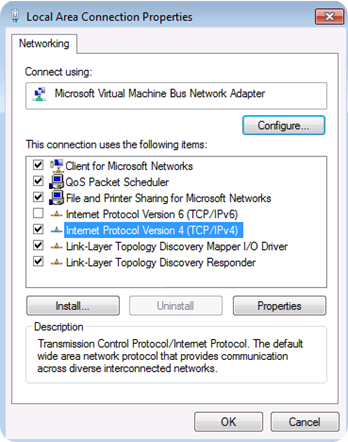
Double click on Internet Protocol Version 4 (TCP/IPv4) to bring up the properties page. Your setting should be similar to the items in the image and outlined below:
IP Address |
192.168.150.1 |
Subnet Mask |
255.255.255.0 |
Default gateway |
<leave blank> |
Preferred DNS server |
192.168.150.1 |
Once you’ve made any necessary changes click OK to exit the properties windows and return back to the desktop. Go ahead and click on the SQL Server – Home shortcut from the Desktop and this will launch IE and take you to the homepage.
For those of you looking to get started with Project Crescent, from this homepage you can click on Reports folder and then either Picnic or Tailspin. These are two demos that are in the image that you can use to learn about Project Crescent, and create your own reports. There is also a sample report for each demo so you can see the end result, but is more fun to create your own.
You can upload your own models as well. The scripts for the demos, as well as the models, data sources, and BIDS developer files are located in the demo folder. There is a shortcut on the Desktop to take you there.
There is a lot in this release and we hope you have a chance to explore the many capabilities that are available. Remember this is a technology preview so your feedback is welcomed. Simply go to https://connect.microsoft.com/sqlserver/feedback and let us know what you think.
Comments
Anonymous
October 18, 2011
Just a note that the download location has changed to www.microsoft.com/.../details.aspx and that they are all RAR files now. Use you favorite UNRAR program to extract.Anonymous
November 17, 2011
Any chance of an RC0 version of this?


