PHP on Windows for Developers
PHP is the ‘P’ in LAMP (Linux, Apache, MySQL, PHP), which might give you the impression that PHP is a *nix technology, but did you know that not only does PHP work on Windows, one could argue that it works better on Windows. There’s a great blog post by Joe Stagner about that here. Note that this isn’t a formal benchmark by any means, but hopefully it will whet your appetite to investigate the performance benefits that your application may achieve when running on Windows.
But the purpose of this post isn’t to spark that debate – it’s to show you how you can use the Web Platform Installer to quickly get PHP up and running on your Windows box so that you can decide for yourself!
Step 1. Use the Web Platform Installer to get PHP
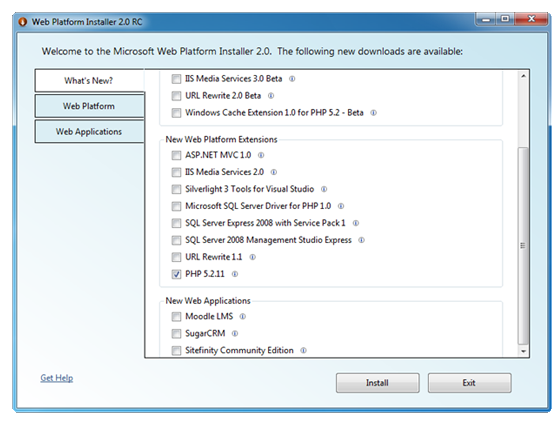
The Web Platform Installer (WPI) can be downloaded and installed from microsoft.com/web. It’s a one stop shop that allows you to install the web platform components, development technologies, tools and applications. Once you’ve downloaded and installed it, launch it and take a look at the ‘What’s New’ tab.
You can see that here:

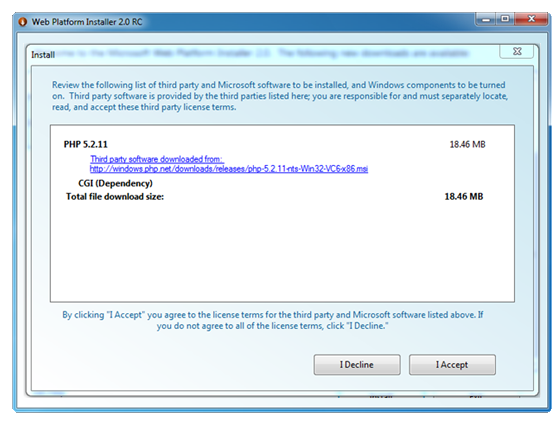
Select PHP from the tab and click ‘Install’. One really nice thing that the WPI gives you is a dependency checker, so not only will it install PHP at this point, it will also check the components that you need to run it, and if they aren’t present, it will add them to your install menu. So, for example, in this case I already had IIS installed on my machine, but I didn’t have the CGI extensions that PHP uses. So the WPI detected this and told me that it would install them. Depending on what you have on your system, you may see different results.
Here’s an example:

Click ‘I Accept’ and the WPI will work its magic. When you’re done, you’ll be good to go with PHP. You’ll see a simple example of using PHP in the next section.
Step 2. Writing a simple PHP page, and running it on IIS.
PHP is a scripting language where the PHP processor works alongside your web browser, and processes tags to provide output. If you’re familiar with ASP – it’s a very similar concept. The nice thing is that the WPI has already not just installed the processor, but it also configured your infrastructure to tell IIS to use the PHP handler when it sees PHP code.
So, let’s write our very first PHP page. It’s pretty simple. Let’s start with very basic HTML code:
You can’t get much simpler than this:
                     <HTML>
                      <HEAD></HEAD>
                      <BODY>
                            <h1>This is my page.</h1>
                      </BODY>
                    </HTML>
When your server is asked to server a page like this, and the page has a ‘.htm’ or a ‘.html’ extension, it simply transfers the page to the end user. The browser understands these tags and renders the page.
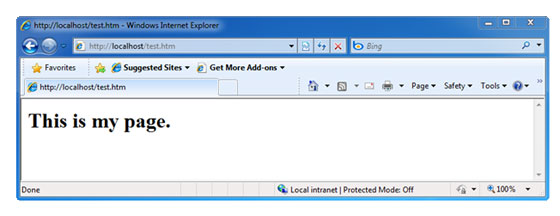
If you’re not familiar with running pages from IIS, just copy the file to the IIS home directory which will likely be ‘c:\inetpub\wwwroot’. Then open your browser and point it at https://localhost/%3Cpagename>.
It’ll look something like this:

But if you save this page with the ‘.php’ extension and put it on your server, it will have the PHP processor parse the page first. PHP will then create markup on your page based on what you’ve asked it to do.
So, for example, PHP has a command phpinfo() which will write all the details about your current PHP parser, and any add-ins etc. that you may have installed.
Let’s add this to the page that we had earlier. Remember when you’ve done this to save it with the .PHP extension before copying it to the IIS home directory.
To add PHP – you start the PHP section with the <?php tag, and end it with ?>. So, to use the phpinfo() command on the aforementioned page, your code will look like this:
                     <HTML>
                      <HEAD></HEAD>
                      <BODY>
                            <h1>This is my page.</h1>
                            <? phpinfo(); ?>
                      </BODY>
                    </HTML>
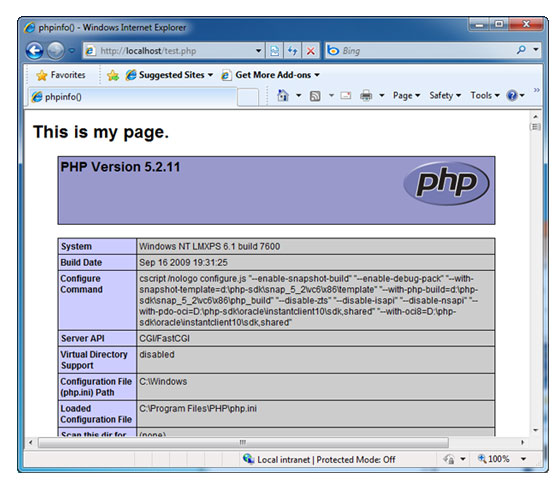
Now when you run your page, the PHP processor will interpret the phpinfo command which generates lots of markup about your current PHP installation.
You can see some of that here:

So now you’ve built and run your first PHP application on the Microsoft Web Platform. Congratulations!
Step 3. Using PHP with Microsoft Expression Web
Microsoft Expression Web 3 is a professional development tool that allows you to build standards-based Web sites quickly and easily. It supports PHP fully, including code completion and intellisense! Learn more about Expression Web.
If you don’t have Expression Web already, you can download a free trial edition using the Microsoft Web Platform Installer.
Launch Expression Web and create a new Site using the Site menu. This will create a default site on your PC which will be previewed using the Expression Web development server (not IIS). To ensure that PHP will work, you’ll need to make sure the Expression Web is pointed at PHP in two places.
First – on the ‘Tools’ menu, select ‘Application Options’. You’ll see a PHP setting on the General tab. Make sure that this is set to point at the following file:
C:\Program Files\PHP\php-cgi.exe
(Note that this is the location that WPI installs the PHP executable. If you installed it somewhere else, make sure that you are pointing to your php-cgi.exe location).
Second, under the Site menu, select ‘Site Settings’. Find the ‘Preview’ tab and make sure that you are using the same path to your PHP executable.
Now you can create, edit and preview your PHP pages using Expression web. Simply use the File menu , and select ‘New’. You’ll see an option to create a new PHP page.
We’ll have some follow up posts on this blog to show you how to use Expression Web for intellisense, code complete and more when building PHP applications for the Microsoft Web Platform.
Enjoy, and welcome to Windows!
Comments
Anonymous
October 22, 2009
The Web Platform installer is great and helps a lot. But what I really miss is the Zend Optimizer. It would be great if it can be selected for install in the near future in the WPI. I had no success to get the package from zend.com to work with the installed PHP on Server 2008 x64.Anonymous
October 26, 2009
@Matthias - Thanks for the feedback. We'll take a look at Zend Optimizer and she how that fits in.Anonymous
November 11, 2009
Neat, I didn't know about WPI... I must have been under a rock somewhere!?Anonymous
November 23, 2009
The, I have downloaded web platform installer, it greats.Anonymous
December 17, 2009
The comment has been removedAnonymous
January 24, 2011
all comind struction learnig to services of the facebook program coming join tegether builder is huge education from over the world education coming now we coming on join servicesAnonymous
January 24, 2016
this is very good to see the process which is going to work for sure in the best possible way. https://itube-download.com/Anonymous
March 06, 2016
And the guide sis also nice on mobdro Download : I am working on this great guide which is also nice. https://mobdrodownloads.comAnonymous
March 06, 2016
What you need is completely unknown to me man. I am working on this great guide which is also nice. https://mobdrodownloads.com