Nota
O acesso a esta página requer autorização. Pode tentar iniciar sessão ou alterar os diretórios.
O acesso a esta página requer autorização. Pode tentar alterar os diretórios.
 Navegue pelo exemplo
As notificações locais são alertas enviados por aplicativos instalados em um dispositivo. As notificações locais são frequentemente usadas para recursos como:
- Eventos do calendário
- Lembretes
- Gatilhos baseados em localização
Cada plataforma requer sua própria implementação de código nativo para enviar e receber notificações locais. No entanto, cada implementação de plataforma pode ser abstraída na camada de plataforma cruzada para que haja uma API consistente para enviar e receber notificações locais em um aplicativo .NET Multi-platform App UI (.NET MAUI).
Criar uma abstração multiplataforma
Um aplicativo .net maui deve enviar e receber notificações locais sem se preocupar com as implementações da plataforma subjacente. A interface INotificationManagerService a seguir é usada para definir uma API multiplataforma que pode ser usada para interagir com notificações locais:
public interface INotificationManagerService
{
    event EventHandler NotificationReceived;
    void SendNotification(string title, string message, DateTime? notifyTime = null);
    void ReceiveNotification(string title, string message);
}
Esta interface define as seguintes operações:
- O evento
NotificationReceivedpermite que um aplicativo manipule notificações de entrada. - O método
SendNotificationenvia uma notificação numDateTimeopcional. - O método
ReceiveNotificationprocessa uma notificação quando recebida pela plataforma subjacente.
A interface deve ser implementada em cada plataforma que você deseja suportar notificações locais.
Implementar notificações locais no Android
No Android, uma notificação local é uma mensagem exibida fora da interface do usuário do aplicativo para fornecer lembretes ou outras informações do aplicativo. Os usuários podem tocar na notificação para abrir seu aplicativo ou, opcionalmente, executar uma ação diretamente da notificação. Para obter informações sobre notificações locais no Android, consulte Visão geral de notificações no developer.android.com.
Para que um aplicativo .NET MAUI envie e receba notificações no Android, o aplicativo deve fornecer uma implementação da interface INotificationManagerService.
Enviar e receber notificações locais
No Android, a classe NotificationManagerService implementa a interface INotificationManagerService e contém a lógica para enviar e receber notificações locais:
using Android.App;
using Android.Content;
using Android.Graphics;
using Android.OS;
using AndroidX.Core.App;

namespace LocalNotificationsDemo.Platforms.Android;

public class NotificationManagerService : INotificationManagerService
{
    const string channelId = "default";
    const string channelName = "Default";
    const string channelDescription = "The default channel for notifications.";

    public const string TitleKey = "title";
    public const string MessageKey = "message";

    bool channelInitialized = false;
    int messageId = 0;
    int pendingIntentId = 0;

    NotificationManagerCompat compatManager;

    public event EventHandler NotificationReceived;

    public static NotificationManagerService Instance { get; private set; }

    public NotificationManagerService()
    {
        if (Instance == null)
        {
            CreateNotificationChannel();
            compatManager = NotificationManagerCompat.From(Platform.AppContext);
            Instance = this;
        }
    }

    public void SendNotification(string title, string message, DateTime? notifyTime = null)
    {
        if (!channelInitialized)
        {
            CreateNotificationChannel();
        }

        if (notifyTime != null)
        {
            Intent intent = new Intent(Platform.AppContext, typeof(AlarmHandler));
            intent.PutExtra(TitleKey, title);
            intent.PutExtra(MessageKey, message);
            intent.SetFlags(ActivityFlags.SingleTop | ActivityFlags.ClearTop);

            var pendingIntentFlags = (Build.VERSION.SdkInt >= BuildVersionCodes.S)
                ? PendingIntentFlags.CancelCurrent | PendingIntentFlags.Immutable
                : PendingIntentFlags.CancelCurrent;

            PendingIntent pendingIntent = PendingIntent.GetBroadcast(Platform.AppContext, pendingIntentId++, intent, pendingIntentFlags);
            long triggerTime = GetNotifyTime(notifyTime.Value);
            AlarmManager alarmManager = Platform.AppContext.GetSystemService(Context.AlarmService) as AlarmManager;
            alarmManager.Set(AlarmType.RtcWakeup, triggerTime, pendingIntent);
        }
        else
        {
            Show(title, message);
        }
    }

    public void ReceiveNotification(string title, string message)
    {
        var args = new NotificationEventArgs()
        {
            Title = title,
            Message = message,
        };
        NotificationReceived?.Invoke(null, args);
    }

    public void Show(string title, string message)
    {
        Intent intent = new Intent(Platform.AppContext, typeof(MainActivity));
        intent.PutExtra(TitleKey, title);
        intent.PutExtra(MessageKey, message);
        intent.SetFlags(ActivityFlags.SingleTop | ActivityFlags.ClearTop);

        var pendingIntentFlags = (Build.VERSION.SdkInt >= BuildVersionCodes.S)
            ? PendingIntentFlags.UpdateCurrent | PendingIntentFlags.Immutable
            : PendingIntentFlags.UpdateCurrent;

        PendingIntent pendingIntent = PendingIntent.GetActivity(Platform.AppContext, pendingIntentId++, intent, pendingIntentFlags);
        NotificationCompat.Builder builder = new NotificationCompat.Builder(Platform.AppContext, channelId)
            .SetContentIntent(pendingIntent)
            .SetContentTitle(title)
            .SetContentText(message)
            .SetLargeIcon(BitmapFactory.DecodeResource(Platform.AppContext.Resources, Resource.Drawable.dotnet_logo))
            .SetSmallIcon(Resource.Drawable.message_small);

        Notification notification = builder.Build();
        compatManager.Notify(messageId++, notification);
    }

    void CreateNotificationChannel()
    {
        // Create the notification channel, but only on API 26+.
        if (Build.VERSION.SdkInt >= BuildVersionCodes.O)
        {
            var channelNameJava = new Java.Lang.String(channelName);
            var channel = new NotificationChannel(channelId, channelNameJava, NotificationImportance.Default)
            {
                Description = channelDescription
            };
            // Register the channel
            NotificationManager manager = (NotificationManager)Platform.AppContext.GetSystemService(Context.NotificationService);
            manager.CreateNotificationChannel(channel);
            channelInitialized = true;
        }
    }

    long GetNotifyTime(DateTime notifyTime)
    {
        DateTime utcTime = TimeZoneInfo.ConvertTimeToUtc(notifyTime);
        double epochDiff = (new DateTime(1970, 1, 1) - DateTime.MinValue).TotalSeconds;
        long utcAlarmTime = utcTime.AddSeconds(-epochDiff).Ticks / 10000;
        return utcAlarmTime; // milliseconds
    }
}
A classe NotificationManagerService deve ser colocada na pasta Plataformas > Android do seu aplicativo. Como alternativa, a segmentação múltipla pode ser realizada com base nos seus próprios critérios de nome de ficheiro e pasta, em vez de usar a pasta Plataformas > Android. Para obter mais informações, consulte Configurar multidestino.
O Android permite que os aplicativos definam vários canais para notificações. O construtor NotificationManagerService cria um canal básico que é usado para enviar notificações. O método SendNotification define a lógica específica da plataforma necessária para criar e enviar uma notificação. O método ReceiveNotification é chamado pelo sistema operacional Android quando uma mensagem é recebida e invoca o manipulador de eventos NotificationReceived. Para obter mais informações, consulte Criar uma notificação no developer.android.com.
O método SendNotification cria uma notificação local imediatamente ou num momento DateTimeexato. Uma notificação pode ser agendada para um DateTime exato usando a classe AlarmManager, e a notificação será recebida por um objeto que deriva da classe BroadcastReceiver:
[BroadcastReceiver(Enabled = true, Label = "Local Notifications Broadcast Receiver")]
public class AlarmHandler : BroadcastReceiver
{
    public override void OnReceive(Context context, Intent intent)
    {
        if (intent?.Extras != null)
        {
            string title = intent.GetStringExtra(NotificationManagerService.TitleKey);
            string message = intent.GetStringExtra(NotificationManagerService.MessageKey);

            NotificationManagerService manager = NotificationManagerService.Instance ?? new NotificationManagerService();
            manager.Show(title, message);
        }
    }
}
Importante
Por padrão, as notificações agendadas usando a classe AlarmManager não sobreviverão à reinicialização do dispositivo. No entanto, você pode projetar seu aplicativo para reagendar notificações automaticamente se o dispositivo for reiniciado. Para obter mais informações, consulte Iniciar um alarme quando o dispositivo for reiniciado em Agendar alarmes repetidos no developer.android.com. Para obter informações sobre processamento em segundo plano no Android, consulte Guia para processamento em segundo plano no developer.android.com.
Lidar com notificações recebidas
O aplicativo Android deve detetar notificações de entrada e notificar a instância NotificationManagerService. Uma maneira de conseguir isso é modificando a classe MainActivity.
O atributo Activity na classe MainActivity deve especificar um valor LaunchMode de LaunchMode.SingleTop:
[Activity(Theme = "@style/Maui.SplashTheme", MainLauncher = true, LaunchMode = LaunchMode.SingleTop, //... )]
public class MainActivity : MauiAppCompatActivity
{
}
O modo SingleTop impede que várias instâncias de um Activity sejam iniciadas enquanto o aplicativo está em primeiro plano. Esse LaunchMode pode não ser apropriado para aplicativos que iniciam várias atividades em cenários de notificação mais complexos. Para obter mais informações sobre os valores de enumeração de LaunchMode, consulte Android Activity LaunchMode em developer.android.com.
A classe MainActivity também precisa ser modificada para receber notificações de entrada:
public class MainActivity : MauiAppCompatActivity
{
    protected override void OnCreate(Bundle? savedInstanceState)
    {
        base.OnCreate(savedInstanceState);

        CreateNotificationFromIntent(Intent);
    }

    protected override void OnNewIntent(Intent? intent)
    {
        base.OnNewIntent(intent);

        CreateNotificationFromIntent(intent);
    }

    static void CreateNotificationFromIntent(Intent intent)
    {
        if (intent?.Extras != null)
        {
            string title = intent.GetStringExtra(LocalNotificationsDemo.Platforms.Android.NotificationManagerService.TitleKey);
            string message = intent.GetStringExtra(LocalNotificationsDemo.Platforms.Android.NotificationManagerService.MessageKey);

            var service = IPlatformApplication.Current.Services.GetService<INotificationManagerService>();
            service.ReceiveNotification(title, message);
        }
    }
}
O método CreateNotificationFromIntent extrai dados de notificação do argumento intent e os passa para o método ReceiveNotification na classe NotificationManagerService. O método CreateNotificationFromIntent é chamado a partir do método OnCreate e do método OnNewIntent:
- Quando o aplicativo é iniciado por dados de notificação, os dados
Intentserão passados para o métodoOnCreate. - Se o aplicativo já estiver em primeiro plano, os dados
Intentserão passados para o métodoOnNewIntent.
Verificar permissão
O Android 13 (API 33) e superior requer a permissão POST_NOTIFICATIONS para enviar notificações de um aplicativo. Esta permissão deve ser declarada no seu ficheiro AndroidManifest.xml:
<uses-permission android:name="android.permission.POST_NOTIFICATIONS" />
Para obter mais informações sobre a permissão de POST_NOTIFICATIONS, consulte ‘Permissão de tempo de execução de notificações’ no developer.android.com.
Você deve implementar uma classe de permissão que verifique a declaração de permissão em tempo de execução:
using Android;

namespace LocalNotificationsDemo.Platforms.Android;

public class NotificationPermission : Permissions.BasePlatformPermission
{
    public override (string androidPermission, bool isRuntime)[] RequiredPermissions
    {
        get
        {
            var result = new List<(string androidPermission, bool isRuntime)>();
            if (OperatingSystem.IsAndroidVersionAtLeast(33))
                result.Add((Manifest.Permission.PostNotifications, true));
            return result.ToArray();
        }
    }
}
Depois que o aplicativo for iniciado, você deve solicitar que o usuário conceda essa permissão antes de tentar enviar uma notificação local:
PermissionStatus status = await Permissions.RequestAsync<NotificationPermission>();
Para obter mais informações sobre permissões do .NET MAUI, consulte Permissions.
Implementar notificações locais no iOS e Mac Catalyst
Nas plataformas da Apple, uma notificação local é uma mensagem que transmite informações importantes aos usuários. O sistema lida com a entrega de notificações com base em um horário ou local especificado. Para obter informações sobre notificações locais em plataformas Apple, consulte Agendar uma notificação localmente a partir da sua aplicação no developer.apple.com.
Para que um aplicativo .NET MAUI envie e receba notificações em plataformas Apple, o aplicativo deve fornecer uma implementação da interface INotificationManagerService.
Enviar e receber notificações locais
Nas plataformas Apple, a classe NotificationManagerService implementa a interface INotificationManagerService e contém a lógica para enviar e receber notificações locais:
using Foundation;
using UserNotifications;

namespace LocalNotificationsDemo.Platforms.iOS;

public class NotificationManagerService : INotificationManagerService
{
    int messageId = 0;
    bool hasNotificationsPermission;

    public event EventHandler? NotificationReceived;

    public NotificationManagerService()
    {
        // Create a UNUserNotificationCenterDelegate to handle incoming messages.
        UNUserNotificationCenter.Current.Delegate = new NotificationReceiver();

        // Request permission to use local notifications.
        UNUserNotificationCenter.Current.RequestAuthorization(UNAuthorizationOptions.Alert, (approved, err) =>
        {
            hasNotificationsPermission = approved;
        });
    }

    public void SendNotification(string title, string message, DateTime? notifyTime = null)
    {
        // App doesn't have permissions.
        if (!hasNotificationsPermission)
            return;

        messageId++;
        var content = new UNMutableNotificationContent()
        {
            Title = title,
            Subtitle = "",
            Body = message,
            Badge = 1
        };

        UNNotificationTrigger trigger;
        if (notifyTime != null)
            // Create a calendar-based trigger.
            trigger = UNCalendarNotificationTrigger.CreateTrigger(GetNSDateComponents(notifyTime.Value), false);
        else
            // Create a time-based trigger, interval is in seconds and must be greater than 0.
            trigger = UNTimeIntervalNotificationTrigger.CreateTrigger(0.25, false);

        var request = UNNotificationRequest.FromIdentifier(messageId.ToString(), content, trigger);
        UNUserNotificationCenter.Current.AddNotificationRequest(request, (err) =>
        {
            if (err != null)
                throw new Exception($"Failed to schedule notification: {err}");
        });
    }

    public void ReceiveNotification(string title, string message)
    {
        var args = new NotificationEventArgs()
        {
            Title = title,
            Message = message
        };
        NotificationReceived?.Invoke(null, args);
    }

    NSDateComponents GetNSDateComponents(DateTime dateTime)
    {
        return new NSDateComponents
        {
            Month = dateTime.Month,
            Day = dateTime.Day,
            Year = dateTime.Year,
            Hour = dateTime.Hour,
            Minute = dateTime.Minute,
            Second = dateTime.Second
        };
    }
}
A NotificationManagerService classe deve ser colocada na pasta Plataformas iOS > ou na pasta Plataformas Mac Catalyst > da sua aplicação. Como alternativa, a multisegmentação pode ser realizada com base nos seus próprios critérios de nome de ficheiro e diretório, em vez de usar os diretórios de Plataformas. Para obter mais informações, consulte Configurar multidestino.
Nas plataformas Apple, você deve solicitar permissão para usar notificações antes de tentar agendar uma notificação. Isso ocorre no construtor NotificationManagerService. Para obter mais informações sobre a permissão de notificação local, consulte Pedindo permissão para usar notificações no developer.apple.com.
O método SendNotification define a lógica necessária para criar e enviar uma notificação e cria uma notificação local imediata usando um objeto UNTimeIntervalNotificationTrigger ou em um DateTime exato usando um objeto UNCalendarNotificationTrigger. O método ReceiveNotification é chamado pelo iOS quando uma mensagem é recebida e invoca o manipulador de eventos NotificationReceived.
Lidar com notificações recebidas
Nas plataformas Apple, para lidar com as mensagens recebidas, você deve criar um delegado que subclassifique UNUserNotificationCenterDelegate:
using UserNotifications;

namespace LocalNotificationsDemo.Platforms.iOS;

public class NotificationReceiver : UNUserNotificationCenterDelegate
{
    // Called if app is in the foreground.
    public override void WillPresentNotification(UNUserNotificationCenter center, UNNotification notification, Action<UNNotificationPresentationOptions> completionHandler)
    {
        ProcessNotification(notification);

        var presentationOptions = (OperatingSystem.IsIOSVersionAtLeast(14))
            ? UNNotificationPresentationOptions.Banner
            : UNNotificationPresentationOptions.Alert;

        completionHandler(presentationOptions);
    }

    // Called if app is in the background, or killed state.
    public override void DidReceiveNotificationResponse(UNUserNotificationCenter center, UNNotificationResponse response, Action completionHandler)
    {
        if (response.IsDefaultAction)
            ProcessNotification(response.Notification);

        completionHandler();
    }

    void ProcessNotification(UNNotification notification)
    {
        string title = notification.Request.Content.Title;
        string message = notification.Request.Content.Body;

        var service = IPlatformApplication.Current?.Services.GetService<INotificationManagerService>();
        service?.ReceiveNotification(title, message);
    }
}
A classe NotificationReceiver é registrada como o delegado UNUserNotificationCenter no construtor NotificationManagerService e fornece dados de notificação de entrada para o método ReceiveNotification na classe NotificationManagerService.
Implementar notificações locais no Windows
As notificações locais no SDK da Aplicação Windows são mensagens que a sua aplicação pode enviar ao utilizador enquanto não estiverem atualmente dentro da sua aplicação. O conteúdo da notificação é exibido em uma janela transitória no canto inferior direito da tela e na Central de Notificações. As notificações locais podem ser usadas para informar o usuário sobre o status do aplicativo ou para solicitar que o usuário execute uma ação.
Para obter informações sobre notificações locais no Windows, incluindo detalhes de implementação para aplicativos empacotados e não empacotados, consulte Visão geral de notificações de aplicativos.
Advertência
Atualmente, as notificações agendadas não são suportadas no SDK de Aplicativos Windows. Para obter mais informações, consulte pedido de funcionalidade: agendar notificações tipo pop-up.
Registrar implementações da plataforma
Cada implementação NotificationManagerService deve ser registrada na interface INotificationManagerService, para que as operações que a interface expõe possam ser chamadas a partir de código multiplataforma. Isso pode ser conseguido registrando os tipos com a propriedade Services do objeto MauiAppBuilder no método CreateMauiApp na classe MauiProgram:
#if ANDROID
            builder.Services.AddTransient<INotificationManagerService, LocalNotificationsDemo.Platforms.Android.NotificationManagerService>();
#elif IOS
            builder.Services.AddTransient<INotificationManagerService, LocalNotificationsDemo.Platforms.iOS.NotificationManagerService>();
#elif MACCATALYST
            builder.Services.AddTransient<INotificationManagerService, LocalNotificationsDemo.Platforms.MacCatalyst.NotificationManagerService>();
#elif WINDOWS
            builder.Services.AddTransient<INotificationManagerService, LocalNotificationsDemo.Platforms.Windows.NotificationManagerService>();
#endif
Para obter mais informações sobre a injeção de dependência no .NET MAUI, consulte Injeção de dependência.
Enviar e receber notificações locais
Uma implementação INotificationManagerService pode ser resolvida através da resolução automática de dependências ou através da resolução explícita de dependências. O exemplo a seguir mostra o uso da resolução de dependência explícita para resolver uma implementação de INotificationManagerService:
// Assume the app uses a single window.
INotificationManagerService notificationManager =
    Application.Current?.Windows[0].Page?.Handler?.MauiContext?.Services.GetService<INotificationManagerService>();
Para obter mais informações sobre como resolver tipos registrados, consulte Resolução.
Uma vez resolvida a implementação INotificationManagerService, as suas operações podem ser invocadas:
// Send
notificationManager.SendNotification();

// Scheduled send
notificationManager.SendNotification("Notification title goes here", "Notification messages goes here.", DateTime.Now.AddSeconds(10));

// Receive
notificationManager.NotificationReceived += (sender, eventArgs) =>
{
    var eventData = (NotificationEventArgs)eventArgs;

    MainThread.BeginInvokeOnMainThread(() =>
    {
        // Take required action in the app once the notification has been received.
    });
};
}
O manipulador de eventos NotificationReceived converte os seus argumentos de evento para NotificationEventArgs, que define as propriedades Title e Message.
public class NotificationEventArgs : EventArgs
{
    public string Title { get; set; }
    public string Message { get; set; }
}
No Android, quando uma notificação é enviada, ela aparece como um ícone na barra de status:

Quando você desliza para baixo na barra de status, a gaveta de notificações abre:
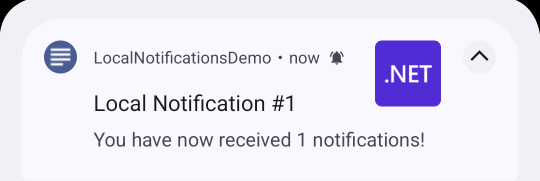
Tocar na notificação inicia o aplicativo. Uma notificação permanece visível na gaveta de notificações até ser descartada pelo aplicativo ou usuário.
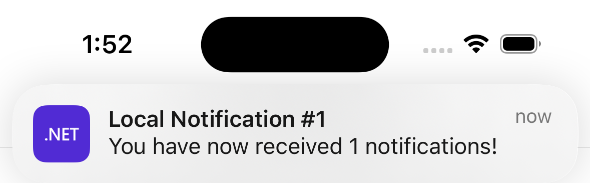
No iOS, as notificações de entrada são recebidas automaticamente por um aplicativo sem exigir a entrada do usuário:
No Mac Catalyst, as notificações recebidas são recebidas automaticamente pela Central de Notificações:

Para obter mais informações sobre a Central de Notificações, consulte Usar a Central de Notificações no Mac no support.apple.com.
Colabore connosco no GitHub
A origem deste conteúdo pode ser encontrada no GitHub, onde também pode criar e rever problemas e pedidos Pull. Para mais informações, consulte o nosso guia do contribuidor.