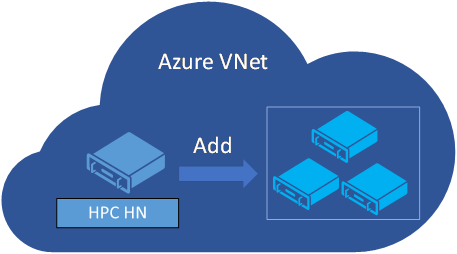
Burst to Azure IaaS VM from an HPC Pack Cluster
Requirements to Add Azure IaaS Compute Nodes with Microsoft HPC Pack
This section describes the requirements to add Azure IaaS compute nodes to your HPC cluster.
Supported version of Microsoft HPC Pack cluster
To deploy Azure IaaS compute nodes on your HPC Pack cluster, you must be running Microsoft HPC Pack 2016 Update 1 or a later version.
If you want to create an new HPC Pack cluster entirely in Azure, go to Deploy an HPC Pack 2016 cluster in Azure and choose a template to deploy. Otherwise you need to create an HPC Pack Cluster on-premises first. For the installation instructions for a hybrid HPC Pack cluster, see below:
Azure subscription account
You must obtain an Azure subscription or be assigned as an Owner role of the subscription.
To create an Azure subscription, go to the Azure site.
To access an existing subscription, go to the Azure portal.
Note
There are some limits (also called quotas) for each Azure subscription. The virtual machine cores have a regional total limit as well as a regional per size series (Dv2, F, etc.) limit that are separately enforced. You can go to Azure portal to check the quotas and usage of your Azure subscription. If you want to raise the quota, open an online customer support request.
Network infrastructure
You will need to provide an Azure virtual network and subnet for the Azure IaaS compute nodes.
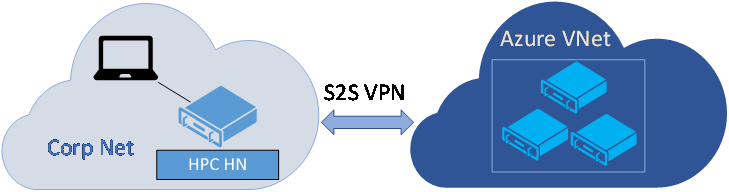
If you plan to create an HPC Pack cluster entirely in Azure, you must create the head node(s) and the Azure IaaS compute nodes in a single Azure virtual network.
If, however, you plan to create a hybrid HPC Pack cluster with head node(s) in your on-premises corporate network and create Azure IaaS compute nodes in Azure, you must configure a Site-to-Site VPN or ExpressRoute connection from your on-premises network to the Azure virtual network. The head node(s) must be able to connect over the Internet to Azure services as well. You might need to contact your network administrator to configure this connectivity.
Configure Network Security Group for Azure virtual network
It is recommended to configure a Network Security Group for the Azure virtual network subnet. The following HPC Port table lists the listening ports for each HPC node type. For more details about the ports, please refer to this document.
| Role | Port | Protocol |
|---|---|---|
| Linux Compute Node | 40000, 40002 | TCP |
| Windows Compute Node | 1856, 6729, 6730, 7998, 8677, 9096, 9100-9611, 42323, 42324 | TCP |
| Broker Node | 9087, 9091, 9095, 80, 443, and ports for Windows Compute Node | TCP |
| Head Node | 445, 5800, 5802, 5969, 5970, 5974, 5999, 7997, 9090, 9092, 9094, 9892-9894, and ports for Broker Node; 1433 for Local Databases; 10100, 10101, 10200, 10300, 10400 for Service Fabric Cluster (High availability) | TCP |
| Head Node | 9894 | UDP |
For HPC Pack cluster with head node(s) in Azure
For an HPC Pack cluster entirely in Azure, the following NSG rules must be configured.
1. Inbound security rules
The default inbound security rule AllowVNetInBound allows all inbound intra-virtual network traffic. But if you have added any rules to deny the traffic with Source VirtualNetwork or Any with higher priority, make sure the ports listed in HPC Port table are not denied.
If you want to submit jobs from on-premises client over Internet, you must add the following inbound security rules.
| Name | Port | Protocol | Source | Destination | Action |
|---|---|---|---|---|---|
| AllowHttpsInBound | 443 | TCP | Any | Any | Allow |
| AllowHpcSoaInbound | 9087,9090,9091,9094 | TCP | Any | Any | Allow |
2. OutBound security rules
The default outbound security rule AllowVNetOutBound allows all outbound intra-virtual network traffic. But if you have added any rules to deny the traffic with Destination VirtualNetwork or Any with higher priority, make sure the ports listed in HPC Port table are not denied.
The default outbound security rule AllowInternetOutBound allows all outbound traffic to Internet. But if you have added any rules to deny the traffic with Destination Internet or Any with higher priority, the following outbound rules must be added with higher priorities:
| Name | Port | Protocol | Source | Destination | Action |
|---|---|---|---|---|---|
| AllowKeyVaultOutBound | Any | Any | VirtualNetwork | AzureKeyVault | Allow |
| AllowAzureCloudOutBound | Any | Any | VirtualNetwork | AzureCloud | Allow |
| AllowHttpsOutBound | 443 | TCP | VirtualNetwork | Any | Allow |
For hybrid HPC Pack cluster with on-premises head node(s)
For the hybrid HPC Pack cluster with on-premises head node(s) and broker node(s), and Azure IaaS compute nodes, the following NSG rules must be configured from the perspective of Azure IaaS compute nodes.
1. Inbound security rules
The default inbound security rule AllowVNetInBound allows all inbound intra-virtual network traffic. But if you have added any rules to deny the traffic with Source VirtualNetwork or Any with higher priority, make sure the ports for Linux compute node and Windows compute node listed in HPC Port table are not denied.
Note
If there are firewalls sitting between your Corporation network and Azure virtual network, configure outbound firewall rules to allow these ports from the perspective of head node(s).
2. OutBound security rules
The default outbound security rule AllowVNetOutBound allows all outbound intra-virtual network traffic. But if you have added any rules to deny the traffic with Destination VirtualNetwork or Any with higher priority, the following outbound rules must be added with higher priorities, so that the Azure IaaS compute nodes can connect to the on-premises head node(s).
| Name | Port | Protocol | Source | Destination | Action |
|---|---|---|---|---|---|
| AllowHpcIntraVNetTcpOutBound | 443, 5970, 6729, 6730, 8677, 9892, 9893, 9894 | TCP | Any | VirtualNetwork | Allow |
| AllowHpcIntraVNetUdpOutBound | 9894 | UDP | Any | VirtualNetwork | Allow |
Note
If there are firewalls sitting between your Corporation network and Azure virtual network, configure inbound firewall rules to allow these ports from the perspective of head node(s).
The default outbound security rule AllowInternetOutBound allows all outbound traffic to Internet. But if you have added any rules to deny the traffic with Destination Internet or Any with higher priority, the following outbound rules must be added with higher priorities:
| Name | Port | Protocol | Source | Destination | Action |
|---|---|---|---|---|---|
| AllowKeyVaultOutBound | Any | Any | VirtualNetwork | AzureKeyVault | Allow |
| AllowAzureCloudOutBound | Any | Any | VirtualNetwork | AzureCloud | Allow |
| AllowHttpsOutBound | 443 | TCP | VirtualNetwork | Any | Allow |
The HPC Pack head node(s) may access the following public URLs at the Set Azure Deployment Configuration step and Create and manage Azure IaaS compute nodes step, you shall add them into the allowlist of your on-premises firewalls.
https://management.core.windows.net
https://login.microsoftonline.com
https://hpcazuresasdispatcher.azurewebsites.net
https://hpcazureconsumptionsb.servicebus.windows.net
https://*.vault.azure.net
https://*.microsoft.com
https://*.msauth.net
https://*.msftauth.net
https://*.core.windows.net
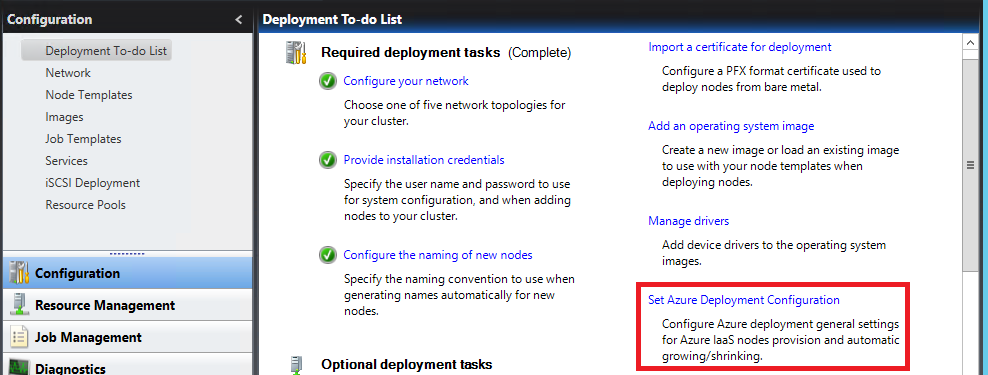
Step 1. Configure the cluster to support deployments of Azure IaaS compute nodes
Open the HPC cluster manager on a head node, in the Deployment To-do List, complete all the three Required deployment tasks. The user name and password of the installation credentials you provided will be used as the administrator user name and password of the Azure virtual machines.
Step 1.1 Set Azure Deployment Configuration
You can set Azure deployment configuration with HPC Cluster Manager or PowerShell Commands.
Set Azure Deployment Configuration with HPC Cluster Manager
Note
The Set Azure Deployment Configuration wizard in this article is based on HPC Pack 2016 Update 2 (and later version).
You can click Set Azure Deployment Configuration and follow the wizard to complete the configuration.
1. Configure Azure Service Principal
Azure Service Principal is used by HPC Pack service to provision, start, stop and delete Azure IaaS VM. To configure the Azure Service Principal, click the button Login to log into your Azure account on the Azure Service Principal page.
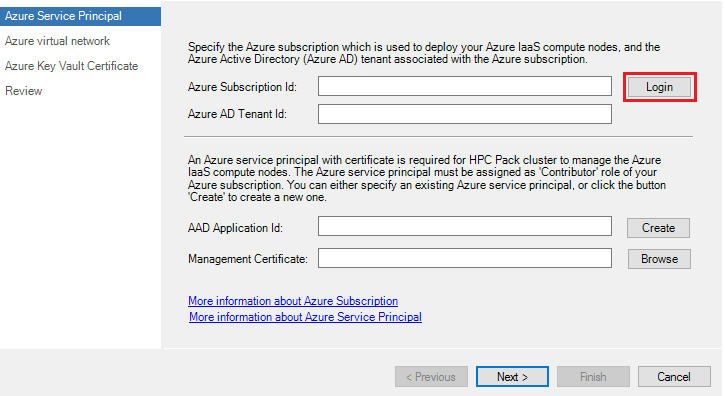
If you have multiple Azure subscriptions associated with your Azure account, click the button Select to choose the subscription used to deploy the Azure IaaS compute nodes.
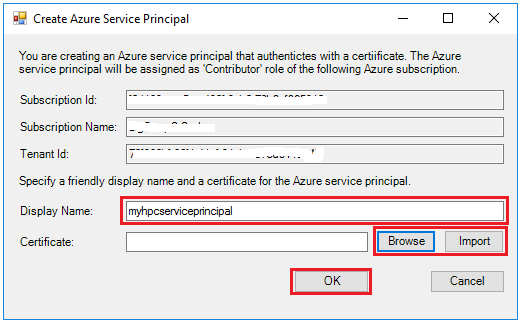
You can choose an existing Azure Service Principal from Service Principal Name list, and click the button Browse to choose the correct Management Certificate which was used to create the Azure Service principal, or you can click the button Create to create a new Azure Service Principal.

If you choose to create a new Azure Service Principal, on the Create Azure Service Principal dialog, Specify a friendly unique Display Name for the new Azure service principal, and click Browse to choose a Certificate from Local Computer\Personal store, or click Import to import a PFX format certificate or generate a new self-signed certificate. And then click OK to create the Azure service principal.
Note
The certificate for the Azure Service Principal must be different from the certificate used to secure the communication between HPC nodes.
To create the Azure Service Principal, your Azure account must be an Owner role of the Azure subscription, and the Azure Service Principal will be granted as Contributor role of the Azure subscription by default, you can refer to Access control for Azure resources in HPC Pack cluster to manually re-configure the access permissions for the Azure Service Principal according to your user scenario.
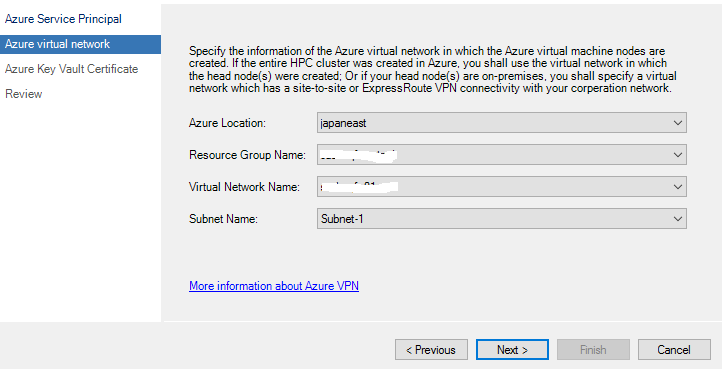
2. Specify Azure Virtual Network
On the Azure virtual network page, specify the information of the Azure virtual network in which your Azure IaaS compute nodes will be created.
Azure Location: The azure location in which the virtual network locates
Resource Group Name: The resource group in which the virtual network was created
Virtual Network Name: The name of the virtual network in which your Azure IaaS compute nodes will be created.
Subnet Name: The name of the subnet in which your Azure IaaS compute nodes will be created.
Note
The virtual network you specified must have a site to site VPN or Express Route connection to the on-premises network where your head node located.
3. Configure Azure Key Vault Certificate
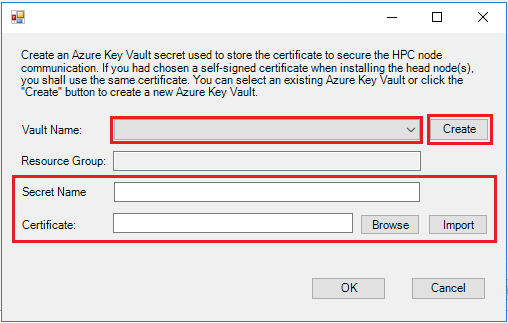
HPC Pack service uses X.509 certificate to secure the HPC node communicate. Thus we need import this certificate to the Azure Key Vault so that it can be installed to the Azure IaaS VM during provisioning. On Azure Key Vault Certificate page, click the button Select to choose the Azure Key Vault Name and Secret Name if you had already created the Azure Key Vault secret. Or click the button Create to create a new one.
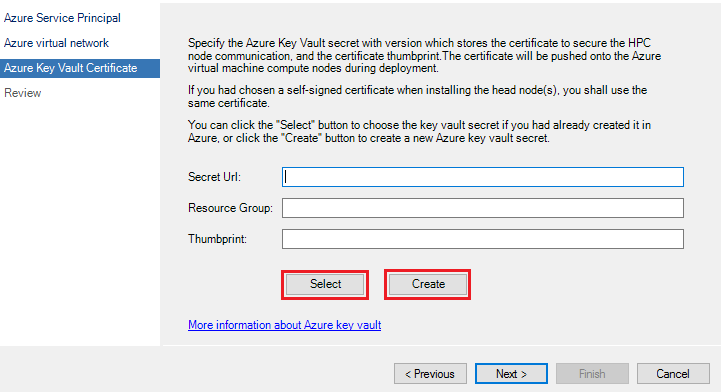
If you choose to create a new Key Vault secret, you can select an existing Azure key vault name from the Vault Name list, or click Create to create a new Azure key vault. And then specify a friendly Secret Name, click Browse or Import to select a correct certificate.
Note
If you are using a self-signed certificate on the head node(s) for HPC node communication, you must upload the same certificate (the one used during head node installation) to Azure Key Vault Secret. If you fails to do so, the Azure IaaS compute nodes will be unreachable for the head node(s) due to un-trusted certificate issue. And you can use the following PowerShell command to get the certificate thumbprint that is used for node communication: Get-HPCClusterRegistry -propertyName SSLThumbprint
Review the settings and click Finish to complete the configuration.
Set Azure Deployment Configuration with PowerShell
You can also choose to run the following PowerShell commands to set Azure Deployment Configuration if you have already:
- Created the Azure Service Principal and Azure Key Vault Certificate.
- Installed the certificate for Azure Service Principal to Local Computer\Personal certificate store with private key on all the head node machines.
Add-PSSnapin Microsoft.Hpc
# Set Azure subscription and Service Principal information
Set-HpcClusterRegistry -PropertyName SubscriptionId -PropertyValue <subscriptionId>
Set-HpcClusterRegistry -PropertyName TenantId -PropertyValue <tenantId>
Set-HpcClusterRegistry -PropertyName ApplicationId -PropertyValue <ServiceprincipalApplicationId>
Set-HpcClusterRegistry -PropertyName Thumbprint -PropertyValue <ServiceprincipalCertThumbprint>

# Set Virtual network information
Set-HpcClusterRegistry -PropertyName VNet -PropertyValue <VNetName>
Set-HpcClusterRegistry -PropertyName Subnet -PropertyValue <SubnetName>
Set-HpcClusterRegistry -PropertyName Location -PropertyValue <VNetLocation>
Set-HpcClusterRegistry -PropertyName ResourceGroup -PropertyValue <VNetResourceGroup>

# Set Azure Key vault certificate
Set-HpcKeyVaultCertificate -ResourceGroup <KeyVaultResourceGroupName> -CertificateUrl <KeyVaultSecretUrlWithVersion> -CertificateThumbprint <KeyVaultCertificateThumbprint>
Step 1.2 Configure other cluster properties
If you plan to create non-domain joined Azure IaaS Windows compute nodes or Linux compute nodes in a different subnet where the head node(s) locate, run the following PowerShell command on a head node to make the cluster add host entries for nodes in different subnets. If you failed to do so, the nodes will be unreachable for the head node(s) because the head node(s) cannot resolve their host name.
Set-HpcClusterRegistry -PropertyName HostFileForOtherSubnet -PropertyValue 1
if($env:CCP_CONNECTIONSTRING -like "*,*,*") {
    Connect-ServiceFabricCluster
    $opId = [Guid]::NewGuid()
    Start-ServiceFabricPartitionRestart -OperationId $opId -RestartPartitionMode AllReplicasOrInstances -ServiceName fabric:/HpcApplication/ManagementStatelessService -ErrorAction Stop
} else {
    Restart-Service -Name HpcManagement
}
If you plan to create Azure IaaS Linux compute nodes with Azure IaaS node template, run the following PowerShell command on a head node to enable the communication over Http between head node(s) and Linux compute nodes.
Set-HpcClusterRegistry -PropertyName LinuxHttps -PropertyValue 0
if($env:CCP_CONNECTIONSTRING -like "*,*,*") {
    Connect-ServiceFabricCluster
    $opId = [Guid]::NewGuid()
    Start-ServiceFabricPartitionRestart -OperationId $opId -RestartPartitionMode AllReplicasOrInstances -ServiceName fabric:/HpcApplication/SchedulerStatefulService -ErrorAction Stop
} else {
    Restart-Service -Name HpcScheduler
}
Step 2. Create an Azure IaaS node template
Important
- The Azure IaaS node template wizard in this article is based on HPC Pack 2016 Update 3. It is slightly different in other HPC Pack versions.
- If you choose to use a custom image or shared image, the operating system of the VM image must meet the requirements.
- Shared Image is NOT supported in HPC Pack 2016 Update 2 or earlier version.
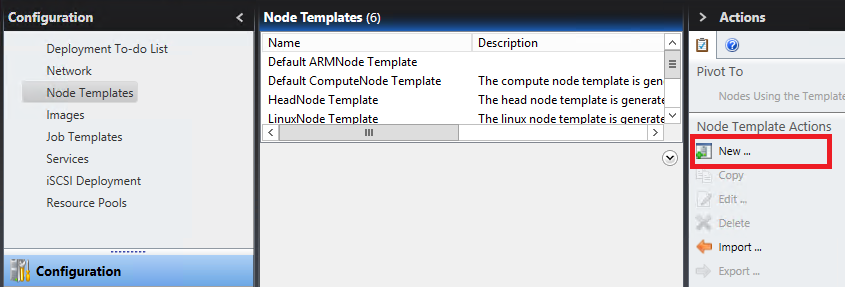
On the Configuration panel, click Node Templates, and click New in the Actions list to create an Azure IaaS node template.
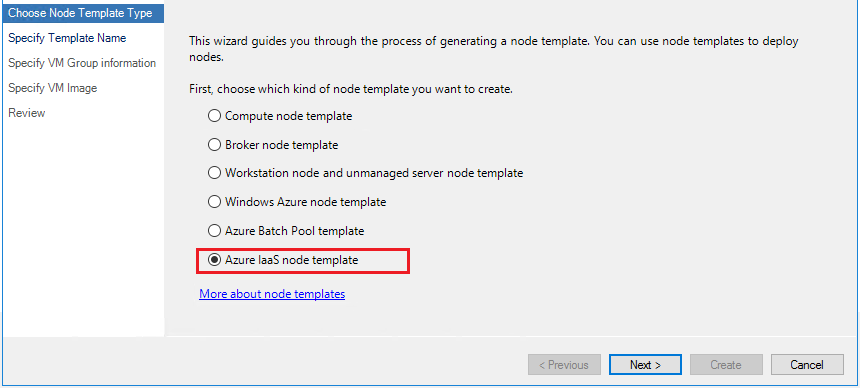
On Choose Node Template Type page, choose the node template type as Azure IaaS node template.
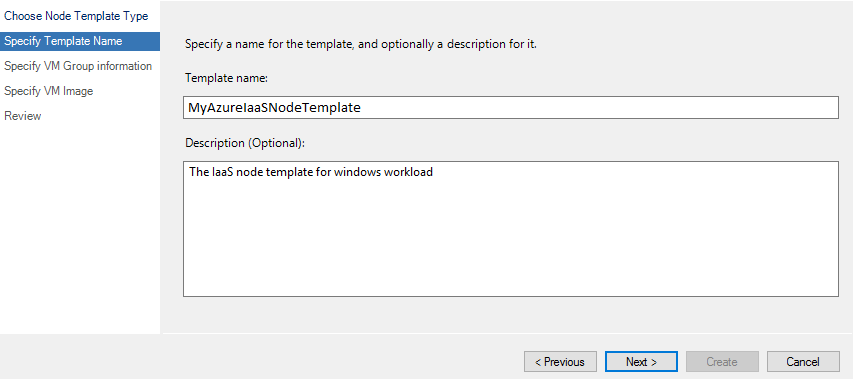
On the Specify Template Name page, specify a Template name and optionally specify the Description.
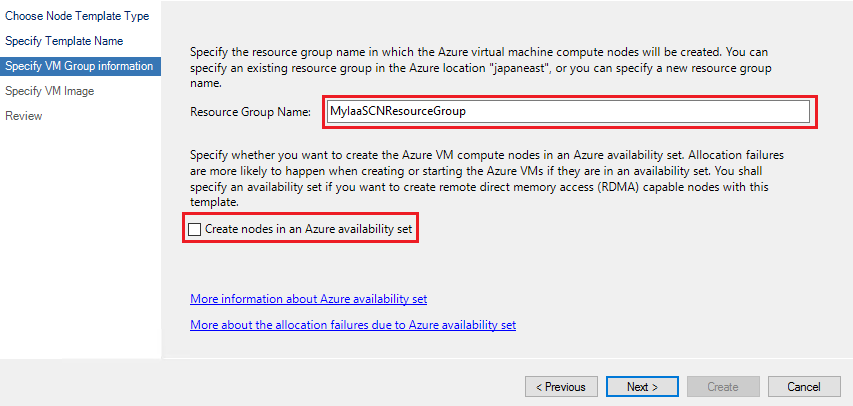
On the Specify VM Group information page, specify Resource Group Name of the Azure resource group in which the IaaS compute nodes will be created in. If you specify an existing resource group, make sure it is in the same Azure location where the Azure virtual network locates.
Specify whether you want to create nodes in an Azure availability set.
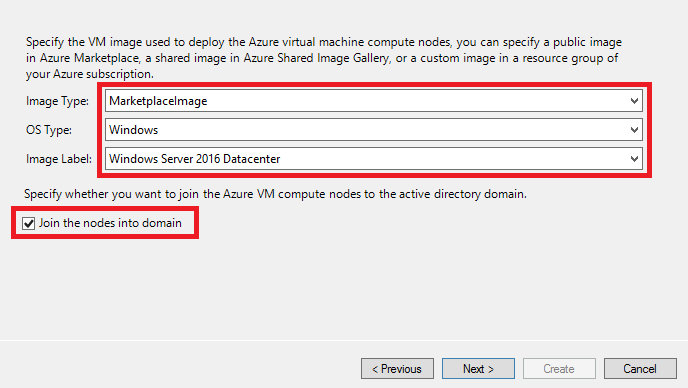
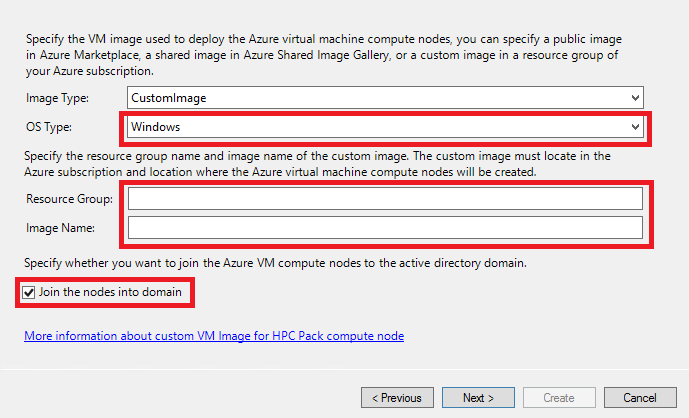
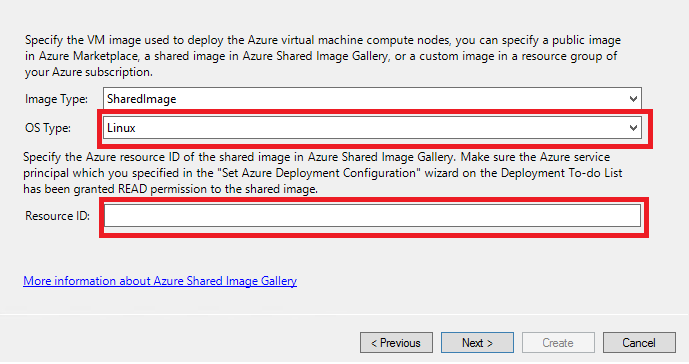
On the Specify VM Image page, specify the VM image used to deploy the IaaS compute nodes. You can select one of the following Image Types: MarketplaceImage, CustomWindowsImage, or CustomLinuxImage.
If you choose Image Type as MarketplaceImage, select OS Type and Image Label to choose a public VM image in Azure marketplace.
If the OS Type is with Windows and your HPC Pack head node(s) are domain joined, specify whether you want to Join the nodes into domain. It is recommended to join the Windows compute nodes into domain.
If you choose Image Type as CustomImage, specify the OS Type, the Image Name of the customized VM image, and the Resource Group in which the image is stored. The VM image must have been created in the same Azure location in which the Azure IaaS compute nodes will be created. Please follow Create Custom Image for creating your own customized image for you IaaS VM.
You can click the link More information about custom VM Image for HPC Pack compute node to learn how to create a customized HPC Pack compute node VM image.
If you choose Image Type as SharedImage, specify the OS Type, the Azure Resource ID of the shared VM image in Azure Shared Image Gallery. Make sure the Azure service principal you specified in Step 1.1 is granted Read permission to the shared image gallery.
On the Review page, review the settings you had specified, and click Create to create the node template.
Step 3. Create the IaaS compute nodes and manage them
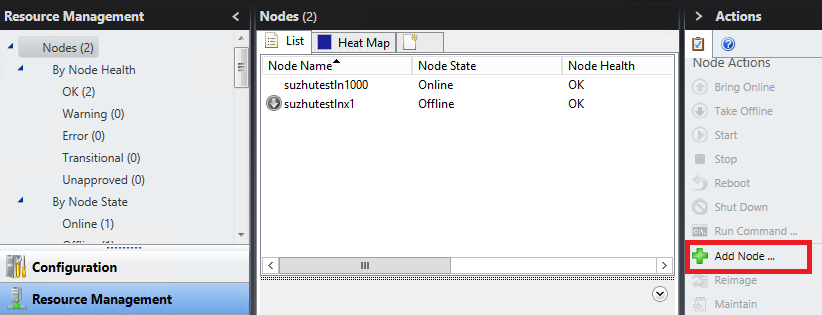
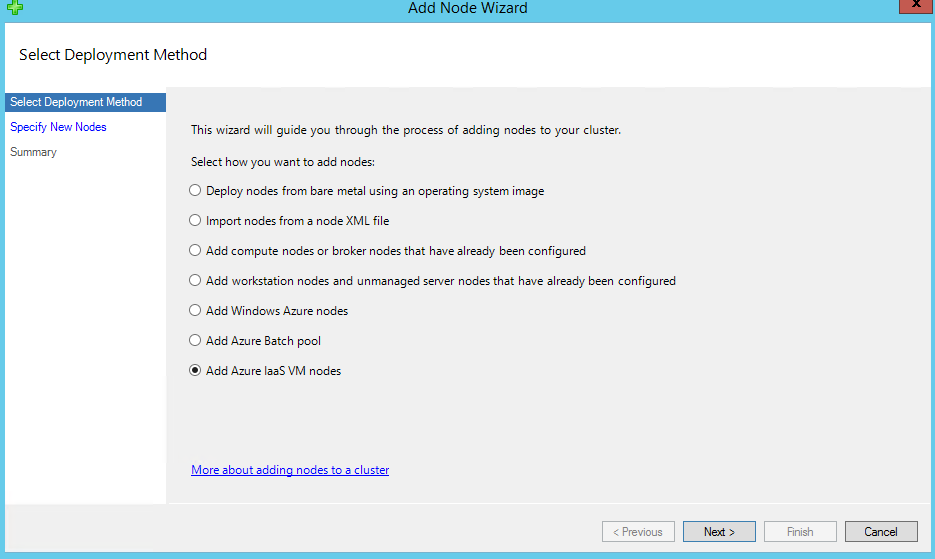
Open HPC Cluster Manager console, click Resource Management bar, and click Add Node to start the Add Node Wizard.
On the Select Deployment Method page, select Add Azure IaaS VM nodes.
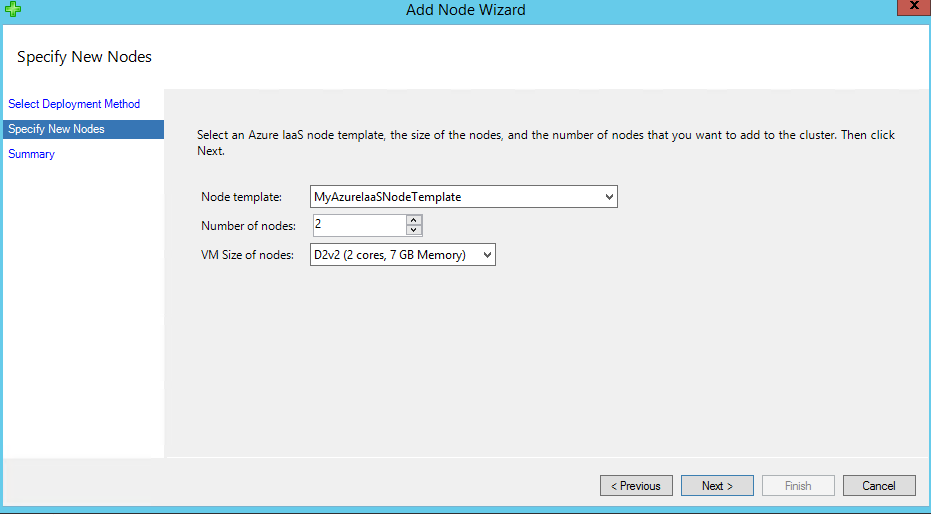
On the Specify New Nodes page, select the Node template we just created in Step 2, and specify Number of nodes and VM size of nodes, and click Next.
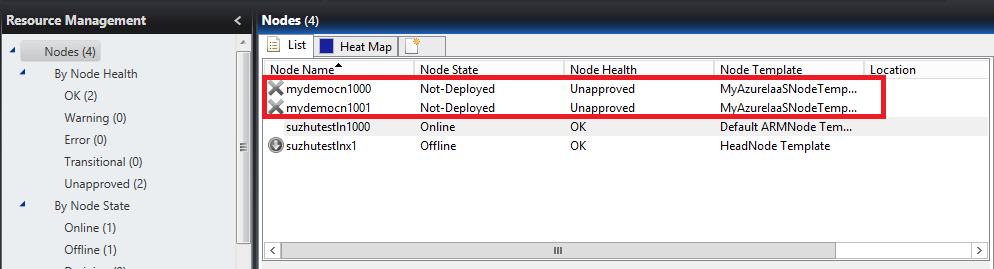
After you click Finish, you can find two new nodes in Nodes list. The corresponding Azure virtual machines for these two nodes are in fact not yet created in Azure side.
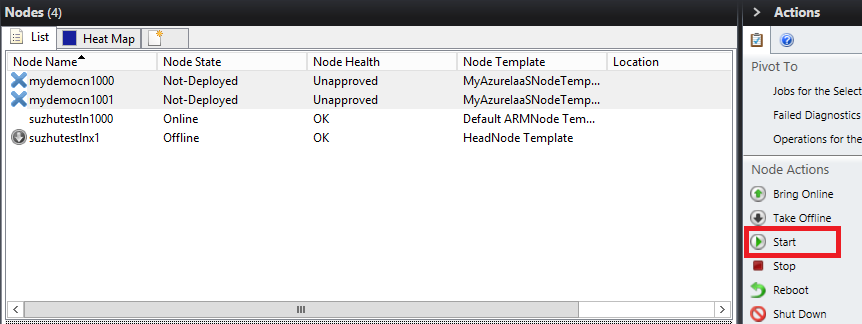
You can then choose the nodes and click Start to create the virtual machines in Azure.
Wait for the provisioning of the Azure IaaS compute nodes.
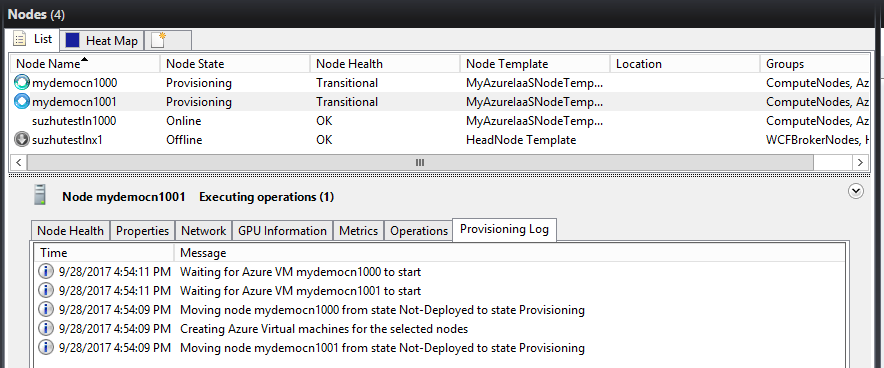
After the deployment of Azure IaaS compute nodes is completed and the Node Health becomes OK, you can submit jobs to these nodes.
You can manually stop the nodes by click the Stop, and the virtual machines in Azure will be de-allocated.
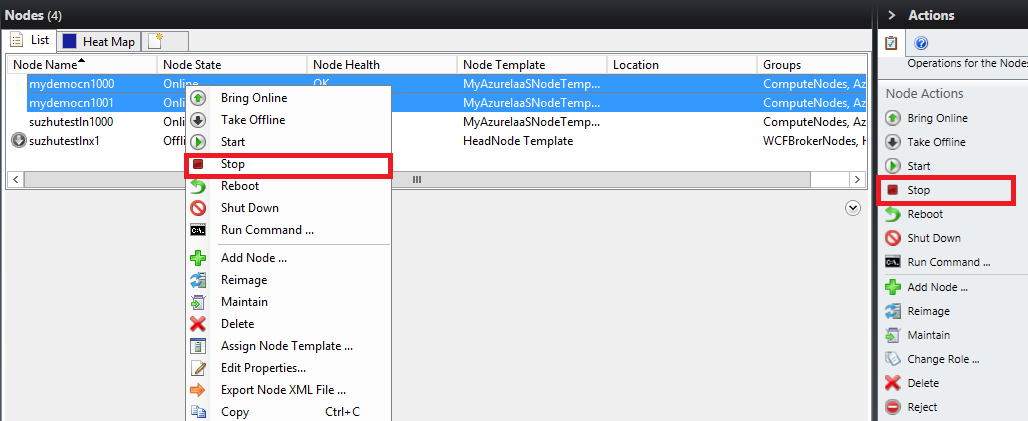
You can also Delete the nodes if you don't need them anymore, the Azure virtual machines will be also deleted if you do so.
If you enabled the auto grow and shrink Azure nodes feature, the Azure IaaS nodes will be automatically started or stopped depending on the cluster workload, see Auto grow shrink for Azure resources.