Nota
O acesso a esta página requer autorização. Pode tentar iniciar sessão ou alterar os diretórios.
O acesso a esta página requer autorização. Pode tentar alterar os diretórios.
Em apenas algumas etapas, você pode criar seu primeiro agente de IA com Kernel Semântico em Python, .NET ou Java. Este guia irá mostrar-lhe como...
- Instale os pacotes necessários
- Crie uma conversa de ida e volta com uma IA
- Dê a um agente de IA a capacidade de executar seu código
- Veja a IA criar planos em tempo real
Instalando o SDK
O Kernel Semântico tem vários pacotes NuGet disponíveis. Para a maioria dos cenários, no entanto, normalmente você só precisa de Microsoft.SemanticKernel.
Você pode instalá-lo usando o seguinte comando:
dotnet add package Microsoft.SemanticKernel
Para obter a lista completa de pacotes Nuget, consulte o artigo de idiomas suportados.
As instruções para acessar o SemanticKernel pacote Python estão disponíveis aqui. É tão fácil como:
pip install semantic-kernel
As instruções para acessar o SemanticKernel pacote Java estão disponíveis aqui. É tão fácil como:
<dependencyManagement>
    <dependencies>
        <dependency>
            <groupId>com.microsoft.semantic-kernel</groupId>
            <artifactId>semantickernel-bom</artifactId>
            <version>${sk.version}</version>
            <type>pom</type>
            <scope>import</scope>
        </dependency>
    </dependencies>
</dependencyManagement>

<dependencies>
<dependency>
    <groupId>com.microsoft.semantic-kernel</groupId>
    <artifactId>semantickernel-api</artifactId>
</dependency>
<dependency>
    <groupId>com.microsoft.semantic-kernel</groupId>
    <artifactId>semantickernel-aiservices-openai</artifactId>
</dependency>
</dependencies>
Comece rapidamente a usar blocos de anotações
Se você é um desenvolvedor Python ou C#, você pode começar rapidamente com nossos blocos de anotações. Esses notebooks fornecem guias passo a passo sobre como usar o Kernel Semântico para criar agentes de IA.
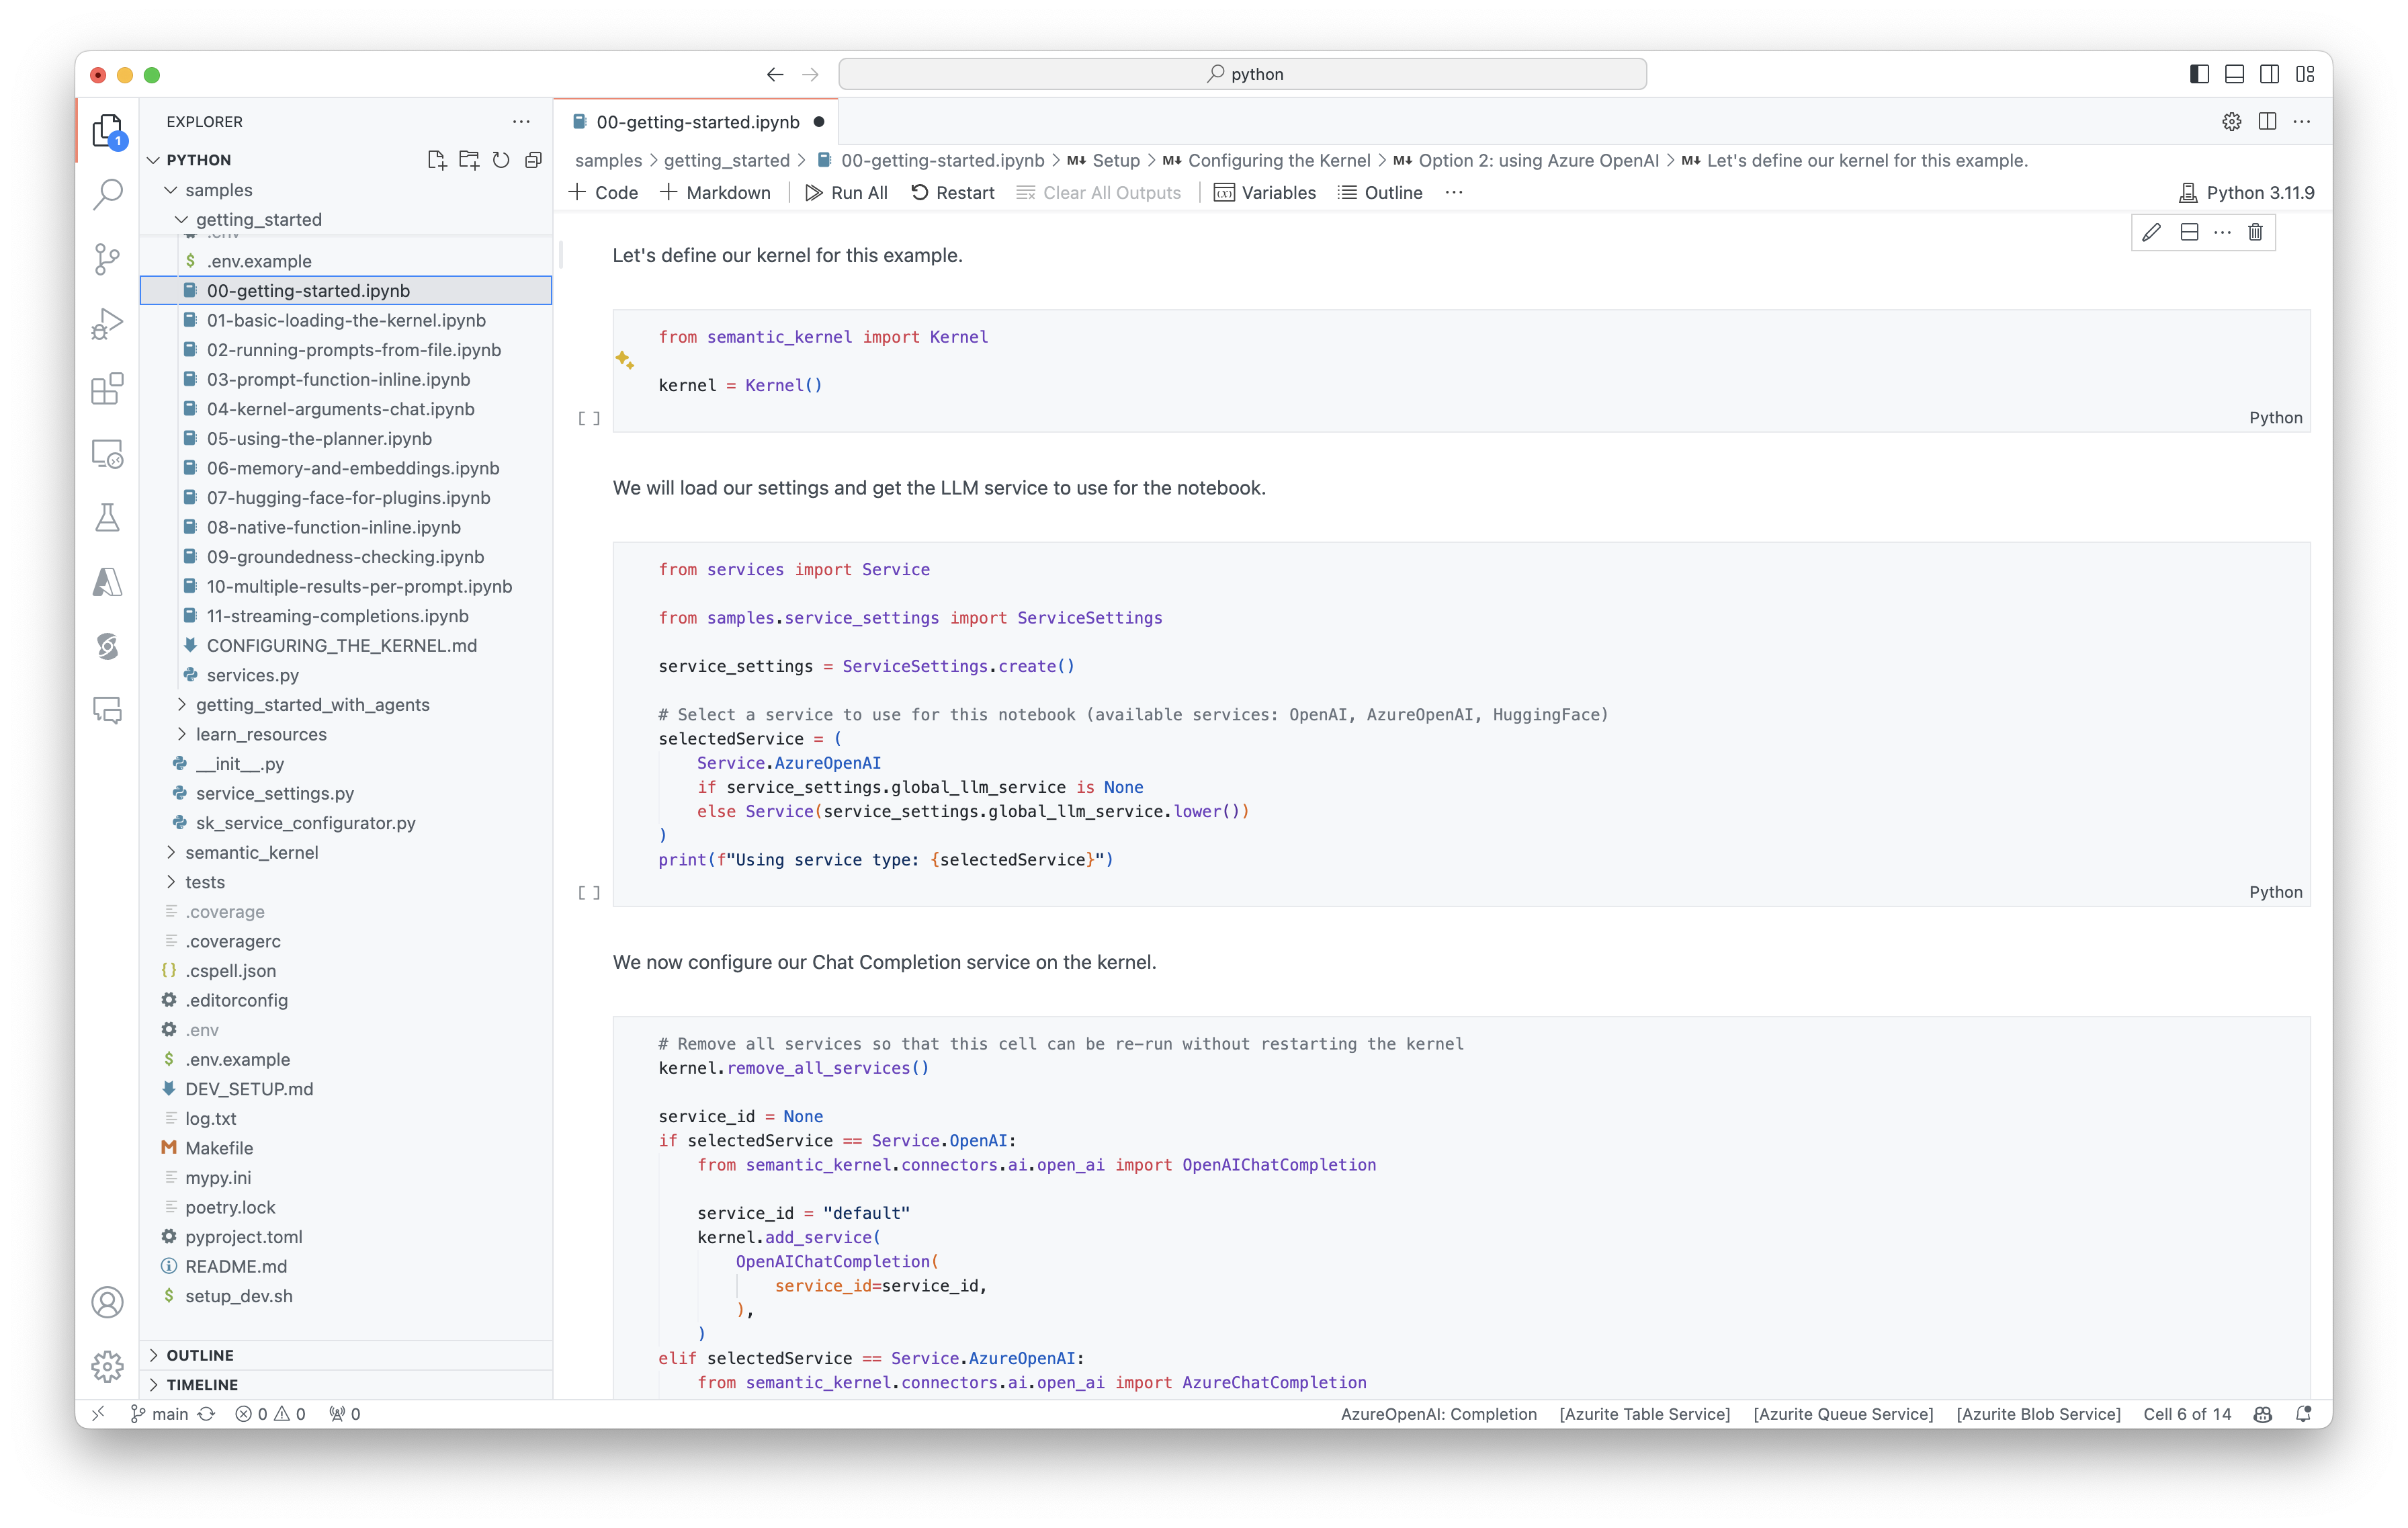
Para começar, siga estes passos:
- Clone o repositório do kernel semântico
- Abra o repositório no Visual Studio Code
- Navegue até _/python/samples/getting_started
- Abra 00-getting-started.ipynb para começar a configurar seu ambiente e criar seu primeiro agente de IA!
Para começar, siga estes passos:
- Clone o repositório do kernel semântico
- Abra o repositório no Visual Studio Code
- Navegue até _/dotnet/notebooks
- Abra 00-getting-started.ipynb para começar a configurar seu ambiente e criar seu primeiro agente de IA!
Escrevendo seu primeiro aplicativo de console
- Crie um novo projeto de console .NET usando este comando:
dotnet new console
- Instale as seguintes dependências do .NET:
dotnet add package Microsoft.SemanticKernel
dotnet add package Microsoft.Extensions.Logging
dotnet add package Microsoft.Extensions.Logging.Console
- Substitua o conteúdo do arquivo
Program.cspor este código:
// Import packages
using Microsoft.Extensions.DependencyInjection;
using Microsoft.Extensions.Logging;
using Microsoft.SemanticKernel;
using Microsoft.SemanticKernel.ChatCompletion;
using Microsoft.SemanticKernel.Connectors.OpenAI;

// Populate values from your OpenAI deployment
var modelId = "";
var endpoint = "";
var apiKey = "";

// Create a kernel with Azure OpenAI chat completion
var builder = Kernel.CreateBuilder().AddAzureOpenAIChatCompletion(modelId, endpoint, apiKey);

// Add enterprise components
builder.Services.AddLogging(services => services.AddConsole().SetMinimumLevel(LogLevel.Trace));

// Build the kernel
Kernel kernel = builder.Build();
var chatCompletionService = kernel.GetRequiredService<IChatCompletionService>();

// Add a plugin (the LightsPlugin class is defined below)
kernel.Plugins.AddFromType<LightsPlugin>("Lights");

// Enable planning
OpenAIPromptExecutionSettings openAIPromptExecutionSettings = new()
{
    FunctionChoiceBehavior = FunctionChoiceBehavior.Auto()
};

// Create a history store the conversation
var history = new ChatHistory();

// Initiate a back-and-forth chat
string? userInput;
do {
    // Collect user input
    Console.Write("User > ");
    userInput = Console.ReadLine();

    // Add user input
    history.AddUserMessage(userInput);

    // Get the response from the AI
    var result = await chatCompletionService.GetChatMessageContentAsync(
        history,
        executionSettings: openAIPromptExecutionSettings,
        kernel: kernel);

    // Print the results
    Console.WriteLine("Assistant > " + result);

    // Add the message from the agent to the chat history
    history.AddMessage(result.Role, result.Content ?? string.Empty);
} while (userInput is not null);
import asyncio

from semantic_kernel import Kernel
from semantic_kernel.utils.logging import setup_logging
from semantic_kernel.functions import kernel_function
from semantic_kernel.connectors.ai.open_ai import AzureChatCompletion
from semantic_kernel.connectors.ai.function_choice_behavior import FunctionChoiceBehavior
from semantic_kernel.connectors.ai.chat_completion_client_base import ChatCompletionClientBase
from semantic_kernel.contents.chat_history import ChatHistory
from semantic_kernel.functions.kernel_arguments import KernelArguments

from semantic_kernel.connectors.ai.open_ai.prompt_execution_settings.azure_chat_prompt_execution_settings import (
    AzureChatPromptExecutionSettings,
)

async def main():
    # Initialize the kernel
    kernel = Kernel()

    # Add Azure OpenAI chat completion
    chat_completion = AzureChatCompletion(
        deployment_name="your_models_deployment_name",
        api_key="your_api_key",
        base_url="your_base_url",
    )
    kernel.add_service(chat_completion)

    # Set the logging level for  semantic_kernel.kernel to DEBUG.
    setup_logging()
    logging.getLogger("kernel").setLevel(logging.DEBUG)

    # Add a plugin (the LightsPlugin class is defined below)
    kernel.add_plugin(
        LightsPlugin(),
        plugin_name="Lights",
    )

    # Enable planning
    execution_settings = AzureChatPromptExecutionSettings()
    execution_settings.function_choice_behavior = FunctionChoiceBehavior.Auto()

    # Create a history of the conversation
    history = ChatHistory()

    # Initiate a back-and-forth chat
    userInput = None
    while True:
        # Collect user input
        userInput = input("User > ")

        # Terminate the loop if the user says "exit"
        if userInput == "exit":
            break

        # Add user input to the history
        history.add_user_message(userInput)

        # Get the response from the AI
        result = await chat_completion.get_chat_message_content(
            chat_history=history,
            settings=execution_settings,
            kernel=kernel,
        )

        # Print the results
        print("Assistant > " + str(result))

        # Add the message from the agent to the chat history
        history.add_message(result)

# Run the main function
if __name__ == "__main__":
    asyncio.run(main())
OpenAIAsyncClient client = new OpenAIClientBuilder()
    .credential(new AzureKeyCredential(AZURE_CLIENT_KEY))
    .endpoint(CLIENT_ENDPOINT)
    .buildAsyncClient();

// Import the LightsPlugin
KernelPlugin lightPlugin = KernelPluginFactory.createFromObject(new LightsPlugin(),
    "LightsPlugin");

// Create your AI service client
ChatCompletionService chatCompletionService = OpenAIChatCompletion.builder()
    .withModelId(MODEL_ID)
    .withOpenAIAsyncClient(client)
    .build();

// Create a kernel with Azure OpenAI chat completion and plugin
Kernel kernel = Kernel.builder()
    .withAIService(ChatCompletionService.class, chatCompletionService)
    .withPlugin(lightPlugin)
    .build();

// Add a converter to the kernel to show it how to serialise LightModel objects into a prompt
ContextVariableTypes
    .addGlobalConverter(
        ContextVariableTypeConverter.builder(LightModel.class)
            .toPromptString(new Gson()::toJson)
            .build());

// Enable planning
InvocationContext invocationContext = new InvocationContext.Builder()
    .withReturnMode(InvocationReturnMode.LAST_MESSAGE_ONLY)
    .withToolCallBehavior(ToolCallBehavior.allowAllKernelFunctions(true))
    .build();

// Create a history to store the conversation
ChatHistory history = new ChatHistory();

// Initiate a back-and-forth chat
Scanner scanner = new Scanner(System.in);
String userInput;
do {
  // Collect user input
  System.out.print("User > ");

  userInput = scanner.nextLine();
  // Add user input
  history.addUserMessage(userInput);

  // Prompt AI for response to users input
  List<ChatMessageContent<?>> results = chatCompletionService
      .getChatMessageContentsAsync(history, kernel, invocationContext)
      .block();

  for (ChatMessageContent<?> result : results) {
    // Print the results
    if (result.getAuthorRole() == AuthorRole.ASSISTANT && result.getContent() != null) {
      System.out.println("Assistant > " + result);
    }
    // Add the message from the agent to the chat history
    history.addMessage(result);
  }
} while (userInput != null && !userInput.isEmpty());
O bate-papo de ida e volta a seguir deve ser semelhante ao que você vê no console. As chamadas de função foram adicionadas abaixo para demonstrar como a IA aproveita o plugin nos bastidores.
| Role | Mensagem |
|---|---|
| 🔵 Utilizador | Por favor, alterne a luz |
| 🔴 Assistente (chamada de função) | LightsPlugin.GetState() |
| 🟢 Ferramenta | off |
| 🔴 Assistente (chamada de função) | LightsPlugin.ChangeState(true) |
| 🟢 Ferramenta | on |
| 🔴 Assistente | A luz está agora acesa |
Se você estiver interessado em entender mais sobre o código acima, vamos detalhar na próxima seção.
Compreender o código
Para facilitar o início da criação de aplicativos corporativos com o Kernel Semântico, criamos um passo a passo que o orienta pelo processo de criação de um kernel e seu uso para interagir com serviços de IA.
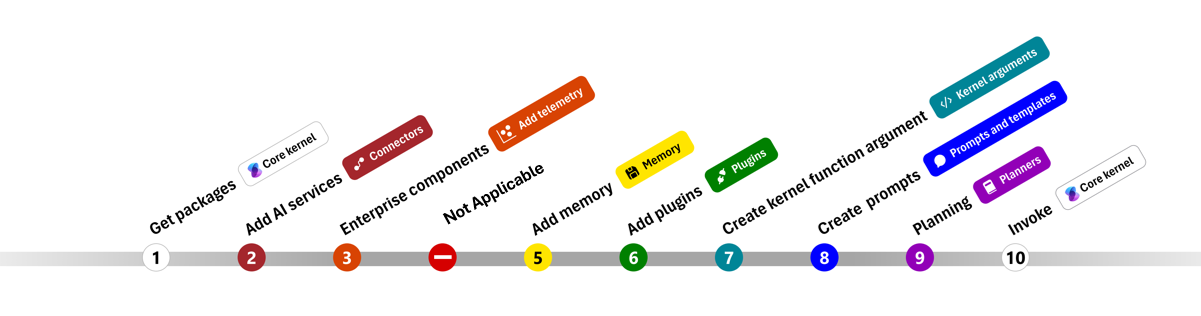
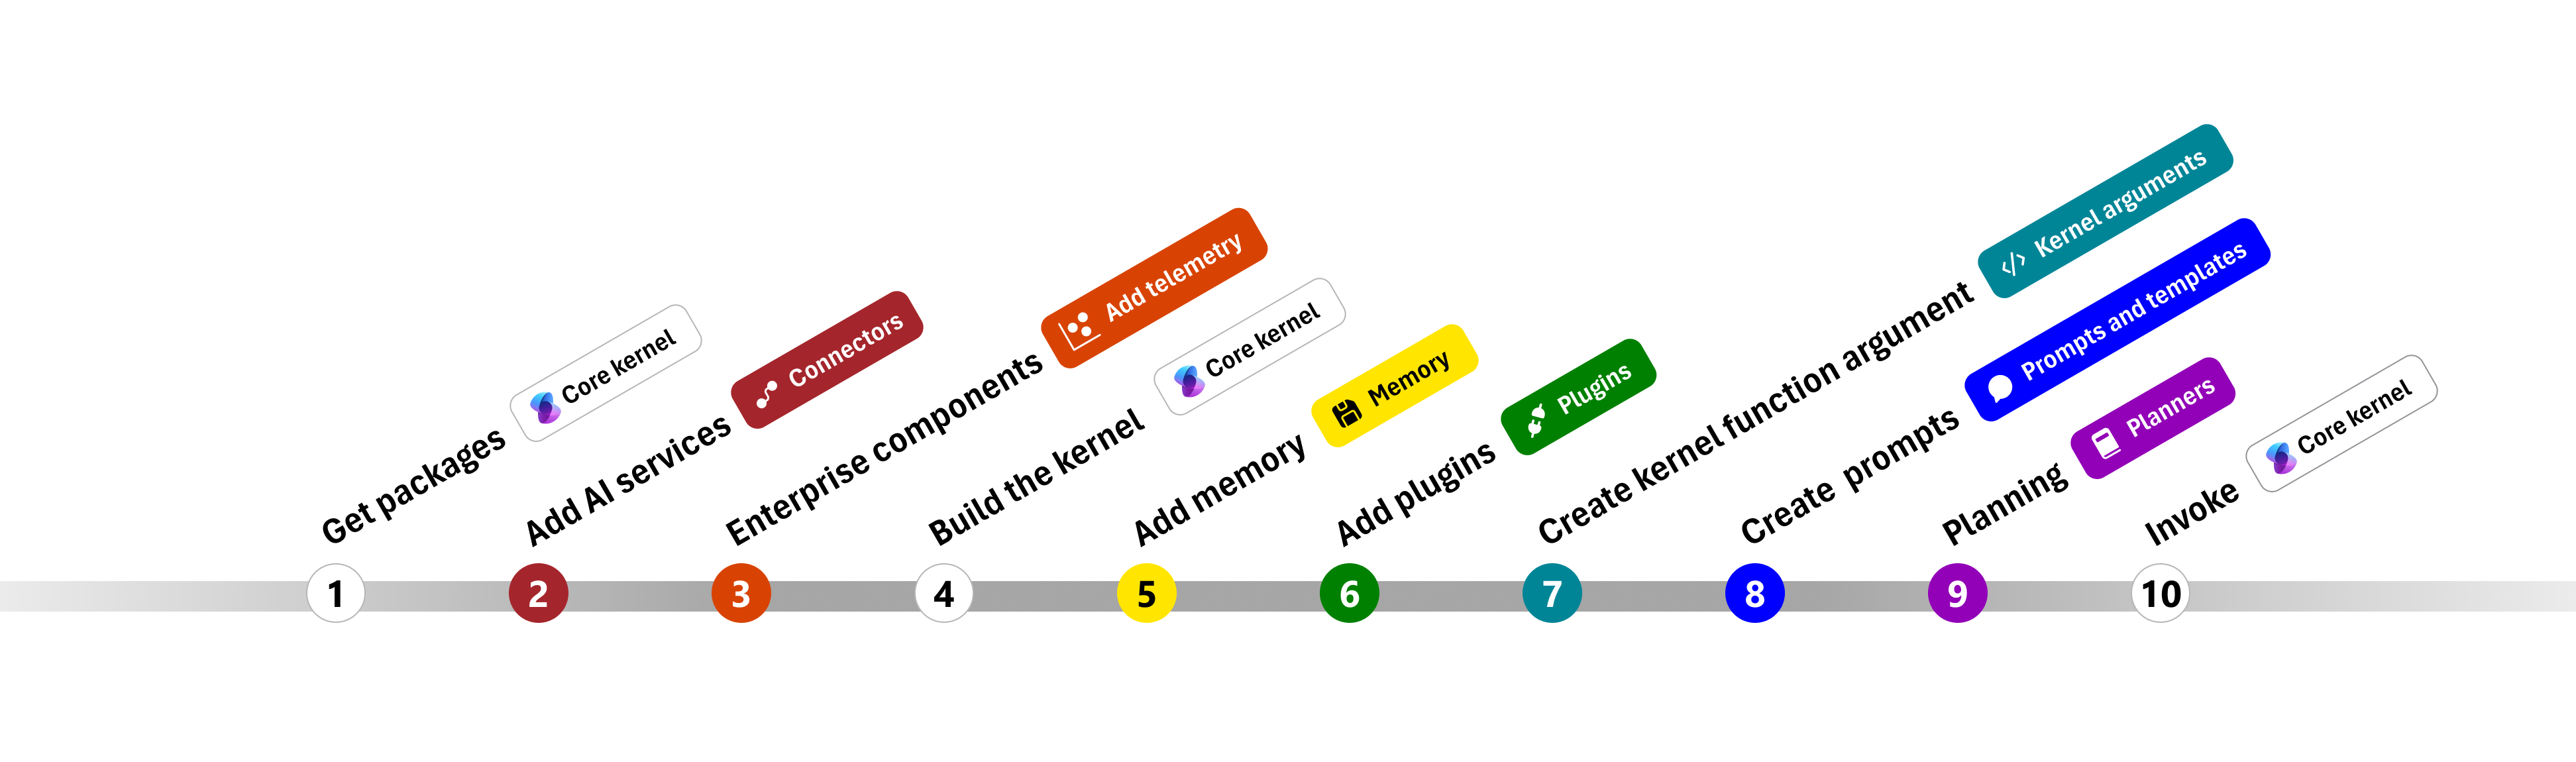
Nas seções a seguir, descompactaremos o exemplo acima percorrendo as etapas 1, 2, 3, 4, 6, 9 e 10. Tudo o que você precisa para construir um agente simples que é alimentado por um serviço de IA e pode executar seu código.
- Importar pacotes
- Adicionar serviços de IA
- Componentes empresariais
- Construa o kernel
- Adicionar memória (ignorado)
- Adicionar plugins
- Criar argumentos do kernel (ignorado)
- Criar prompts (ignorado)
- Planeamento
- Invoque
- Importar pacotes
- Adicionar serviços de IA
- Construa o kernel
- Adicionar memória (ignorado)
- Adicionar plugins
- Criar argumentos do kernel (ignorado)
- Criar prompts (ignorado)
- Planeamento
- Invoque
1) Pacotes de importação
Para este exemplo, começamos importando os seguintes pacotes:
using Microsoft.SemanticKernel;
using Microsoft.SemanticKernel.ChatCompletion;
using Microsoft.SemanticKernel.Connectors.OpenAI;
import asyncio

from semantic_kernel import Kernel
from semantic_kernel.connectors.ai.open_ai import AzureChatCompletion
from semantic_kernel.connectors.ai.function_choice_behavior import FunctionChoiceBehavior
from semantic_kernel.connectors.ai.chat_completion_client_base import ChatCompletionClientBase
from semantic_kernel.contents.chat_history import ChatHistory
from semantic_kernel.functions.kernel_arguments import KernelArguments

from semantic_kernel.connectors.ai.open_ai.prompt_execution_settings.azure_chat_prompt_execution_settings import (
    AzureChatPromptExecutionSettings,
)
import com.microsoft.semantickernel.Kernel;
import com.microsoft.semantickernel.aiservices.openai.chatcompletion.OpenAIChatCompletion;
import com.microsoft.semantickernel.contextvariables.ContextVariableTypeConverter;
import com.microsoft.semantickernel.contextvariables.ContextVariableTypes;
import com.microsoft.semantickernel.orchestration.InvocationContext;
import com.microsoft.semantickernel.orchestration.InvocationReturnMode;
import com.microsoft.semantickernel.orchestration.ToolCallBehavior;
import com.microsoft.semantickernel.plugin.KernelPlugin;
import com.microsoft.semantickernel.plugin.KernelPluginFactory;
import com.microsoft.semantickernel.services.chatcompletion.AuthorRole;
import com.microsoft.semantickernel.services.chatcompletion.ChatCompletionService;
import com.microsoft.semantickernel.services.chatcompletion.ChatHistory;
import com.microsoft.semantickernel.services.chatcompletion.ChatMessageContent;
2) Adicionar serviços de IA
Depois, adicionamos a parte mais importante de um kernel: os serviços de IA que você deseja usar. Neste exemplo, adicionamos um serviço de conclusão de chat do Azure OpenAI ao construtor do kernel.
Nota
Neste exemplo, usamos o Azure OpenAI, mas você pode usar qualquer outro serviço de conclusão de chat. Para ver a lista completa de serviços suportados, consulte o artigo sobre idiomas suportados. Se precisar de ajuda para criar um serviço diferente, consulte o artigo Serviços de IA. Lá, você encontrará orientações sobre como usar modelos OpenAI ou Azure OpenAI como serviços.
// Create kernel
var builder = Kernel.CreateBuilder()
builder.AddAzureOpenAIChatCompletion(modelId, endpoint, apiKey);
# Initialize the kernel
kernel = Kernel()

# Add Azure OpenAI chat completion
kernel.add_service(AzureChatCompletion(
    deployment_name="your_models_deployment_name",
    api_key="your_api_key",
    base_url="your_base_url",
))
// Create your AI service client
ChatCompletionService chatCompletionService = OpenAIChatCompletion.builder()
    .withModelId(MODEL_ID)
    .withOpenAIAsyncClient(client)
    .build();

// Create a kernel with Azure OpenAI chat completion and plugin
Kernel kernel = Kernel.builder()
    .withAIService(ChatCompletionService.class, chatCompletionService)
    .withPlugin(lightPlugin)
    .build();
3) Adicionar serviços empresariais
Um dos principais benefícios do uso do Semantic Kernel é que ele suporta serviços de nível empresarial. Neste exemplo, adicionamos o serviço de registro ao kernel para ajudar a depurar o agente de IA.
builder.Services.AddLogging(services => services.AddConsole().SetMinimumLevel(LogLevel.Trace));
import logging

# Set the logging level for  semantic_kernel.kernel to DEBUG.
logging.basicConfig(
    format="[%(asctime)s - %(name)s:%(lineno)d - %(levelname)s] %(message)s",
    datefmt="%Y-%m-%d %H:%M:%S",
)
logging.getLogger("kernel").setLevel(logging.DEBUG)
4) Construa o kernel e recupere serviços
Uma vez que os serviços tenham sido adicionados, construímos o kernel e recuperamos o serviço de conclusão de chat para uso posterior.
Kernel kernel = builder.Build();

// Retrieve the chat completion service
var chatCompletionService = kernel.Services.GetRequiredService<IChatCompletionService>();
Uma vez que o kernel tenha sido configurado, recuperamos o serviço de conclusão de chat para uso posterior.
Nota
Em Python, você não precisa construir explicitamente o kernel. Em vez disso, você pode acessar os serviços diretamente do objeto kernel.
chat_completion : AzureChatCompletion = kernel.get_service(type=ChatCompletionClientBase)
// Create a kernel with Azure OpenAI chat completion and plugin
Kernel kernel = Kernel.builder()
    .withAIService(ChatCompletionService.class, chatCompletionService)
    .withPlugin(lightPlugin)
    .build();
6) Adicionar plugins
Com plugins, pode dar ao seu agente de IA a capacidade de executar seu código para recuperar informações de fontes externas ou executar ações. No exemplo acima, adicionamos um plugin que permite que o agente de IA interaja com uma lâmpada. Abaixo, vamos mostrar-lhe como criar este plugin.
Criar um plugin nativo
Abaixo, você pode ver que criar um plugin nativo é tão simples quanto criar uma nova classe.
Neste exemplo, criamos um plugin que pode manipular uma lâmpada. Embora este seja um exemplo simples, este plugin demonstra rapidamente como você pode suportar ambos...
- Geração aumentada de recuperação (RAG), fornecendo ao agente de IA o estado da lâmpada
- E automação de tarefas, permitindo que o agente de IA ligue ou desligue a lâmpada.
Em seu próprio código, você pode criar um plugin que interage com qualquer serviço externo ou API para alcançar resultados semelhantes.
using System.ComponentModel;
using System.Text.Json.Serialization;
using Microsoft.SemanticKernel;

public class LightsPlugin
{
   // Mock data for the lights
   private readonly List<LightModel> lights = new()
   {
      new LightModel { Id = 1, Name = "Table Lamp", IsOn = false },
      new LightModel { Id = 2, Name = "Porch light", IsOn = false },
      new LightModel { Id = 3, Name = "Chandelier", IsOn = true }
   };

   [KernelFunction("get_lights")]
   [Description("Gets a list of lights and their current state")]
   public async Task<List<LightModel>> GetLightsAsync()
   {
      return lights;
   }

   [KernelFunction("change_state")]
   [Description("Changes the state of the light")]
   public async Task<LightModel?> ChangeStateAsync(int id, bool isOn)
   {
      var light = lights.FirstOrDefault(light => light.Id == id);

      if (light == null)
      {
         return null;
      }

      // Update the light with the new state
      light.IsOn = isOn;

      return light;
   }
}

public class LightModel
{
   [JsonPropertyName("id")]
   public int Id { get; set; }

   [JsonPropertyName("name")]
   public string Name { get; set; }

   [JsonPropertyName("is_on")]
   public bool? IsOn { get; set; }
}
from typing import Annotated
from semantic_kernel.functions import kernel_function

class LightsPlugin:
    lights = [
        {"id": 1, "name": "Table Lamp", "is_on": False},
        {"id": 2, "name": "Porch light", "is_on": False},
        {"id": 3, "name": "Chandelier", "is_on": True},
    ]

    @kernel_function(
        name="get_lights",
        description="Gets a list of lights and their current state",
    )
    def get_state(
        self,
    ) -> str:
        """Gets a list of lights and their current state."""
        return self.lights

    @kernel_function(
        name="change_state",
        description="Changes the state of the light",
    )
    def change_state(
        self,
        id: int,
        is_on: bool,
    ) -> str:
        """Changes the state of the light."""
        for light in self.lights:
            if light["id"] == id:
                light["is_on"] = is_on
                return light
        return None
public class LightsPlugin {

  // Mock data for the lights
  private final Map<Integer, LightModel> lights = new HashMap<>();

  public LightsPlugin() {
    lights.put(1, new LightModel(1, "Table Lamp", false));
    lights.put(2, new LightModel(2, "Porch light", false));
    lights.put(3, new LightModel(3, "Chandelier", true));
  }

  @DefineKernelFunction(name = "get_lights", description = "Gets a list of lights and their current state")
  public List<LightModel> getLights() {
    System.out.println("Getting lights");
    return new ArrayList<>(lights.values());
  }

  @DefineKernelFunction(name = "change_state", description = "Changes the state of the light")
  public LightModel changeState(
      @KernelFunctionParameter(name = "id", description = "The ID of the light to change") int id,
      @KernelFunctionParameter(name = "isOn", description = "The new state of the light") boolean isOn) {
    System.out.println("Changing light " + id + " " + isOn);
    if (!lights.containsKey(id)) {
      throw new IllegalArgumentException("Light not found");
    }

    lights.get(id).setIsOn(isOn);

    return lights.get(id);
  }
}
Adicione o plugin ao kernel
Depois de criar seu plugin, você pode adicioná-lo ao kernel para que o agente de IA possa acessá-lo. No exemplo, adicionamos a LightsPlugin classe ao kernel.
// Add the plugin to the kernel
kernel.Plugins.AddFromType<LightsPlugin>("Lights");
# Add the plugin to the kernel
kernel.add_plugin(
    LightsPlugin(),
    plugin_name="Lights",
)
// Import the LightsPlugin
KernelPlugin lightPlugin = KernelPluginFactory.createFromObject(new LightsPlugin(),
    "LightsPlugin");
9) Planeamento
O Kernel Semântico aproveita a chamada de função – um recurso nativo da maioria dos LLMs – para fornecer planejamento. Com a chamada de função, os LLMs podem solicitar (ou chamar) uma função específica para satisfazer a solicitação de um usuário. Em seguida, o Kernel Semântico organiza a solicitação para a função apropriada em sua base de código e retorna os resultados de volta ao LLM para que o agente de IA possa gerar uma resposta final.
Para habilitar a chamada automática de funções, primeiro precisamos criar as configurações de execução apropriadas para que o Kernel Semântico saiba invocar automaticamente as funções no kernel quando o agente de IA as solicitar.
OpenAIPromptExecutionSettings openAIPromptExecutionSettings = new()
{
    FunctionChoiceBehavior = FunctionChoiceBehavior.Auto()
};
execution_settings = AzureChatPromptExecutionSettings()
execution_settings.function_choice_behavior = FunctionChoiceBehavior.Auto()
// Enable planning
InvocationContext invocationContext = new InvocationContext.Builder()
    .withReturnMode(InvocationReturnMode.LAST_MESSAGE_ONLY)
    .withToolCallBehavior(ToolCallBehavior.allowAllKernelFunctions(true))
    .build();
10) Invoque
Finalmente, invocamos o agente de IA com o plugin. O código de exemplo demonstra como gerar uma resposta que não é de streaming, mas você também pode gerar uma resposta de streaming usando o GetStreamingChatMessageContentAsync método.
// Create chat history
var history = new ChatHistory();

// Get the response from the AI
var result = await chatCompletionService.GetChatMessageContentAsync(
    history,
    executionSettings: openAIPromptExecutionSettings,
    kernel: kernel
);
Execute o programa usando este comando:
dotnet run
# Create a history of the conversation
history = ChatHistory()

# Get the response from the AI
result = (await chat_completion.get_chat_message_contents(
    chat_history=history,
    settings=execution_settings,
    kernel=kernel,
    arguments=KernelArguments(),
))[0]
userInput = scanner.nextLine();
// Add user input
history.addUserMessage(userInput);

// Prompt AI for response to users input
List<ChatMessageContent<?>> results = chatCompletionService
    .getChatMessageContentsAsync(history, kernel, invocationContext)
    .block();
Próximos passos
Neste guia, você aprendeu como começar rapidamente com o Kernel Semântico criando um agente de IA simples que pode interagir com um serviço de IA e executar seu código. Para ver mais exemplos e aprender a criar agentes de IA mais complexos, confira nossos exemplos detalhados.