Nota
O acesso a esta página requer autorização. Pode tentar iniciar sessão ou alterar os diretórios.
O acesso a esta página requer autorização. Pode tentar alterar os diretórios.
No tutorial anterior da série, configurámos uma página Web que contém uma cena Babylon.js com uma câmara e uma luz. Neste tutorial, vamos criar e adicionar um modelo de piano à cena.
Neste tutorial, vai aprender a:
- Criar, posicionar e intercalar malhas
- Criar um teclado para piano a partir de malhas de caixa
- Importar um modelo 3D de uma moldura de piano
Antes de começar
Confirme que já passou pelo tutorial anterior da série e que está pronto para continuar a adicionar ao código.
index.html
<html>
    <head>
        <title>Piano in BabylonJS</title>
        <script src="https://cdn.babylonjs.com/babylon.js"></script>
        <script src="scene.js"></script>
        <style>
            body,#renderCanvas { width: 100%; height: 100%;}
        </style>
    </head>
    <body>
        <canvas id="renderCanvas"></canvas>
        <script type="text/javascript">
            const canvas = document.getElementById("renderCanvas");
            const engine = new BABYLON.Engine(canvas, true);

            createScene(engine).then(sceneToRender => {
                engine.runRenderLoop(() => sceneToRender.render());
            });

            // Watch for browser/canvas resize events
            window.addEventListener("resize", function () {
                engine.resize();
            });
        </script>
    </body>
</html>
scene.js
const createScene = async function(engine) {
    const scene = new BABYLON.Scene(engine);

    const alpha =  3*Math.PI/2;
    const beta = Math.PI/50;
    const radius = 220;
    const target = new BABYLON.Vector3(0, 0, 0);

    const camera = new BABYLON.ArcRotateCamera("Camera", alpha, beta, radius, target, scene);
    camera.attachControl(canvas, true);

    const light = new BABYLON.HemisphericLight("light", new BABYLON.Vector3(0, 1, 0), scene);
    light.intensity = 0.6;

    const xrHelper = await scene.createDefaultXRExperienceAsync();

    return scene;
}
Introdução
Vamos começar por criar um teclado para piano simples que tenha esta estrutura:
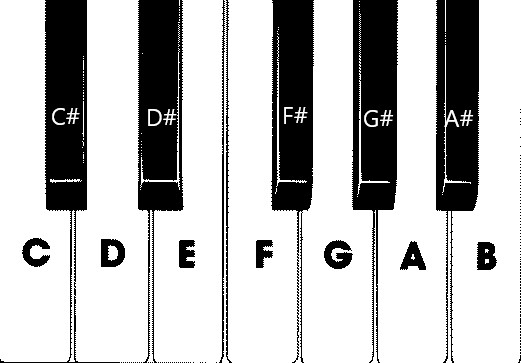
Nesta imagem, existem 7 teclas brancas e 5 teclas pretas, cada uma etiquetada com o nome da nota. Um teclado completo para piano com 88 teclas contém 7 repetições completas desta seleção de teclas (também denominadas registo) e 4 teclas adicionais. Cada registo tem o dobro da frequência do registo anterior. Por exemplo, a frequência de tom de C5 (o que significa que a nota C no quinto registo) é dupla de C4, a frequência de tom de D5 é dupla de D4 e assim sucessivamente.
Visualmente, cada registo tem exatamente o mesmo aspeto que outro, pelo que podemos começar por investigar como criar um teclado de piano simples com esta seleção de teclas. Mais tarde, podemos encontrar uma forma de expandir o âmbito para um teclado de piano completo com 88 teclas.
Criar um teclado para piano simples
Nota
Embora seja possível encontrar modelos 3D pré-criados de teclados para piano a partir de origens online e importá-los para a nossa página Web, iremos criar o teclado do zero neste tutorial para permitir a máxima personalização e mostrar como os modelos 3D podem ser criados através de Babylon.js.
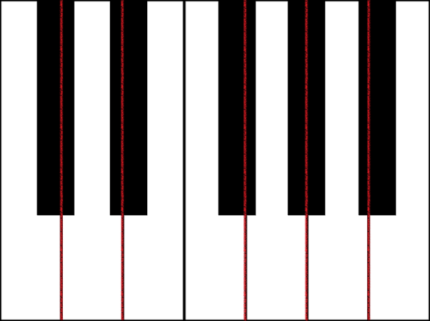
Antes de começarmos a criar malhas para criar o teclado, repare que cada tecla preta não está perfeitamente alinhada no meio das duas teclas brancas à sua volta e que nem todas as teclas têm a mesma largura. Isto significa que temos de criar e posicionar a malha para cada chave individualmente.
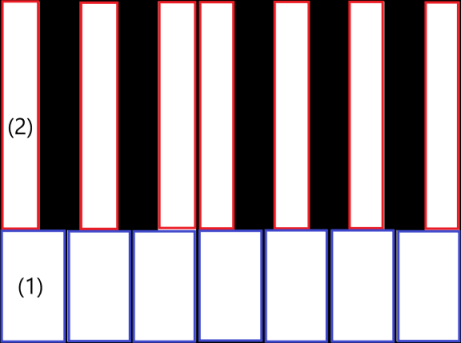
Para as teclas brancas, podemos observar que cada tecla branca é composta por duas partes: (1) a parte inferior abaixo das teclas pretas e (2) a parte superior junto às teclas pretas. As duas partes têm dimensões diferentes, mas são empilhadas em conjunto para cretar uma chave branca completa.
Eis o código para criar uma única chave branca para a nota C (ainda não se preocupe em adicioná-lo a scene.js ):
const whiteKeyBottom = BABYLON.MeshBuilder.CreateBox("whiteKeyBottom", {width: 2.3, height: 1.5, depth: 4.5}, scene);
const whiteKeyTop = BABYLON.MeshBuilder.CreateBox("whiteKeyTop", {width: 1.4, height: 1.5, depth: 5}, scene);
whiteKeyTop.position.z += 4.75;
whiteKeyTop.position.x -= 0.45;

// Parameters of BABYLON.Mesh.MergeMeshes:
// (arrayOfMeshes, disposeSource, allow32BitsIndices, meshSubclass, subdivideWithSubMeshes, multiMultiMaterials)
const whiteKeyV1 = BABYLON.Mesh.MergeMeshes([whiteKeyBottom, whiteKeyTop], true, false, null, false, false);
whiteKeyV1.material = whiteMat;
whiteKeyV1.name = "C4";
Aqui criámos duas malhas box , uma para a parte inferior e outra para a parte superior da chave branca. Em seguida, modificamos a posição da parte superior para empilhá-la em cima da parte inferior e movê-la para a esquerda para deixar espaço para a chave preta vizinha (C#).
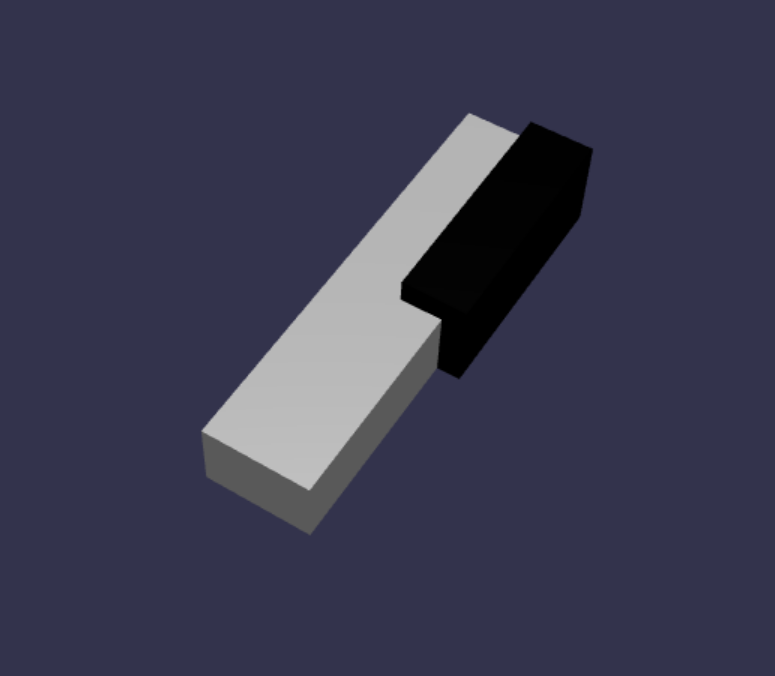
Por fim, estas duas partes foram intercaladas com a função MergeMeshes para se tornarem uma chave branca completa. Esta é a malha resultante que este código produziria:

Criar uma chave preta é mais simples. Uma vez que todas as teclas pretas são da forma de uma caixa, podemos criar uma chave preta apenas ao criar uma malha de caixa com um StandardMaterial de cor preta.
Nota
Uma vez que a cor de malha predefinida é um cinzento claro que se assemelha a branco, este tutorial não inclui passos para adicionar um material de cor branca às teclas brancas. No entanto, não hesite em adicionar o material se quiser uma cor branca verdadeira e brilhante nas teclas brancas.
Eis o código para criar a chave preta C# (também não se preocupe em adicioná-lo a scene.js ):
const blackMat = new BABYLON.StandardMaterial("black");
blackMat.diffuseColor = new BABYLON.Color3(0, 0, 0);

const blackKey = BABYLON.MeshBuilder.CreateBox("C#4", {width: 1.4, height: 2, depth: 5}, scene);
blackKey.position.z += 4.75;
blackKey.position.y += 0.25;
blackKey.position.x += 0.95;
blackKey.material = blackMat;
A chave preta produzida por este código (juntamente com a chave branca anterior) teria o seguinte aspeto:
Como pode ver, criar cada chave pode resultar em muitos códigos semelhantes, uma vez que temos de especificar cada uma das respetivas dimensões e posição. Vamos tentar tornar o processo de criação mais eficiente na próxima secção.
Criar um teclado para piano simples de forma eficiente
Embora cada tecla branca tenha uma forma ligeiramente diferente uma da outra, todas elas podem ser criadas ao combinar uma parte superior e uma parte inferior. Vamos implementar uma função genérica para criar e posicionar qualquer chave branca.
Adicione a função abaixo a scene.js, fora da
createScene()função:const buildKey = function (scene, parent, props) { if (props.type === "white") { /* Props for building a white key should contain: note, topWidth, bottomWidth, topPositionX, wholePositionX, register, referencePositionX As an example, the props for building the middle C white key would be {type: "white", note: "C", topWidth: 1.4, bottomWidth: 2.3, topPositionX: -0.45, wholePositionX: -14.4, register: 4, referencePositionX: 0} */ // Create bottom part const bottom = BABYLON.MeshBuilder.CreateBox("whiteKeyBottom", {width: props.bottomWidth, height: 1.5, depth: 4.5}, scene); // Create top part const top = BABYLON.MeshBuilder.CreateBox("whiteKeyTop", {width: props.topWidth, height: 1.5, depth: 5}, scene); top.position.z = 4.75; top.position.x += props.topPositionX; // Merge bottom and top parts // Parameters of BABYLON.Mesh.MergeMeshes: (arrayOfMeshes, disposeSource, allow32BitsIndices, meshSubclass, subdivideWithSubMeshes, multiMultiMaterials) const key = BABYLON.Mesh.MergeMeshes([bottom, top], true, false, null, false, false); key.position.x = props.referencePositionX + props.wholePositionX; key.name = props.note + props.register; key.parent = parent; return key; } }Neste bloco de código, criámos uma função chamada
buildKey(), que compila e devolve uma chave branca seprops.typefor"white". Ao identificar o tipo da chave no parâmetroprops, podemos criar teclas pretas e chaves brancas na mesma função ao ramificar com uma instrução if..Os parâmetros de
buildKey()são:- cena: cena em que a chave está
- principal: elemento principal da malha (isto permite-nos agrupar todas as teclas num único elemento principal)
- adereços: propriedades da chave que será criada
O
propspara uma chave branca irá conter os seguintes itens:- tipo: "branco"
- name: o nome da nota que a chave representa
- topWidth: largura da parte superior
- bottomWidth: largura da parte inferior
- topPositionX: x-position da parte superior relativa à parte inferior
- wholePositionX: x-position da chave inteira relativamente ao ponto final do registo (o limite direito da chave B).
- registar: registar a que a chave pertence (um número entre 0 e 8)
- referencePositionX: coordenada x do ponto final do registo (utilizado como ponto de referência).
Ao separar
wholePositionXereferencePositionX, conseguimos inicializar ospropsparâmetros necessários para criar um tipo específico de chave (por exemplo, C) em qualquer registo e, em seguida, adicionarregisterereferencePositionXaopropscriar essa chave num registo específico (por exemplo, C4, C5).Da mesma forma, também podemos escrever uma função genérica para criar uma chave preta. Vamos expandir a
buildKey()função para incluir essa lógica:const buildKey = function (scene, parent, props) { if (props.type === "white") { /* Props for building a white key should contain: note, topWidth, bottomWidth, topPositionX, wholePositionX, register, referencePositionX As an example, the props for building the middle C white key would be {type: "white", note: "C", topWidth: 1.4, bottomWidth: 2.3, topPositionX: -0.45, wholePositionX: -14.4, register: 4, referencePositionX: 0} */ // Create bottom part const bottom = BABYLON.MeshBuilder.CreateBox("whiteKeyBottom", {width: props.bottomWidth, height: 1.5, depth: 4.5}, scene); // Create top part const top = BABYLON.MeshBuilder.CreateBox("whiteKeyTop", {width: props.topWidth, height: 1.5, depth: 5}, scene); top.position.z = 4.75; top.position.x += props.topPositionX; // Merge bottom and top parts // Parameters of BABYLON.Mesh.MergeMeshes: (arrayOfMeshes, disposeSource, allow32BitsIndices, meshSubclass, subdivideWithSubMeshes, multiMultiMaterials) const key = BABYLON.Mesh.MergeMeshes([bottom, top], true, false, null, false, false); key.position.x = props.referencePositionX + props.wholePositionX; key.name = props.note + props.register; key.parent = parent; return key; } else if (props.type === "black") { /* Props for building a black key should contain: note, wholePositionX, register, referencePositionX As an example, the props for building the C#4 black key would be {type: "black", note: "C#", wholePositionX: -13.45, register: 4, referencePositionX: 0} */ // Create black color material const blackMat = new BABYLON.StandardMaterial("black"); blackMat.diffuseColor = new BABYLON.Color3(0, 0, 0); // Create black key const key = BABYLON.MeshBuilder.CreateBox(props.note + props.register, {width: 1.4, height: 2, depth: 5}, scene); key.position.z += 4.75; key.position.y += 0.25; key.position.x = props.referencePositionX + props.wholePositionX; key.material = blackMat; key.parent = parent; return key; } }O
propspara uma chave preta contém os seguintes itens:- tipo: "preto"
- name: o nome da nota que a chave representa
- wholePositionX: x-position da chave inteira relativamente ao ponto final do registo (o limite direito da chave B)
- registar: registar a que a chave pertence (um número entre 0 e 8)
- referencePositionX: coordenada x do ponto final do registo (utilizado como ponto de referência).
O
propspara criar uma chave preta é muito mais simples porque criar uma chave preta apenas envolve criar uma caixa, e a largura e a posição z de cada tecla preta são as mesmas.Agora que temos uma forma mais eficiente de criar as teclas, vamos inicializar uma matriz que armazena o
propspara cada chave que corresponde a uma nota num registo e, em seguida, chamar abuildKey()função com cada uma delas para criar um teclado simples no 4º registo.Também vamos criar um TransformNode com o nome
keyboardpara atuar como o pai de todas as teclas de piano. Uma vez que qualquer alteração de posição ou dimensionamento aplicada ao elemento principal também seria aplicada às crianças, agrupar as chaves desta forma permitir-nos-á dimensioná-las ou movê-las como um todo.Acrescente as seguintes linhas de código na
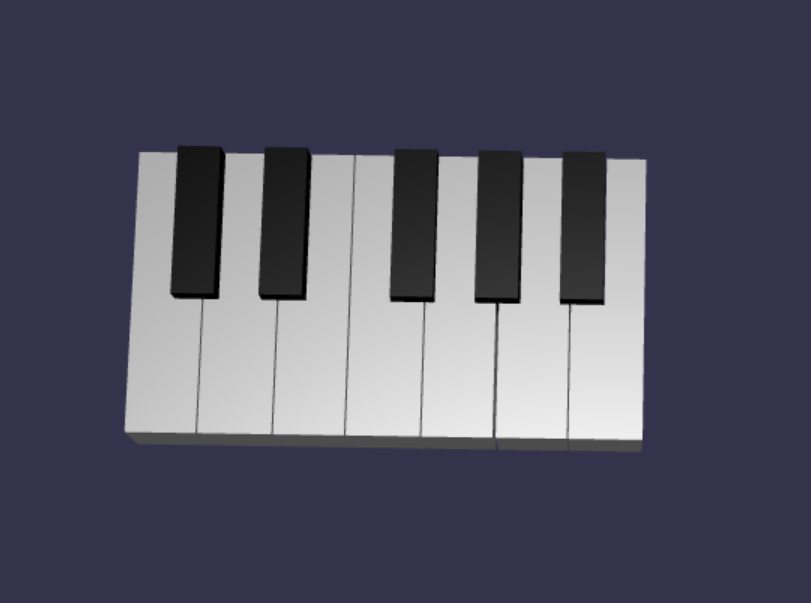
createScene()função:const keyParams = [ {type: "white", note: "C", topWidth: 1.4, bottomWidth: 2.3, topPositionX: -0.45, wholePositionX: -14.4}, {type: "black", note: "C#", wholePositionX: -13.45}, {type: "white", note: "D", topWidth: 1.4, bottomWidth: 2.4, topPositionX: 0, wholePositionX: -12}, {type: "black", note: "D#", wholePositionX: -10.6}, {type: "white", note: "E", topWidth: 1.4, bottomWidth: 2.3, topPositionX: 0.45, wholePositionX: -9.6}, {type: "white", note: "F", topWidth: 1.3, bottomWidth: 2.4, topPositionX: -0.55, wholePositionX: -7.2}, {type: "black", note: "F#", wholePositionX: -6.35}, {type: "white", note: "G", topWidth: 1.3, bottomWidth: 2.3, topPositionX: -0.2, wholePositionX: -4.8}, {type: "black", note: "G#", wholePositionX: -3.6}, {type: "white", note: "A", topWidth: 1.3, bottomWidth: 2.3, topPositionX: 0.2, wholePositionX: -2.4}, {type: "black", note: "A#", wholePositionX: -0.85}, {type: "white", note: "B", topWidth: 1.3, bottomWidth: 2.4, topPositionX: 0.55, wholePositionX: 0}, ] // Transform Node that acts as the parent of all piano keys const keyboard = new BABYLON.TransformNode("keyboard"); keyParams.forEach(key => { buildKey(scene, keyboard, Object.assign({register: 4, referencePositionX: 0}, key)); })Como provavelmente já reparou, neste bloco de código, estamos a colocar todas as chaves relativamente à origem do espaço.
Eis o código que scene.js contém até agora:
const buildKey = function (scene, parent, props) { if (props.type === "white") { /* Props for building a white key should contain: note, topWidth, bottomWidth, topPositionX, wholePositionX, register, referencePositionX As an example, the props for building the middle C white key would be {type: "white", note: "C", topWidth: 1.4, bottomWidth: 2.3, topPositionX: -0.45, wholePositionX: -14.4, register: 4, referencePositionX: 0} */ // Create bottom part const bottom = BABYLON.MeshBuilder.CreateBox("whiteKeyBottom", {width: props.bottomWidth, height: 1.5, depth: 4.5}, scene); // Create top part const top = BABYLON.MeshBuilder.CreateBox("whiteKeyTop", {width: props.topWidth, height: 1.5, depth: 5}, scene); top.position.z = 4.75; top.position.x += props.topPositionX; // Merge bottom and top parts // Parameters of BABYLON.Mesh.MergeMeshes: (arrayOfMeshes, disposeSource, allow32BitsIndices, meshSubclass, subdivideWithSubMeshes, multiMultiMaterials) const key = BABYLON.Mesh.MergeMeshes([bottom, top], true, false, null, false, false); key.position.x = props.referencePositionX + props.wholePositionX; key.name = props.note + props.register; key.parent = parent; return key; } else if (props.type === "black") { /* Props for building a black key should contain: note, wholePositionX, register, referencePositionX As an example, the props for building the C#4 black key would be {type: "black", note: "C#", wholePositionX: -13.45, register: 4, referencePositionX: 0} */ // Create black color material const blackMat = new BABYLON.StandardMaterial("black"); blackMat.diffuseColor = new BABYLON.Color3(0, 0, 0); // Create black key const key = BABYLON.MeshBuilder.CreateBox(props.note + props.register, {width: 1.4, height: 2, depth: 5}, scene); key.position.z += 4.75; key.position.y += 0.25; key.position.x = props.referencePositionX + props.wholePositionX; key.material = blackMat; key.parent = parent; return key; } } const createScene = async function(engine) { const scene = new BABYLON.Scene(engine); const alpha = 3*Math.PI/2; const beta = Math.PI/50; const radius = 220; const target = new BABYLON.Vector3(0, 0, 0); const camera = new BABYLON.ArcRotateCamera("Camera", alpha, beta, radius, target, scene); camera.attachControl(canvas, true); const light = new BABYLON.HemisphericLight("light", new BABYLON.Vector3(0, 1, 0), scene); light.intensity = 0.6; const keyParams = [ {type: "white", note: "C", topWidth: 1.4, bottomWidth: 2.3, topPositionX: -0.45, wholePositionX: -14.4}, {type: "black", note: "C#", wholePositionX: -13.45}, {type: "white", note: "D", topWidth: 1.4, bottomWidth: 2.4, topPositionX: 0, wholePositionX: -12}, {type: "black", note: "D#", wholePositionX: -10.6}, {type: "white", note: "E", topWidth: 1.4, bottomWidth: 2.3, topPositionX: 0.45, wholePositionX: -9.6}, {type: "white", note: "F", topWidth: 1.3, bottomWidth: 2.4, topPositionX: -0.55, wholePositionX: -7.2}, {type: "black", note: "F#", wholePositionX: -6.35}, {type: "white", note: "G", topWidth: 1.3, bottomWidth: 2.3, topPositionX: -0.2, wholePositionX: -4.8}, {type: "black", note: "G#", wholePositionX: -3.6}, {type: "white", note: "A", topWidth: 1.3, bottomWidth: 2.3, topPositionX: 0.2, wholePositionX: -2.4}, {type: "black", note: "A#", wholePositionX: -0.85}, {type: "white", note: "B", topWidth: 1.3, bottomWidth: 2.4, topPositionX: 0.55, wholePositionX: 0}, ] // Transform Node that acts as the parent of all piano keys const keyboard = new BABYLON.TransformNode("keyboard"); keyParams.forEach(key => { buildKey(scene, keyboard, Object.assign({register: 4, referencePositionX: 0}, key)); }) const xrHelper = await scene.createDefaultXRExperienceAsync(); return scene; }Este é o aspeto do teclado resultante:
Expandir para um piano de 88 teclas
Nesta secção, vamos expandir a utilização das funções de criação de teclas para gerar um teclado de piano completo de 88 teclas.
Como mencionado anteriormente, um teclado de piano cheio de 88 teclas contém 7 registos repetidos e 4 outras notas. 3 dessas notas adicionais estão no registo 0 (extremidade esquerda do teclado) e 1 está no registo 8 (extremidade direita do teclado).

Primeiro, vamos trabalhar na criação das 7 repetições completas ao adicionar um ciclo adicional à volta do ciclo que escrevemos anteriormente. Substitua o ciclo anterior da
buildKey()função pelo seguinte código:// Register 1 through 7 var referencePositionX = -2.4*14; for (let register = 1; register <= 7; register++) { keyParams.forEach(key => { buildKey(scene, keyboard, Object.assign({register: register, referencePositionX: referencePositionX}, key)); }) referencePositionX += 2.4*7; }Neste ciclo, vamos criar as chaves para registar 1 a 7 e incrementar a posição de referência sempre que avançarmos para o registo seguinte.
Em seguida, vamos criar as restantes chaves. Adicione o seguinte fragmento à
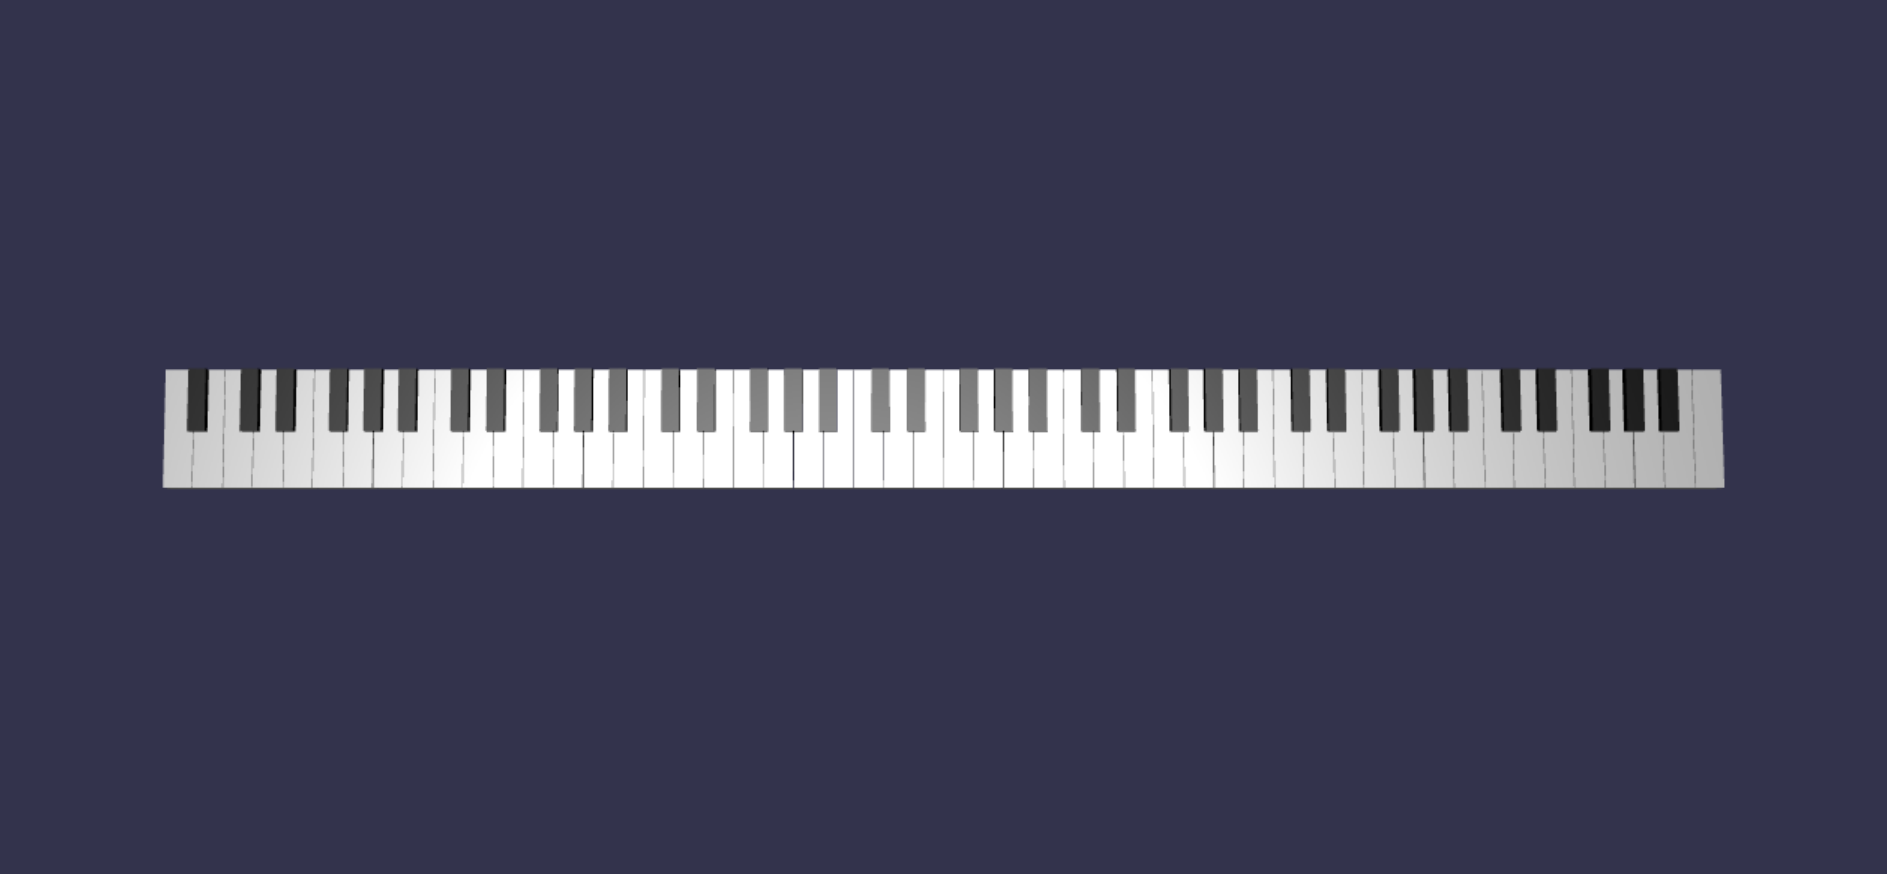
createScene()função:// Register 0 buildKey(scene, keyboard, {type: "white", note: "A", topWidth: 1.9, bottomWidth: 2.3, topPositionX: -0.20, wholePositionX: -2.4, register: 0, referencePositionX: -2.4*21}); keyParams.slice(10, 12).forEach(key => { buildKey(scene, keyboard, Object.assign({register: 0, referencePositionX: -2.4*21}, key)); }) // Register 8 buildKey(scene, keyboard, {type: "white", note: "C", topWidth: 2.3, bottomWidth: 2.3, topPositionX: 0, wholePositionX: -2.4*6, register: 8, referencePositionX: 84});Tenha em atenção que a tecla mais à esquerda e a tecla mais à direita do teclado para piano não se encaixam nas dimensões dos adereços definidos em
keyParams(porque não estão ao lado de uma tecla preta na extremidade), pelo que temos de definir um novopropsobjeto para cada um deles especificar a sua forma especial.O teclado produzido deverá ter o seguinte aspeto depois de efetuar as alterações:
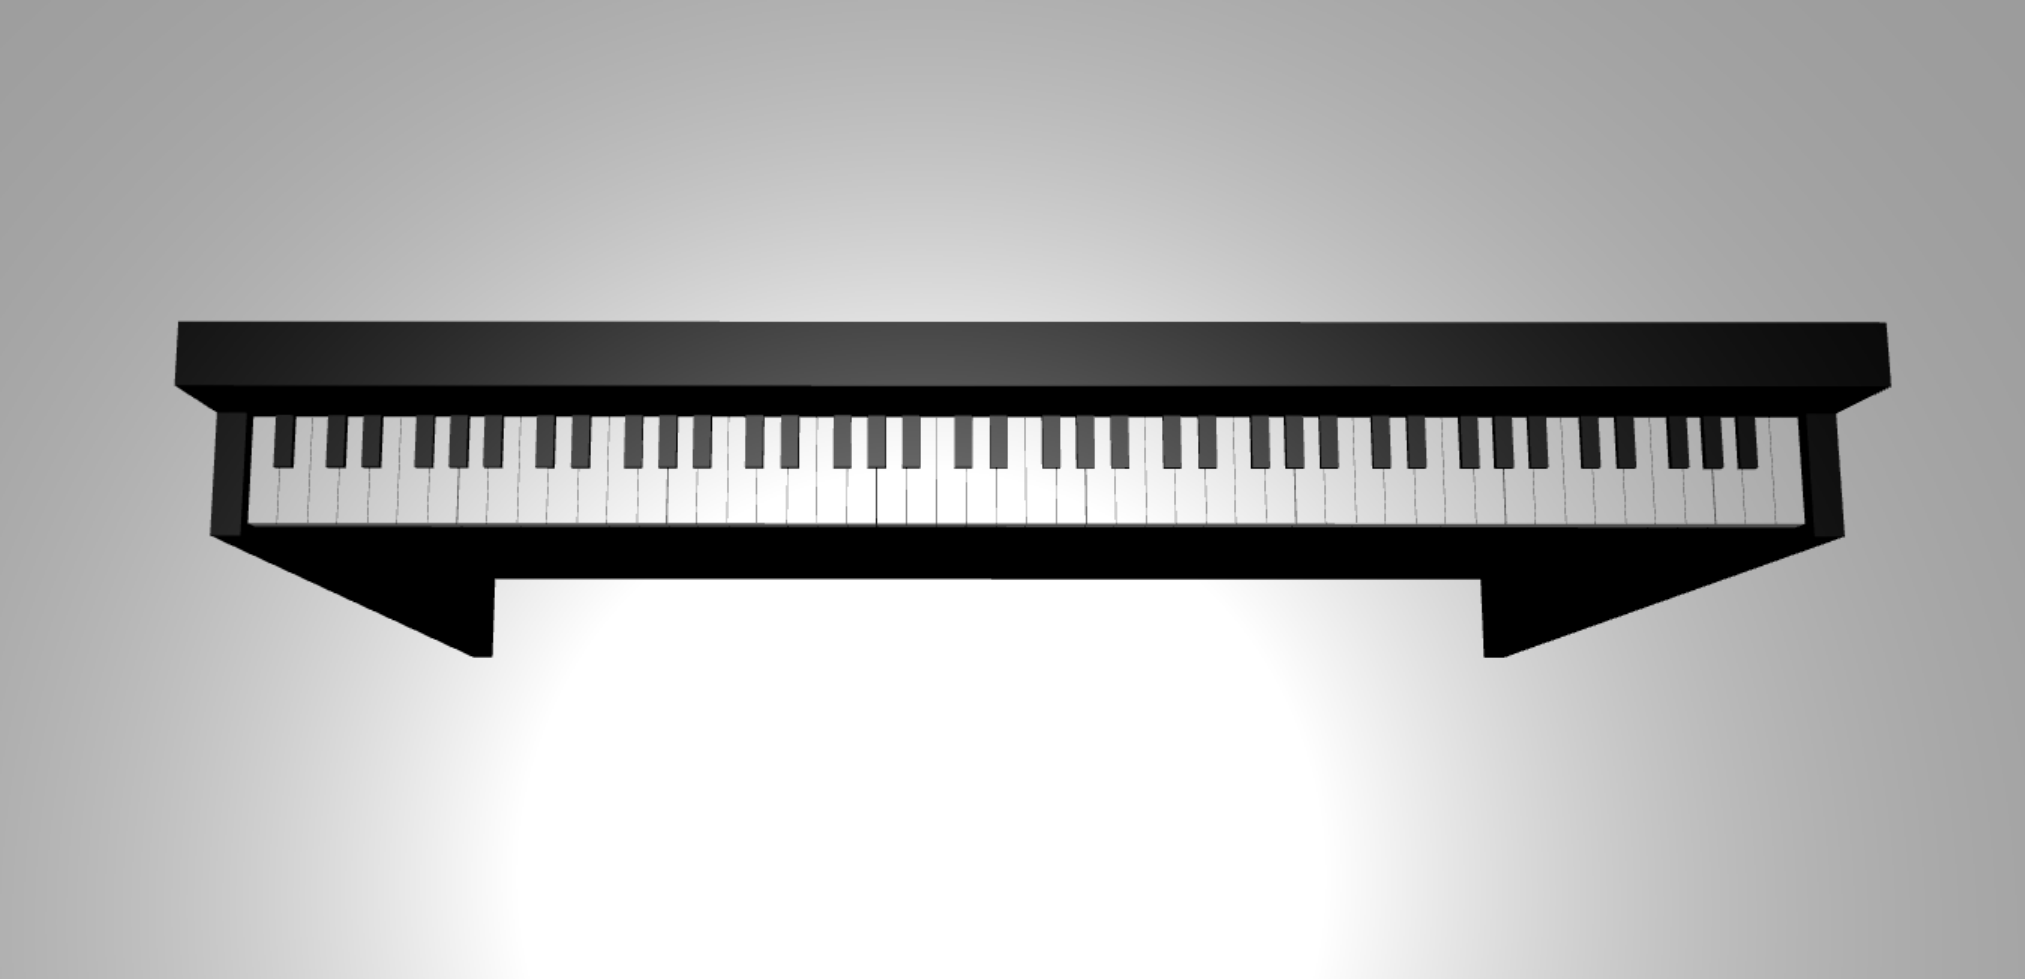
Adicionar uma moldura de piano
A cena parece um pouco estranha com apenas um teclado a flutuar no espaço. Vamos adicionar uma moldura de piano à volta do teclado para criar o aspeto de um piano de stand-up.
À semelhança da forma como criámos as teclas, também podemos criar a moldura ao posicionar e combinar um grupo de malhas de caixa.
No entanto, deixaremos esse desafio para que experimente sozinho e utilize BABYLON. SceneLoader.ImportMesh para importar uma malha pré-criada de uma moldura de piano de stand-up. Acrescente este código a
createScene():// Transform node that acts as the parent of all piano components const piano = new BABYLON.TransformNode("piano"); keyboard.parent = piano; // Import and scale piano frame BABYLON.SceneLoader.ImportMesh("frame", "https://raw.githubusercontent.com/MicrosoftDocs/mixed-reality/docs/mixed-reality-docs/mr-dev-docs/develop/javascript/tutorials/babylonjs-webxr-piano/files/", "pianoFrame.babylon", scene, function(meshes) { const frame = meshes[0]; frame.parent = piano; });Tenha em atenção que estamos, mais uma vez, a criar um elemento principal
TransformNodecom o nomepianopara agrupar o teclado e a moldura como um todo. Isto tornará mais fácil mover ou dimensionar todo o piano se alguma vez precisarmos de o fazer.Assim que a moldura for importada, tenha em atenção que o teclado está na parte inferior da moldura (uma vez que as coordenadas y das teclas estão em 0 por predefinição). Vamos levantar o teclado para que se encaixe na moldura de piano de stand-up:
// Lift piano keys
keyboard.position.y += 80;
Uma
keyboardvez que é o pai de todas as teclas de piano, podemos levantar todas as teclas de piano mudando apenas a posição y dekeyboard.O código final de scene.js deverá ter o seguinte aspeto:
const buildKey = function (scene, parent, props) {
    if (props.type === "white") {
        /*
        Props for building a white key should contain:
        note, topWidth, bottomWidth, topPositionX, wholePositionX, register, referencePositionX

        As an example, the props for building the middle C white key would be
        {type: "white", note: "C", topWidth: 1.4, bottomWidth: 2.3, topPositionX: -0.45, wholePositionX: -14.4, register: 4, referencePositionX: 0}
        */

        // Create bottom part
        const bottom = BABYLON.MeshBuilder.CreateBox("whiteKeyBottom", {width: props.bottomWidth, height: 1.5, depth: 4.5}, scene);

        // Create top part
        const top = BABYLON.MeshBuilder.CreateBox("whiteKeyTop", {width: props.topWidth, height: 1.5, depth: 5}, scene);
        top.position.z =  4.75;
        top.position.x += props.topPositionX;

        // Merge bottom and top parts
        // Parameters of BABYLON.Mesh.MergeMeshes: (arrayOfMeshes, disposeSource, allow32BitsIndices, meshSubclass, subdivideWithSubMeshes, multiMultiMaterials)
        const key = BABYLON.Mesh.MergeMeshes([bottom, top], true, false, null, false, false);
        key.position.x = props.referencePositionX + props.wholePositionX;
        key.name = props.note + props.register;
        key.parent = parent;

        return key;
    }
    else if (props.type === "black") {
        /*
        Props for building a black key should contain:
        note, wholePositionX, register, referencePositionX

        As an example, the props for building the C#4 black key would be
        {type: "black", note: "C#", wholePositionX: -13.45, register: 4, referencePositionX: 0}
        */

        // Create black color material
        const blackMat = new BABYLON.StandardMaterial("black");
        blackMat.diffuseColor = new BABYLON.Color3(0, 0, 0);

        // Create black key
        const key = BABYLON.MeshBuilder.CreateBox(props.note + props.register, {width: 1.4, height: 2, depth: 5}, scene);
        key.position.z += 4.75;
        key.position.y += 0.25;
        key.position.x = props.referencePositionX + props.wholePositionX;
        key.material = blackMat;
        key.parent = parent;

        return key;
    }
}

const createScene = async function(engine) {
    const scene = new BABYLON.Scene(engine);

    const alpha =  3*Math.PI/2;
    const beta = Math.PI/50;
    const radius = 220;
    const target = new BABYLON.Vector3(0, 0, 0);

    const camera = new BABYLON.ArcRotateCamera("Camera", alpha, beta, radius, target, scene);
    camera.attachControl(canvas, true);

    const light = new BABYLON.HemisphericLight("light", new BABYLON.Vector3(0, 1, 0), scene);
    light.intensity = 0.6;

    const keyParams = [
        {type: "white", note: "C", topWidth: 1.4, bottomWidth: 2.3, topPositionX: -0.45, wholePositionX: -14.4},
        {type: "black", note: "C#", wholePositionX: -13.45},
        {type: "white", note: "D", topWidth: 1.4, bottomWidth: 2.4, topPositionX: 0, wholePositionX: -12},
        {type: "black", note: "D#", wholePositionX: -10.6},
        {type: "white", note: "E", topWidth: 1.4, bottomWidth: 2.3, topPositionX: 0.45, wholePositionX: -9.6},
        {type: "white", note: "F", topWidth: 1.3, bottomWidth: 2.4, topPositionX: -0.55, wholePositionX: -7.2},
        {type: "black", note: "F#", wholePositionX: -6.35},
        {type: "white", note: "G", topWidth: 1.3, bottomWidth: 2.3, topPositionX: -0.2, wholePositionX: -4.8},
        {type: "black", note: "G#", wholePositionX: -3.6},
        {type: "white", note: "A", topWidth: 1.3, bottomWidth: 2.3, topPositionX: 0.2, wholePositionX: -2.4},
        {type: "black", note: "A#", wholePositionX: -0.85},
        {type: "white", note: "B", topWidth: 1.3, bottomWidth: 2.4, topPositionX: 0.55, wholePositionX: 0},
    ]

    // Transform Node that acts as the parent of all piano keys
    const keyboard = new BABYLON.TransformNode("keyboard");

    // Register 1 through 7
    var referencePositionX = -2.4*14;
    for (let register = 1; register <= 7; register++) {
        keyParams.forEach(key => {
            buildKey(scene, keyboard, Object.assign({register: register, referencePositionX: referencePositionX}, key));
        })
        referencePositionX += 2.4*7;
    }

    // Register 0
    buildKey(scene, keyboard, {type: "white", note: "A", topWidth: 1.9, bottomWidth: 2.3, topPositionX: -0.20, wholePositionX: -2.4, register: 0, referencePositionX: -2.4*21});
    keyParams.slice(10, 12).forEach(key => {
        buildKey(scene, keyboard, Object.assign({register: 0, referencePositionX: -2.4*21}, key));
    })

    // Register 8
    buildKey(scene, keyboard, {type: "white", note: "C", topWidth: 2.3, bottomWidth: 2.3, topPositionX: 0, wholePositionX: -2.4*6, register: 8, referencePositionX: 84});

    // Transform node that acts as the parent of all piano components
    const piano = new BABYLON.TransformNode("piano");
    keyboard.parent = piano;

    // Import and scale piano frame
    BABYLON.SceneLoader.ImportMesh("frame", "https://raw.githubusercontent.com/MicrosoftDocs/mixed-reality/docs/mixed-reality-docs/mr-dev-docs/develop/javascript/tutorials/babylonjs-webxr-piano/files/", "pianoFrame.babylon", scene, function(meshes) {
        const frame = meshes[0];
        frame.parent = piano;
    });

    // Lift the piano keyboard
    keyboard.position.y += 80;

    const xrHelper = await scene.createDefaultXRExperienceAsync();

    return scene;
}
Agora devemos ter um piano de stand-up com o seguinte aspeto: