Quickstart: Use Azure Cache for Redis with a Node.js app
In this quickstart, you incorporate Azure Cache for Redis into a Node.js app for access to a secure, dedicated cache that is accessible from any application in Azure.
Prerequisites
- An Azure subscription. Create one for free
- Node.js installed. For information about how to install Node and npm on a Windows computer, see Install Node.js on Windows.
Create a cache
To create a cache, sign in to the Azure portal. On the portal menu, select Create a resource.

On the Get Started pane, enter Azure Cache for Redis in the search bar. In the search results, find Azure Cache for Redis, and then select Create.

On the New Redis Cache pane, on the Basics tab, configure the following settings for your cache:
Setting Action Description Subscription Select your Azure subscription. The subscription to use to create the new instance of Azure Cache for Redis. Resource group Select a resource group, or select Create new and enter a new resource group name. A name for the resource group in which to create your cache and other resources. By putting all your app resources in one resource group, you can easily manage or delete them together. DNS name Enter a unique name. The cache name must be a string of 1 to 63 characters that contains only numbers, letters, and hyphens. The name must start and end with a number or letter, and it can't contain consecutive hyphens. Your cache instance's host name is \<DNS name>.redis.cache.windows.net.Location Select a location. An Azure region that is near other services that use your cache. Cache SKU Select a SKU. The SKU determines the size, performance, and feature parameters that are available for the cache. For more information, see Azure Cache for Redis overview. Cache size Select a cache size. For more information, see Azure Cache for Redis overview. Select the Networking tab or select Next: Networking.
On the Networking tab, select a connectivity method to use for the cache.
Select the Advanced tab or select Next: Advanced.
On the Advanced pane, verify or select an authentication method based on the following information:

- By default, for a new Basic, Standard, or Premium cache, Microsoft Entra Authentication is enabled and Access Keys Authentication is disabled.
- For Basic or Standard caches, you can choose the selection for a non-TLS port.
- For Standard and Premium caches, you can choose to enable availability zones. You can't disable availability zones after the cache is created.
- For a Premium cache, configure the settings for non-TLS port, clustering, managed identity, and data persistence.
Important
For optimal security, we recommend that you use Microsoft Entra ID with managed identities to authorize requests against your cache if possible. Authorization by using Microsoft Entra ID and managed identities provides superior security and ease of use over shared access key authorization. For more information about using managed identities with your cache, see Use Microsoft Entra ID for cache authentication.
(Optional) Select the Tags tab or select Next: Tags.
(Optional) On the Tags tab, enter a tag name and value if you want to categorize your cache resource.
Select the Review + create button.
On the Review + create tab, Azure automatically validates your configuration.
After the green Validation passed message appears, select Create.
A new cache deployment occurs over several minutes. You can monitor the progress of the deployment on the Azure Cache for Redis Overview pane. When Status displays Running, the cache is ready to use.
Install the node-redis client library
The node-redis library is the primary Node.js client for Redis. You can install the client by using npm and the following command:
npm install redis
Create a Node.js app to access a cache
Create a Node.js app that uses either Microsoft Entra ID or access keys to connect to Azure Cache for Redis. We recommend that you use Microsoft Entra ID.
Enable Microsoft Entra ID authentication on your cache
For an existing cache, first check to see if Microsoft Entra authentication is enabled. If it's not, complete the following steps to enable Microsoft Entra authentication. We recommend that you use Microsoft Entra ID for authentication in your applications.
In the Azure portal, select the Azure Cache for Redis instance where you'd like to use Microsoft Entra token-based authentication.
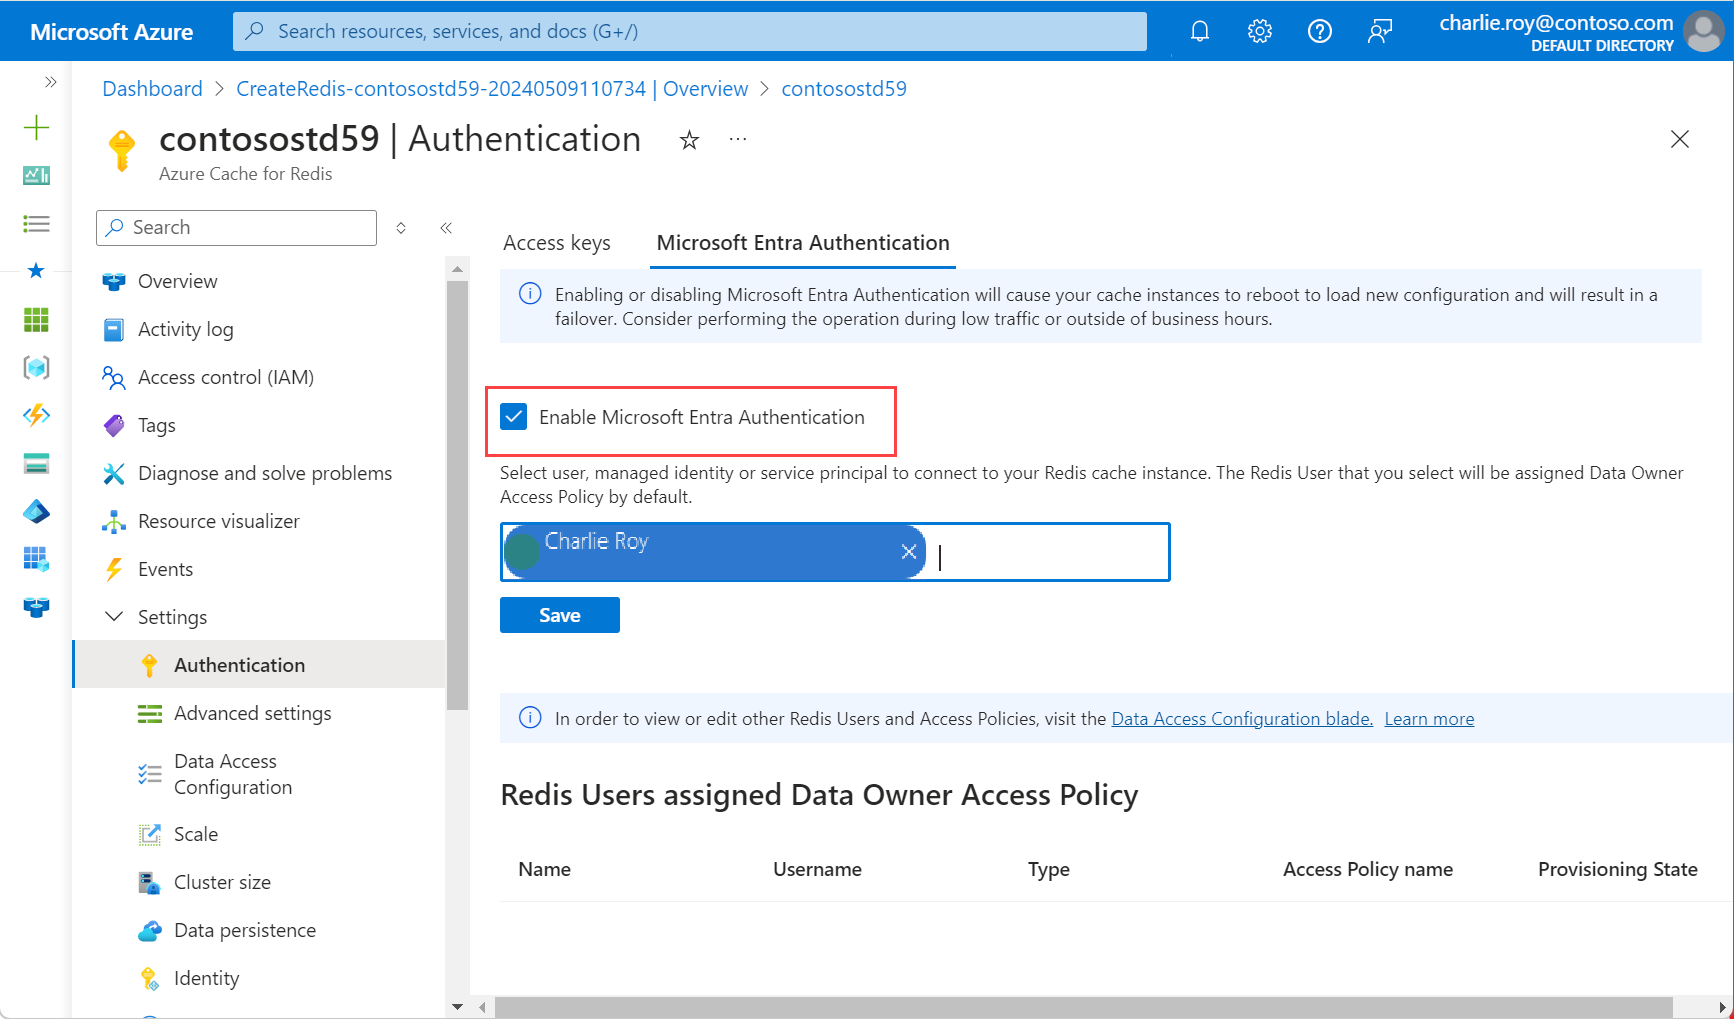
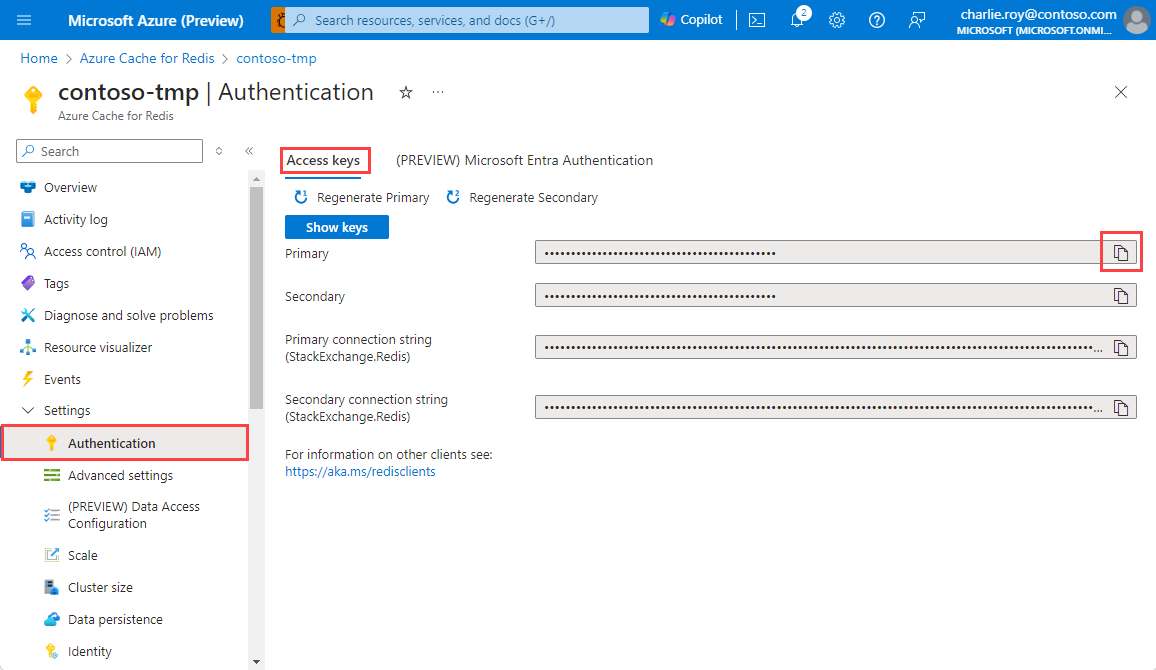
On the service menu, under Settings, select Authentication.
On the Authentication pane, check to see whether the Enable Microsoft Entra Authentication checkbox is selected. If it is, you can move on to the next section.
Otherwise, select the Enable Microsoft Entra Authentication checkbox. Then, enter the name of a valid user. Select Save. The user name that you enter is automatically assigned the Data Owner Access Policy.
You also can enter a managed identity or a service principal to connect to your cache.
In a dialog box, you're asked if you want to update your configuration, and you're informed that making the update takes several minutes to finish. Select Yes.
Important
When the enable operation is finished, the nodes in your cache reboot to load the new configuration. We recommend that you complete this operation during your standard maintenance window or outside your peak business hours. The process can take up to 30 minutes.
For information about using Microsoft Entra ID with the Azure CLI, see the identity reference pages.
Install the Azure Identity client library for JavaScript
The Azure Identity client library for JavaScript uses the required Microsoft Authentication Library (MSAL) to provide token authentication support. Install the library by using npm:
npm install @azure/identity
Create a Node.js app by using Microsoft Entra ID
Add environment variables for your host name and service principal ID.
The service principal ID is the object ID of your Microsoft Entra ID service principal or user. In the Azure portal, this value appears as Username.
set AZURE_CACHE_FOR_REDIS_HOST_NAME=contosoCache
set REDIS_SERVICE_PRINCIPAL_ID=XXXXXXXXXXXXXXXXXXXXXXXXXXXXXXXXXXXXXXXXXXXX
Create a script file named redistest.js.
Add the following example JavaScript to the file. This code shows you how to connect to an Azure Cache for Redis instance by using the cache host name and key environment variables. The code also stores and retrieves a string value in the cache. The
PINGandCLIENT LISTcommands are also executed. For more examples of using Redis with the node-redis client, see Node-Redis.const { createClient } = require("redis"); const { DefaultAzureCredential } = require("@azure/identity"); async function main() { // Construct a Token Credential from Identity library, e.g. ClientSecretCredential / ClientCertificateCredential / ManagedIdentityCredential, etc. const credential = new DefaultAzureCredential(); const redisScope = "https://redis.azure.com/.default"; // Fetch a Microsoft Entra token to be used for authentication. This token will be used as the password. let accessToken = await credential.getToken(redisScope); console.log("access Token", accessToken); // Create redis client and connect to the Azure Cache for Redis over the TLS port using the access token as password. const cacheConnection = createClient({ username: process.env.REDIS_SERVICE_PRINCIPAL_ID, password: accessToken.token, url: `redis://${process.env.AZURE_CACHE_FOR_REDIS_HOST_NAME}:6380`, pingInterval: 100000, socket: { tls: true, keepAlive: 0 }, }); cacheConnection.on("error", (err) => console.log("Redis Client Error", err)); await cacheConnection.connect(); // PING command console.log("\nCache command: PING"); console.log("Cache response : " + await cacheConnection.ping()); // SET console.log("\nCache command: SET Message"); console.log("Cache response : " + await cacheConnection.set("Message", "Hello! The cache is working from Node.js!")); // GET console.log("\nCache command: GET Message"); console.log("Cache response : " + await cacheConnection.get("Message")); // Client list, useful to see if connection list is growing... console.log("\nCache command: CLIENT LIST"); console.log("Cache response : " + await cacheConnection.sendCommand(["CLIENT", "LIST"])); cacheConnection.disconnect(); return "Done" } main().then((result) => console.log(result)).catch(ex => console.log(ex));Run the script by using Node.js:
node redistest.jsVerify that the output of your code looks like this example:
Cache command: PING
Cache response : PONG

Cache command: GET Message
Cache response : Hello! The cache is working from Node.js!

Cache command: SET Message
Cache response : OK

Cache command: GET Message
Cache response : Hello! The cache is working from Node.js!

Cache command: CLIENT LIST
Cache response : id=10017364 addr=76.22.73.183:59380 fd=221 name= age=1 idle=0 flags=N db=0 sub=0 psub=0 multi=-1 qbuf=26 qbuf-free=32742 argv-mem=10 obl=0 oll=0 omem=0 tot-mem=61466 ow=0 owmem=0 events=r cmd=client user=default numops=6

Done
Create a sample JavaScript app that has reauthentication
Microsoft Entra ID access tokens have a limited lifespan of approximately 75 minutes. To maintain a connection to your cache, you must refresh the token.
This example demonstrates how to refresh the token by using JavaScript:
Create a script file named redistestreauth.js.
Add the following example JavaScript to the file:
 const { createClient } = require("redis");
 const { DefaultAzureCredential } = require("@azure/identity");

 async function returnPassword(credential) {
     const redisScope = "https://redis.azure.com/.default";

     // Fetch a Microsoft Entra token to be used for authentication. This token will be used as the password.
     return credential.getToken(redisScope);
 }

 async function main() {
   // Construct a Token Credential from Identity library, e.g. ClientSecretCredential / ClientCertificateCredential / ManagedIdentityCredential, etc.
   const credential = new DefaultAzureCredential();
   let accessToken = await returnPassword(credential);

   // Create redis client and connect to the Azure Cache for Redis over the TLS port using the access token as password.
   let cacheConnection = createClient({
     username: process.env.REDIS_SERVICE_PRINCIPAL_ID,
     password: accessToken.token,
     url: `redis://${process.env.AZURE_CACHE_FOR_REDIS_HOST_NAME}:6380`,
     pingInterval: 100000,
     socket: {
       tls: true,
       keepAlive: 0
     },
   });

   cacheConnection.on("error", (err) => console.log("Redis Client Error", err));
   await cacheConnection.connect();

   for (let i = 0; i < 3; i++) {
     try {
         // PING command
         console.log("\nCache command: PING");
         console.log("Cache response : " + await cacheConnection.ping());

         // SET
         console.log("\nCache command: SET Message");
         console.log("Cache response : " + await cacheConnection.set("Message",
             "Hello! The cache is working from Node.js!"));

         // GET
         console.log("\nCache command: GET Message");
         console.log("Cache response : " + await cacheConnection.get("Message"));

         // Client list, useful to see if connection list is growing...
         console.log("\nCache command: CLIENT LIST");
         console.log("Cache response : " + await cacheConnection.sendCommand(["CLIENT", "LIST"]));
       break;
     } catch (e) {
       console.log("error during redis get", e.toString());
       if ((accessToken.expiresOnTimestamp <= Date.now())|| (redis.status === "end" || "close") ) {
         await redis.disconnect();
         accessToken = await returnPassword(credential);
         cacheConnection = createClient({
           username: process.env.REDIS_SERVICE_PRINCIPAL_ID,
           password: accessToken.token,
           url: `redis://${process.env.AZURE_CACHE_FOR_REDIS_HOST_NAME}:6380`,
           pingInterval: 100000,
           socket: {
             tls: true,
             keepAlive: 0
           },
         });
       }
     }
   }
 }

 main().then((result) => console.log(result)).catch(ex => console.log(ex));
Run the script by using Node.js:
node redistestreauth.jsCheck for output that looks similar to this example:
 Cache command: PING
 Cache response : PONG

 Cache command: GET Message
 Cache response : Hello! The cache is working from Node.js!

 Cache command: SET Message
 Cache response : OK

 Cache command: GET Message
 Cache response : Hello! The cache is working from Node.js!

 Cache command: CLIENT LIST
 Cache response : id=10017364 addr=76.22.73.183:59380 fd=221 name= age=1 idle=0 flags=N db=0 sub=0 psub=0 multi=-1 qbuf=26 qbuf-free=32742 argv-mem=10 obl=0 oll=0 omem=0 tot-mem=61466 ow=0 owmem=0 events=r cmd=client user=default numops=6
Note
For more examples of how to use Microsoft Entra ID to authenticate to Redis via the node-redis library, see the node-redis GitHub repository.

Clean up resources
If you want to continue to use the resources you created in this article, keep the resource group.
Otherwise, to avoid charges related to the resources, if you're finished using the resources, you can delete the Azure resource group that you created.
Warning
Deleting a resource group is irreversible. When you delete a resource group, all the resources in the resource group are permanently deleted. Make sure that you do not accidentally delete the wrong resource group or resources. If you created the resources inside an existing resource group that has resources you want to keep, you can delete each resource individually instead of deleting the resource group.
Delete a resource group
Sign in to the Azure portal, and then select Resource groups.
Select the resource group to delete.
If there are many resource groups, in Filter for any field, enter the name of the resource group you created to complete this article. In the list of search results, select the resource group.
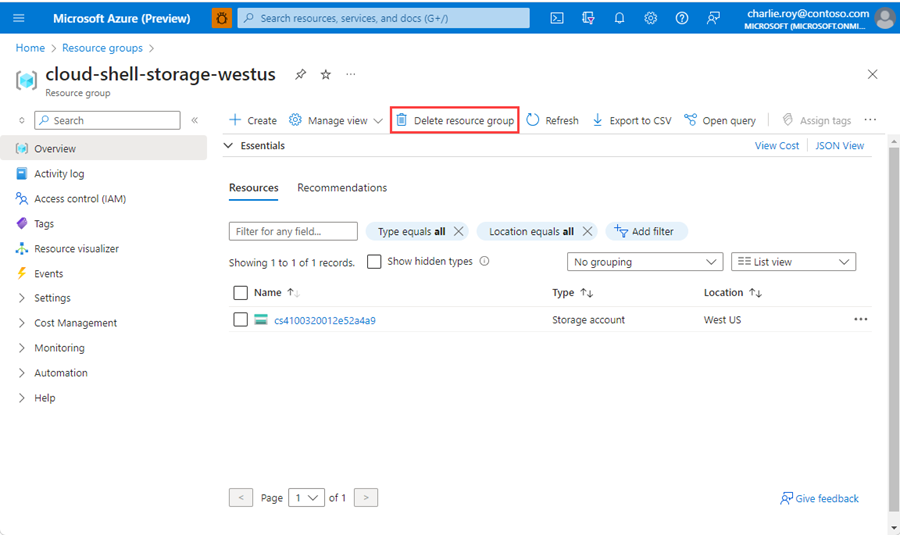
Select Delete resource group.
In the Delete a resource group pane, enter the name of your resource group to confirm, and then select Delete.
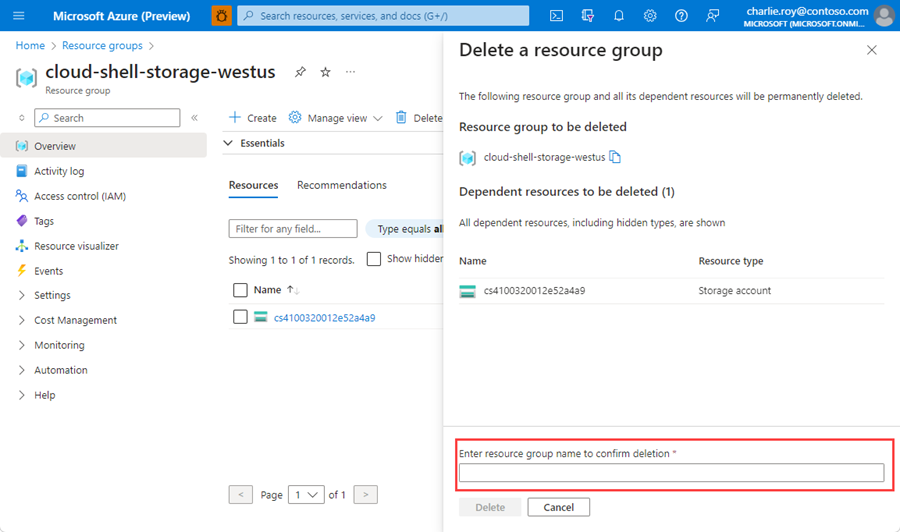
Within a few moments, the resource group and all of its resources are deleted.
Get the sample code
Get the Node.js quickstart sample on GitHub.