Начало работы с аналитикой документов
Внимание
- Azure Cognitive Services Распознаватель документов теперь — аналитика документов ИИ Azure.
- Некоторые платформы по-прежнему ожидают переименования обновления.
- Все упоминание Распознаватель документов или аналитики документов в нашей документации относятся к одной службе Azure.
Это содержимое относится к:v4.0 (предварительная версия)Более ранние![]() версии:
версии:![]() v3.1 (GA)
v3.1 (GA)![]() v3.0 (GA)
v3.0 (GA)
- Начало работы с Azure AI Document Intelligence последней предварительной версией (2024-02-29-preview).
Это содержимое относится к:v3.1 (GA)Более ранние версии:![]()
![]() v3.0
v3.0![]() версии 2.1
версии 2.1
- Приступая к работе с Azure Распознаватель документов последней версии общедоступной версии (
2023-07-31).
Это содержимое относится к:v3.0 (GA)Newer version![]() :
:![]() v3.1
v3.1![]() v2.1
v2.1
- Начало работы с устаревшей версией общедоступной версии Azure
2022-08-31Распознаватель документов.
Azure AI Document Intelligence / Распознаватель документов — это облачная служба ИИ Azure, которая использует машинное обучение для извлечения пар "ключ-значение", текста, таблиц и ключевых данных из документов.
Модели обработки документов можно легко интегрировать в рабочие процессы и приложения с помощью пакета SDK языка программирования или вызова REST API.
Для этого краткого руководства при изучении технологии рекомендуем использовать бесплатную версию службы. Имейте в виду, что количество бесплатных страниц ограничено до 500 страниц в месяц.
Дополнительные сведения о функциях API и параметрах разработки см. на странице обзора .
Справочник по | пакету SDK для клиентской библиотеки | REST API. Примеры| | | пакетов, поддерживаемые версией REST API
Справочная | версия | ПАКЕТА SDK для клиентской библиотеки | (NuGet)Samples | |
Справочник по | пакету SDK для клиентской библиотеки | REST API. Примеры | | | пакетов, поддерживаемые версией REST API
В этом кратком руководстве используются следующие функции для анализа и извлечения данных и значений из форм и документов:
Модель макета — анализ и извлечение таблиц, строк, слов и меток выбора, таких как переключатели и флажки в документах форм, без необходимости обучения модели.
Предварительно созданная модель — анализ и извлечение общих полей из конкретных типов документов с помощью предварительно созданной модели.
Необходимые компоненты
Подписка Azure — создайте бесплатную учетную запись.
Текущая версия IDE Visual Studio.
Служба ИИ Azure или ресурс аналитики документов. После получения подписки Azure создайте ресурс с несколькими службами или azure AI в портал Azure, чтобы получить ключ и конечную точку.
Используйте бесплатную ценовую категорию (
F0), чтобы опробовать службу, а затем выполните обновление до платного уровня для рабочей среды.
Совет
Создайте ресурс служб искусственного интеллекта Azure, если вы планируете получить доступ к нескольким службам ИИ Azure в рамках одной конечной точки или ключа. Только для доступа к аналитике документов создайте ресурс аналитики документов. Обратите внимание, что если вы планируете использовать проверку подлинности Microsoft Entra, вам потребуется один ресурс службы.
После развертывания ресурса выберите Перейти к ресурсу. Вам потребуется ключ и конечная точка из ресурса, создаваемого для подключения приложения к API аналитики документов. Вставьте ключ и конечную точку в код далее в кратком руководстве:
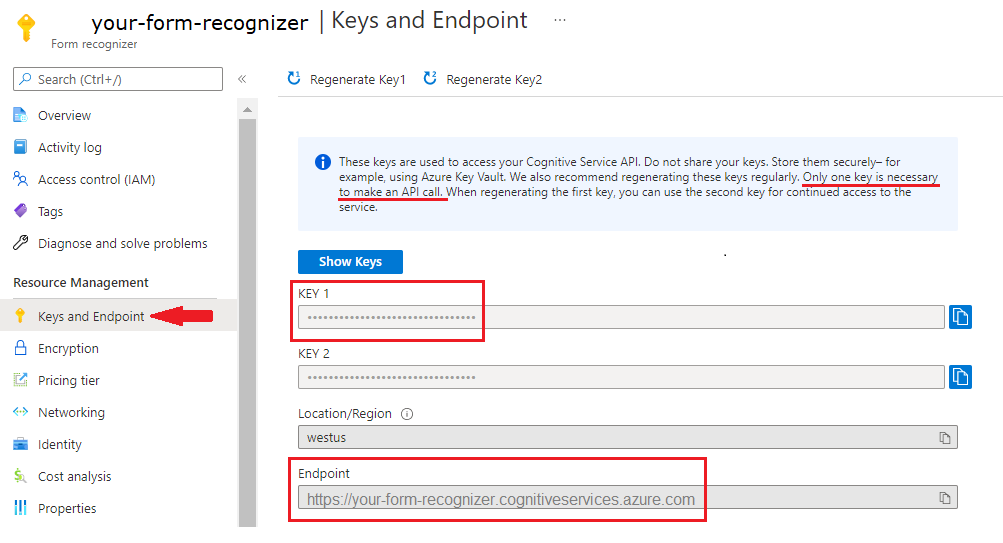
Службы ИИ Azure или ресурс Распознаватель документов. После получения подписки Azure создайте ресурс с несколькими службами или azure AI в портал Azure, чтобы получить ключ и конечную точку.
Используйте бесплатную ценовую категорию (
F0), чтобы опробовать службу, а затем выполните обновление до платного уровня для рабочей среды.
Совет
Создайте ресурс служб искусственного интеллекта Azure, если вы планируете получить доступ к нескольким службам ИИ Azure в рамках одной конечной точки или ключа. Для доступа только к Распознавателю документов создайте ресурс Распознавателя документов. Обратите внимание, что если вы планируете использовать проверку подлинности Microsoft Entra, вам потребуется один ресурс службы.
После развертывания ресурса выберите Перейти к ресурсу. Для подключения приложения к API "Распознаватель документов" потребуется ключ и конечная точка созданного ресурса. Вставьте ключ и конечную точку в код далее в кратком руководстве:
Настройка
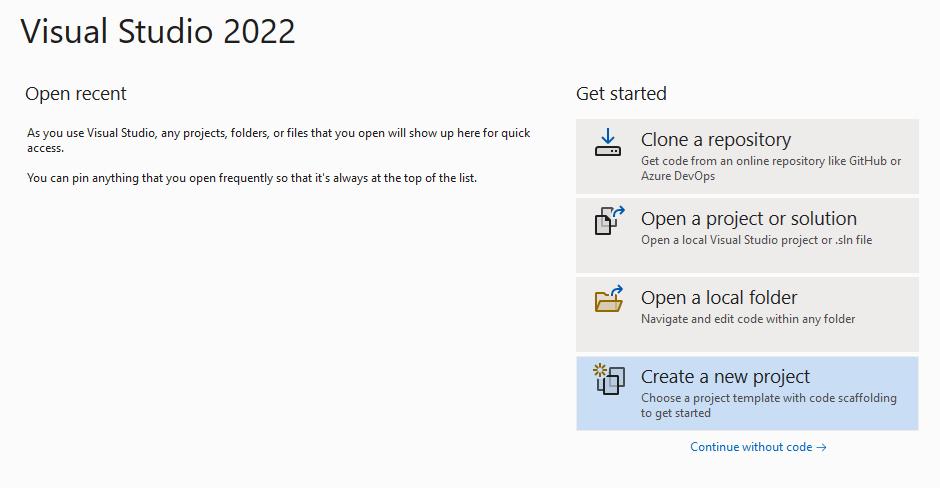
Запустите среду Visual Studio.
На начальной странице выберите Создать проект.
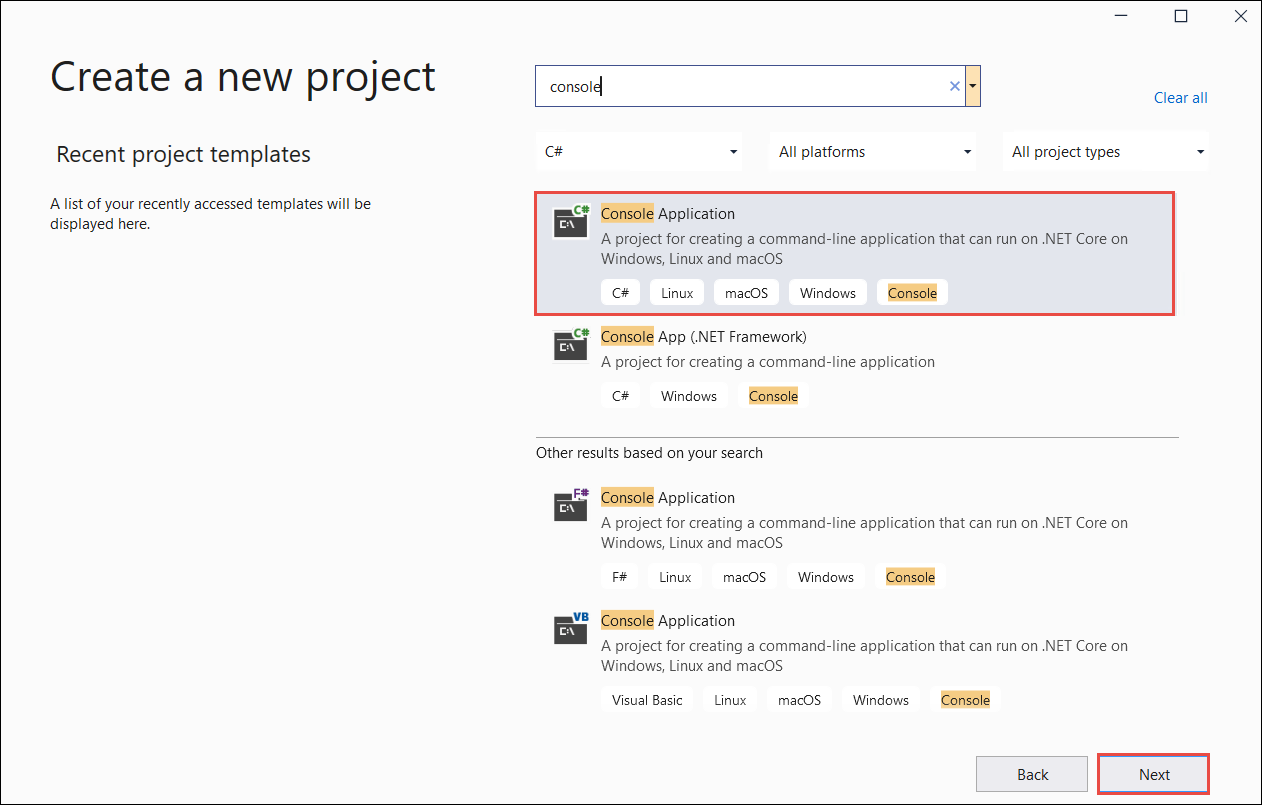
На странице Создание проекта введите в поле поиска консоль. Выберите шаблон Консольное приложение, затем нажмите кнопку Далее.
- В окне Настроить новый проект введите в поле "Имя проекта" значение
doc_intel_quickstart. Нажмите кнопку "Далее".
- В окне Настроить новый проект введите в поле "Имя проекта" значение
form_recognizer_quickstart. Нажмите кнопку "Далее".
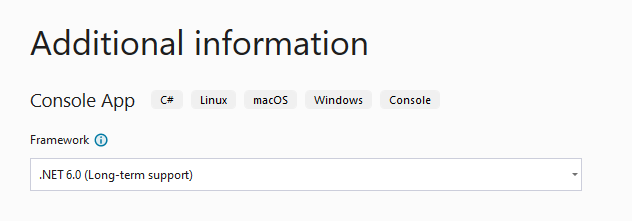
В диалоговом окне Дополнительные сведения выберите .NET 6.0 (долгосрочная поддержка) и щелкните Создать.
Установка клиентской библиотеки с помощью NuGet
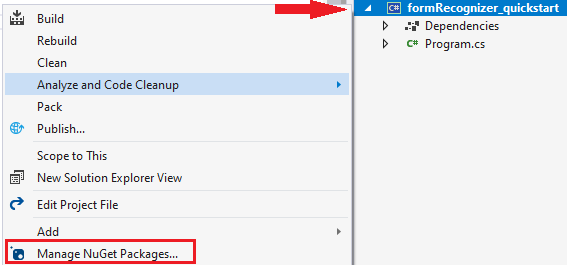
Щелкните правой кнопкой мыши проект doc_intel_quickstart и выберите "Управление пакетами NuGet...".

Выберите вкладку "Обзор" и введите Azure.AI.DocumentIntelligence.
Include prereleaseВыберите проверка box и выберите версию 1.0.0-beta.1 в раскрывающемся меню
Щелкните правой кнопкой мыши проект form_recognizer_quickstart и выберите пункт "Управление пакетами NuGet... ".
Перейдите на вкладку "Обзор" и введите Azure.AI.FormRecognizer. Выберите версию 4.1.0 в раскрывающемся меню
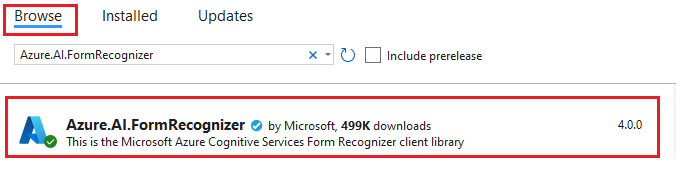
Щелкните правой кнопкой мыши проект form_recognizer_quickstart и выберите пункт "Управление пакетами NuGet... ".
Перейдите на вкладку "Обзор" и введите Azure.AI.FormRecognizer. Выберите версию 4.0.0 в раскрывающемся меню

Сборка приложения
Чтобы взаимодействовать со службой аналитики DocumentIntelligenceClient документов, необходимо создать экземпляр класса. Для этого вы создадите AzureKeyCredential с key помощью портал Azure и DocumentIntelligenceClient экземпляра с AzureKeyCredential помощью аналитики документовendpoint.
Чтобы взаимодействовать со службой Распознаватель документов, необходимо создать экземпляр DocumentAnalysisClient класса. Для этого вы создадите AzureKeyCredential с key портал Azure и DocumentAnalysisClient экземпляром с AzureKeyCredential Распознаватель документовendpoint.
Примечание.
- Начиная с .NET 6, в новых проектах, где используется шаблон
console, создается новый стиль программы, отличный от предыдущих версий. - В новых выходных данных используются последние функции C#, упрощающие код, который необходимо написать.
- При использовании более новой версии необходимо только написать текст метода
Main. Вам не нужно включать инструкции верхнего уровня, глобальные директивы using или неявные директивы using. - Дополнительные сведения см. в статье Новые шаблоны C# для создания инструкций верхнего уровня.
Откройте файл Program.cs.
Удалите существующий код, включая строку
Console.Writeline("Hello World!"), и выберите один из приведенных ниже примеров кода, который необходимо скопировать и вставить в файл Program.csприложения:
Внимание
Обязательно удалите ключ из кода, когда завершите работу, и ни в коем случае не публикуйте его в открытом доступе. Для рабочей среды используйте безопасный способ хранения и доступа к учетным данным, например Azure Key Vault. Дополнительные сведения см. в статье "Безопасность служб искусственного интеллекта Azure".
Модель макета
Извлеките из документов текст, метки выбора, стили текста, сведения о структуре таблиц и координаты ограничивающих рамок для них.
- В этом примере потребуется файл документа из URI. В этом кратком руководстве можно использовать наш пример документа .
- Мы добавили значение URI файла в переменную
Uri fileUri, расположенную в верхней части скрипта. - Чтобы извлечь макет из заданного файла по универсальному коду ресурса (URI), используйте метод
StartAnalyzeDocumentFromUriи передайтеprebuilt-layoutв качестве идентификатора модели. Возвращаемое значение — это объектAnalyzeResult, содержащий данные из отправленного документа.
Добавьте в файл Program.cs следующий пример кода. Убедитесь, что вы обновляете переменные ключа и конечной точки со значениями из экземпляра аналитики документов портал Azure:
using Azure;
using Azure.AI.DocumentIntelligence;

//set `<your-endpoint>` and `<your-key>` variables with the values from the Azure portal to create your `AzureKeyCredential` and `DocumentIntelligenceClient` instance
string endpoint = "<your-endpoint>";
string key = "<your-key>";
AzureKeyCredential credential = new AzureKeyCredential(key);
DocumentIntelligenceClient client = new DocumentIntelligenceClient(new Uri(endpoint), credential);

//sample document
Uri fileUri = new Uri ("https://raw.githubusercontent.com/Azure-Samples/cognitive-services-REST-api-samples/master/curl/form-recognizer/sample-layout.pdf");

Operation<AnalyzeResult> operation = await client.AnalyzeDocumentAsync(WaitUntil.Completed, "prebuilt-layout", fileUri);

AnalyzeResult result = operation.Value;

foreach (DocumentPage page in result.Pages)
{
    Console.WriteLine($"Document Page {page.PageNumber} has {page.Lines.Count} line(s), {page.Words.Count} word(s)," +
        $" and {page.SelectionMarks.Count} selection mark(s).");

    for (int i = 0; i < page.Lines.Count; i++)
    {
        DocumentLine line = page.Lines[i];

        Console.WriteLine($"  Line {i}:");
        Console.WriteLine($"    Content: '{line.Content}'");

        Console.Write("    Bounding polygon, with points ordered clockwise:");
        for (int j = 0; j < line.Polygon.Count; j += 2)
        {
            Console.Write($" ({line.Polygon[j]}, {line.Polygon[j + 1]})");
        }

        Console.WriteLine();
    }

    for (int i = 0; i < page.SelectionMarks.Count; i++)
    {
        DocumentSelectionMark selectionMark = page.SelectionMarks[i];

        Console.WriteLine($"  Selection Mark {i} is {selectionMark.State}.");
        Console.WriteLine($"    State: {selectionMark.State}");

        Console.Write("    Bounding polygon, with points ordered clockwise:");
        for (int j = 0; j < selectionMark.Polygon.Count; j++)
        {
            Console.Write($" ({selectionMark.Polygon[j]}, {selectionMark.Polygon[j + 1]})");
        }

        Console.WriteLine();
    }
}

for (int i = 0; i < result.Paragraphs.Count; i++)
{
    DocumentParagraph paragraph = result.Paragraphs[i];

    Console.WriteLine($"Paragraph {i}:");
    Console.WriteLine($"  Content: {paragraph.Content}");

    if (paragraph.Role != null)
    {
        Console.WriteLine($"  Role: {paragraph.Role}");
    }
}

foreach (DocumentStyle style in result.Styles)
{
    // Check the style and style confidence to see if text is handwritten.
    // Note that value '0.8' is used as an example.

    bool isHandwritten = style.IsHandwritten.HasValue && style.IsHandwritten == true;

    if (isHandwritten && style.Confidence > 0.8)
    {
        Console.WriteLine($"Handwritten content found:");

        foreach (DocumentSpan span in style.Spans)
        {
            var handwrittenContent = result.Content.Substring(span.Offset, span.Length);
            Console.WriteLine($"  {handwrittenContent}");
        }
    }
}

for (int i = 0; i < result.Tables.Count; i++)
{
    DocumentTable table = result.Tables[i];

    Console.WriteLine($"Table {i} has {table.RowCount} rows and {table.ColumnCount} columns.");

    foreach (DocumentTableCell cell in table.Cells)
    {
        Console.WriteLine($"  Cell ({cell.RowIndex}, {cell.ColumnIndex}) is a '{cell.Kind}' with content: {cell.Content}");
    }
}
Запуск приложения
После добавления примера кода в приложение нажмите зеленую кнопку "Пуск " рядом с formRecognizer_quickstart, чтобы создать и запустить программу, или нажмите клавишу F5.

Добавьте в файл Program.cs следующий пример кода. Убедитесь, что ключи и переменные конечной точки обновлены значениями из экземпляра Распознавателя документов на портале Azure:
using Azure;
using Azure.AI.FormRecognizer.DocumentAnalysis;

//set `<your-endpoint>` and `<your-key>` variables with the values from the Azure portal to create your `AzureKeyCredential` and `DocumentAnalysisClient` instance
string endpoint = "<your-endpoint>";
string key = "<your-key>";
AzureKeyCredential credential = new AzureKeyCredential(key);
DocumentAnalysisClient client = new DocumentAnalysisClient(new Uri(endpoint), credential);

//sample document
Uri fileUri = new Uri ("https://raw.githubusercontent.com/Azure-Samples/cognitive-services-REST-api-samples/master/curl/form-recognizer/sample-layout.pdf");

AnalyzeDocumentOperation operation = await client.AnalyzeDocumentFromUriAsync(WaitUntil.Completed, "prebuilt-layout", fileUri);

AnalyzeResult result = operation.Value;

foreach (DocumentPage page in result.Pages)
{
    Console.WriteLine($"Document Page {page.PageNumber} has {page.Lines.Count} line(s), {page.Words.Count} word(s),");
    Console.WriteLine($"and {page.SelectionMarks.Count} selection mark(s).");

    for (int i = 0; i < page.Lines.Count; i++)
    {
        DocumentLine line = page.Lines[i];
        Console.WriteLine($"  Line {i} has content: '{line.Content}'.");

        Console.WriteLine($"    Its bounding box is:");
        Console.WriteLine($"      Upper left => X: {line.BoundingPolygon[0].X}, Y= {line.BoundingPolygon[0].Y}");
        Console.WriteLine($"      Upper right => X: {line.BoundingPolygon[1].X}, Y= {line.BoundingPolygon[1].Y}");
        Console.WriteLine($"      Lower right => X: {line.BoundingPolygon[2].X}, Y= {line.BoundingPolygon[2].Y}");
        Console.WriteLine($"      Lower left => X: {line.BoundingPolygon[3].X}, Y= {line.BoundingPolygon[3].Y}");
    }

    for (int i = 0; i < page.SelectionMarks.Count; i++)
    {
        DocumentSelectionMark selectionMark = page.SelectionMarks[i];

        Console.WriteLine($"  Selection Mark {i} is {selectionMark.State}.");
        Console.WriteLine($"    Its bounding box is:");
        Console.WriteLine($"      Upper left => X: {selectionMark.BoundingPolygon[0].X}, Y= {selectionMark.BoundingPolygon[0].Y}");
        Console.WriteLine($"      Upper right => X: {selectionMark.BoundingPolygon[1].X}, Y= {selectionMark.BoundingPolygon[1].Y}");
        Console.WriteLine($"      Lower right => X: {selectionMark.BoundingPolygon[2].X}, Y= {selectionMark.BoundingPolygon[2].Y}");
        Console.WriteLine($"      Lower left => X: {selectionMark.BoundingPolygon[3].X}, Y= {selectionMark.BoundingPolygon[3].Y}");
    }
}

foreach (DocumentStyle style in result.Styles)
{
    // Check the style and style confidence to see if text is handwritten.
    // Note that value '0.8' is used as an example.

    bool isHandwritten = style.IsHandwritten.HasValue && style.IsHandwritten == true;

    if (isHandwritten && style.Confidence > 0.8)
    {
        Console.WriteLine($"Handwritten content found:");

        foreach (DocumentSpan span in style.Spans)
        {
            Console.WriteLine($"  Content: {result.Content.Substring(span.Index, span.Length)}");
        }
    }
}

Console.WriteLine("The following tables were extracted:");

for (int i = 0; i < result.Tables.Count; i++)
{
    DocumentTable table = result.Tables[i];
    Console.WriteLine($"  Table {i} has {table.RowCount} rows and {table.ColumnCount} columns.");

    foreach (DocumentTableCell cell in table.Cells)
    {
        Console.WriteLine($"    Cell ({cell.RowIndex}, {cell.ColumnIndex}) has kind '{cell.Kind}' and content: '{cell.Content}'.");
    }
}
Запуск приложения
После добавления примера кода в приложение нажмите зеленую кнопку "Пуск " рядом с formRecognizer_quickstart, чтобы создать и запустить программу, или нажмите клавишу F5.

Выходные данные модели макета
Ниже приведен фрагмент ожидаемых выходных данных:
  Document Page 1 has 69 line(s), 425 word(s), and 15 selection mark(s).
  Line 0 has content: 'UNITED STATES'.
    Its bounding box is:
      Upper left => X: 3.4915, Y= 0.6828
      Upper right => X: 5.0116, Y= 0.6828
      Lower right => X: 5.0116, Y= 0.8265
      Lower left => X: 3.4915, Y= 0.8265
  Line 1 has content: 'SECURITIES AND EXCHANGE COMMISSION'.
    Its bounding box is:
      Upper left => X: 2.1937, Y= 0.9061
      Upper right => X: 6.297, Y= 0.9061
      Lower right => X: 6.297, Y= 1.0498
      Lower left => X: 2.1937, Y= 1.0498
Чтобы просмотреть все выходные данные, посетите репозиторий примеров Azure на GitHub, где находятся выходные данные модели макета.
Добавьте в файл Program.cs следующий пример кода. Убедитесь, что ключи и переменные конечной точки обновлены значениями из экземпляра Распознавателя документов на портале Azure:
using Azure;
using Azure.AI.FormRecognizer.DocumentAnalysis;

//set `<your-endpoint>` and `<your-key>` variables with the values from the Azure portal to create your `AzureKeyCredential` and `DocumentAnalysisClient` instance
string endpoint = "<your-endpoint>";
string key = "<your-key>";
AzureKeyCredential credential = new AzureKeyCredential(key);
DocumentAnalysisClient client = new DocumentAnalysisClient(new Uri(endpoint), credential);

//sample document
Uri fileUri = new Uri ("https://raw.githubusercontent.com/Azure-Samples/cognitive-services-REST-api-samples/master/curl/form-recognizer/sample-layout.pdf");

AnalyzeDocumentOperation operation = await client.AnalyzeDocumentFromUriAsync(WaitUntil.Completed, "prebuilt-layout", fileUri);

AnalyzeResult result = operation.Value;

foreach (DocumentPage page in result.Pages)
{
    Console.WriteLine($"Document Page {page.PageNumber} has {page.Lines.Count} line(s), {page.Words.Count} word(s),");
    Console.WriteLine($"and {page.SelectionMarks.Count} selection mark(s).");

    for (int i = 0; i < page.Lines.Count; i++)
    {
        DocumentLine line = page.Lines[i];
        Console.WriteLine($"  Line {i} has content: '{line.Content}'.");

        Console.WriteLine($"    Its bounding polygon (points ordered clockwise):");

        for (int j = 0; j < line.BoundingPolygon.Count; j++)
        {
            Console.WriteLine($"      Point {j} => X: {line.BoundingPolygon[j].X}, Y: {line.BoundingPolygon[j].Y}");
        }
    }

    for (int i = 0; i < page.SelectionMarks.Count; i++)
    {
        DocumentSelectionMark selectionMark = page.SelectionMarks[i];

        Console.WriteLine($"  Selection Mark {i} is {selectionMark.State}.");
        Console.WriteLine($"    Its bounding polygon (points ordered clockwise):");

        for (int j = 0; j < selectionMark.BoundingPolygon.Count; j++)
        {
            Console.WriteLine($"      Point {j} => X: {selectionMark.BoundingPolygon[j].X}, Y: {selectionMark.BoundingPolygon[j].Y}");
        }
    }
}

Console.WriteLine("Paragraphs:");

foreach (DocumentParagraph paragraph in result.Paragraphs)
{
    Console.WriteLine($"  Paragraph content: {paragraph.Content}");

    if (paragraph.Role != null)
    {
        Console.WriteLine($"    Role: {paragraph.Role}");
    }
}

foreach (DocumentStyle style in result.Styles)
{
    // Check the style and style confidence to see if text is handwritten.
    // Note that value '0.8' is used as an example.

    bool isHandwritten = style.IsHandwritten.HasValue && style.IsHandwritten == true;

    if (isHandwritten && style.Confidence > 0.8)
    {
        Console.WriteLine($"Handwritten content found:");

        foreach (DocumentSpan span in style.Spans)
        {
            Console.WriteLine($"  Content: {result.Content.Substring(span.Index, span.Length)}");
        }
    }
}

Console.WriteLine("The following tables were extracted:");

for (int i = 0; i < result.Tables.Count; i++)
{
    DocumentTable table = result.Tables[i];
    Console.WriteLine($"  Table {i} has {table.RowCount} rows and {table.ColumnCount} columns.");

    foreach (DocumentTableCell cell in table.Cells)
    {
        Console.WriteLine($"    Cell ({cell.RowIndex}, {cell.ColumnIndex}) has kind '{cell.Kind}' and content: '{cell.Content}'.");
    }
}
Extract the layout of a document from a file stream
To extract the layout from a given file at a file stream, use the AnalyzeDocument method and pass prebuilt-layout as the model ID. The returned value is an AnalyzeResult object containing data about the submitted document.

string filePath = "<filePath>";
using var stream = new FileStream(filePath, FileMode.Open);

AnalyzeDocumentOperation operation = await client.AnalyzeDocumentAsync(WaitUntil.Completed, "prebuilt-layout", stream);
AnalyzeResult result = operation.Value;

foreach (DocumentPage page in result.Pages)
{
    Console.WriteLine($"Document Page {page.PageNumber} has {page.Lines.Count} line(s), {page.Words.Count} word(s),");
    Console.WriteLine($"and {page.SelectionMarks.Count} selection mark(s).");

    for (int i = 0; i < page.Lines.Count; i++)
    {
        DocumentLine line = page.Lines[i];
        Console.WriteLine($"  Line {i} has content: '{line.Content}'.");

        Console.WriteLine($"    Its bounding polygon (points ordered clockwise):");

        for (int j = 0; j < line.BoundingPolygon.Count; j++)
        {
            Console.WriteLine($"      Point {j} => X: {line.BoundingPolygon[j].X}, Y: {line.BoundingPolygon[j].Y}");
        }
    }

    for (int i = 0; i < page.SelectionMarks.Count; i++)
    {
        DocumentSelectionMark selectionMark = page.SelectionMarks[i];

        Console.WriteLine($"  Selection Mark {i} is {selectionMark.State}.");
        Console.WriteLine($"    Its bounding polygon (points ordered clockwise):");

        for (int j = 0; j < selectionMark.BoundingPolygon.Count; j++)
        {
            Console.WriteLine($"      Point {j} => X: {selectionMark.BoundingPolygon[j].X}, Y: {selectionMark.BoundingPolygon[j].Y}");
        }
    }
}

Console.WriteLine("Paragraphs:");

foreach (DocumentParagraph paragraph in result.Paragraphs)
{
    Console.WriteLine($"  Paragraph content: {paragraph.Content}");

    if (paragraph.Role != null)
    {
        Console.WriteLine($"    Role: {paragraph.Role}");
    }
}

foreach (DocumentStyle style in result.Styles)
{
    // Check the style and style confidence to see if text is handwritten.
    // Note that value '0.8' is used as an example.

    bool isHandwritten = style.IsHandwritten.HasValue && style.IsHandwritten == true;

    if (isHandwritten && style.Confidence > 0.8)
    {
        Console.WriteLine($"Handwritten content found:");

        foreach (DocumentSpan span in style.Spans)
        {
            Console.WriteLine($"  Content: {result.Content.Substring(span.Index, span.Length)}");
        }
    }
}

Console.WriteLine("The following tables were extracted:");

for (int i = 0; i < result.Tables.Count; i++)
{
    DocumentTable table = result.Tables[i];
    Console.WriteLine($"  Table {i} has {table.RowCount} rows and {table.ColumnCount} columns.");

    foreach (DocumentTableCell cell in table.Cells)
    {
        Console.WriteLine($"    Cell ({cell.RowIndex}, {cell.ColumnIndex}) has kind '{cell.Kind}' and content: '{cell.Content}'.");
    }
}
Запуск приложения
После добавления примера кода в приложение нажмите зеленую кнопку "Пуск " рядом с formRecognizer_quickstart, чтобы создать и запустить программу, или нажмите клавишу F5.
Предварительно созданная модель
Анализ и извлечение общих полей из конкретных типов документов с помощью предварительно созданной модели. В этом примере мы анализируем счет с помощью предварительно созданной модели счета .
Совет
Вы можете использовать не только счета. Есть несколько предварительно созданных моделей, у каждой из которых собственный набор поддерживаемых полей. Модель, используемая для analyze операции, зависит от типа документа, который необходимо проанализировать. См. Извлечение данных модели.
- Анализ счета с помощью модели готового счета. Для работы с этим кратким руководством можно использовать пример документа со счетом.
- Значение универсального кода ресурса (URI) для файла было добавлено в переменную
Uri invoiceUriв верхней части файла Program.cs. - Чтобы проанализировать заданный файл по универсальному коду ресурса (URI), используйте метод
StartAnalyzeDocumentFromUriи передайтеprebuilt-invoiceв качестве идентификатора модели. Возвращаемое значение — это объектAnalyzeResult, содержащий данные из отправленного документа. - Для простоты здесь показаны не все пары "ключ-значение", возвращаемые службой. Список всех поддерживаемых полей и соответствующих типов см. на странице концепции Счет.
Добавьте в файл Program.cs следующий пример кода. Убедитесь, что вы обновляете переменные ключа и конечной точки со значениями из экземпляра аналитики документов портал Azure:
using Azure;
using Azure.AI.DocumentIntelligence;

//set `<your-endpoint>` and `<your-key>` variables with the values from the Azure portal to create your `AzureKeyCredential` and `DocumentIntelligenceClient` instance
string endpoint = "<your-endpoint>";
string key = "<your-key>";
AzureKeyCredential credential = new AzureKeyCredential(key);
DocumentIntelligenceClient client = new DocumentIntelligenceClient(new Uri(endpoint), credential);

//sample invoice document

Uri invoiceUri = new Uri ("https://raw.githubusercontent.com/Azure-Samples/cognitive-services-REST-api-samples/master/curl/form-recognizer/sample-invoice.pdf");

Operation<AnalyzeResult> operation = await client.AnalyzeDocumentAsync(WaitUntil.Completed, "prebuilt-invoice", invoiceUri);

AnalyzeResult result = operation.Value;

for (int i = 0; i < result.Documents.Count; i++)
{
    Console.WriteLine($"Document {i}:");

    AnalyzedDocument document = result.Documents[i];

    if (document.Fields.TryGetValue("VendorName", out DocumentField vendorNameField)
        && vendorNameField.Type == DocumentFieldType.String)
    {
        string vendorName = vendorNameField.ValueString;
        Console.WriteLine($"Vendor Name: '{vendorName}', with confidence {vendorNameField.Confidence}");
    }

    if (document.Fields.TryGetValue("CustomerName", out DocumentField customerNameField)
        && customerNameField.Type == DocumentFieldType.String)
    {
        string customerName = customerNameField.ValueString;
        Console.WriteLine($"Customer Name: '{customerName}', with confidence {customerNameField.Confidence}");
    }

    if (document.Fields.TryGetValue("Items", out DocumentField itemsField)
        && itemsField.Type == DocumentFieldType.Array)
    {
        foreach (DocumentField itemField in itemsField.ValueArray)
        {
            Console.WriteLine("Item:");

            if (itemField.Type == DocumentFieldType.Object)
            {
                IReadOnlyDictionary<string, DocumentField> itemFields = itemField.ValueObject;

                if (itemFields.TryGetValue("Description", out DocumentField itemDescriptionField)
                    && itemDescriptionField.Type == DocumentFieldType.String)
                {
                    string itemDescription = itemDescriptionField.ValueString;
                    Console.WriteLine($"  Description: '{itemDescription}', with confidence {itemDescriptionField.Confidence}");
                }

                if (itemFields.TryGetValue("Amount", out DocumentField itemAmountField)
                    && itemAmountField.Type == DocumentFieldType.Currency)
                {
                    CurrencyValue itemAmount = itemAmountField.ValueCurrency;
                    Console.WriteLine($"  Amount: '{itemAmount.CurrencySymbol}{itemAmount.Amount}', with confidence {itemAmountField.Confidence}");
                }
            }
        }
    }

    if (document.Fields.TryGetValue("SubTotal", out DocumentField subTotalField)
        && subTotalField.Type == DocumentFieldType.Currency)
    {
        CurrencyValue subTotal = subTotalField.ValueCurrency;
        Console.WriteLine($"Sub Total: '{subTotal.CurrencySymbol}{subTotal.Amount}', with confidence {subTotalField.Confidence}");
    }

    if (document.Fields.TryGetValue("TotalTax", out DocumentField totalTaxField)
        && totalTaxField.Type == DocumentFieldType.Currency)
    {
        CurrencyValue totalTax = totalTaxField.ValueCurrency;
        Console.WriteLine($"Total Tax: '{totalTax.CurrencySymbol}{totalTax.Amount}', with confidence {totalTaxField.Confidence}");
    }

    if (document.Fields.TryGetValue("InvoiceTotal", out DocumentField invoiceTotalField)
        && invoiceTotalField.Type == DocumentFieldType.Currency)
    {
        CurrencyValue invoiceTotal = invoiceTotalField.ValueCurrency;
        Console.WriteLine($"Invoice Total: '{invoiceTotal.CurrencySymbol}{invoiceTotal.Amount}', with confidence {invoiceTotalField.Confidence}");
    }
}
Запуск приложения
После добавления примера кода в приложение нажмите зеленую кнопку "Пуск " рядом с formRecognizer_quickstart, чтобы создать и запустить программу, или нажмите клавишу F5.
Добавьте в файл Program.cs следующий пример кода. Убедитесь, что ключи и переменные конечной точки обновлены значениями из экземпляра Распознавателя документов на портале Azure:
using Azure;
using Azure.AI.FormRecognizer.DocumentAnalysis;

//set `<your-endpoint>` and `<your-key>` variables with the values from the Azure portal to create your `AzureKeyCredential` and `FormRecognizerClient` instance
string endpoint = "<your-endpoint>";
string key = "<your-key>";
AzureKeyCredential credential = new AzureKeyCredential(key);
DocumentAnalysisClient client = new DocumentAnalysisClient(new Uri(endpoint), credential);

//sample invoice document

Uri invoiceUri = new Uri ("https://raw.githubusercontent.com/Azure-Samples/cognitive-services-REST-api-samples/master/curl/form-recognizer/sample-invoice.pdf");

Operation operation = await client.AnalyzeDocumentAsync(WaitUntil.Completed, "prebuilt-invoice", invoiceUri);

AnalyzeResult result = operation.Value;

for (int i = 0; i < result.Documents.Count; i++)
{
    Console.WriteLine($"Document {i}:");

    AnalyzedDocument document = result.Documents[i];

    if (document.Fields.TryGetValue("VendorName", out DocumentField vendorNameField))
    {
        if (vendorNameField.FieldType == DocumentFieldType.String)
        {
            string vendorName = vendorNameField.Value.AsString();
            Console.WriteLine($"Vendor Name: '{vendorName}', with confidence {vendorNameField.Confidence}");
        }
    }

    if (document.Fields.TryGetValue("CustomerName", out DocumentField customerNameField))
    {
        if (customerNameField.FieldType == DocumentFieldType.String)
        {
            string customerName = customerNameField.Value.AsString();
            Console.WriteLine($"Customer Name: '{customerName}', with confidence {customerNameField.Confidence}");
        }
    }

    if (document.Fields.TryGetValue("Items", out DocumentField itemsField))
    {
        if (itemsField.FieldType == DocumentFieldType.List)
        {
            foreach (DocumentField itemField in itemsField.Value.AsList())
            {
                Console.WriteLine("Item:");

                if (itemField.FieldType == DocumentFieldType.Dictionary)
                {
                    IReadOnlyDictionary<string, DocumentField> itemFields = itemField.Value.AsDictionary();

                    if (itemFields.TryGetValue("Description", out DocumentField itemDescriptionField))
                    {
                        if (itemDescriptionField.FieldType == DocumentFieldType.String)
                        {
                            string itemDescription = itemDescriptionField.Value.AsString();

                            Console.WriteLine($"  Description: '{itemDescription}', with confidence {itemDescriptionField.Confidence}");
                        }
                    }

                    if (itemFields.TryGetValue("Amount", out DocumentField itemAmountField))
                    {
                        if (itemAmountField.FieldType == DocumentFieldType.Currency)
                        {
                            CurrencyValue itemAmount = itemAmountField.Value.AsCurrency();

                            Console.WriteLine($"  Amount: '{itemAmount.Symbol}{itemAmount.Amount}', with confidence {itemAmountField.Confidence}");
                        }
                    }
                }
            }
        }
    }

    if (document.Fields.TryGetValue("SubTotal", out DocumentField subTotalField))
    {
        if (subTotalField.FieldType == DocumentFieldType.Currency)
        {
            CurrencyValue subTotal = subTotalField.Value.AsCurrency();
            Console.WriteLine($"Sub Total: '{subTotal.Symbol}{subTotal.Amount}', with confidence {subTotalField.Confidence}");
        }
    }

    if (document.Fields.TryGetValue("TotalTax", out DocumentField totalTaxField))
    {
        if (totalTaxField.FieldType == DocumentFieldType.Currency)
        {
            CurrencyValue totalTax = totalTaxField.Value.AsCurrency();
            Console.WriteLine($"Total Tax: '{totalTax.Symbol}{totalTax.Amount}', with confidence {totalTaxField.Confidence}");
        }
    }

    if (document.Fields.TryGetValue("InvoiceTotal", out DocumentField invoiceTotalField))
    {
        if (invoiceTotalField.FieldType == DocumentFieldType.Currency)
        {
            CurrencyValue invoiceTotal = invoiceTotalField.Value.AsCurrency();
            Console.WriteLine($"Invoice Total: '{invoiceTotal.Symbol}{invoiceTotal.Amount}', with confidence {invoiceTotalField.Confidence}");
        }
    }
}
Запуск приложения
После добавления примера кода в приложение нажмите зеленую кнопку "Пуск " рядом с formRecognizer_quickstart, чтобы создать и запустить программу, или нажмите клавишу F5.
Выходные данные предварительно созданной модели
Ниже приведен фрагмент ожидаемых выходных данных:
  Document 0:
  Vendor Name: 'CONTOSO LTD.', with confidence 0.962
  Customer Name: 'MICROSOFT CORPORATION', with confidence 0.951
  Item:
    Description: 'Test for 23 fields', with confidence 0.899
    Amount: '100', with confidence 0.902
  Sub Total: '100', with confidence 0.979
Чтобы просмотреть все выходные данные, посетите репозиторий примеров Azure на GitHub, где находятся выходные данные модели готового счета.
Добавьте в файл Program.cs следующий пример кода. Убедитесь, что ключи и переменные конечной точки обновлены значениями из экземпляра Распознавателя документов на портале Azure:
using Azure;
using Azure.AI.FormRecognizer.DocumentAnalysis;

//set `<your-endpoint>` and `<your-key>` variables with the values from the Azure portal to create your `AzureKeyCredential` and `FormRecognizerClient` instance
string endpoint = "<your-endpoint>";
string key = "<your-key>";
AzureKeyCredential credential = new AzureKeyCredential(key);
DocumentAnalysisClient client = new DocumentAnalysisClient(new Uri(endpoint), credential);

//sample invoice document

Uri invoiceUri = new Uri ("https://raw.githubusercontent.com/Azure-Samples/cognitive-services-REST-api-samples/master/curl/form-recognizer/sample-invoice.pdf");

AnalyzeDocumentOperation operation = await client.AnalyzeDocumentFromUriAsync(WaitUntil.Completed, "prebuilt-invoice", invoiceUri);

AnalyzeResult result = operation.Value;

for (int i = 0; i < result.Documents.Count; i++)
{
    Console.WriteLine($"Document {i}:");

    AnalyzedDocument document = result.Documents[i];

    if (document.Fields.TryGetValue("VendorName", out DocumentField vendorNameField))
    {
        if (vendorNameField.FieldType == DocumentFieldType.String)
        {
            string vendorName = vendorNameField.Value.AsString();
            Console.WriteLine($"Vendor Name: '{vendorName}', with confidence {vendorNameField.Confidence}");
        }
    }

    if (document.Fields.TryGetValue("CustomerName", out DocumentField customerNameField))
    {
        if (customerNameField.FieldType == DocumentFieldType.String)
        {
            string customerName = customerNameField.Value.AsString();
            Console.WriteLine($"Customer Name: '{customerName}', with confidence {customerNameField.Confidence}");
        }
    }

    if (document.Fields.TryGetValue("Items", out DocumentField itemsField))
    {
        if (itemsField.FieldType == DocumentFieldType.List)
        {
            foreach (DocumentField itemField in itemsField.Value.AsList())
            {
                Console.WriteLine("Item:");

                if (itemField.FieldType == DocumentFieldType.Dictionary)
                {
                    IReadOnlyDictionary<string, DocumentField> itemFields = itemField.Value.AsDictionary();

                    if (itemFields.TryGetValue("Description", out DocumentField itemDescriptionField))
                    {
                        if (itemDescriptionField.FieldType == DocumentFieldType.String)
                        {
                            string itemDescription = itemDescriptionField.Value.AsString();

                            Console.WriteLine($"  Description: '{itemDescription}', with confidence {itemDescriptionField.Confidence}");
                        }
                    }

                    if (itemFields.TryGetValue("Amount", out DocumentField itemAmountField))
                    {
                        if (itemAmountField.FieldType == DocumentFieldType.Currency)
                        {
                            CurrencyValue itemAmount = itemAmountField.Value.AsCurrency();

                            Console.WriteLine($"  Amount: '{itemAmount.Symbol}{itemAmount.Amount}', with confidence {itemAmountField.Confidence}");
                        }
                    }
                }
            }
        }
    }

    if (document.Fields.TryGetValue("SubTotal", out DocumentField subTotalField))
    {
        if (subTotalField.FieldType == DocumentFieldType.Currency)
        {
            CurrencyValue subTotal = subTotalField.Value.AsCurrency();
            Console.WriteLine($"Sub Total: '{subTotal.Symbol}{subTotal.Amount}', with confidence {subTotalField.Confidence}");
        }
    }

    if (document.Fields.TryGetValue("TotalTax", out DocumentField totalTaxField))
    {
        if (totalTaxField.FieldType == DocumentFieldType.Currency)
        {
            CurrencyValue totalTax = totalTaxField.Value.AsCurrency();
            Console.WriteLine($"Total Tax: '{totalTax.Symbol}{totalTax.Amount}', with confidence {totalTaxField.Confidence}");
        }
    }

    if (document.Fields.TryGetValue("InvoiceTotal", out DocumentField invoiceTotalField))
    {
        if (invoiceTotalField.FieldType == DocumentFieldType.Currency)
        {
            CurrencyValue invoiceTotal = invoiceTotalField.Value.AsCurrency();
            Console.WriteLine($"Invoice Total: '{invoiceTotal.Symbol}{invoiceTotal.Amount}', with confidence {invoiceTotalField.Confidence}");
        }
    }
}
Запуск приложения
После добавления примера кода в приложение нажмите зеленую кнопку "Пуск " рядом с formRecognizer_quickstart, чтобы создать и запустить программу, или нажмите клавишу F5.
Справочник по | пакету REST API для | пакета SDK для клиентской библиотеки | (Maven) | Примеры |поддерживаемой версии REST API
Справочник по | пакету REST API для | пакета SDK для клиентской библиотеки | (Maven) | Примеры| поддерживаемой версии REST API
Справочник по | пакету REST API для | пакета SDK для клиентской библиотеки | (Maven) | Примеры|поддерживаемой версии REST API
В этом кратком руководстве используются следующие функции для анализа и извлечения данных и значений из форм и документов:
Макет — анализ и извлечение таблиц, строк, слов и меток выбора, таких как переключатели и флажки в документах форм, без необходимости обучения модели.
Предварительно созданный счет— анализ и извлечение общих полей из определенных типов документов с помощью предварительно обученной модели.
Необходимые компоненты
Подписка Azure — создайте бесплатную учетную запись.
Последняя версия Visual Studio Code или предпочтительная интегрированная среда разработки. См. разделJava в Visual Studio Code.
Совет
- Visual Studio Code предлагает Пакет кодировки для Java для Windows и macOS. Пакет кодировки — это набор VS Code, комплект SDK для Java (JDK) и набор рекомендуемых расширений Microsoft. Пакет кодировки можно также использовать для исправления существующей среды разработки.
- Если вы используете VS Code и Пакет кодировки для Java, установите расширение Gradle для Java.
Если вы не используете Visual Studio Code, убедитесь, что в среде разработки установлено следующее:
Пакет Java Development Kit (JDK) версии 8 или более поздней версии. Дополнительные сведения см. в статьеMicrosoft Build для OpenJDK.
Gradle версии 6.8 или более поздней.
Служба ИИ Azure или ресурс аналитики документов. После получения подписки Azure создайте ресурс аналитики документов с несколькими службами в портал Azure, чтобы получить ключ и конечную точку. Используйте бесплатную ценовую категорию (
F0), чтобы опробовать службу, а затем выполните обновление до платного уровня для рабочей среды.Совет
Создайте ресурс служб искусственного интеллекта Azure, если вы планируете получить доступ к нескольким службам ИИ Azure в рамках одной конечной точки или ключа. Только для доступа к аналитике документов создайте ресурс аналитики документов. Обратите внимание, что если вы планируете использовать проверку подлинности Microsoft Entra, вам потребуется один ресурс службы.
После развертывания ресурса выберите Перейти к ресурсу. Вам потребуется ключ и конечная точка из ресурса, создаваемого для подключения приложения к API аналитики документов. Позже вы вставьте ключ и конечную точку в код:
Настройка
Создание проекта Gradle
В окне консоли (например, cmd, PowerShell или Bash) создайте новый каталог для приложения под названием doc-intel-app и перейдите к нему.
mkdir doc-intel-app && doc-intel-appmkdir doc-intel-app; cd doc-intel-appВыполните команду
gradle initиз рабочей папки. Эта команда создает основные файлы сборки для Gradle, включая build.gradle.kts, который используется во время выполнения для создания и настройки приложения.gradle init --type basicКогда появится запрос на выбор предметно-ориентированного языка, выберите Kotlin.
Примите имя проекта по умолчанию (doc-intel-app), выбрав "Возврат " или "ВВОД".
В окне консоли (например, cmd, PowerShell или Bash) создайте новый каталог для приложения под названием form-recognize-app и перейдите к нему.
mkdir form-recognize-app && form-recognize-appmkdir form-recognize-app; cd form-recognize-appВыполните команду
gradle initиз рабочей папки. Эта команда создает основные файлы сборки для Gradle, включая build.gradle.kts, который используется во время выполнения для создания и настройки приложения.gradle init --type basicКогда появится запрос на выбор предметно-ориентированного языка, выберите Kotlin.
Примите имя проекта по умолчанию (form-recognize-app), выбрав "Возврат " или "Ввод".
Установка клиентской библиотеки
В этом кратком руководстве используется диспетчер зависимостей Gradle. Клиентскую библиотеку и информацию для других диспетчеров зависимостей можно найти в центральном репозитории Maven.
Откройте файл проекта Build. gradle. КТС в интегрированной среде разработки. Скопируйте и вставьте следующий код, чтобы включить клиентскую библиотеку в качестве инструкции implementation, а также необходимые подключаемые модули и параметры.
   plugins {
       java
       application
   }
   application {
       mainClass.set("DocIntelligence")
   }
   repositories {
       mavenCentral()
   }
   dependencies {
       implementation group: 'com.azure', name: 'azure-ai-documentintelligence', version: '1.0.0-beta.2'

   }
В этом кратком руководстве используется диспетчер зависимостей Gradle. Клиентскую библиотеку и информацию для других диспетчеров зависимостей можно найти в центральном репозитории Maven.
Откройте файл проекта Build. gradle. КТС в интегрированной среде разработки. Скопируйте и вставьте следующий код, чтобы включить клиентскую библиотеку в качестве инструкции implementation, а также необходимые подключаемые модули и параметры.
   plugins {
       java
       application
   }
   application {
       mainClass.set("FormRecognizer")
   }
   repositories {
       mavenCentral()
   }
   dependencies {
       implementation group: 'com.azure', name: 'azure-ai-formrecognizer', version: '4.1.0'

   }
В этом кратком руководстве используется диспетчер зависимостей Gradle. Клиентскую библиотеку и информацию для других диспетчеров зависимостей можно найти в центральном репозитории Maven.
Откройте файл проекта Build. gradle. КТС в интегрированной среде разработки. Скопируйте и вставьте следующий код, чтобы включить клиентскую библиотеку в качестве инструкции implementation, а также необходимые подключаемые модули и параметры.
   plugins {
       java
       application
   }
   application {
       mainClass.set("FormRecognizer")
   }
   repositories {
       mavenCentral()
   }
   dependencies {
       implementation group: 'com.azure', name: 'azure-ai-formrecognizer', version: '4.0.0'


   }
Создание приложения Java
Чтобы взаимодействовать со службой аналитики DocumentIntelligenceClient документов, необходимо создать экземпляр класса. Для этого вы создадите AzureKeyCredential с key помощью портал Azure и DocumentIntelligenceClient экземпляра с AzureKeyCredential помощью аналитики документовendpoint.
Чтобы взаимодействовать со службой аналитики DocumentAnalysisClient документов, необходимо создать экземпляр класса. Для этого вы создадите AzureKeyCredential с key помощью портал Azure и DocumentAnalysisClient экземпляра с AzureKeyCredential помощью аналитики документовendpoint.
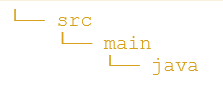
В каталоге doc-intel-app выполните следующую команду:
mkdir -p src/main/javaВы создадите следующую структуру каталогов:
Перейдите в каталог
javaи создайте файл с именемDocIntelligence.java.Совет
- Вы можете создать новый файл с помощью PowerShell.
- Откройте окно PowerShell в каталоге проекта, удерживая клавишу Shift и нажав правой кнопкой мыши на папку.
- Введите следующую команду New-Item DocIntelligence.java.
Откройте файл
DocIntelligence.java. Скопируйте и вставьте один из следующих примеров кода в приложение:
Перейдите в каталог
javaи создайте файл с именемFormRecognizer.java.Совет
- Вы можете создать новый файл с помощью PowerShell.
- Откройте окно PowerShell в каталоге проекта, удерживая клавишу Shift и нажав правой кнопкой мыши на папку.
- Введите следующую команду: New-Item FormRecognizer.java.
Откройте файл
FormRecognizer.java. Скопируйте и вставьте один из следующих примеров кода в приложение:
Внимание
Обязательно удалите ключ из кода, когда завершите работу, и ни в коем случае не публикуйте его в открытом доступе. Для рабочей среды используйте безопасный способ хранения и доступа к учетным данным, например Azure Key Vault. Дополнительные сведения см. в статье "Безопасность служб искусственного интеллекта Azure".
Модель макета
Извлеките из документов текст, метки выбора, стили текста, сведения о структуре таблиц и координаты ограничивающих рамок для них.
- В этом примере потребуется файл документа в URI. В этом кратком руководстве можно использовать наш пример документа .
- Чтобы проанализировать заданный файл по универсальному коду ресурса, используйте метод
beginAnalyzeDocumentFromUrlи передайтеprebuilt-layoutв качестве идентификатора модели. Возвращаемое значение — это объектAnalyzeResult, содержащий данные об отправленном документе. - Значение универсального кода ресурса (URI) для файла было добавлено в переменную
documentUrlв методе Main.
Добавьте в файл DocIntelligence.java следующий пример кода. Убедитесь, что вы обновляете переменные ключа и конечной точки со значениями из экземпляра аналитики документов портал Azure:
import com.azure.ai.documentintelligence;

import com.azure.ai.documentintelligence.models.AnalyzeDocumentRequest;
import com.azure.ai.documentintelligence.models.AnalyzeResult;
import com.azure.ai.documentintelligence.models.AnalyzeResultOperation;
import com.azure.ai.documentintelligence.models.DocumentTable;
import com.azure.core.credential.AzureKeyCredential;
import com.azure.core.util.polling.SyncPoller;

import java.util.List;

public class DocIntelligence {

  // set `<your-endpoint>` and `<your-key>` variables with the values from the Azure portal
  private static final String endpoint = "<your-endpoint>";
  private static final String key = "<your-key>";

  public static void main(String[] args) {

    // create your `DocumentAnalysisClient` instance and `AzureKeyCredential` variable
    DocumentIntelligenceClient client = new DocumentIntelligenceClientBuilder()
      .credential(new AzureKeyCredential(key))
      .endpoint(endpoint)
      .buildClient();

    // sample document
    String documentUrl = "https://raw.githubusercontent.com/Azure-Samples/cognitive-services-REST-api-samples/master/curl/form-recognizer/sample-layout.pdf";
    String modelId = "prebuilt-layout";

    SyncPoller <AnalyzeResultOperation, AnalyzeResultOperation> analyzeLayoutResultPoller =
      client.beginAnalyzeDocument(modelId, documentUrl);

    AnalyzeResult analyzeLayoutResult = analyzeLayoutPoller.getFinalResult().getAnalyzeResult();

    // pages
    analyzeLayoutResult.getPages().forEach(documentPage -> {
      System.out.printf("Page has width: %.2f and height: %.2f, measured with unit: %s%n",
        documentPage.getWidth(),
        documentPage.getHeight(),
        documentPage.getUnit());

      // lines
      documentPage.getLines().forEach(documentLine ->
        System.out.printf("Line '%s' is within a bounding polygon %s.%n",
          documentLine.getContent(),
          documentLine.getPolygon()));

      // words
      documentPage.getWords().forEach(documentWord ->
        System.out.printf("Word '%s' has a confidence score of %.2f.%n",
          documentWord.getContent(),
          documentWord.getConfidence()));

      // selection marks
      documentPage.getSelectionMarks().forEach(documentSelectionMark ->
        System.out.printf("Selection mark is '%s' and is within a bounding polygon %s with confidence %.2f.%n",
          documentSelectionMark.getState().toString(),
          documentSelectionMark.getPolygon(),
          documentSelectionMark.getConfidence()));
    });

    // tables
    List < DocumentTable > tables = analyzeLayoutResult.getTables();
    for (int i = 0; i < tables.size(); i++) {
      DocumentTable documentTable = tables.get(i);
      System.out.printf("Table %d has %d rows and %d columns.%n", i, documentTable.getRowCount(),
        documentTable.getColumnCount());
      documentTable.getCells().forEach(documentTableCell -> {
        System.out.printf("Cell '%s', has row index %d and column index %d.%n", documentTableCell.getContent(),
          documentTableCell.getRowIndex(), documentTableCell.getColumnIndex());
      });
      System.out.println();
    }

    // styles
    analyzeLayoutResult.getStyles().forEach(documentStyle -
      > System.out.printf("Document is handwritten %s.%n", documentStyle.isHandwritten()));
  }
}
Создание и запуск приложения
После добавления примера кода в приложение вернитесь к основному каталогу проекта — doc-intel-app.
Выполните сборку приложения с помощью команды
build:gradle buildЗапустите приложение с помощью команды
run:gradle run
Добавьте в файл FormRecognizer.java следующий пример кода. Убедитесь, что вы обновляете переменные ключа и конечной точки со значениями из экземпляра аналитики документов портал Azure:
import com.azure.ai.formrecognizer.*;

import com.azure.ai.formrecognizer.documentanalysis.models.*;
import com.azure.ai.formrecognizer.documentanalysis.DocumentAnalysisClient;
import com.azure.ai.formrecognizer.documentanalysis.DocumentAnalysisClientBuilder;

import com.azure.core.credential.AzureKeyCredential;
import com.azure.core.util.polling.SyncPoller;

import java.io.IOException;
import java.util.List;
import java.util.Arrays;
import java.time.LocalDate;
import java.util.Map;
import java.util.stream.Collectors;

public class FormRecognizer {

  // set `<your-endpoint>` and `<your-key>` variables with the values from the Azure portal
  private static final String endpoint = "<your-endpoint>";
  private static final String key = "<your-key>";

  public static void main(String[] args) {

    // create your `DocumentAnalysisClient` instance and `AzureKeyCredential` variable
    DocumentAnalysisClient client = new DocumentAnalysisClientBuilder()
      .credential(new AzureKeyCredential(key))
      .endpoint(endpoint)
      .buildClient();

    // sample document
    String documentUrl = "https://raw.githubusercontent.com/Azure-Samples/cognitive-services-REST-api-samples/master/curl/form-recognizer/sample-layout.pdf";
    String modelId = "prebuilt-layout";

    SyncPoller < OperationResult, AnalyzeResult > analyzeLayoutResultPoller =
      client.beginAnalyzeDocumentFromUrl(modelId, documentUrl);

    AnalyzeResult analyzeLayoutResult = analyzeLayoutResultPoller.getFinalResult();

    // pages
    analyzeLayoutResult.getPages().forEach(documentPage -> {
      System.out.printf("Page has width: %.2f and height: %.2f, measured with unit: %s%n",
        documentPage.getWidth(),
        documentPage.getHeight(),
        documentPage.getUnit());

      // lines
      documentPage.getLines().forEach(documentLine ->
        System.out.printf("Line %s is within a bounding polygon %s.%n",
          documentLine.getContent(),
          documentLine.getBoundingPolygon().toString()));

      // words
      documentPage.getWords().forEach(documentWord ->
        System.out.printf("Word '%s' has a confidence score of %.2f%n",
          documentWord.getContent(),
          documentWord.getConfidence()));

      // selection marks
      documentPage.getSelectionMarks().forEach(documentSelectionMark ->
        System.out.printf("Selection mark is %s and is within a bounding polygon %s with confidence %.2f.%n",
          documentSelectionMark.getState().toString(),
          documentSelectionMark.getBoundingPolygon().toString(),
          documentSelectionMark.getConfidence()));
    });

    // tables
    List < DocumentTable > tables = analyzeLayoutResult.getTables();
    for (int i = 0; i < tables.size(); i++) {
      DocumentTable documentTable = tables.get(i);
      System.out.printf("Table %d has %d rows and %d columns.%n", i, documentTable.getRowCount(),
        documentTable.getColumnCount());
      documentTable.getCells().forEach(documentTableCell -> {
        System.out.printf("Cell '%s', has row index %d and column index %d.%n", documentTableCell.getContent(),
          documentTableCell.getRowIndex(), documentTableCell.getColumnIndex());
      });
      System.out.println();
    }
  }
  // Utility function to get the bounding polygon coordinates
  private static String getBoundingCoordinates(List < Point > boundingPolygon) {
    return boundingPolygon.stream().map(point -> String.format("[%.2f, %.2f]", point.getX(),
      point.getY())).collect(Collectors.joining(", "));
  }
}
Создание и запуск приложения
После добавления примера кода в приложение вернитесь к главному каталогу проекта — form-recognize-app.
Выполните сборку приложения с помощью команды
build:gradle buildЗапустите приложение с помощью команды
run:gradle run
Выходные данные модели макета
Ниже приведен фрагмент ожидаемых выходных данных:
  Table 0 has 5 rows and 3 columns.
  Cell 'Title of each class', has row index 0 and column index 0.
  Cell 'Trading Symbol', has row index 0 and column index 1.
  Cell 'Name of exchange on which registered', has row index 0 and column index 2.
  Cell 'Common stock, $0.00000625 par value per share', has row index 1 and column index 0.
  Cell 'MSFT', has row index 1 and column index 1.
  Cell 'NASDAQ', has row index 1 and column index 2.
  Cell '2.125% Notes due 2021', has row index 2 and column index 0.
  Cell 'MSFT', has row index 2 and column index 1.
  Cell 'NASDAQ', has row index 2 and column index 2.
  Cell '3.125% Notes due 2028', has row index 3 and column index 0.
  Cell 'MSFT', has row index 3 and column index 1.
  Cell 'NASDAQ', has row index 3 and column index 2.
  Cell '2.625% Notes due 2033', has row index 4 and column index 0.
  Cell 'MSFT', has row index 4 and column index 1.
  Cell 'NASDAQ', has row index 4 and column index 2.
Чтобы просмотреть все выходные данные, посетите репозиторий примеров Azure на GitHub, где находятся выходные данные модели макета.
Добавьте в файл FormRecognizer.java следующий пример кода. Убедитесь, что вы обновляете переменные ключа и конечной точки со значениями из экземпляра аналитики документов портал Azure:
import com.azure.ai.formrecognizer;

import com.azure.ai.formrecognizer.documentanalysis.DocumentAnalysisClient;
import com.azure.ai.formrecognizer.documentanalysis.DocumentAnalysisClientBuilder;
import com.azure.ai.formrecognizer.documentanalysis.models.AnalyzeResult;
import com.azure.ai.formrecognizer.documentanalysis.models.OperationResult;
import com.azure.ai.formrecognizer.documentanalysis.models.DocumentTable;
import com.azure.ai.formrecognizer.documentanalysis.models.Point;
import com.azure.core.credential.AzureKeyCredential;
import com.azure.core.util.polling.SyncPoller;

import java.util.List;
import java.util.stream.Collectors;

public class FormRecognizer {

  // set `<your-endpoint>` and `<your-key>` variables with the values from the Azure portal
  private static final String endpoint = "<your-endpoint>";
  private static final String key = "<your-key>";

  public static void main(String[] args) {

    // create your `DocumentAnalysisClient` instance and `AzureKeyCredential` variable
    DocumentAnalysisClient client = new DocumentAnalysisClientBuilder()
      .credential(new AzureKeyCredential(key))
      .endpoint(endpoint)
      .buildClient();

    // sample document
    String documentUrl = "https://raw.githubusercontent.com/Azure-Samples/cognitive-services-REST-api-samples/master/curl/form-recognizer/sample-layout.pdf";
    String modelId = "prebuilt-layout";

    SyncPoller < OperationResult, AnalyzeResult > analyzeLayoutPoller =
      client.beginAnalyzeDocumentFromUrl(modelId, documentUrl);

    AnalyzeResult analyzeLayoutResult = analyzeLayoutPoller.getFinalResult();

    // pages
    analyzeLayoutResult.getPages().forEach(documentPage -> {
      System.out.printf("Page has width: %.2f and height: %.2f, measured with unit: %s%n",
        documentPage.getWidth(),
        documentPage.getHeight(),
        documentPage.getUnit());

      // lines
      documentPage.getLines().forEach(documentLine ->
        System.out.printf("Line '%s' is within a bounding polygon %s.%n",
          documentLine.getContent(),
          getBoundingCoordinates(documentLine.getBoundingPolygon())));

      // words
      documentPage.getWords().forEach(documentWord ->
        System.out.printf("Word '%s' has a confidence score of %.2f.%n",
          documentWord.getContent(),
          documentWord.getConfidence()));

      // selection marks
      documentPage.getSelectionMarks().forEach(documentSelectionMark ->
        System.out.printf("Selection mark is '%s' and is within a bounding polygon %s with confidence %.2f.%n",
          documentSelectionMark.getSelectionMarkState().toString(),
          getBoundingCoordinates(documentSelectionMark.getBoundingPolygon()),
          documentSelectionMark.getConfidence()));
    });

    // tables
    List < DocumentTable > tables = analyzeLayoutResult.getTables();
    for (int i = 0; i < tables.size(); i++) {
      DocumentTable documentTable = tables.get(i);
      System.out.printf("Table %d has %d rows and %d columns.%n", i, documentTable.getRowCount(),
        documentTable.getColumnCount());
      documentTable.getCells().forEach(documentTableCell -> {
        System.out.printf("Cell '%s', has row index %d and column index %d.%n", documentTableCell.getContent(),
          documentTableCell.getRowIndex(), documentTableCell.getColumnIndex());
      });
      System.out.println();
    }

    // styles
    analyzeLayoutResult.getStyles().forEach(documentStyle -
      > System.out.printf("Document is handwritten %s.%n", documentStyle.isHandwritten()));
  }

  /**
   * Utility function to get the bounding polygon coordinates.
   */
  private static String getBoundingCoordinates(List < Point > boundingPolygon) {
    return boundingPolygon.stream().map(point -> String.format("[%.2f, %.2f]", point.getX(),
      point.getY())).collect(Collectors.joining(", "));
  }
}
Создание и запуск приложения
После добавления примера кода в приложение вернитесь к главному каталогу проекта — form-recognize-app.
Выполните сборку приложения с помощью команды
build:gradle buildЗапустите приложение с помощью команды
run:gradle run
Предварительно созданная модель
Анализ и извлечение общих полей из конкретных типов документов с помощью предварительно созданной модели. В этом примере мы анализируем счет с помощью предварительно созданной модели счета .
Совет
Вы можете использовать не только счета. Есть несколько предварительно созданных моделей, у каждой из которых собственный набор поддерживаемых полей. Модель, используемая для analyze операции, зависит от типа документа, который необходимо проанализировать. См. Извлечение данных модели.
- Анализ счета с помощью модели готового счета. Для работы с этим кратким руководством можно использовать пример документа со счетом.
- Мы добавили значение URL файла в переменную
invoiceUrl, расположенную в верхней части файла. - Чтобы проанализировать заданный файл по универсальному коду ресурса, используйте метод
beginAnalyzeDocumentsи передайтеPrebuiltModels.Invoiceв качестве идентификатора модели. Возвращаемое значение — это объектresult, содержащий данные об отправленном документе. - Для простоты здесь показаны не все пары "ключ-значение", возвращаемые службой. Список всех поддерживаемых полей и соответствующих типов см. на странице концепции Счет.
Добавьте в файл DocIntelligence.java следующий пример кода. Убедитесь, что вы обновляете переменные ключа и конечной точки со значениями из экземпляра аналитики документов портал Azure:
import com.azure.ai.documentintelligence;

import com.azure.ai.documentintelligence.models.AnalyzeDocumentRequest;
import com.azure.ai.documentintelligence.models.AnalyzeResult;
import com.azure.ai.documentintelligence.models.AnalyzeResultOperation;
import com.azure.ai.documentintelligence.models.Document;
import com.azure.ai.documentintelligence.models.DocumentField;
import com.azure.ai.documentintelligence.models.DocumentFieldType;
import com.azure.core.credential.AzureKeyCredential;
import com.azure.core.util.polling.SyncPoller;

import java.io.IOException;
import java.time.LocalDate;
import java.util.List;
import java.util.Map;

public class DocIntelligence {

  // set `<your-endpoint>` and `<your-key>` variables with the values from the Azure portal
  private static final String endpoint = "<your-endpoint>";
  private static final String key = "<your-key>";

  public static void main(String[] args) {

    // create your `DocumentAnalysisClient` instance and `AzureKeyCredential` variable
    DocumentIntelligenceClient client = new DocumentIntelligenceClientBuilder()
      .credential(new AzureKeyCredential(key))
      .endpoint(endpoint)
      .buildClient();

    // sample document
    String modelId = "prebuilt-invoice";
    String invoiceUrl = "https://raw.githubusercontent.com/Azure-Samples/cognitive-services-REST-api-samples/master/curl/form-recognizer/sample-invoice.pdf";

    public static void main(final String[] args) throws IOException {
      // Instantiate a client that will be used to call the service.
      DocumentIntelligenceClient client = new DocumentIntelligenceClientBuilder()
        .credential(new AzureKeyCredential("{key}"))
        .endpoint("https://{endpoint}.cognitiveservices.azure.com/")
        .buildClient();

      SyncPoller < OperationResult, AnalyzeResult > analyzeLayoutResultPoller =
        client.beginAnalyzeDocument(modelId, invoiceUrl);

      AnalyzeResult analyzeInvoiceResult = analyzeInvoicesPoller.getFinalResult().getAnalyzeResult();

      for (int i = 0; i < analyzeInvoiceResult.getDocuments().size(); i++) {
        Document analyzedInvoice = analyzeInvoiceResult.getDocuments().get(i);
        Map < String, DocumentField > invoiceFields = analyzedInvoice.getFields();
        System.out.printf("----------- Analyzing invoice  %d -----------%n", i);
        DocumentField vendorNameField = invoiceFields.get("VendorName");
        if (vendorNameField != null) {
          if (DocumentFieldType.STRING == vendorNameField.getType()) {
            String merchantName = vendorNameField.getValueString();
            System.out.printf("Vendor Name: %s, confidence: %.2f%n",
              merchantName, vendorNameField.getConfidence());
          }
        }

        DocumentField vendorAddressField = invoiceFields.get("VendorAddress");
        if (vendorAddressField != null) {
          if (DocumentFieldType.STRING == vendorAddressField.getType()) {
            String merchantAddress = vendorAddressField.getValueString();
            System.out.printf("Vendor address: %s, confidence: %.2f%n",
              merchantAddress, vendorAddressField.getConfidence());
          }
        }

        DocumentField customerNameField = invoiceFields.get("CustomerName");
        if (customerNameField != null) {
          if (DocumentFieldType.STRING == customerNameField.getType()) {
            String merchantAddress = customerNameField.getValueString();
            System.out.printf("Customer Name: %s, confidence: %.2f%n",
              merchantAddress, customerNameField.getConfidence());
          }
        }

        DocumentField customerAddressRecipientField = invoiceFields.get("CustomerAddressRecipient");
        if (customerAddressRecipientField != null) {
          if (DocumentFieldType.STRING == customerAddressRecipientField.getType()) {
            String customerAddr = customerAddressRecipientField.getValueString();
            System.out.printf("Customer Address Recipient: %s, confidence: %.2f%n",
              customerAddr, customerAddressRecipientField.getConfidence());
          }
        }

        DocumentField invoiceIdField = invoiceFields.get("InvoiceId");
        if (invoiceIdField != null) {
          if (DocumentFieldType.STRING == invoiceIdField.getType()) {
            String invoiceId = invoiceIdField.getValueString();
            System.out.printf("Invoice ID: %s, confidence: %.2f%n",
              invoiceId, invoiceIdField.getConfidence());
          }
        }

        DocumentField invoiceDateField = invoiceFields.get("InvoiceDate");
        if (customerNameField != null) {
          if (DocumentFieldType.DATE == invoiceDateField.getType()) {
            LocalDate invoiceDate = invoiceDateField.getValueDate();
            System.out.printf("Invoice Date: %s, confidence: %.2f%n",
              invoiceDate, invoiceDateField.getConfidence());
          }
        }

        DocumentField invoiceTotalField = invoiceFields.get("InvoiceTotal");
        if (customerAddressRecipientField != null) {
          if (DocumentFieldType.NUMBER == invoiceTotalField.getType()) {
            Double invoiceTotal = invoiceTotalField.getValueNumber();
            System.out.printf("Invoice Total: %.2f, confidence: %.2f%n",
              invoiceTotal, invoiceTotalField.getConfidence());
          }
        }

        DocumentField invoiceItemsField = invoiceFields.get("Items");
        if (invoiceItemsField != null) {
          System.out.printf("Invoice Items: %n");
          if (DocumentFieldType.ARRAY == invoiceItemsField.getType()) {
            List < DocumentField > invoiceItems = invoiceItemsField.getValueArray();
            invoiceItems.stream()
              .filter(invoiceItem -> DocumentFieldType.OBJECT == invoiceItem.getType())
              .map(documentField -> documentField.getValueObject())
              .forEach(documentFieldMap -> documentFieldMap.forEach((key, documentField) -> {

                // See a full list of fields found on an invoice here:
                // https://aka.ms/documentintelligence/invoicefields

                if ("Description".equals(key)) {
                  if (DocumentFieldType.STRING == documentField.getType()) {
                    String name = documentField.getValueString();
                    System.out.printf("Description: %s, confidence: %.2fs%n",
                      name, documentField.getConfidence());
                  }
                }
                if ("Quantity".equals(key)) {
                  if (DocumentFieldType.NUMBER == documentField.getType()) {
                    Double quantity = documentField.getValueNumber();
                    System.out.printf("Quantity: %f, confidence: %.2f%n",
                      quantity, documentField.getConfidence());
                  }
                }
                if ("UnitPrice".equals(key)) {
                  if (DocumentFieldType.NUMBER == documentField.getType()) {
                    Double unitPrice = documentField.getValueNumber();
                    System.out.printf("Unit Price: %f, confidence: %.2f%n",
                      unitPrice, documentField.getConfidence());
                  }
                }
                if ("ProductCode".equals(key)) {
                  if (DocumentFieldType.NUMBER == documentField.getType()) {
                    Double productCode = documentField.getValueNumber();
                    System.out.printf("Product Code: %f, confidence: %.2f%n",
                      productCode, documentField.getConfidence());
                  }
                }
              }));
          }
        }
      }
    }
  }
}
Создание и запуск приложения
После добавления примера кода в приложение вернитесь к основному каталогу проекта — doc-intel-app.
Выполните сборку приложения с помощью команды
build:gradle buildЗапустите приложение с помощью команды
run:gradle run
Добавьте в файл FormRecognizer.java следующий пример кода. Убедитесь, что вы обновляете переменные ключа и конечной точки со значениями из экземпляра аналитики документов портал Azure:
import com.azure.ai.formrecognizer.*;

import com.azure.ai.formrecognizer.documentanalysis.models.*;
import com.azure.ai.formrecognizer.documentanalysis.DocumentAnalysisClient;
import com.azure.ai.formrecognizer.documentanalysis.DocumentAnalysisClientBuilder;

import com.azure.core.credential.AzureKeyCredential;
import com.azure.core.util.polling.SyncPoller;

import java.io.IOException;
import java.util.List;
import java.util.Arrays;
import java.time.LocalDate;
import java.util.Map;
import java.util.stream.Collectors;

public class FormRecognizer {

  // set `<your-endpoint>` and `<your-key>` variables with the values from the Azure portal
  private static final String endpoint = "<your-endpoint>";
  private static final String key = "<your-key>";

  public static void main(final String[] args) throws IOException {

    // create your `DocumentAnalysisClient` instance and `AzureKeyCredential` variable
    DocumentAnalysisClient client = new DocumentAnalysisClientBuilder()
      .credential(new AzureKeyCredential(key))
      .endpoint(endpoint)
      .buildClient();

    // sample document
    String modelId = "prebuilt-invoice";
    String invoiceUrl = "https://raw.githubusercontent.com/Azure-Samples/cognitive-services-REST-api-samples/master/curl/form-recognizer/sample-invoice.pdf";

    SyncPoller < OperationResult, AnalyzeResult > analyzeInvoicePoller = client.beginAnalyzeDocumentFromUrl(modelId, invoiceUrl);

    AnalyzeResult analyzeInvoiceResult = analyzeInvoicePoller.getFinalResult();

    for (int i = 0; i < analyzeInvoiceResult.getDocuments().size(); i++) {
      AnalyzedDocument analyzedInvoice = analyzeInvoiceResult.getDocuments().get(i);
      Map < String, DocumentField > invoiceFields = analyzedInvoice.getFields();
      System.out.printf("----------- Analyzing invoice  %d -----------%n", i);
      DocumentField vendorNameField = invoiceFields.get("VendorName");
      if (vendorNameField != null) {
        if (DocumentFieldType.STRING == vendorNameField.getType()) {
          String merchantName = vendorNameField.getValueAsString();
          System.out.printf("Vendor Name: %s, confidence: %.2f%n",
            merchantName, vendorNameField.getConfidence());
        }
      }

      DocumentField vendorAddressField = invoiceFields.get("VendorAddress");
      if (vendorAddressField != null) {
        if (DocumentFieldType.STRING == vendorAddressField.getType()) {
          String merchantAddress = vendorAddressField.getValueAsString();
          System.out.printf("Vendor address: %s, confidence: %.2f%n",
            merchantAddress, vendorAddressField.getConfidence());
        }
      }

      DocumentField customerNameField = invoiceFields.get("CustomerName");
      if (customerNameField != null) {
        if (DocumentFieldType.STRING == customerNameField.getType()) {
          String merchantAddress = customerNameField.getValueAsString();
          System.out.printf("Customer Name: %s, confidence: %.2f%n",
            merchantAddress, customerNameField.getConfidence());
        }
      }

      DocumentField customerAddressRecipientField = invoiceFields.get("CustomerAddressRecipient");
      if (customerAddressRecipientField != null) {
        if (DocumentFieldType.STRING == customerAddressRecipientField.getType()) {
          String customerAddr = customerAddressRecipientField.getValueAsString();
          System.out.printf("Customer Address Recipient: %s, confidence: %.2f%n",
            customerAddr, customerAddressRecipientField.getConfidence());
        }
      }

      DocumentField invoiceIdField = invoiceFields.get("InvoiceId");
      if (invoiceIdField != null) {
        if (DocumentFieldType.STRING == invoiceIdField.getType()) {
          String invoiceId = invoiceIdField.getValueAsString();
          System.out.printf("Invoice ID: %s, confidence: %.2f%n",
            invoiceId, invoiceIdField.getConfidence());
        }
      }

      DocumentField invoiceDateField = invoiceFields.get("InvoiceDate");
      if (customerNameField != null) {
        if (DocumentFieldType.DATE == invoiceDateField.getType()) {
          LocalDate invoiceDate = invoiceDateField.getValueAsDate();
          System.out.printf("Invoice Date: %s, confidence: %.2f%n",
            invoiceDate, invoiceDateField.getConfidence());
        }
      }

      DocumentField invoiceTotalField = invoiceFields.get("InvoiceTotal");
      if (customerAddressRecipientField != null) {
        if (DocumentFieldType.DOUBLE == invoiceTotalField.getType()) {
          Double invoiceTotal = invoiceTotalField.getValueAsDouble();
          System.out.printf("Invoice Total: %.2f, confidence: %.2f%n",
            invoiceTotal, invoiceTotalField.getConfidence());
        }
      }

      DocumentField invoiceItemsField = invoiceFields.get("Items");
      if (invoiceItemsField != null) {
        System.out.printf("Invoice Items: %n");
        if (DocumentFieldType.LIST == invoiceItemsField.getType()) {
          List < DocumentField > invoiceItems = invoiceItemsField.getValueAsList();
          invoiceItems.stream()
            .filter(invoiceItem -> DocumentFieldType.MAP == invoiceItem.getType())
            .map(documentField -> documentField.getValueAsMap())
            .forEach(documentFieldMap -> documentFieldMap.forEach((key, documentField) -> {

              // See a full list of fields found on an invoice here:
              // https://aka.ms/formrecognizer/invoicefields

              if ("Description".equals(key)) {
                if (DocumentFieldType.STRING == documentField.getType()) {
                  String name = documentField.getValueAsString();
                  System.out.printf("Description: %s, confidence: %.2fs%n",
                    name, documentField.getConfidence());
                }
              }
              if ("Quantity".equals(key)) {
                if (DocumentFieldType.DOUBLE == documentField.getType()) {
                  Double quantity = documentField.getValueAsDouble();
                  System.out.printf("Quantity: %f, confidence: %.2f%n",
                    quantity, documentField.getConfidence());
                }
              }
              if ("UnitPrice".equals(key)) {
                if (DocumentFieldType.DOUBLE == documentField.getType()) {
                  Double unitPrice = documentField.getValueAsDouble();
                  System.out.printf("Unit Price: %f, confidence: %.2f%n",
                    unitPrice, documentField.getConfidence());
                }
              }
              if ("ProductCode".equals(key)) {
                if (DocumentFieldType.DOUBLE == documentField.getType()) {
                  Double productCode = documentField.getValueAsDouble();
                  System.out.printf("Product Code: %f, confidence: %.2f%n",
                    productCode, documentField.getConfidence());
                }
              }
            }));
        }
      }
    }
  }
}
Создание и запуск приложения
После добавления примера кода в приложение вернитесь к основному каталогу проекта — doc-intel-app.
Выполните сборку приложения с помощью команды
build:gradle buildЗапустите приложение с помощью команды
run:gradle run
Выходные данные предварительно созданной модели
Ниже приведен фрагмент ожидаемых выходных данных:
  ----------- Analyzing invoice  0 -----------
  Analyzed document has doc type invoice with confidence : 1.00
  Vendor Name: CONTOSO LTD., confidence: 0.92
  Vendor address: 123 456th St New York, NY, 10001, confidence: 0.91
  Customer Name: MICROSOFT CORPORATION, confidence: 0.84
  Customer Address Recipient: Microsoft Corp, confidence: 0.92
  Invoice ID: INV-100, confidence: 0.97
  Invoice Date: 2019-11-15, confidence: 0.97
Чтобы просмотреть все выходные данные, посетите репозиторий примеров Azure на GitHub, где находятся выходные данные модели готового счета.
Добавьте в файл FormRecognizer.java следующий пример кода. Убедитесь, что вы обновляете переменные ключа и конечной точки со значениями из экземпляра аналитики документов портал Azure:
import com.azure.ai.formrecognizer;

import com.azure.ai.formrecognizer.documentanalysis.DocumentAnalysisClient;
import com.azure.ai.formrecognizer.documentanalysis.DocumentAnalysisClientBuilder;
import com.azure.ai.formrecognizer.documentanalysis.models.AnalyzeResult;
import com.azure.ai.formrecognizer.documentanalysis.models.AnalyzedDocument;
import com.azure.ai.formrecognizer.documentanalysis.models.DocumentField;
import com.azure.ai.formrecognizer.documentanalysis.models.DocumentFieldType;
import com.azure.ai.formrecognizer.documentanalysis.models.OperationResult;
import com.azure.core.credential.AzureKeyCredential;
import com.azure.core.util.polling.SyncPoller;

import java.io.IOException;
import java.time.LocalDate;
import java.util.List;
import java.util.Map;

public class FormRecognizer {

  // set `<your-endpoint>` and `<your-key>` variables with the values from the Azure portal
  private static final String endpoint = "<your-endpoint>";
  private static final String key = "<your-key>";

  public static void main(String[] args) {

    // create your `DocumentAnalysisClient` instance and `AzureKeyCredential` variable
    DocumentAnalysisClient client = new DocumentAnalysisClientBuilder()
      .credential(new AzureKeyCredential(key))
      .endpoint(endpoint)
      .buildClient();

    // sample document
    String modelId = "prebuilt-invoice";
    String invoiceUrl = "https://raw.githubusercontent.com/Azure-Samples/cognitive-services-REST-api-samples/master/curl/form-recognizer/sample-invoice.pdf";

    SyncPoller < OperationResult, AnalyzeResult > analyzeInvoicePoller = client.beginAnalyzeDocumentFromUrl(modelId, invoiceUrl);

    AnalyzeResult analyzeInvoiceResult = analyzeInvoicePoller.getFinalResult();

    for (int i = 0; i < analyzeInvoiceResult.getDocuments().size(); i++) {
      AnalyzedDocument analyzedInvoice = analyzeInvoiceResult.getDocuments().get(i);
      Map < String, DocumentField > invoiceFields = analyzedInvoice.getFields();
      System.out.printf("----------- Analyzing invoice  %d -----------%n", i);
      DocumentField vendorNameField = invoiceFields.get("VendorName");
      if (vendorNameField != null) {
        if (DocumentFieldType.STRING == vendorNameField.getType()) {
          String merchantName = vendorNameField.getValueAsString();
          System.out.printf("Vendor Name: %s, confidence: %.2f%n",
            merchantName, vendorNameField.getConfidence());
        }
      }

      DocumentField vendorAddressField = invoiceFields.get("VendorAddress");
      if (vendorAddressField != null) {
        if (DocumentFieldType.STRING == vendorAddressField.getType()) {
          String merchantAddress = vendorAddressField.getValueAsString();
          System.out.printf("Vendor address: %s, confidence: %.2f%n",
            merchantAddress, vendorAddressField.getConfidence());
        }
      }

      DocumentField customerNameField = invoiceFields.get("CustomerName");
      if (customerNameField != null) {
        if (DocumentFieldType.STRING == customerNameField.getType()) {
          String merchantAddress = customerNameField.getValueAsString();
          System.out.printf("Customer Name: %s, confidence: %.2f%n",
            merchantAddress, customerNameField.getConfidence());
        }
      }

      DocumentField customerAddressRecipientField = invoiceFields.get("CustomerAddressRecipient");
      if (customerAddressRecipientField != null) {
        if (DocumentFieldType.STRING == customerAddressRecipientField.getType()) {
          String customerAddr = customerAddressRecipientField.getValueAsString();
          System.out.printf("Customer Address Recipient: %s, confidence: %.2f%n",
            customerAddr, customerAddressRecipientField.getConfidence());
        }
      }

      DocumentField invoiceIdField = invoiceFields.get("InvoiceId");
      if (invoiceIdField != null) {
        if (DocumentFieldType.STRING == invoiceIdField.getType()) {
          String invoiceId = invoiceIdField.getValueAsString();
          System.out.printf("Invoice ID: %s, confidence: %.2f%n",
            invoiceId, invoiceIdField.getConfidence());
        }
      }

      DocumentField invoiceDateField = invoiceFields.get("InvoiceDate");
      if (customerNameField != null) {
        if (DocumentFieldType.DATE == invoiceDateField.getType()) {
          LocalDate invoiceDate = invoiceDateField.getValueAsDate();
          System.out.printf("Invoice Date: %s, confidence: %.2f%n",
            invoiceDate, invoiceDateField.getConfidence());
        }
      }

      DocumentField invoiceTotalField = invoiceFields.get("InvoiceTotal");
      if (customerAddressRecipientField != null) {
        if (DocumentFieldType.DOUBLE == invoiceTotalField.getType()) {
          Double invoiceTotal = invoiceTotalField.getValueAsDouble();
          System.out.printf("Invoice Total: %.2f, confidence: %.2f%n",
            invoiceTotal, invoiceTotalField.getConfidence());
        }
      }

      DocumentField invoiceItemsField = invoiceFields.get("Items");
      if (invoiceItemsField != null) {
        System.out.printf("Invoice Items: %n");
        if (DocumentFieldType.LIST == invoiceItemsField.getType()) {
          List < DocumentField > invoiceItems = invoiceItemsField.getValueAsList();
          invoiceItems.stream()
            .filter(invoiceItem -> DocumentFieldType.MAP == invoiceItem.getType())
            .map(documentField -> documentField.getValueAsMap())
            .forEach(documentFieldMap -> documentFieldMap.forEach((key, documentField) -> {

              // See a full list of fields found on an invoice here:
              // https://aka.ms/formrecognizer/invoicefields

              if ("Description".equals(key)) {
                if (DocumentFieldType.STRING == documentField.getType()) {
                  String name = documentField.getValueAsString();
                  System.out.printf("Description: %s, confidence: %.2fs%n",
                    name, documentField.getConfidence());
                }
              }
              if ("Quantity".equals(key)) {
                if (DocumentFieldType.DOUBLE == documentField.getType()) {
                  Double quantity = documentField.getValueAsDouble();
                  System.out.printf("Quantity: %f, confidence: %.2f%n",
                    quantity, documentField.getConfidence());
                }
              }
              if ("UnitPrice".equals(key)) {
                if (DocumentFieldType.DOUBLE == documentField.getType()) {
                  Double unitPrice = documentField.getValueAsDouble();
                  System.out.printf("Unit Price: %f, confidence: %.2f%n",
                    unitPrice, documentField.getConfidence());
                }
              }
              if ("ProductCode".equals(key)) {
                if (DocumentFieldType.DOUBLE == documentField.getType()) {
                  Double productCode = documentField.getValueAsDouble();
                  System.out.printf("Product Code: %f, confidence: %.2f%n",
                    productCode, documentField.getConfidence());
                }
              }
            }));
        }
      }
    }
  }
}
Создание и запуск приложения
После добавления примера кода в приложение вернитесь к основному каталогу проекта — doc-intel-app.
Выполните сборку приложения с помощью команды
build:gradle buildЗапустите приложение с помощью команды
run:gradle run
Справочник по | пакету REST API клиентской библиотеки | (npm) | Samples |Supported REST API version
Справочник | по | пакету SDK клиентской библиотеки | REST API (npm) | Samples Supported REST API version (Примеры |поддерживаемой версии REST API)
Справочник | по | пакету SDK клиентской библиотеки | REST API (npm) | Samples Supported REST API version (Примеры |поддерживаемой версии REST API)
В этом кратком руководстве используются следующие функции для анализа и извлечения данных и значений из форм и документов:
Макет — анализ и извлечение таблиц, строк, слов и меток выбора, таких как переключатели и флажки в документах форм, без необходимости обучения модели.
Предварительно созданный счет— анализ и извлечение общих полей из определенных типов документов с помощью предварительно обученной модели счета.
Необходимые компоненты
Подписка Azure — создайте бесплатную учетную запись.
Последняя версия Visual Studio Code или предпочтительная интегрированная среда разработки. Дополнительные сведения см. в разделеNode.js в Visual Studio Code.
Последняя
LTSверсия Node.js.Служба ИИ Azure или ресурс аналитики документов. После получения подписки Azure создайте ресурс аналитики документов с несколькими службами в портал Azure, чтобы получить ключ и конечную точку. Используйте бесплатную ценовую категорию (
F0), чтобы опробовать службу, а затем выполните обновление до платного уровня для рабочей среды.Совет
Создайте ресурс служб искусственного интеллекта Azure, если вы планируете получить доступ к нескольким службам ИИ Azure в рамках одной конечной точки или ключа. Только для доступа к аналитике документов создайте ресурс аналитики документов. Обратите внимание, что если вы планируете использовать проверку подлинности Microsoft Entra, вам потребуется один ресурс службы.
После развертывания ресурса выберите Перейти к ресурсу. Вам потребуется ключ и конечная точка из ресурса, создаваемого для подключения приложения к API аналитики документов. Вставьте ключ и конечную точку в код далее в кратком руководстве:
Настройка
Создание нового приложения Express Node.js: в окне консоли (например, cmd, PowerShell или Bash) создайте новый каталог для приложения с именем
doc-intel-appи перейдите в него.mkdir doc-intel-app && cd doc-intel-appВыполните команду
npm init, чтобы инициализировать приложение и сформировать шаблон проекта.npm initУкажите атрибуты проекта с помощью запросов, представленных в терминале.
- Наиболее важными атрибутами являются имя, номер версии и точка входа.
- Рекомендуется хранить
index.jsдля имени точки входа. Описание, команда тестирования, репозиторий GitHub, ключевые слова, автор и данные лицензии являются необязательными атрибутами: их можно пропустить для этого проекта. - Примите предложения в круглых скобках с помощью кнопок Назад или Ввод.
- После выполнения запроса
package.jsonфайл будет создан в каталоге doc-intel-app.
Установите клиентскую библиотеку
ai-document-intelligenceи пакеты npmazure/identity:npm i @azure-rest/ai-document-intelligence@1.0.0-beta.2 @azure/identityФайл
package.jsonприложения обновлен с учетом зависимостей.
Установите клиентскую библиотеку
ai-form-recognizerи пакеты npmazure/identity:npm i @azure/ai-form-recognizer@5.0.0 @azure/identity- Файл
package.jsonприложения обновлен с учетом зависимостей.
- Файл
Установите клиентскую библиотеку
ai-form-recognizerи пакеты npmazure/identity:npm i @azure/ai-form-recognizer@4.0.0 @azure/identity
В каталоге приложения создайте файл с именем
index.js.Совет
- Вы можете создать новый файл с помощью PowerShell.
- Откройте окно PowerShell в каталоге проекта, удерживая клавишу Shift и нажав правой кнопкой мыши на папку.
- Введите следующую команду: New-Item index.js.
Сборка приложения
Чтобы взаимодействовать со службой аналитики DocumentIntelligenceClient документов, необходимо создать экземпляр класса. Для этого вы создадите AzureKeyCredential с key помощью портал Azure и DocumentIntelligenceClient экземпляра с AzureKeyCredential помощью аналитики документовendpoint.
Чтобы взаимодействовать со службой аналитики DocumentAnalysisClient документов, необходимо создать экземпляр класса. Для этого вы создадите AzureKeyCredential с key портал Azure и DocumentAnalysisClient экземпляром с AzureKeyCredential Распознаватель документовendpoint.
index.jsОткройте файл в Visual Studio Code или любимой интегрированной среде разработки. Скопируйте и вставьте один из следующих примеров кода в приложение:
Внимание
Обязательно удалите ключ из кода, когда завершите работу, и ни в коем случае не публикуйте его в открытом доступе. Для рабочей среды используйте безопасный способ хранения и доступа к учетным данным, например Azure Key Vault. Дополнительные сведения см. в статье "Безопасность служб искусственного интеллекта Azure".
Модель макета
Извлеките из документов текст, метки выбора, стили текста, сведения о структуре таблиц и координаты ограничивающих рамок для них.
- В этом примере потребуется файл документа из URL-адреса. В этом кратком руководстве можно использовать наш пример документа .
- Мы добавили значение URL-адреса файла в переменную
formUrl, расположенную в верхней части файла.- Чтобы проанализировать заданный файл из URL-адреса, используйте метод
beginAnalyzeDocumentsи передайте вprebuilt-layoutв качестве идентификатора модели.
    const { DocumentIntelligenceClient } = require("@azure-rest/ai-document-intelligence");
    const  { AzureKeyCredential } = require("@azure/core-auth");

    // set `<your-key>` and `<your-endpoint>` variables with the values from the Azure portal.
    const key = "<your-key";
    const endpoint = "<your-endpoint>";

    // sample document
  const formUrl = "https://raw.githubusercontent.com/Azure-Samples/cognitive-services-REST-api-samples/master/curl/form-recognizer/sample-layout.pdf"

async function main() {
    const client = DocumentIntelligenceClient(endpoint, new AzureKeyCredential(key));

    const poller = await client.beginAnalyzeDocument("prebuilt-layout", formUrl);

const {
        pages,
        tables
    } = await poller.pollUntilDone();

    if (pages.length <= 0) {
        console.log("No pages were extracted from the document.");
    } else {
        console.log("Pages:");
        for (const page of pages) {
            console.log("- Page", page.pageNumber, `(unit: ${page.unit})`);
            console.log(`  ${page.width}x${page.height}, angle: ${page.angle}`);
            console.log(`  ${page.lines.length} lines, ${page.words.length} words`);
        }
    }

    if (tables.length <= 0) {
        console.log("No tables were extracted from the document.");
    } else {
        console.log("Tables:");
        for (const table of tables) {
            console.log(
                `- Extracted table: ${table.columnCount} columns, ${table.rowCount} rows (${table.cells.length} cells)`
            );
        }
    }
}

main().catch((error) => {
    console.error("An error occurred:", error);
    process.exit(1);
});
Запуск приложения
После добавления примера кода в приложение запустите программу:
Перейдите в папку, в которой есть приложение Аналитики документов (doc-intel-app).
В окне терминала введите следующую команду:
node index.js
Добавьте в файл index.js следующий пример кода. Убедитесь, что вы обновляете переменные ключа и конечной точки со значениями из экземпляра аналитики документов портал Azure:
 const { AzureKeyCredential, DocumentAnalysisClient } = require("@azure/ai-form-recognizer");

    // set `<your-key>` and `<your-endpoint>` variables with the values from the Azure portal.
    const key = "<your-key>";
    const endpoint = "<your-endpoint>";

    // sample document
  const formUrl = "https://raw.githubusercontent.com/Azure-Samples/cognitive-services-REST-api-samples/master/curl/form-recognizer/sample-layout.pdf"

  async function main() {
    const client = new DocumentAnalysisClient(endpoint, new AzureKeyCredential(key));

    const poller = await client.beginAnalyzeDocumentFromUrl("prebuilt-layout", formUrl);

    const {
        pages,
        tables
    } = await poller.pollUntilDone();

    if (pages.length <= 0) {
        console.log("No pages were extracted from the document.");
    } else {
        console.log("Pages:");
        for (const page of pages) {
            console.log("- Page", page.pageNumber, `(unit: ${page.unit})`);
            console.log(`  ${page.width}x${page.height}, angle: ${page.angle}`);
            console.log(`  ${page.lines.length} lines, ${page.words.length} words`);
        }
    }

    if (tables.length <= 0) {
        console.log("No tables were extracted from the document.");
    } else {
        console.log("Tables:");
        for (const table of tables) {
            console.log(
                `- Extracted table: ${table.columnCount} columns, ${table.rowCount} rows (${table.cells.length} cells)`
            );
        }
    }
}

main().catch((error) => {
    console.error("An error occurred:", error);
    process.exit(1);
});
Запуск приложения
После добавления примера кода в приложение запустите программу:
Перейдите в папку, в которой есть приложение Аналитики документов (doc-intel-app).
В окне терминала введите следующую команду:
node index.js
Выходные данные модели макета
Ниже приведен фрагмент ожидаемых выходных данных:
Pages:
- Page 1 (unit: inch)
  8.5x11, angle: 0
  69 lines, 425 words
Tables:
- Extracted table: 3 columns, 5 rows (15 cells)
Чтобы просмотреть все выходные данные, посетите репозиторий примеров Azure на GitHub, где находятся выходные данные модели макета.
Предварительно созданная модель
В этом примере мы анализируем счет с помощью предварительно созданной модели счета .
Совет
Вы можете использовать не только счета. Есть несколько предварительно созданных моделей, у каждой из которых собственный набор поддерживаемых полей. Модель, используемая для analyze операции, зависит от типа документа, который необходимо проанализировать. См. Извлечение данных модели.
- Анализ счета с помощью модели готового счета. Для работы с этим кратким руководством можно использовать пример документа со счетом.
- Мы добавили значение URL файла в переменную
invoiceUrl, расположенную в верхней части файла. - Чтобы проанализировать заданный файл по универсальному коду ресурса, используйте метод
beginAnalyzeDocumentsи передайтеPrebuiltModels.Invoiceв качестве идентификатора модели. Возвращаемое значение — это объектresult, содержащий данные об отправленном документе. - Для простоты здесь показаны не все пары "ключ-значение", возвращаемые службой. Список всех поддерживаемых полей и соответствующих типов см. на странице концепции Счет.
const { DocumentIntelligenceClient } = require("@azure-rest/ai-document-intelligence");
const  { AzureKeyCredential } = require("@azure/core-auth");

    // set `<your-key>` and `<your-endpoint>` variables with the values from the Azure portal.
    const key = "<your-key>";
    const endpoint = "<your-endpoint>";

    // sample document
    invoiceUrl = "https://raw.githubusercontent.com/Azure-Samples/cognitive-services-REST-api-samples/master/curl/form-recognizer/sample-invoice.pdf"

async function main() {
    const client = DocumentIntelligenceClient(endpoint, new AzureKeyCredential(key));

    const poller = await client.beginAnalyzeDocument("prebuilt-invoice", invoiceUrl);
if (pages.length <= 0) {
        console.log("No pages were extracted from the document.");
    } else {
        console.log("Pages:");
        for (const page of pages) {
            console.log("- Page", page.pageNumber, `(unit: ${page.unit})`);
            console.log(`  ${page.width}x${page.height}, angle: ${page.angle}`);
            console.log(`  ${page.lines.length} lines, ${page.words.length} words`);
        }
    }

    if (tables.length <= 0) {
        console.log("No tables were extracted from the document.");
    } else {
        console.log("Tables:");
        for (const table of tables) {
            console.log(
                `- Extracted table: ${table.columnCount} columns, ${table.rowCount} rows (${table.cells.length} cells)`
            );
        }
    }
}

main().catch((error) => {
    console.error("An error occurred:", error);
    process.exit(1);
});
Запуск приложения
После добавления примера кода в приложение запустите программу:
Перейдите в папку, в которой есть приложение Аналитики документов (doc-intel-app).
В окне терминала введите следующую команду:
node index.js
 const {
    AzureKeyCredential,
    DocumentAnalysisClient
} = require("@azure/ai-form-recognizer");

// set `<your-key>` and `<your-endpoint>` variables with the values from the Azure portal.
const key = "<your-key>";
const endpoint = "<your-endpoint>";
// sample document
invoiceUrl = "https://raw.githubusercontent.com/Azure-Samples/cognitive-services-REST-api-samples/master/curl/form-recognizer/sample-invoice.pdf"

async function main() {
    const client = new DocumentAnalysisClient(endpoint, new AzureKeyCredential(key));

    const poller = await client.beginAnalyzeDocumentFromUrl("prebuilt-invoice", invoiceUrl);

    const {
        pages,
        tables
    } = await poller.pollUntilDone();

    if (pages.length <= 0) {
        console.log("No pages were extracted from the document.");
    } else {
        console.log("Pages:");
        for (const page of pages) {
            console.log("- Page", page.pageNumber, `(unit: ${page.unit})`);
            console.log(`  ${page.width}x${page.height}, angle: ${page.angle}`);
            console.log(`  ${page.lines.length} lines, ${page.words.length} words`);

            if (page.lines && page.lines.length > 0) {
                console.log("  Lines:");

                for (const line of page.lines) {
                    console.log(`  - "${line.content}"`);

                    // The words of the line can also be iterated independently. The words are computed based on their
                    // corresponding spans.
                    for (const word of line.words()) {
                        console.log(`    - "${word.content}"`);
                    }
                }
            }
        }
    }

    if (tables.length <= 0) {
        console.log("No tables were extracted from the document.");
    } else {
        console.log("Tables:");
        for (const table of tables) {
            console.log(
                `- Extracted table: ${table.columnCount} columns, ${table.rowCount} rows (${table.cells.length} cells)`
            );
        }
    }
}

main().catch((error) => {
    console.error("An error occurred:", error);
    process.exit(1);
});
Запуск приложения
После добавления примера кода в приложение запустите программу:
Перейдите в папку, в которой есть приложение Аналитики документов (doc-intel-app).
В окне терминала введите следующую команду:
node index.js
Выходные данные предварительно созданной модели
Ниже приведен фрагмент ожидаемых выходных данных:
  Vendor Name: CONTOSO LTD.
  Customer Name: MICROSOFT CORPORATION
  Invoice Date: 2019-11-15T00:00:00.000Z
  Due Date: 2019-12-15T00:00:00.000Z
  Items:
  - <no product code>
    Description: Test for 23 fields
    Quantity: 1
    Date: undefined
    Unit: undefined
    Unit Price: 1
    Tax: undefined
    Amount: 100
Чтобы просмотреть все выходные данные, посетите репозиторий примеров Azure на GitHub, где находятся выходные данные модели готового счета.
const { AzureKeyCredential, DocumentAnalysisClient } = require("@azure/ai-form-recognizer");

  // set `<your-key>` and `<your-endpoint>` variables with the values from the Azure portal.
      const key = "<your-key>";
      const endpoint = "<your-endpoint>";
// sample document
    invoiceUrl = "https://raw.githubusercontent.com/Azure-Samples/cognitive-services-REST-api-samples/master/curl/form-recognizer/sample-invoice.pdf"

async function main() {
    const client = new DocumentAnalysisClient(endpoint, new AzureKeyCredential(key));

    const poller = await client.beginAnalyzeDocument("prebuilt-invoice", invoiceUrl);

    const {
    documents: [document],
  } = await poller.pollUntilDone();


  if (document) {
    const {
      vendorName,
      customerName,
      invoiceDate,
      dueDate,
      items,
      subTotal,
      previousUnpaidBalance,
      totalTax,
      amountDue,
    } = document.fields;

    // The invoice model has many fields. For details, *see* [Invoice model field extraction](../../concept-invoice.md#field-extraction)
    console.log("Vendor Name:", vendorName && vendorName.value);
    console.log("Customer Name:", customerName && customerName.value);
    console.log("Invoice Date:", invoiceDate && invoiceDate.value);
    console.log("Due Date:", dueDate && dueDate.value);

    console.log("Items:");
    for (const item of (items && items.values) || []) {
      const { productCode, description, quantity, date, unit, unitPrice, tax, amount } =
        item.properties;

      console.log("-", (productCode && productCode.value) || "<no product code>");
      console.log("  Description:", description && description.value);
      console.log("  Quantity:", quantity && quantity.value);
      console.log("  Date:", date && date.value);
      console.log("  Unit:", unit && unit.value);
      console.log("  Unit Price:", unitPrice && unitPrice.value);
      console.log("  Tax:", tax && tax.value);
      console.log("  Amount:", amount && amount.value);
    }

    console.log("Subtotal:", subTotal && subTotal.value);
    console.log("Previous Unpaid Balance:", previousUnpaidBalance && previousUnpaidBalance.value);
    console.log("Tax:", totalTax && totalTax.value);
    console.log("Amount Due:", amountDue && amountDue.value);
  } else {
    throw new Error("Expected at least one receipt in the result.");
  }
}


main().catch((error) => {
    console.error("An error occurred:", error);
    process.exit(1);
});
Запуск приложения
После добавления примера кода в приложение запустите программу:
Перейдите в папку, в которой есть приложение Аналитики документов (doc-intel-app).
В окне терминала введите следующую команду:
node index.js
Справочник по | пакету REST API для | пакета SDK для клиентской библиотеки |(PyPi) | Samples | Rest API
Справочник по | пакету REST API для | пакета SDK для клиентской библиотеки |(PyPi) | Samples | Rest API
Справочник по | пакету REST API для | пакета SDK для клиентской библиотеки | (PyPi) | Samples | Rest API
В этом кратком руководстве используются следующие функции для анализа и извлечения данных из форм и документов:
Макет— анализ и извлечение таблиц, строк, слов и выделений, таких как переключатели и проверка поля, а также пары "ключ-значение", без необходимости обучения модели.
Предварительно созданный счет— анализ и извлечение общих полей из определенных типов документов с помощью предварительно обученной модели.
Необходимые компоненты
Подписка Azure — создайте бесплатную учетную запись.
Python 3.7 или более поздней версии.
- Установка Python должна включать pip. Чтобы проверить, установлен ли pip, выполните команду
pip --versionв командной строке. Чтобы использовать pip, установите последнюю версию Python.
- Установка Python должна включать pip. Чтобы проверить, установлен ли pip, выполните команду
Последняя версия Visual Studio Code или предпочтительная интегрированная среда разработки. Дополнительные сведения см. в статье"Начало работы с Python" в Visual Studio Code.
Служба ИИ Azure или ресурс аналитики документов. После получения подписки Azure создайте ресурс аналитики документов с несколькими службами в портал Azure, чтобы получить ключ и конечную точку. Используйте бесплатную ценовую категорию (
F0), чтобы опробовать службу, а затем выполните обновление до платного уровня для рабочей среды.
Совет
Создайте ресурс служб искусственного интеллекта Azure, если вы планируете получить доступ к нескольким службам ИИ Azure в рамках одной конечной точки или ключа. Только для доступа к аналитике документов создайте ресурс аналитики документов. Обратите внимание, что если вы планируете использовать проверку подлинности Microsoft Entra, вам потребуется один ресурс службы.
После развертывания ресурса выберите Перейти к ресурсу. Вам потребуется ключ и конечная точка из ресурса, создаваемого для подключения приложения к API аналитики документов. Вставьте ключ и конечную точку в код далее в кратком руководстве:
Настройка
Откройте окно терминала в локальной среде и установите клиентская библиотека Аналитики документов Azure для Python с помощью pip:
pip install azure-ai-documentintelligence==1.0.0b2
pip install azure-ai-formrecognizer==3.3.0
pip install azure-ai-formrecognizer==3.2.0b6
Создание приложения Python
Чтобы взаимодействовать со службой аналитики DocumentIntelligenceClient документов, необходимо создать экземпляр класса. Для этого вы создадите AzureKeyCredential с key помощью портал Azure и DocumentIntelligenceClient экземпляра с AzureKeyCredential помощью аналитики документовendpoint.
Создайте новый файл Python с именем doc_intel_quickstart.py в предпочтительном редакторе или интегрированной среде разработки.
Откройте файл doc_intel_quickstart.py и выберите один из следующих примеров кода, чтобы скопировать и вставить в приложение:
Чтобы взаимодействовать со службой аналитики DocumentAnalysisClient документов, необходимо создать экземпляр класса. Для этого вы создадите AzureKeyCredential с key помощью портал Azure и DocumentAnalysisClient экземпляра с AzureKeyCredential помощью аналитики документовendpoint.
Создайте новый файл Python с именем form_recognizer_quickstart.py в предпочитаемом редакторе или IDE.
Откройте файл form_recognizer_quickstart.py и выберите один из следующих примеров кода для копирования и вставки в приложение:
Внимание
Обязательно удалите ключ из кода, когда завершите работу, и ни в коем случае не публикуйте его в открытом доступе. Для рабочей среды используйте безопасный способ хранения и доступа к учетным данным, например Azure Key Vault. Дополнительные сведения см. в статье "Безопасность служб искусственного интеллекта Azure".
Модель макета
Извлеките из документов текст, метки выбора, стили текста, сведения о структуре таблиц и координаты ограничивающих рамок для них.
- В этом примере потребуется файл документа из URL-адреса. В этом кратком руководстве можно использовать наш пример документа .
- Значение универсального кода ресурса (URI) для файла было добавлено в переменную
formUrlв функцииanalyze_layout. - Чтобы проанализировать заданный файл по универсальному коду ресурса, используйте метод
begin_analyze_document_from_urlи передайтеprebuilt-layoutв качестве идентификатора модели. Возвращаемое значение — это объектresult, содержащий данные об отправленном документе.
Добавьте следующий пример кода в приложение doc_intel_quickstart.py. Убедитесь, что вы обновляете переменные ключа и конечной точки со значениями из экземпляра аналитики документов портал Azure:
# import libraries
import os
from azure.core.credentials import AzureKeyCredential
from azure.ai.documentintelligence import DocumentIntelligenceClient
from azure.ai.documentintelligence.models import AnalyzeResult

# set `<your-endpoint>` and `<your-key>` variables with the values from the Azure portal
endpoint = "<your-endpoint>"
key = "<your-key>"

# helper functions

def get_words(page, line):
    result = []
    for word in page.words:
        if _in_span(word, line.spans):
            result.append(word)
    return result


def _in_span(word, spans):
    for span in spans:
        if word.span.offset >= span.offset and (
            word.span.offset + word.span.length
        ) <= (span.offset + span.length):
            return True
    return False


def analyze_layout():
    # sample document
    formUrl = "https://raw.githubusercontent.com/Azure-Samples/cognitive-services-REST-api-samples/master/curl/form-recognizer/sample-layout.pdf"

    document_intelligence_client = DocumentIntelligenceClient(
        endpoint=endpoint, credential=AzureKeyCredential(key)
    )

    poller = document_intelligence_client.begin_analyze_document(
        "prebuilt-layout", formUrl
    )

    analyze_request = AnalyzeDocumentRequest(
        url_source=formUrl
    )

    result: AnalyzeResult = poller.result()

    if result.styles and any([style.is_handwritten for style in result.styles]):
        print("Document contains handwritten content")
    else:
        print("Document does not contain handwritten content")

    for page in result.pages:
        print(f"----Analyzing layout from page #{page.page_number}----")
        print(
            f"Page has width: {page.width} and height: {page.height}, measured with unit: {page.unit}"
        )

        if page.lines:
            for line_idx, line in enumerate(page.lines):
                words = get_words(page, line)
                print(
                    f"...Line # {line_idx} has word count {len(words)} and text '{line.content}' "
                    f"within bounding polygon '{line.polygon}'"
                )

                for word in words:
                    print(
                        f"......Word '{word.content}' has a confidence of {word.confidence}"
                    )

        if page.selection_marks:
            for selection_mark in page.selection_marks:
                print(
                    f"Selection mark is '{selection_mark.state}' within bounding polygon "
                    f"'{selection_mark.polygon}' and has a confidence of {selection_mark.confidence}"
                )

    if result.tables:
        for table_idx, table in enumerate(result.tables):
            print(
                f"Table # {table_idx} has {table.row_count} rows and "
                f"{table.column_count} columns"
            )
            if table.bounding_regions:
                for region in table.bounding_regions:
                    print(
                        f"Table # {table_idx} location on page: {region.page_number} is {region.polygon}"
                    )
            for cell in table.cells:
                print(
                    f"...Cell[{cell.row_index}][{cell.column_index}] has text '{cell.content}'"
                )
                if cell.bounding_regions:
                    for region in cell.bounding_regions:
                        print(
                            f"...content on page {region.page_number} is within bounding polygon '{region.polygon}'"
                        )

    print("----------------------------------------")


if __name__ == "__main__":
    analyze_layout()
Запуск приложения
После добавления примера кода в приложение создайте и запустите программу:
Перейдите в папку, в которой есть файл doc_intel_quickstart.py .
В окне терминала введите следующую команду:
python doc_intel_quickstart.py
Добавьте приведенный ниже пример кода в свое приложение form_recognizer_quickstart.py. Убедитесь, что ключи и переменные конечной точки обновлены значениями из экземпляра Распознавателя документов на портале Azure:
# import libraries
import os
from azure.ai.formrecognizer import DocumentAnalysisClient
from azure.core.credentials import AzureKeyCredential

# set `<your-endpoint>` and `<your-key>` variables with the values from the Azure portal
endpoint = "<your-endpoint>"
key = "<your-key>"

def format_polygon(polygon):
    if not polygon:
        return "N/A"
    return ", ".join(["[{}, {}]".format(p.x, p.y) for p in polygon])

def analyze_layout():
    # sample document
    formUrl = "https://raw.githubusercontent.com/Azure-Samples/cognitive-services-REST-api-samples/master/curl/form-recognizer/sample-layout.pdf"

    document_analysis_client = DocumentAnalysisClient(
        endpoint=endpoint, credential=AzureKeyCredential(key)
    )

    poller = document_analysis_client.begin_analyze_document(
            "prebuilt-layout", formUrl)
    result = poller.result()

    for idx, style in enumerate(result.styles):
        print(
            "Document contains {} content".format(
                "handwritten" if style.is_handwritten else "no handwritten"
            )
        )

    for page in result.pages:
        print("----Analyzing layout from page #{}----".format(page.page_number))
        print(
            "Page has width: {} and height: {}, measured with unit: {}".format(
                page.width, page.height, page.unit
            )
        )

        for line_idx, line in enumerate(page.lines):
            words = line.get_words()
            print(
                "...Line # {} has word count {} and text '{}' within bounding box '{}'".format(
                    line_idx,
                    len(words),
                    line.content,
                    format_polygon(line.polygon),
                )
            )

            for word in words:
                print(
                    "......Word '{}' has a confidence of {}".format(
                        word.content, word.confidence
                    )
                )

        for selection_mark in page.selection_marks:
            print(
                "...Selection mark is '{}' within bounding box '{}' and has a confidence of {}".format(
                    selection_mark.state,
                    format_polygon(selection_mark.polygon),
                    selection_mark.confidence,
                )
            )

    for table_idx, table in enumerate(result.tables):
        print(
            "Table # {} has {} rows and {} columns".format(
                table_idx, table.row_count, table.column_count
            )
        )
        for region in table.bounding_regions:
            print(
                "Table # {} location on page: {} is {}".format(
                    table_idx,
                    region.page_number,
                    format_polygon(region.polygon),
                )
            )
        for cell in table.cells:
            print(
                "...Cell[{}][{}] has content '{}'".format(
                    cell.row_index,
                    cell.column_index,
                    cell.content,
                )
            )
            for region in cell.bounding_regions:
                print(
                    "...content on page {} is within bounding box '{}'".format(
                        region.page_number,
                        format_polygon(region.polygon),
                    )
                )

    print("----------------------------------------")


if __name__ == "__main__":
    analyze_layout()
Запуск приложения
После добавления примера кода в приложение создайте и запустите программу:
Перейдите в папку с файлом form_recognizer_quickstart.py
В окне терминала введите следующую команду:
python form_recognizer_quickstart.py
Выходные данные модели макета
Ниже приведен фрагмент ожидаемых выходных данных:
  ----Analyzing layout from page #1----
  Page has width: 8.5 and height: 11.0, measured with unit: inch
  ...Line # 0 has word count 2 and text 'UNITED STATES' within bounding box '[3.4915, 0.6828], [5.0116, 0.6828], [5.0116, 0.8265], [3.4915, 0.8265]'
  ......Word 'UNITED' has a confidence of 1.0
  ......Word 'STATES' has a confidence of 1.0
  ...Line # 1 has word count 4 and text 'SECURITIES AND EXCHANGE COMMISSION' within bounding box '[2.1937, 0.9061], [6.297, 0.9061], [6.297, 1.0498], [2.1937, 1.0498]'
  ......Word 'SECURITIES' has a confidence of 1.0
  ......Word 'AND' has a confidence of 1.0
  ......Word 'EXCHANGE' has a confidence of 1.0
  ......Word 'COMMISSION' has a confidence of 1.0
  ...Line # 2 has word count 3 and text 'Washington, D.C. 20549' within bounding box '[3.4629, 1.1179], [5.031, 1.1179], [5.031, 1.2483], [3.4629, 1.2483]'
  ......Word 'Washington,' has a confidence of 1.0
  ......Word 'D.C.' has a confidence of 1.0
Чтобы просмотреть все выходные данные, посетите репозиторий примеров Azure на GitHub, где находятся выходные данные модели макета.
Добавьте приведенный ниже пример кода в свое приложение form_recognizer_quickstart.py. Убедитесь, что ключи и переменные конечной точки обновлены значениями из экземпляра Распознавателя документов на портале Azure:
# import libraries
import os
from azure.ai.formrecognizer import DocumentAnalysisClient
from azure.core.credentials import AzureKeyCredential

# set `<your-endpoint>` and `<your-key>` variables with the values from the Azure portal
endpoint = "<your-endpoint>"
key = "<your-key>"


def analyze_layout():
    # sample document
    formUrl = "https://raw.githubusercontent.com/Azure-Samples/cognitive-services-REST-api-samples/master/curl/form-recognizer/sample-layout.pdf"

    document_analysis_client = DocumentAnalysisClient(
        endpoint=endpoint, credential=AzureKeyCredential(key)
    )

    poller = document_analysis_client.begin_analyze_document_from_url(
        "prebuilt-layout", formUrl
    )
    result = poller.result()

    for idx, style in enumerate(result.styles):
        print(
            "Document contains {} content".format(
                "handwritten" if style.is_handwritten else "no handwritten"
            )
        )

    for page in result.pages:
        print("----Analyzing layout from page #{}----".format(page.page_number))
        print(
            "Page has width: {} and height: {}, measured with unit: {}".format(
                page.width, page.height, page.unit
            )
        )

        for line_idx, line in enumerate(page.lines):
            words = line.get_words()
            print(
                "...Line # {} has word count {} and text '{}' within bounding polygon '{}'".format(
                    line_idx,
                    len(words),
                    line.content,
                    format_polygon(line.polygon),
                )
            )

            for word in words:
                print(
                    "......Word '{}' has a confidence of {}".format(
                        word.content, word.confidence
                    )
                )

        for selection_mark in page.selection_marks:
            print(
                "...Selection mark is '{}' within bounding polygon '{}' and has a confidence of {}".format(
                    selection_mark.state,
                    format_polygon(selection_mark.polygon),
                    selection_mark.confidence,
                )
            )

    for table_idx, table in enumerate(result.tables):
        print(
            "Table # {} has {} rows and {} columns".format(
                table_idx, table.row_count, table.column_count
            )
        )
        for region in table.bounding_regions:
            print(
                "Table # {} location on page: {} is {}".format(
                    table_idx,
                    region.page_number,
                    format_polygon(region.polygon),
                )
            )
        for cell in table.cells:
            print(
                "...Cell[{}][{}] has content '{}'".format(
                    cell.row_index,
                    cell.column_index,
                    cell.content,
                )
            )
            for region in cell.bounding_regions:
                print(
                    "...content on page {} is within bounding polygon '{}'".format(
                        region.page_number,
                        format_polygon(region.polygon),
                    )
                )

    print("----------------------------------------")


if __name__ == "__main__":
    analyze_layout()
Запуск приложения
После добавления примера кода в приложение создайте и запустите программу:
Перейдите в папку с файлом form_recognizer_quickstart.py
В окне терминала введите следующую команду:
python form_recognizer_quickstart.py
Предварительно созданная модель
Анализ и извлечение общих полей из конкретных типов документов с помощью предварительно созданной модели. В этом примере мы анализируем счет с помощью предварительно созданной модели счета .
Совет
Вы можете использовать не только счета. Есть несколько предварительно созданных моделей, у каждой из которых собственный набор поддерживаемых полей. Модель, используемая для analyze операции, зависит от типа документа, который необходимо проанализировать. См. Извлечение данных модели.
- Анализ счета с помощью модели готового счета. Для работы с этим кратким руководством можно использовать пример документа со счетом.
- Мы добавили значение URL файла в переменную
invoiceUrl, расположенную в верхней части файла. - Чтобы проанализировать заданный файл по универсальному коду ресурса, используйте метод
begin_analyze_document_from_urlи передайтеprebuilt-invoiceв качестве идентификатора модели. Возвращаемое значение — это объектresult, содержащий данные об отправленном документе. - Для простоты здесь показаны не все пары "ключ-значение", возвращаемые службой. Список всех поддерживаемых полей и соответствующих типов см. на странице концепции Счет.
Добавьте следующий пример кода в приложение doc_intel_quickstart.py. Убедитесь, что вы обновляете переменные ключа и конечной точки со значениями из экземпляра аналитики документов портал Azure:
# import libraries
import os
from azure.core.credentials import AzureKeyCredential
from azure.ai.documentintelligence import DocumentIntelligenceClient


# set `<your-endpoint>` and `<your-key>` variables with the values from the Azure portal
endpoint = "<your-endpoint>"
key = "<your-key>"

def analyze_invoice():
    # sample document

    invoiceUrl = "https://raw.githubusercontent.com/Azure-Samples/cognitive-services-REST-api-samples/master/curl/form-recognizer/sample-invoice.pdf"

    document_intelligence_client = DocumentIntelligenceClient(
        endpoint=endpoint, credential=AzureKeyCredential(key)
    )

    poller = document_intelligence_client.begin_analyze_document(
        "prebuilt-invoice", invoiceUrl
    )
    invoices = poller.result()

    if invoices.documents:
        for idx, invoice in enumerate(invoices.documents):
            print(f"--------Analyzing invoice #{idx + 1}--------")
            vendor_name = invoice.fields.get("VendorName")
            if vendor_name:
                print(
                    f"Vendor Name: {vendor_name.get('content')} has confidence: {vendor_name.get('confidence')}"
                )
            vendor_address = invoice.fields.get("VendorAddress")
            if vendor_address:
                print(
                    f"Vendor Address: {vendor_address.get('content')} has confidence: {vendor_address.get('confidence')}"
                )
            vendor_address_recipient = invoice.fields.get("VendorAddressRecipient")
            if vendor_address_recipient:
                print(
                    f"Vendor Address Recipient: {vendor_address_recipient.get('content')} has confidence: {vendor_address_recipient.get('confidence')}"
                )
            customer_name = invoice.fields.get("CustomerName")
            if customer_name:
                print(
                    f"Customer Name: {customer_name.get('content')} has confidence: {customer_name.get('confidence')}"
                )
            customer_id = invoice.fields.get("CustomerId")
            if customer_id:
                print(
                    f"Customer Id: {customer_id.get('content')} has confidence: {customer_id.get('confidence')}"
                )
            customer_address = invoice.fields.get("CustomerAddress")
            if customer_address:
                print(
                    f"Customer Address: {customer_address.get('content')} has confidence: {customer_address.get('confidence')}"
                )
            customer_address_recipient = invoice.fields.get("CustomerAddressRecipient")
            if customer_address_recipient:
                print(
                    f"Customer Address Recipient: {customer_address_recipient.get('content')} has confidence: {customer_address_recipient.get('confidence')}"
                )
            invoice_id = invoice.fields.get("InvoiceId")
            if invoice_id:
                print(
                    f"Invoice Id: {invoice_id.get('content')} has confidence: {invoice_id.get('confidence')}"
                )
            invoice_date = invoice.fields.get("InvoiceDate")
            if invoice_date:
                print(
                    f"Invoice Date: {invoice_date.get('content')} has confidence: {invoice_date.get('confidence')}"
                )
            invoice_total = invoice.fields.get("InvoiceTotal")
            if invoice_total:
                print(
                    f"Invoice Total: {invoice_total.get('content')} has confidence: {invoice_total.get('confidence')}"
                )
            due_date = invoice.fields.get("DueDate")
            if due_date:
                print(
                    f"Due Date: {due_date.get('content')} has confidence: {due_date.get('confidence')}"
                )
            purchase_order = invoice.fields.get("PurchaseOrder")
            if purchase_order:
                print(
                    f"Purchase Order: {purchase_order.get('content')} has confidence: {purchase_order.get('confidence')}"
                )
            billing_address = invoice.fields.get("BillingAddress")
            if billing_address:
                print(
                    f"Billing Address: {billing_address.get('content')} has confidence: {billing_address.get('confidence')}"
                )
            billing_address_recipient = invoice.fields.get("BillingAddressRecipient")
            if billing_address_recipient:
                print(
                    f"Billing Address Recipient: {billing_address_recipient.get('content')} has confidence: {billing_address_recipient.get('confidence')}"
                )
            shipping_address = invoice.fields.get("ShippingAddress")
            if shipping_address:
                print(
                    f"Shipping Address: {shipping_address.get('content')} has confidence: {shipping_address.get('confidence')}"
                )
            shipping_address_recipient = invoice.fields.get("ShippingAddressRecipient")
            if shipping_address_recipient:
                print(
                    f"Shipping Address Recipient: {shipping_address_recipient.get('content')} has confidence: {shipping_address_recipient.get('confidence')}"
                )
            print("Invoice items:")
            for idx, item in enumerate(invoice.fields.get("Items").get("valueArray")):
                print(f"...Item #{idx + 1}")
                item_description = item.get("valueObject").get("Description")
                if item_description:
                    print(
                        f"......Description: {item_description.get('content')} has confidence: {item_description.get('confidence')}"
                    )
                item_quantity = item.get("valueObject").get("Quantity")
                if item_quantity:
                    print(
                        f"......Quantity: {item_quantity.get('content')} has confidence: {item_quantity.get('confidence')}"
                    )
                unit = item.get("valueObject").get("Unit")
                if unit:
                    print(
                        f"......Unit: {unit.get('content')} has confidence: {unit.get('confidence')}"
                    )
                unit_price = item.get("valueObject").get("UnitPrice")
                if unit_price:
                    unit_price_code = (
                        unit_price.get("valueCurrency").get("currencyCode")
                        if unit_price.get("valueCurrency").get("currencyCode")
                        else ""
                    )
                    print(
                        f"......Unit Price: {unit_price.get('content')}{unit_price_code} has confidence: {unit_price.get('confidence')}"
                    )
                product_code = item.get("valueObject").get("ProductCode")
                if product_code:
                    print(
                        f"......Product Code: {product_code.get('content')} has confidence: {product_code.get('confidence')}"
                    )
                item_date = item.get("valueObject").get("Date")
                if item_date:
                    print(
                        f"......Date: {item_date.get('content')} has confidence: {item_date.get('confidence')}"
                    )
                tax = item.get("valueObject").get("Tax")
                if tax:
                    print(
                        f"......Tax: {tax.get('content')} has confidence: {tax.get('confidence')}"
                    )
                amount = item.get("valueObject").get("Amount")
                if amount:
                    print(
                        f"......Amount: {amount.get('content')} has confidence: {amount.get('confidence')}"
                    )
            subtotal = invoice.fields.get("SubTotal")
            if subtotal:
                print(
                    f"Subtotal: {subtotal.get('content')} has confidence: {subtotal.get('confidence')}"
                )
            total_tax = invoice.fields.get("TotalTax")
            if total_tax:
                print(
                    f"Total Tax: {total_tax.get('content')} has confidence: {total_tax.get('confidence')}"
                )
            previous_unpaid_balance = invoice.fields.get("PreviousUnpaidBalance")
            if previous_unpaid_balance:
                print(
                    f"Previous Unpaid Balance: {previous_unpaid_balance.get('content')} has confidence: {previous_unpaid_balance.get('confidence')}"
                )
            amount_due = invoice.fields.get("AmountDue")
            if amount_due:
                print(
                    f"Amount Due: {amount_due.get('content')} has confidence: {amount_due.get('confidence')}"
                )
            service_start_date = invoice.fields.get("ServiceStartDate")
            if service_start_date:
                print(
                    f"Service Start Date: {service_start_date.get('content')} has confidence: {service_start_date.get('confidence')}"
                )
            service_end_date = invoice.fields.get("ServiceEndDate")
            if service_end_date:
                print(
                    f"Service End Date: {service_end_date.get('content')} has confidence: {service_end_date.get('confidence')}"
                )
            service_address = invoice.fields.get("ServiceAddress")
            if service_address:
                print(
                    f"Service Address: {service_address.get('content')} has confidence: {service_address.get('confidence')}"
                )
            service_address_recipient = invoice.fields.get("ServiceAddressRecipient")
            if service_address_recipient:
                print(
                    f"Service Address Recipient: {service_address_recipient.get('content')} has confidence: {service_address_recipient.get('confidence')}"
                )
            remittance_address = invoice.fields.get("RemittanceAddress")
            if remittance_address:
                print(
                    f"Remittance Address: {remittance_address.get('content')} has confidence: {remittance_address.get('confidence')}"
                )
            remittance_address_recipient = invoice.fields.get(
                "RemittanceAddressRecipient"
            )
            if remittance_address_recipient:
                print(
                    f"Remittance Address Recipient: {remittance_address_recipient.get('content')} has confidence: {remittance_address_recipient.get('confidence')}"
                )


          print("----------------------------------------")


if __name__ == "__main__":
    analyze_invoice()
Запуск приложения
После добавления примера кода в приложение создайте и запустите программу:
Перейдите в папку, в которой есть файл doc_intel_quickstart.py .
В окне терминала введите следующую команду:
python doc_intel_quickstart.py
Добавьте приведенный ниже пример кода в свое приложение form_recognizer_quickstart.py. Убедитесь, что ключи и переменные конечной точки обновлены значениями из экземпляра Распознавателя документов на портале Azure:
# import libraries
import os
from azure.ai.formrecognizer import DocumentAnalysisClient
from azure.core.credentials import AzureKeyCredential

# set `<your-endpoint>` and `<your-key>` variables with the values from the Azure portal
endpoint = "<your-endpoint>"
key = "<your-key>"


def format_bounding_region(bounding_regions):
    if not bounding_regions:
        return "N/A"
    return ", ".join(
        "Page #{}: {}".format(region.page_number, format_polygon(region.polygon))
        for region in bounding_regions
    )


def format_polygon(polygon):
    if not polygon:
        return "N/A"
    return ", ".join(["[{}, {}]".format(p.x, p.y) for p in polygon])


def analyze_invoice():

    invoiceUrl = "https://raw.githubusercontent.com/Azure-Samples/cognitive-services-REST-api-samples/master/curl/form-recognizer/sample-invoice.pdf"

    document_analysis_client = DocumentAnalysisClient(
        endpoint=endpoint, credential=AzureKeyCredential(key)
    )

    poller = document_analysis_client.begin_analyze_document_from_url(
        "prebuilt-invoice", invoiceUrl
    )
    invoices = poller.result()

    for idx, invoice in enumerate(invoices.documents):
        print("--------Recognizing invoice #{}--------".format(idx + 1))
        vendor_name = invoice.fields.get("VendorName")
        if vendor_name:
            print(
                "Vendor Name: {} has confidence: {}".format(
                    vendor_name.value, vendor_name.confidence
                )
            )
        vendor_address = invoice.fields.get("VendorAddress")
        if vendor_address:
            print(
                "Vendor Address: {} has confidence: {}".format(
                    vendor_address.value, vendor_address.confidence
                )
            )
        vendor_address_recipient = invoice.fields.get("VendorAddressRecipient")
        if vendor_address_recipient:
            print(
                "Vendor Address Recipient: {} has confidence: {}".format(
                    vendor_address_recipient.value, vendor_address_recipient.confidence
                )
            )
        customer_name = invoice.fields.get("CustomerName")
        if customer_name:
            print(
                "Customer Name: {} has confidence: {}".format(
                    customer_name.value, customer_name.confidence
                )
            )
        customer_id = invoice.fields.get("CustomerId")
        if customer_id:
            print(
                "Customer Id: {} has confidence: {}".format(
                    customer_id.value, customer_id.confidence
                )
            )
        customer_address = invoice.fields.get("CustomerAddress")
        if customer_address:
            print(
                "Customer Address: {} has confidence: {}".format(
                    customer_address.value, customer_address.confidence
                )
            )
        customer_address_recipient = invoice.fields.get("CustomerAddressRecipient")
        if customer_address_recipient:
            print(
                "Customer Address Recipient: {} has confidence: {}".format(
                    customer_address_recipient.value,
                    customer_address_recipient.confidence,
                )
            )
        invoice_id = invoice.fields.get("InvoiceId")
        if invoice_id:
            print(
                "Invoice Id: {} has confidence: {}".format(
                    invoice_id.value, invoice_id.confidence
                )
            )
        invoice_date = invoice.fields.get("InvoiceDate")
        if invoice_date:
            print(
                "Invoice Date: {} has confidence: {}".format(
                    invoice_date.value, invoice_date.confidence
                )
            )
        invoice_total = invoice.fields.get("InvoiceTotal")
        if invoice_total:
            print(
                "Invoice Total: {} has confidence: {}".format(
                    invoice_total.value, invoice_total.confidence
                )
            )
        due_date = invoice.fields.get("DueDate")
        if due_date:
            print(
                "Due Date: {} has confidence: {}".format(
                    due_date.value, due_date.confidence
                )
            )
        purchase_order = invoice.fields.get("PurchaseOrder")
        if purchase_order:
            print(
                "Purchase Order: {} has confidence: {}".format(
                    purchase_order.value, purchase_order.confidence
                )
            )
        billing_address = invoice.fields.get("BillingAddress")
        if billing_address:
            print(
                "Billing Address: {} has confidence: {}".format(
                    billing_address.value, billing_address.confidence
                )
            )
        billing_address_recipient = invoice.fields.get("BillingAddressRecipient")
        if billing_address_recipient:
            print(
                "Billing Address Recipient: {} has confidence: {}".format(
                    billing_address_recipient.value,
                    billing_address_recipient.confidence,
                )
            )
        shipping_address = invoice.fields.get("ShippingAddress")
        if shipping_address:
            print(
                "Shipping Address: {} has confidence: {}".format(
                    shipping_address.value, shipping_address.confidence
                )
            )
        shipping_address_recipient = invoice.fields.get("ShippingAddressRecipient")
        if shipping_address_recipient:
            print(
                "Shipping Address Recipient: {} has confidence: {}".format(
                    shipping_address_recipient.value,
                    shipping_address_recipient.confidence,
                )
            )
        print("Invoice items:")
        for idx, item in enumerate(invoice.fields.get("Items").value):
            print("...Item #{}".format(idx + 1))
            item_description = item.value.get("Description")
            if item_description:
                print(
                    "......Description: {} has confidence: {}".format(
                        item_description.value, item_description.confidence
                    )
                )
            item_quantity = item.value.get("Quantity")
            if item_quantity:
                print(
                    "......Quantity: {} has confidence: {}".format(
                        item_quantity.value, item_quantity.confidence
                    )
                )
            unit = item.value.get("Unit")
            if unit:
                print(
                    "......Unit: {} has confidence: {}".format(
                        unit.value, unit.confidence
                    )
                )
            unit_price = item.value.get("UnitPrice")
            if unit_price:
                print(
                    "......Unit Price: {} has confidence: {}".format(
                        unit_price.value, unit_price.confidence
                    )
                )
            product_code = item.value.get("ProductCode")
            if product_code:
                print(
                    "......Product Code: {} has confidence: {}".format(
                        product_code.value, product_code.confidence
                    )
                )
            item_date = item.value.get("Date")
            if item_date:
                print(
                    "......Date: {} has confidence: {}".format(
                        item_date.value, item_date.confidence
                    )
                )
            tax = item.value.get("Tax")
            if tax:
                print(
                    "......Tax: {} has confidence: {}".format(tax.value, tax.confidence)
                )
            amount = item.value.get("Amount")
            if amount:
                print(
                    "......Amount: {} has confidence: {}".format(
                        amount.value, amount.confidence
                    )
                )
        subtotal = invoice.fields.get("SubTotal")
        if subtotal:
            print(
                "Subtotal: {} has confidence: {}".format(
                    subtotal.value, subtotal.confidence
                )
            )
        total_tax = invoice.fields.get("TotalTax")
        if total_tax:
            print(
                "Total Tax: {} has confidence: {}".format(
                    total_tax.value, total_tax.confidence
                )
            )
        previous_unpaid_balance = invoice.fields.get("PreviousUnpaidBalance")
        if previous_unpaid_balance:
            print(
                "Previous Unpaid Balance: {} has confidence: {}".format(
                    previous_unpaid_balance.value, previous_unpaid_balance.confidence
                )
            )
        amount_due = invoice.fields.get("AmountDue")
        if amount_due:
            print(
                "Amount Due: {} has confidence: {}".format(
                    amount_due.value, amount_due.confidence
                )
            )
        service_start_date = invoice.fields.get("ServiceStartDate")
        if service_start_date:
            print(
                "Service Start Date: {} has confidence: {}".format(
                    service_start_date.value, service_start_date.confidence
                )
            )
        service_end_date = invoice.fields.get("ServiceEndDate")
        if service_end_date:
            print(
                "Service End Date: {} has confidence: {}".format(
                    service_end_date.value, service_end_date.confidence
                )
            )
        service_address = invoice.fields.get("ServiceAddress")
        if service_address:
            print(
                "Service Address: {} has confidence: {}".format(
                    service_address.value, service_address.confidence
                )
            )
        service_address_recipient = invoice.fields.get("ServiceAddressRecipient")
        if service_address_recipient:
            print(
                "Service Address Recipient: {} has confidence: {}".format(
                    service_address_recipient.value,
                    service_address_recipient.confidence,
                )
            )
        remittance_address = invoice.fields.get("RemittanceAddress")
        if remittance_address:
            print(
                "Remittance Address: {} has confidence: {}".format(
                    remittance_address.value, remittance_address.confidence
                )
            )
        remittance_address_recipient = invoice.fields.get("RemittanceAddressRecipient")
        if remittance_address_recipient:
            print(
                "Remittance Address Recipient: {} has confidence: {}".format(
                    remittance_address_recipient.value,
                    remittance_address_recipient.confidence,
                )
            )

        print("----------------------------------------")

if __name__ == "__main__":
    analyze_invoice()
Запуск приложения
После добавления примера кода в приложение создайте и запустите программу:
Перейдите в папку с файлом form_recognizer_quickstart.py
В окне терминала введите следующую команду:
python form_recognizer_quickstart.py
Выходные данные предварительно созданной модели
Ниже приведен фрагмент ожидаемых выходных данных:
  --------Recognizing invoice #1--------
  Vendor Name: CONTOSO LTD. has confidence: 0.919
  Vendor Address: 123 456th St New York, NY, 10001 has confidence: 0.907
  Vendor Address Recipient: Contoso Headquarters has confidence: 0.919
  Customer Name: MICROSOFT CORPORATION has confidence: 0.84
  Customer Id: CID-12345 has confidence: 0.956
  Customer Address: 123 Other St, Redmond WA, 98052 has confidence: 0.909
  Customer Address Recipient: Microsoft Corp has confidence: 0.917
  Invoice Id: INV-100 has confidence: 0.972
  Invoice Date: 2019-11-15 has confidence: 0.971
  Invoice Total: CurrencyValue(amount=110.0, symbol=$) has confidence: 0.97
  Due Date: 2019-12-15 has confidence: 0.973
Чтобы просмотреть все выходные данные, посетите репозиторий примеров Azure на GitHub, где находятся выходные данные модели готового счета.
Добавьте приведенный ниже пример кода в свое приложение form_recognizer_quickstart.py. Убедитесь, что ключи и переменные конечной точки обновлены значениями из экземпляра Распознавателя документов на портале Azure:
# import libraries
import os
from azure.ai.formrecognizer import DocumentAnalysisClient
from azure.core.credentials import AzureKeyCredential

# set `<your-endpoint>` and `<your-key>` variables with the values from the Azure portal
endpoint = "<your-endpoint>"
key = "<your-key>"


def format_polygon(polygon):
    if not polygon:
        return "N/A"
    return ", ".join(["[{}, {}]".format(p.x, p.y) for p in polygon])


def analyze_layout():
    # sample document
    formUrl = "https://raw.githubusercontent.com/Azure-Samples/cognitive-services-REST-api-samples/master/curl/form-recognizer/sample-layout.pdf"

    document_analysis_client = DocumentAnalysisClient(
        endpoint=endpoint, credential=AzureKeyCredential(key)
    )

    poller = document_analysis_client.begin_analyze_document_from_url(
        "prebuilt-layout", formUrl
    )
    result = poller.result()

    for idx, style in enumerate(result.styles):
        print(
            "Document contains {} content".format(
                "handwritten" if style.is_handwritten else "no handwritten"
            )
        )


for page in result.pages:
    print("----Analyzing layout from page #{}----".format(page.page_number))
    print(
        "Page has width: {} and height: {}, measured with unit: {}".format(
            page.width, page.height, page.unit
        )
    )

    for line_idx, line in enumerate(page.lines):
        words = line.get_words()
        print(
            "...Line # {} has word count {} and text '{}' within bounding polygon '{}'".format(
                line_idx,
                len(words),
                line.content,
                format_polygon(line.polygon),
            )
        )

        for word in words:
            print(
                "......Word '{}' has a confidence of {}".format(
                    word.content, word.confidence
                )
            )

    for selection_mark in page.selection_marks:
        print(
            "...Selection mark is '{}' within bounding polygon '{}' and has a confidence of {}".format(
                selection_mark.state,
                format_polygon(selection_mark.polygon),
                selection_mark.confidence,
            )
        )

for table_idx, table in enumerate(result.tables):
    print(
        "Table # {} has {} rows and {} columns".format(
            table_idx, table.row_count, table.column_count
        )
    )
    for region in table.bounding_regions:
        print(
            "Table # {} location on page: {} is {}".format(
                table_idx,
                region.page_number,
                format_polygon(region.polygon),
            )
        )
    for cell in table.cells:
        print(
            "...Cell[{}][{}] has content '{}'".format(
                cell.row_index,
                cell.column_index,
                cell.content,
            )
        )
        for region in cell.bounding_regions:
            print(
                "...content on page {} is within bounding polygon '{}'".format(
                    region.page_number,
                    format_polygon(region.polygon),
                )
            )

print("----------------------------------------")


if __name__ == "__main__":
    analyze_layout()
Запуск приложения
После добавления примера кода в приложение создайте и запустите программу:
Перейдите в папку с файлом form_recognizer_quickstart.py
В окне терминала введите следующую команду:
python form_recognizer_quickstart.py
В этом кратком руководстве вы узнаете, как использовать REST API аналитики документов для анализа и извлечения данных и значений из документов:
Необходимые компоненты
Подписка Azure — создайте бесплатную учетную запись.
Установлено средство командной строки curl.
PowerShell версии 7.*+ (или аналогичное приложение командной строки):
Чтобы проверка версию PowerShell, введите следующую команду относительно операционной системы:
- Windows:
Get-Host | Select-Object Version - macOS или Linux.
$PSVersionTable
- Windows:
Ресурс аналитики документов (однослужба) или службы ИИ Azure (мультислужбы). После получения подписки Azure создайте ресурс аналитики документов с несколькими службами в портал Azure, чтобы получить ключ и конечную точку. Используйте бесплатную ценовую категорию (
F0), чтобы опробовать службу, а затем выполните обновление до платного уровня для рабочей среды.
Совет
Создайте ресурс служб искусственного интеллекта Azure, если вы планируете получить доступ к нескольким службам ИИ Azure в рамках одной конечной точки или ключа. Только для доступа к аналитике документов создайте ресурс аналитики документов. Обратите внимание, что если вы планируете использовать проверку подлинности Microsoft Entra, вам потребуется один ресурс службы.
После развертывания ресурса выберите Перейти к ресурсу. Вам потребуется ключ и конечная точка из ресурса, создаваемого для подключения приложения к API аналитики документов. Вставьте ключ и конечную точку в код далее в кратком руководстве:
Анализ документов и получение результатов
Запрос POST используется для анализа документов с помощью предварительно созданной или пользовательской модели. Запрос GET используется для получения результата вызова анализа документов. Объект modelId используется для операций POST, а объект resultId — для операции GET.
Анализ документов (запрос POST)
Перед выполнением команды cURL внесите следующие изменения в запрос после выполнения:
Замените
{endpoint}значение конечной точки из экземпляра аналитики документов портал Azure.Замените
{key}значением ключа из экземпляра аналитики документов портал Azure.Используя приведенную ниже таблицу в качестве ссылки, замените
{modelID}и{your-document-url}на нужные значения.Вам нужен файл документа по URL-адресу. В этом кратком руководстве можно использовать примеры форм, указанных в следующей таблице для каждой функции:
Примеры документов
| Компонент | {modelID} | {your-document-url} |
|---|---|---|
| Чтение | prebuilt-read | https://raw.githubusercontent.com/Azure-Samples/cognitive-services-REST-api-samples/master/curl/form-recognizer/rest-api/read.png |
| Макет | prebuilt-layout | https://raw.githubusercontent.com/Azure-Samples/cognitive-services-REST-api-samples/master/curl/form-recognizer/rest-api/layout.png |
| Медицинское страхование карта | prebuilt-healthInsuranceCard.us | https://raw.githubusercontent.com/Azure-Samples/cognitive-services-REST-api-samples/master/curl/form-recognizer/rest-api/insurance-card.png |
| W-2 | prebuilt-tax.us.w2 | https://raw.githubusercontent.com/Azure-Samples/cognitive-services-REST-api-samples/master/curl/form-recognizer/rest-api/w2.png |
| Счет-фактура | prebuilt-invoice | https://github.com/Azure-Samples/cognitive-services-REST-api-samples/raw/master/curl/form-recognizer/rest-api/invoice.pdf |
| Получения | prebuilt-receipt | https://raw.githubusercontent.com/Azure-Samples/cognitive-services-REST-api-samples/master/curl/form-recognizer/rest-api/receipt.png |
| Удостоверение | prebuilt-idDocument | https://raw.githubusercontent.com/Azure-Samples/cognitive-services-REST-api-samples/master/curl/form-recognizer/rest-api/identity_documents.png |
Примеры документов
| Компонент | {modelID} | {your-document-url} |
|---|---|---|
| Общий документ | prebuilt-document | https://raw.githubusercontent.com/Azure-Samples/cognitive-services-REST-api-samples/master/curl/form-recognizer/sample-layout.pdf |
| Чтение | prebuilt-read | https://raw.githubusercontent.com/Azure-Samples/cognitive-services-REST-api-samples/master/curl/form-recognizer/rest-api/read.png |
| Макет | prebuilt-layout | https://raw.githubusercontent.com/Azure-Samples/cognitive-services-REST-api-samples/master/curl/form-recognizer/rest-api/layout.png |
| Медицинское страхование карта | prebuilt-healthInsuranceCard.us | https://raw.githubusercontent.com/Azure-Samples/cognitive-services-REST-api-samples/master/curl/form-recognizer/rest-api/insurance-card.png |
| W-2 | prebuilt-tax.us.w2 | https://raw.githubusercontent.com/Azure-Samples/cognitive-services-REST-api-samples/master/curl/form-recognizer/rest-api/w2.png |
| Счет-фактура | prebuilt-invoice | https://github.com/Azure-Samples/cognitive-services-REST-api-samples/raw/master/curl/form-recognizer/rest-api/invoice.pdf |
| Получения | prebuilt-receipt | https://raw.githubusercontent.com/Azure-Samples/cognitive-services-REST-api-samples/master/curl/form-recognizer/rest-api/receipt.png |
| Удостоверение | prebuilt-idDocument | https://raw.githubusercontent.com/Azure-Samples/cognitive-services-REST-api-samples/master/curl/form-recognizer/rest-api/identity_documents.png |
| Визитная карточка | prebuilt-businessCard | https://raw.githubusercontent.com/Azure-Samples/cognitive-services-REST-api-samples/de5e0d8982ab754823c54de47a47e8e499351523/curl/form-recognizer/rest-api/business_card.jpg |
Внимание
Обязательно удалите ключ из кода, когда завершите работу, и ни в коем случае не публикуйте его в открытом доступе. Для рабочей среды используйте безопасный способ хранения и доступа к учетным данным, например Azure Key Vault. Дополнительные сведения см. в статье "Безопасность служб искусственного интеллекта Azure".
Запрос POST
curl -v -i POST "{endpoint}/documentintelligence/documentModels/{modelId}:analyze?api-version=2024-02-29-preview" -H "Content-Type: application/json" -H "Ocp-Apim-Subscription-Key: {key}" --data-ascii "{'urlSource': '{your-document-url}'}"
curl -v -i POST "{endpoint}/formrecognizer/documentModels/{modelID}:analyze?api-version=2023-07-31" -H "Content-Type: application/json" -H "Ocp-Apim-Subscription-Key: {key}" --data-ascii "{'urlSource': '{your-document-url}'}"
curl -v -i POST "{endpoint}/formrecognizer/documentModels/{modelId}:analyze?api-version=2022-08-31" -H "Content-Type: application/json" -H "Ocp-Apim-Subscription-Key: {key}" --data-ascii "{'urlSource': '{your-document-url}'}"
Ответ POST (resultID)
Вы получите 202 (Success) ответ, содержащий заголовок Operation-Location только для чтения. Значение этого заголовка содержит resultID запрос, который можно запросить, чтобы получить состояние асинхронной операции и получить результаты с помощью запроса GET с тем же ключом подписки ресурса:

Получение результатов анализа (запрос GET)
После вызова API вызовите Analyze documentAPI анализа результатов , чтобы получить состояние операции и извлеченные данные. Перед выполнением команды внесите следующие изменения:
После вызова API вызовите Analyze documentAPI анализа результатов , чтобы получить состояние операции и извлеченные данные. Перед выполнением команды внесите следующие изменения:
После вызова API вызовите Analyze documentAPI анализа результатов , чтобы получить состояние операции и извлеченные данные. Перед выполнением команды внесите следующие изменения:
Замените
{resultID}заголовок Operation-Location из ответа POST.Замените
{key}значением ключа из экземпляра Аналитики документов в портал Azure.
Запрос GET
curl -v -X GET "{endpoint}/documentintelligence/documentModels/{modelId}/analyzeResults/{resultId}?api-version=2024-02-29-preview" -H "Ocp-Apim-Subscription-Key: {key}"
curl -v -X GET "{endpoint}/formrecognizer/documentModels/{modelId}/analyzeResults/{resultId}?api-version=2023-07-31" -H "Ocp-Apim-Subscription-Key: {key}"
curl -v -X GET "{endpoint}/formrecognizer/documentModels/{modelId}/analyzeResults/{resultId}?api-version=2022-08-31" -H "Ocp-Apim-Subscription-Key: {key}"
Изучите ответ.
Вы получаете ответ с выходными данными 200 (Success) JSON. В первом поле, "status", указывается состояние операции. Если операция не завершена, значение "status" равно "running" или "notStarted", и необходимо снова вызвать API вручную или через скрипт. Мы рекомендуем установить между вызовами интервал в одну секунду или более.
Пример ответа для параметра prebuilt-invoice
{
    "status": "succeeded",
    "createdDateTime": "2024-03-25T19:31:37Z",
    "lastUpdatedDateTime": "2024-03-25T19:31:43Z",
    "analyzeResult": {
        "apiVersion": "2024-02-29-preview",
        "modelId": "prebuilt-invoice",
        "stringIndexType": "textElements"...
    ..."pages": [
            {
                "pageNumber": 1,
                "angle": 0,
                "width": 8.5,
                "height": 11,
                "unit": "inch",
                "words": [
                    {
                        "content": "CONTOSO",
                        "boundingBox": [
                            0.5911,
                            0.6857,
                            1.7451,
                            0.6857,
                            1.7451,
                            0.8664,
                            0.5911,
                            0.8664
                        ],
                        "confidence": 1,
                        "span": {
                            "offset": 0,
                            "length": 7
                                }
                      }],
              }]
      }
}
{
    "status": "succeeded",
    "createdDateTime": "2023-08-25T19:31:37Z",
    "lastUpdatedDateTime": "2023-08-25T19:31:43Z",
    "analyzeResult": {
        "apiVersion": "2023-07-31",
        "modelId": "prebuilt-invoice",
        "stringIndexType": "textElements"...
    ..."pages": [
            {
                "pageNumber": 1,
                "angle": 0,
                "width": 8.5,
                "height": 11,
                "unit": "inch",
                "words": [
                    {
                        "content": "CONTOSO",
                        "boundingBox": [
                            0.5911,
                            0.6857,
                            1.7451,
                            0.6857,
                            1.7451,
                            0.8664,
                            0.5911,
                            0.8664
                        ],
                        "confidence": 1,
                        "span": {
                            "offset": 0,
                            "length": 7
                                }
                      }],
              }]
      }
}
{
    "status": "succeeded",
    "createdDateTime": "2022-09-25T19:31:37Z",
    "lastUpdatedDateTime": "2022-09-25T19:31:43Z",
    "analyzeResult": {
        "apiVersion": "2022-08-31",
        "modelId": "prebuilt-invoice",
        "stringIndexType": "textElements"...
    ..."pages": [
            {
                "pageNumber": 1,
                "angle": 0,
                "width": 8.5,
                "height": 11,
                "unit": "inch",
                "words": [
                    {
                        "content": "CONTOSO",
                        "boundingBox": [
                            0.5911,
                            0.6857,
                            1.7451,
                            0.6857,
                            1.7451,
                            0.8664,
                            0.5911,
                            0.8664
                        ],
                        "confidence": 1,
                        "span": {
                            "offset": 0,
                            "length": 7
                                }
                      }],
              }]
      }
}
Поддерживаемые поля документов
Предварительно созданные модели извлекают предопределенные наборы полей документов. Извлеченные имена полей, типы, описания и примеры см. в разделе Извлечение данных модели.
Готово, поздравляем!
В этом кратком руководстве вы использовали модель аналитики документов для анализа различных форм и документов. Затем изучите Студию аналитики документов и справочную документацию, чтобы подробно узнать об API аналитики документов.
Следующие шаги
Дополнительные возможности и расширенное качество модели см . в Статье "Аналитика документов"
Сведения о миграции версии 3.1 до версии 4.0 см. в руководствах по миграции в журнале изменений.
Это содержимое относится к:v2.1 Последняя версия![]() :
:![]() v4.0 (предварительная версия) |
v4.0 (предварительная версия) |
Приступая к работе с Аналитикой документов Azure с помощью выбранного языка программирования или REST API. Аналитика документов — это облачная служба ИИ Azure, которая использует машинное обучение для извлечения пар "ключ-значение", текста и таблиц из документов. При изучении технологии мы рекомендуем использовать бесплатную версию службы. Имейте в виду, что количество бесплатных страниц ограничено до 500 страниц в месяц.
Дополнительные сведения о функциях аналитики документов и параметрах разработки см . на странице "Обзор ".
Справочная документация | Исходный код библиотеки | Пакет (NuGet) | Примеры
В этом кратком руководстве вы используете следующие API для извлечения структурированных данных из форм и документов:
Необходимые компоненты
Подписка Azure — создайте бесплатную учетную запись.
Текущая версия IDE Visual Studio.
Служба ИИ Azure или ресурс аналитики документов. После получения подписки Azure создайте ресурс аналитики документов с одной службой или несколькими службами в портал Azure, чтобы получить ключ и конечную точку. Используйте бесплатную ценовую категорию (
F0), чтобы опробовать службу, а затем выполните обновление до платного уровня для рабочей среды.Совет
Создайте ресурс служб искусственного интеллекта Azure, если вы планируете получить доступ к нескольким службам ИИ Azure в рамках одной конечной точки или ключа. Только для доступа к аналитике документов создайте ресурс аналитики документов. Обратите внимание, что если вы планируете использовать проверку подлинности Microsoft Entra, вам потребуется один ресурс службы.
После развертывания ресурса выберите Перейти к ресурсу. Вам потребуется ключ и конечная точка из ресурса, создаваемого для подключения приложения к API аналитики документов. Вставьте ключ и конечную точку в код далее в кратком руководстве:
Настройка
Запустите Visual Studio 2019.
На начальной странице выберите Создать проект.
На странице Создание проекта введите в поле поиска консоль. Выберите шаблон Консольное приложение, затем нажмите кнопку Далее.
В окне Настроить новый проект введите в поле "Имя проекта" значение
formRecognizer_quickstart. Нажмите кнопку "Далее".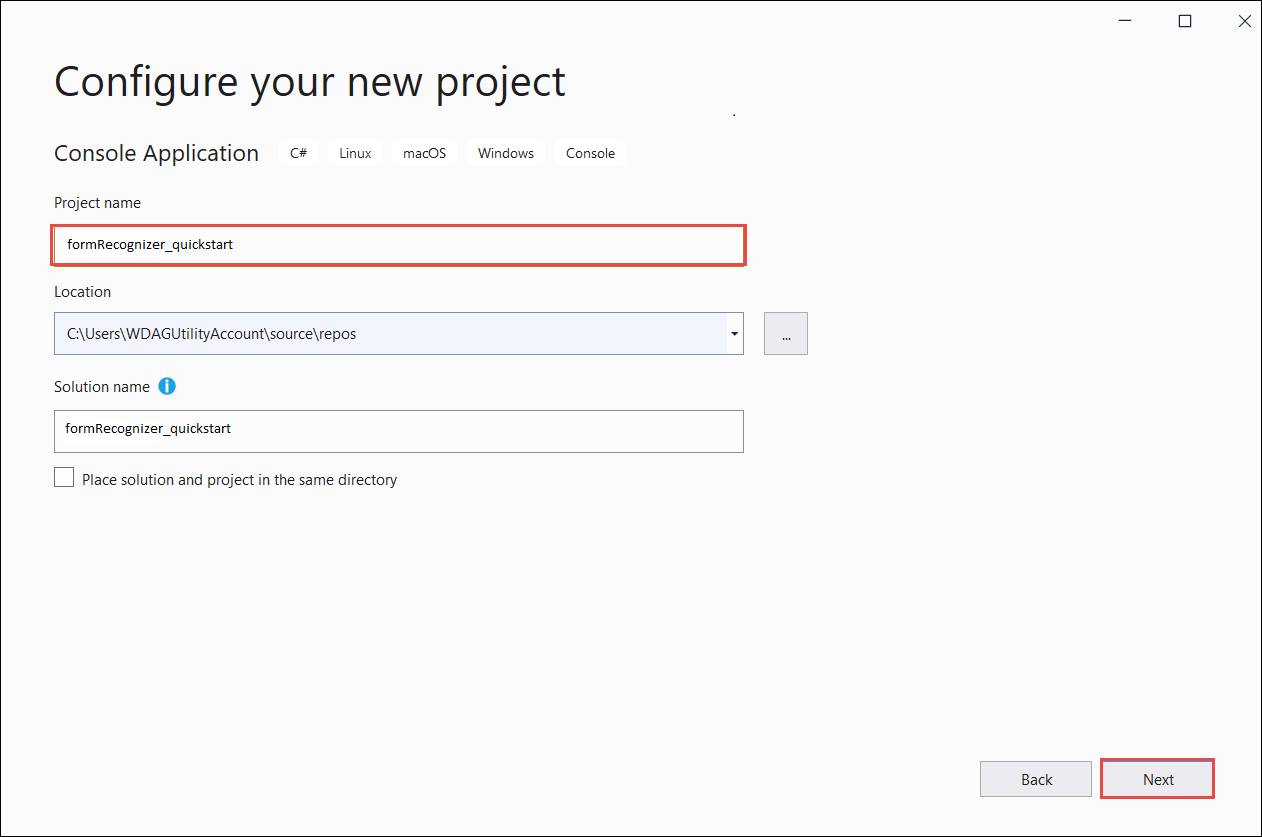
В диалоговом окне Дополнительные сведения выберите элемент .NET 5.0 (Current) (.NET 5.0 (текущая версия)), а затем выберите команду Создать.
Установка клиентской библиотеки с помощью NuGet
Щелкните правой кнопкой мыши проект formRecognizer_quickstart и выберите элемент Управление пакетами NuGet...
Перейдите на вкладку "Обзор" и введите Azure.AI.FormRecognizer.
Выберите версию 3.1.1 в раскрывающемся меню и нажмите Установить.
Сборка приложения
Чтобы взаимодействовать со службой аналитики FormRecognizerClient документов, необходимо создать экземпляр класса. Для этого необходимо создать AzureKeyCredential ключ и FormRecognizerClient экземпляр с AzureKeyCredential помощью аналитики документов endpoint.
Примечание.
- Начиная с .NET 6, в новых проектах, где используется шаблон
console, создается новый стиль программы, отличный от предыдущих версий. - В новых выходных данных используются последние функции C#, упрощающие код, который необходимо написать.
- При использовании более новой версии необходимо только написать текст метода
Main. Вам не нужно включать инструкции верхнего уровня, глобальные директивы using или неявные директивы using. - Дополнительные сведения см. в статье Новые шаблоны C# для создания инструкций верхнего уровня.
Откройте файл Program.cs.
Добавьте следующие директивы using:
using Azure;
using Azure.AI.FormRecognizer;
using Azure.AI.FormRecognizer.Models;
using System.Threading.Tasks;
- Задайте переменные среды
endpointиkey, а затем создайтеAzureKeyCredentialи экземплярFormRecognizerClient:
private static readonly string endpoint = "your-form-recognizer-endpoint";
private static readonly string key = "your-api-key";
private static readonly AzureKeyCredential credential = new AzureKeyCredential(key);
Удалите строку
Console.Writeline("Hello World!");и добавьте один из примеров кода в разделе практического задания файла Program.cs:
Выберите пример кода для копирования и вставки в метод Main приложения:
Внимание
Обязательно удалите ключ из кода, когда завершите работу, и ни в коем случае не публикуйте его в открытом доступе. Для рабочей среды используйте безопасный способ хранения и доступа к учетным данным, например Azure Key Vault. Дополнительные сведения см. в статье по безопасности служб искусственного интеллекта Azure.
Практическое задание: модель макета
Извлеките из документов текст, метки выбора, стили текста и сведения о структуре таблиц наряду с координатами ограничивающих рамок для них.
- В этом примере потребуется файл документа в URI. В этом кратком руководстве можно использовать наш пример документа .
- Значение универсального кода ресурса (URI) для файла было добавлено в переменную
formUri. - Чтобы извлечь макет из заданного файла по универсальному коду ресурса (URI), используйте метод
StartRecognizeContentFromUriAsync.
Добавьте приведенный ниже код в файл Program.cs приложения для обработки макетов.
FormRecognizerClient recognizerClient = AuthenticateClient();

Task recognizeContent = RecognizeContent(recognizerClient);
Task.WaitAll(recognizeContent);

private static FormRecognizerClient AuthenticateClient()
            {
                var credential = new AzureKeyCredential(key);
                var client = new FormRecognizerClient(new Uri(endpoint), credential);
                return client;
            }

            private static async Task RecognizeContent(FormRecognizerClient recognizerClient)
        {
            string formUrl = "https://raw.githubusercontent.com/Azure-Samples/cognitive-services-REST-api-samples/master/curl/form-recognizer/sample-layout.pdf";
            FormPageCollection formPages = await recognizerClient
        .StartRecognizeContentFromUri(new Uri(formUrl))
        .WaitForCompletionAsync();

            foreach (FormPage page in formPages)
            {
                Console.WriteLine($"Form Page {page.PageNumber} has {page.Lines.Count} lines.");

                for (int i = 0; i < page.Lines.Count; i++)
                {
                    FormLine line = page.Lines[i];
                    Console.WriteLine($"    Line {i} has {line.Words.Count} word{(line.Words.Count > 1 ? "s" : "")}, and text: '{line.Text}'.");
                }

                for (int i = 0; i < page.Tables.Count; i++)
                {
                    FormTable table = page.Tables[i];
                    Console.WriteLine($"Table {i} has {table.RowCount} rows and {table.ColumnCount} columns.");
                    foreach (FormTableCell cell in table.Cells)
                    {
                        Console.WriteLine($"    Cell ({cell.RowIndex}, {cell.ColumnIndex}) contains text: '{cell.Text}'.");
                    }
                }
            }
        }
    }
}
Попробуйте: предварительно созданная модель
В этом примере показано, как анализировать данные из определенных типов общих документов с предварительно обученными моделями, используя счет в качестве примера.
- В этом примере мы проанализируем документ счета с помощью предварительно созданной модели. Для работы с этим кратким руководством можно использовать пример документа со счетом.
- Значение универсального кода ресурса (URI) для файла было добавлено в переменную
invoiceUriв верхней части метода Main. - Чтобы проанализировать файл по универсальному коду ресурса (URI), используйте метод
StartRecognizeInvoicesFromUriAsync. - Для простоты здесь показаны не все поля, возвращаемые службой. Список всех поддерживаемых полей и соответствующих типов см. на странице концепции Счет.
Выберите предварительно созданную модель
Вы можете использовать не только счета. Есть несколько предварительно созданных моделей, у каждой из которых собственный набор поддерживаемых полей. Модель, используемая для операции анализа, зависит от типа анализируемого документа. Ниже приведены готовые модели, поддерживаемые в настоящее время службой аналитики документов:
- Счет — извлекает текст, метки выбора, таблицы, поля и сведения о ключах из счетов.
- Квитанция — извлекает текст и ключевые данные из квитанций.
- ID document (Удостоверение) — извлекает текст и ключевые данные из водительских прав и заграничных паспортов.
- Визитная карточка — извлекает текст и ключевые данные из визитных карточек.
Добавьте приведенный ниже код в файл Program.cs предварительно созданного приложения для обработки счетов.
FormRecognizerClient recognizerClient = AuthenticateClient();

  Task analyzeinvoice = AnalyzeInvoice(recognizerClient, invoiceUrl);
  Task.WaitAll(analyzeinvoice);

   private static FormRecognizerClient AuthenticateClient() {
     var credential = new AzureKeyCredential(key);
     var client = new FormRecognizerClient(new Uri(endpoint), credential);
     return client;
   }

   static string invoiceUrl = "https://raw.githubusercontent.com/Azure-Samples/cognitive-services-REST-api-samples/master/curl/form-recognizer/sample-invoice.pdf";

   private static async Task AnalyzeInvoice(FormRecognizerClient recognizerClient, string invoiceUrl) {
     var options = new RecognizeInvoicesOptions() {
       Locale = "en-US"
     };
     RecognizedFormCollection invoices = await recognizerClient.StartRecognizeInvoicesFromUriAsync(new Uri(invoiceUrl), options).WaitForCompletionAsync();

     RecognizedForm invoice = invoices[0];

     FormField invoiceIdField;
     if (invoice.Fields.TryGetValue("InvoiceId", out invoiceIdField)) {
       if (invoiceIdField.Value.ValueType == FieldValueType.String) {
         string invoiceId = invoiceIdField.Value.AsString();
         Console.WriteLine($"    Invoice Id: '{invoiceId}', with confidence {invoiceIdField.Confidence}");
       }
     }

     FormField invoiceDateField;
     if (invoice.Fields.TryGetValue("InvoiceDate", out invoiceDateField)) {
       if (invoiceDateField.Value.ValueType == FieldValueType.Date) {
         DateTime invoiceDate = invoiceDateField.Value.AsDate();
         Console.WriteLine($"    Invoice Date: '{invoiceDate}', with confidence {invoiceDateField.Confidence}");
       }
     }

     FormField dueDateField;
     if (invoice.Fields.TryGetValue("DueDate", out dueDateField)) {
       if (dueDateField.Value.ValueType == FieldValueType.Date) {
         DateTime dueDate = dueDateField.Value.AsDate();
         Console.WriteLine($"    Due Date: '{dueDate}', with confidence {dueDateField.Confidence}");
       }
     }

     FormField vendorNameField;
     if (invoice.Fields.TryGetValue("VendorName", out vendorNameField)) {
       if (vendorNameField.Value.ValueType == FieldValueType.String) {
         string vendorName = vendorNameField.Value.AsString();
         Console.WriteLine($"    Vendor Name: '{vendorName}', with confidence {vendorNameField.Confidence}");
       }
     }

     FormField vendorAddressField;
     if (invoice.Fields.TryGetValue("VendorAddress", out vendorAddressField)) {
       if (vendorAddressField.Value.ValueType == FieldValueType.String) {
         string vendorAddress = vendorAddressField.Value.AsString();
         Console.WriteLine($"    Vendor Address: '{vendorAddress}', with confidence {vendorAddressField.Confidence}");
       }
     }

     FormField customerNameField;
     if (invoice.Fields.TryGetValue("CustomerName", out customerNameField)) {
       if (customerNameField.Value.ValueType == FieldValueType.String) {
         string customerName = customerNameField.Value.AsString();
         Console.WriteLine($"    Customer Name: '{customerName}', with confidence {customerNameField.Confidence}");
       }
     }

     FormField customerAddressField;
     if (invoice.Fields.TryGetValue("CustomerAddress", out customerAddressField)) {
       if (customerAddressField.Value.ValueType == FieldValueType.String) {
         string customerAddress = customerAddressField.Value.AsString();
         Console.WriteLine($"    Customer Address: '{customerAddress}', with confidence {customerAddressField.Confidence}");
       }
     }

     FormField customerAddressRecipientField;
     if (invoice.Fields.TryGetValue("CustomerAddressRecipient", out customerAddressRecipientField)) {
       if (customerAddressRecipientField.Value.ValueType == FieldValueType.String) {
         string customerAddressRecipient = customerAddressRecipientField.Value.AsString();
         Console.WriteLine($"    Customer address recipient: '{customerAddressRecipient}', with confidence {customerAddressRecipientField.Confidence}");
       }
     }

     FormField invoiceTotalField;
     if (invoice.Fields.TryGetValue("InvoiceTotal", out invoiceTotalField)) {
       if (invoiceTotalField.Value.ValueType == FieldValueType.Float) {
         float invoiceTotal = invoiceTotalField.Value.AsFloat();
         Console.WriteLine($"    Invoice Total: '{invoiceTotal}', with confidence {invoiceTotalField.Confidence}");
       }
     }
   }
 }
}
Запуск приложения
Нажмите зеленую кнопку Пуск рядом с formRecognizer_quickstart или нажмите F5, чтобы выполнить сборку программы и запустить ее.
Справочная документация | Исходный код библиотеки | Пакет (Maven) | Примеры
В этом кратком руководстве вы используете следующие API для извлечения структурированных данных из форм и документов:
Необходимые компоненты
Подписка Azure — создайте бесплатную учетную запись.
Пакет Java Development Kit (JDK) версии 8 или более поздней версии. Дополнительные сведения см. в статье оподдерживаемых версиях Java и расписании обновлений.
Служба ИИ Azure или ресурс аналитики документов. После получения подписки Azure создайте ресурс аналитики документов с одной службой или несколькими службами в портал Azure, чтобы получить ключ и конечную точку. Используйте бесплатную ценовую категорию (
F0), чтобы опробовать службу, а затем выполните обновление до платного уровня для рабочей среды.После развертывания ресурса выберите Перейти к ресурсу. Вам потребуется ключ и конечная точка из ресурса, создаваемого для подключения приложения к API аналитики документов. Вставьте ключ и конечную точку в код далее в кратком руководстве:
Настройка
Создание проекта Gradle
В окне консоли (например, cmd, PowerShell или Bash) создайте новый каталог для приложения под названием form-recognizer-app и перейдите в него.
mkdir form-recognizer-app && form-recognizer-app
Выполните команду
gradle initиз рабочей папки. Эта команда создает основные файлы сборки для Gradle, включая build.gradle.kts, который используется во время выполнения для создания и настройки приложения.gradle init --type basicКогда появится запрос на выбор предметно-ориентированного языка, выберите Kotlin.
Примите имя проекта по умолчанию (form-recognizer-app).
Установка клиентской библиотеки
В этом кратком руководстве используется диспетчер зависимостей Gradle. Клиентскую библиотеку и информацию для других диспетчеров зависимостей можно найти в центральном репозитории Maven.
В файле проекта build.gradle.kts включите клиентскую библиотеку в качестве оператора implementation наряду с требуемыми подключаемыми модулями и параметрами.
plugins {
    java
    application
}
application {
    mainClass.set("FormRecognizer")
}
repositories {
    mavenCentral()
}
dependencies {
    implementation(group = "com.azure", name = "azure-ai-formrecognizer", version = "3.1.1")
}
Создание файла Java
Выполните следующие команды из рабочего каталога:
mkdir -p src/main/java
Вы создадите следующую структуру каталогов:
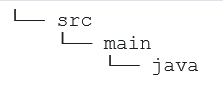
Перейдите к новому каталог java и создайте файл с именем FormRecognizer.java. Откройте его в предпочитаемом редакторе или интегрированной среде разработки и добавьте следующие объявления пакетов и операторы import:
import com.azure.ai.formrecognizer.*;
import com.azure.ai.formrecognizer.models.*;

import java.util.concurrent.atomic.AtomicReference;
import java.util.List;
import java.util.Map;
import java.time.LocalDate;

import com.azure.core.credential.AzureKeyCredential;
import com.azure.core.http.rest.PagedIterable;
import com.azure.core.util.Context;
import com.azure.core.util.polling.SyncPoller;
Выберите пример кода для копирования и вставки в метод Main приложения:
Внимание
Обязательно удалите ключ из кода, когда завершите работу, и ни в коем случае не публикуйте его в открытом доступе. Для рабочей среды используйте безопасный способ хранения и доступа к учетным данным, например Azure Key Vault. Дополнительные сведения см. в статье "Безопасность служб искусственного интеллекта Azure".
Практическое задание: модель макета
Извлеките из документов текст, метки выбора, стили текста и сведения о структуре таблиц наряду с координатами ограничивающих рамок для них.
- В этом примере потребуется файл документа в URI. В этом кратком руководстве можно использовать наш пример документа .
- Чтобы проанализировать файл по универсальному коду ресурса (URI), вы будете использовать метод
beginRecognizeContentFromUrl. - Значение универсального кода ресурса (URI) для файла было добавлено в переменную
formUrlв методе Main.
Обновите класс FormRecognizer приложения с помощью следующего кода (обязательно обновите переменные ключа и конечной точки со значениями из экземпляра аналитики документов портал Azure):
static final String key = "PASTE_YOUR_FORM_RECOGNIZER_KEY_HERE";
static final String endpoint = "PASTE_YOUR_FORM_RECOGNIZER_ENDPOINT_HERE";

public static void main(String[] args) {FormRecognizerClient recognizerClient = new FormRecognizerClientBuilder()
                .credential(new AzureKeyCredential(key)).endpoint(endpoint).buildClient();

    String formUrl = "https://raw.githubusercontent.com/Azure-Samples/cognitive-services-REST-api-samples/master/curl/form-recognizer/sample-layout.pdf";

    System.out.println("Get form content...");
        GetContent(recognizerClient, formUrl);
  }
    private static void GetContent(FormRecognizerClient recognizerClient, String invoiceUri) {
        String analyzeFilePath = invoiceUri;
        SyncPoller<FormRecognizerOperationResult, List<FormPage>> recognizeContentPoller = recognizerClient
                .beginRecognizeContentFromUrl(analyzeFilePath);

        List<FormPage> contentResult = recognizeContentPoller.getFinalResult();
        // </snippet_getcontent_call>
        // <snippet_getcontent_print>
        contentResult.forEach(formPage -> {
            // Table information
            System.out.println("----Recognizing content ----");
            System.out.printf("Has width: %f and height: %f, measured with unit: %s.%n", formPage.getWidth(),
                    formPage.getHeight(), formPage.getUnit());
            formPage.getTables().forEach(formTable -> {
                System.out.printf("Table has %d rows and %d columns.%n", formTable.getRowCount(),
                        formTable.getColumnCount());
                formTable.getCells().forEach(formTableCell -> {
                    System.out.printf("Cell has text %s.%n", formTableCell.getText());
                });
                System.out.println();
            });
        });
    }
Попробуйте: предварительно созданная модель
В этом примере показано, как анализировать данные из определенных типов общих документов с предварительно обученными моделями, используя счет в качестве примера.
- В этом примере мы проанализируем документ счета с помощью предварительно созданной модели. Для работы с этим кратким руководством можно использовать пример документа со счетом.
- Чтобы проанализировать файл по универсальному коду ресурса (URI), вы будете использовать
beginRecognizeInvoicesFromUrl. - Значение универсального кода ресурса (URI) для файла было добавлено в переменную
invoiceUrlв методе Main. - Для простоты здесь показаны не все поля, возвращаемые службой. Список всех поддерживаемых полей и соответствующих типов см. на странице концепции Счет.
Выберите предварительно созданную модель
Вы можете использовать не только счета. Есть несколько предварительно созданных моделей, у каждой из которых собственный набор поддерживаемых полей. Модель, используемая для операции анализа, зависит от типа анализируемого документа. Ниже приведены готовые модели, поддерживаемые в настоящее время службой аналитики документов:
- Счет — извлекает текст, метки выбора, таблицы, поля и сведения о ключах из счетов.
- Квитанция — извлекает текст и ключевые данные из квитанций.
- ID document (Удостоверение) — извлекает текст и ключевые данные из водительских прав и заграничных паспортов.
- Визитная карточка — извлекает текст и ключевые данные из визитных карточек.
Обновите класс FormRecognizer приложения с помощью следующего кода (обязательно обновите переменные ключа и конечной точки со значениями из экземпляра аналитики документов портал Azure):
static final String key = "PASTE_YOUR_FORM_RECOGNIZER_KEY_HERE";
static final String endpoint = "PASTE_YOUR_FORM_RECOGNIZER_ENDPOINT_HERE";

public static void main(String[] args) {
    FormRecognizerClient recognizerClient = new FormRecognizerClientBuilder().credential(new AzureKeyCredential(key)).endpoint(endpoint).buildClient();

    String invoiceUrl = "https://raw.githubusercontent.com/Azure-Samples/cognitive-services-REST-api-samples/master/curl/form-recognizer/sample-invoice.pdf";

    System.out.println("Analyze invoice...");
        AnalyzeInvoice(recognizerClient, invoiceUrl);
  }
    private static void AnalyzeInvoice(FormRecognizerClient recognizerClient, String invoiceUrl) {
      SyncPoller < FormRecognizerOperationResult,
        List < RecognizedForm >> recognizeInvoicesPoller = recognizerClient.beginRecognizeInvoicesFromUrl(invoiceUrl);
      List < RecognizedForm > recognizedInvoices = recognizeInvoicesPoller.getFinalResult();

      for (int i = 0; i < recognizedInvoices.size(); i++) {
        RecognizedForm recognizedInvoice = recognizedInvoices.get(i);
        Map < String,
        FormField > recognizedFields = recognizedInvoice.getFields();
        System.out.printf("----------- Recognized invoice info for page %d -----------%n", i);
        FormField vendorNameField = recognizedFields.get("VendorName");
        if (vendorNameField != null) {
            if (FieldValueType.STRING == vendorNameField.getValue().getValueType()) {
                String merchantName = vendorNameField.getValue().asString();
                System.out.printf("Vendor Name: %s, confidence: %.2f%n", merchantName, vendorNameField.getConfidence());
            }
        }

        FormField vendorAddressField = recognizedFields.get("VendorAddress");
        if (vendorAddressField != null) {
            if (FieldValueType.STRING == vendorAddressField.getValue().getValueType()) {
                String merchantAddress = vendorAddressField.getValue().asString();
                System.out.printf("Vendor address: %s, confidence: %.2f%n", merchantAddress, vendorAddressField.getConfidence());
            }
        }

        FormField customerNameField = recognizedFields.get("CustomerName");
        if (customerNameField != null) {
            if (FieldValueType.STRING == customerNameField.getValue().getValueType()) {
                String merchantAddress = customerNameField.getValue().asString();
                System.out.printf("Customer Name: %s, confidence: %.2f%n", merchantAddress, customerNameField.getConfidence());
            }
        }

        FormField customerAddressRecipientField = recognizedFields.get("CustomerAddressRecipient");
        if (customerAddressRecipientField != null) {
            if (FieldValueType.STRING == customerAddressRecipientField.getValue().getValueType()) {
                String customerAddr = customerAddressRecipientField.getValue().asString();
                System.out.printf("Customer Address Recipient: %s, confidence: %.2f%n", customerAddr, customerAddressRecipientField.getConfidence());
            }
        }

        FormField invoiceIdField = recognizedFields.get("InvoiceId");
        if (invoiceIdField != null) {
            if (FieldValueType.STRING == invoiceIdField.getValue().getValueType()) {
                String invoiceId = invoiceIdField.getValue().asString();
                System.out.printf("Invoice Id: %s, confidence: %.2f%n", invoiceId, invoiceIdField.getConfidence());
            }
        }

        FormField invoiceDateField = recognizedFields.get("InvoiceDate");
        if (customerNameField != null) {
            if (FieldValueType.DATE == invoiceDateField.getValue().getValueType()) {
                LocalDate invoiceDate = invoiceDateField.getValue().asDate();
                System.out.printf("Invoice Date: %s, confidence: %.2f%n", invoiceDate, invoiceDateField.getConfidence());
            }
        }

        FormField invoiceTotalField = recognizedFields.get("InvoiceTotal");
        if (customerAddressRecipientField != null) {
            if (FieldValueType.FLOAT == invoiceTotalField.getValue().getValueType()) {
                Float invoiceTotal = invoiceTotalField.getValue().asFloat();
                System.out.printf("Invoice Total: %.2f, confidence: %.2f%n", invoiceTotal, invoiceTotalField.getConfidence());
            }
        }
    }
}
Создание и запуск приложения
Вернитесь к главному каталогу проекта form-recognizer-app.
- Выполните сборку приложения с помощью команды
build:
gradle build
- Запустите приложение с помощью команды
run:
gradle run
Справочная документация | Исходный код библиотеки | Пакет (npm) | Примеры
В этом кратком руководстве вы используете следующие API для извлечения структурированных данных из форм и документов:
Необходимые компоненты
Подписка Azure — создайте бесплатную учетную запись.
Последняя версия Visual Studio Code или предпочтительная интегрированная среда разработки.
Последняя версия LTS Node.js.
Служба ИИ Azure или ресурс аналитики документов. После получения подписки Azure создайте ресурс аналитики документов с одной службой или несколькими службами в портал Azure, чтобы получить ключ и конечную точку. Используйте бесплатную ценовую категорию (
F0), чтобы опробовать службу, а затем выполните обновление до платного уровня для рабочей среды.Совет
Создайте ресурс служб искусственного интеллекта Azure, если вы планируете получить доступ к нескольким службам ИИ Azure в рамках одной конечной точки или ключа. Только для доступа к аналитике документов создайте ресурс аналитики документов. Обратите внимание, что если вы планируете использовать проверку подлинности Microsoft Entra, вам потребуется один ресурс службы.
После развертывания ресурса выберите Перейти к ресурсу. Вам потребуется ключ и конечная точка из ресурса, создаваемого для подключения приложения к API аналитики документов. Вставьте ключ и конечную точку в код далее в кратком руководстве:
Настройка
Создайте новое приложение Node.js. В окне консоли (например, cmd, PowerShell или Bash) создайте новый каталог для приложения и перейдите в него.
mkdir form-recognizer-app && cd form-recognizer-appВыполните команду
npm init, чтобы создать приложение узла с помощью файлаpackage.json.npm initУстановите пакет npm клиентской библиотеки
ai-form-recognizer:npm install @azure/ai-form-recognizerФайл
package.jsonприложения обновлен с учетом зависимостей.Создайте файл с именем
index.js, откройте его и импортируйте следующие библиотеки:const { FormRecognizerClient, AzureKeyCredential } = require("@azure/ai-form-recognizer");Создайте переменные для конечной точки Azure и ключа ресурса.
const key = "PASTE_YOUR_FORM_RECOGNIZER_KEY_HERE";
const endpoint = "PASTE_YOUR_FORM_RECOGNIZER_ENDPOINT_HERE";
На этом этапе приложение JavaScript должно содержать следующие строки кода:
const { FormRecognizerClient, AzureKeyCredential } = require("@azure/ai-form-recognizer");

const endpoint = "PASTE_YOUR_FORM_RECOGNIZER_ENDPOINT_HERE";
const key = "PASTE_YOUR_FORM_RECOGNIZER_KEY_HERE";
Выберите пример кода для копирования и вставки в приложение:
Внимание
Обязательно удалите ключ из кода, когда завершите работу, и ни в коем случае не публикуйте его в открытом доступе. Для рабочей среды используйте безопасный способ хранения и доступа к учетным данным, например Azure Key Vault. Дополнительные сведения см. в статье "Безопасность служб искусственного интеллекта Azure".
Практическое задание: модель макета
- В этом примере потребуется файл документа в URI. В этом кратком руководстве можно использовать наш пример документа .
- Мы добавили значение URI файла в переменную
formUrl, расположенную в верхней части файла. - Чтобы проанализировать файл по универсальному коду ресурса (URI), вы будете использовать метод
beginRecognizeContent.
Добавление соответствующего кода в строку под переменной key в приложении для обработки макетов
const formUrl = "https://raw.githubusercontent.com/Azure-Samples/cognitive-services-REST-api-samples/master/curl/form-recognizer/sample-invoice.pdf";

const formUrl = "https://raw.githubusercontent.com/Azure-Samples/cognitive-services-REST-api-samples/master/curl/form-recognizer/sample-invoice.pdf";

async function recognizeContent() {
    const client = new FormRecognizerClient(endpoint, new AzureKeyCredential(key));
    const poller = await client.beginRecognizeContentFromUrl(formUrl);
    const pages = await poller.pollUntilDone();

    if (!pages || pages.length === 0) {
        throw new Error("Expecting non-empty list of pages!");
    }

    for (const page of pages) {
        console.log(
            `Page ${page.pageNumber}: width ${page.width} and height ${page.height} with unit ${page.unit}`
        );
        for (const table of page.tables) {
            for (const cell of table.cells) {
                console.log(`cell [${cell.rowIndex},${cell.columnIndex}] has text ${cell.text}`);
            }
        }
    }
}

recognizeContent().catch((err) => {
    console.error("The sample encountered an error:", err);
});
Попробуйте: предварительно созданная модель
В этом примере показано, как анализировать данные из определенных типов общих документов с предварительно обученными моделями, используя счет в качестве примера. Полный список полей счета для счета см. на странице со сведениями о концепции предварительного создания.
- В этом примере мы проанализируем документ счета с помощью предварительно созданной модели. Для работы с этим кратким руководством можно использовать пример документа со счетом.
- Мы добавили значение URI файла в переменную
invoiceUrl, расположенную в верхней части файла. - Чтобы проанализировать файл по универсальному коду ресурса (URI), вы будете использовать метод
beginRecognizeInvoices. - Для простоты здесь показаны не все поля, возвращаемые службой. Список всех поддерживаемых полей и соответствующих типов см. на странице концепции Счет.
Выберите предварительно созданную модель
Вы можете использовать не только счета. Есть несколько предварительно созданных моделей, у каждой из которых собственный набор поддерживаемых полей. Модель, используемая для операции анализа, зависит от типа анализируемого документа. Ниже приведены готовые модели, поддерживаемые в настоящее время службой аналитики документов:
- Счет — извлекает текст, метки выбора, таблицы, поля и сведения о ключах из счетов.
- Квитанция — извлекает текст и ключевые данные из квитанций.
- ID document (Удостоверение) — извлекает текст и ключевые данные из водительских прав и заграничных паспортов.
- Визитная карточка — извлекает текст и ключевые данные из визитных карточек.
Добавление соответствующего кода в предварительно созданное приложение для обработки счетов (под переменной key)
const invoiceUrl = "https://raw.githubusercontent.com/Azure-Samples/cognitive-services-REST-api-samples/master/curl/form-recognizer/sample-invoice.pdf";

async function recognizeInvoices() {

    const client = new FormRecognizerClient(endpoint, new AzureKeyCredential(key));

    const poller = await client.beginRecognizeInvoicesFromUrl(invoiceUrl);
    const [invoice] = await poller.pollUntilDone();

    if (invoice === undefined) {
        throw new Error("Failed to extract data from at least one invoice.");
    }

    /**
     * This is a helper function for printing a simple field with an elemental type.
     */
    function fieldToString(field) {
        const {
            name,
            valueType,
            value,
            confidence
        } = field;
        return `${name} (${valueType}): '${value}' with confidence ${confidence}'`;
    }

    console.log("Invoice fields:");

    /**
     * Invoices contain a lot of optional fields, but they are all of elemental types
     * such as strings, numbers, and dates, so we will just enumerate them all.
     */
    for (const [name, field] of Object.entries(invoice.fields)) {
        if (field.valueType !== "array" && field.valueType !== "object") {
            console.log(`- ${name} ${fieldToString(field)}`);
        }
    }

    // Invoices also support nested line items, so we can iterate over them.
    let idx = 0;

    console.log("- Items:");

    const items = invoice.fields["Items"]?.value;
    for (const item of items ?? []) {
        const value = item.value;

        // Each item has several subfields that are nested within the item. We'll
        // map over this list of the subfields and filter out any fields that
        // weren't found. Not all fields will be returned every time, only those
        // that the service identified for the particular document in question.

        const subFields = [
                "Description",
                "Quantity",
                "Unit",
                "UnitPrice",
                "ProductCode",
                "Date",
                "Tax",
                "Amount"
            ]
            .map((fieldName) => value[fieldName])
            .filter((field) => field !== undefined);

        console.log(
            [
                `  - Item #${idx}`,
                // Now we will convert those fields into strings to display
                ...subFields.map((field) => `    - ${fieldToString(field)}`)
            ].join("\n")
        );
    }
}

recognizeInvoices().catch((err) => {
    console.error("The sample encountered an error:", err);
});
Справочная документация | Исходный код библиотеки | Пакет (PyPi) | Примеры
В этом кратком руководстве вы используете следующие API для извлечения структурированных данных из форм и документов:
Необходимые компоненты
Подписка Azure — создайте бесплатную учетную запись.
-
- Установка Python должна включать pip. Чтобы проверить, установлен ли pip, выполните команду
pip --versionв командной строке. Чтобы использовать pip, установите последнюю версию Python.
- Установка Python должна включать pip. Чтобы проверить, установлен ли pip, выполните команду
Служба ИИ Azure или ресурс аналитики документов. После получения подписки Azure создайте ресурс аналитики документов с одной службой или несколькими службами в портал Azure, чтобы получить ключ и конечную точку. Используйте бесплатную ценовую категорию (
F0), чтобы опробовать службу, а затем выполните обновление до платного уровня для рабочей среды.Совет
Создайте ресурс служб искусственного интеллекта Azure, если вы планируете получить доступ к нескольким службам ИИ Azure в рамках одной конечной точки или ключа. Только для доступа к аналитике документов создайте ресурс аналитики документов. Обратите внимание, что если вы планируете использовать проверку подлинности Microsoft Entra, вам потребуется один ресурс службы.
После развертывания ресурса выберите Перейти к ресурсу. Вам потребуется ключ и конечная точка из ресурса, создаваемого для подключения приложения к API аналитики документов. Вставьте ключ и конечную точку в код далее в кратком руководстве:
Настройка
Откройте окно терминала в локальной среде и установите клиентская библиотека Аналитики документов Azure для Python с помощью pip:
pip install azure-ai-formrecognizer
Создание приложения Python
Создайте новое приложение Python с именем form_recognizer_quickstart.py в предпочитаемом редакторе или IDE. Затем импортируйте приведенные ниже библиотеки.
import os
from azure.ai.formrecognizer import FormRecognizerClient
from azure.core.credentials import AzureKeyCredential
Создание переменных для конечной точки и ключа ресурса Azure
endpoint = "YOUR_FORM_RECOGNIZER_ENDPOINT"
key = "YOUR_FORM_RECOGNIZER_KEY"
На этом этапе приложение Python должно содержать следующие строки кода:
import os
from azure.core.exceptions import ResourceNotFoundError
from azure.ai.formrecognizer import DocumentAnalysisClient
from azure.core.credentials import AzureKeyCredential

endpoint = "YOUR_FORM_RECOGNIZER_ENDPOINT"
key = "YOUR_FORM_RECOGNIZER_KEY"
Выберите пример кода для копирования и вставки в приложение:
Внимание
Обязательно удалите ключ из кода, когда завершите работу, и ни в коем случае не публикуйте его в открытом доступе. Для рабочей среды используйте безопасный способ хранения и доступа к учетным данным, например Azure Key Vault. Дополнительные сведения см. в статье "Безопасность служб искусственного интеллекта Azure".
Практическое задание: модель макета
- В этом примере потребуется файл документа в URI. В этом кратком руководстве можно использовать наш пример документа .
- Мы добавили значение URI файла в переменную
formUrl, расположенную в верхней части файла. - Чтобы проанализировать файл по универсальному коду ресурса (URI), вы будете использовать метод
begin_recognize_content_from_url.
Добавление соответствующего кода в строку под переменной key в приложении для обработки макетов
  def format_bounding_box(bounding_box):
    if not bounding_box:
        return "N/A"
    return ", ".join(["[{}, {}]".format(p.x, p.y) for p in bounding_box])

 def recognize_content():
    # sample document
    formUrl = "https://raw.githubusercontent.com/Azure-Samples/cognitive-services-REST-api-samples/master/curl/form-recognizer/sample-layout.pdf"

    form_recognizer_client = FormRecognizerClient(
        endpoint=endpoint, credential=AzureKeyCredential(key)
    )

    poller = form_recognizer_client.begin_recognize_content_from_url(formUrl)
    form_pages = poller.result()

    for idx, content in enumerate(form_pages):
        print(
            "Page has width: {} and height: {}, measured with unit: {}".format(
                content.width, content.height, content.unit
            )
        )
        for table_idx, table in enumerate(content.tables):
            print(
                "Table # {} has {} rows and {} columns".format(
                    table_idx, table.row_count, table.column_count
                )
            )
            print(
                "Table # {} location on page: {}".format(
                    table_idx, format_bounding_box(table.bounding_box)
                )
            )
            for cell in table.cells:
                print(
                    "...Cell[{}][{}] has text '{}' within bounding box '{}'".format(
                        cell.row_index,
                        cell.column_index,
                        cell.text,
                        format_bounding_box(cell.bounding_box),
                    )
                )

        for line_idx, line in enumerate(content.lines):
            print(
                "Line # {} has word count '{}' and text '{}' within bounding box '{}'".format(
                    line_idx,
                    len(line.words),
                    line.text,
                    format_bounding_box(line.bounding_box),
                )
            )
            if line.appearance:
                if (
                    line.appearance.style_name == "handwriting"
                    and line.appearance.style_confidence > 0.8
                ):
                    print(
                        "Text line '{}' is handwritten and might be a signature.".format(
                            line.text
                        )
                    )
            for word in line.words:
                print(
                    "...Word '{}' has a confidence of {}".format(
                        word.text, word.confidence
                    )
                )

        for selection_mark in content.selection_marks:
            print(
                "Selection mark is '{}' within bounding box '{}' and has a confidence of {}".format(
                    selection_mark.state,
                    format_bounding_box(selection_mark.bounding_box),
                    selection_mark.confidence,
                )
            )
        print("----------------------------------------")


if __name__ == "__main__":
    recognize_content()
Попробуйте: предварительно созданная модель
В этом примере показано, как анализировать данные из определенных типов общих документов с предварительно обученными моделями, используя счет в качестве примера. Полный список полей счета для счета см. на странице со сведениями о концепции предварительного создания.
- В этом примере мы проанализируем документ счета с помощью предварительно созданной модели. Для работы с этим кратким руководством можно использовать пример документа со счетом.
- Мы добавили значение URI файла в переменную "formUrl", расположенную в верхней части файла.
- Чтобы проанализировать заданный файл по универсальному коду ресурса, используйте метод "begin_recognize_invoices_from_url".
- Для простоты здесь показаны не все поля, возвращаемые службой. Список всех поддерживаемых полей и соответствующих типов см. на странице концепции Счет.
Выберите предварительно созданную модель
Вы можете использовать не только счета. Есть несколько предварительно созданных моделей, у каждой из которых собственный набор поддерживаемых полей. Модель, используемая для операции анализа, зависит от типа анализируемого документа. Ниже приведены готовые модели, поддерживаемые в настоящее время службой аналитики документов:
- Счет — извлекает текст, метки выбора, таблицы, поля и сведения о ключах из счетов.
- Квитанция — извлекает текст и ключевые данные из квитанций.
- ID document (Удостоверение) — извлекает текст и ключевые данные из водительских прав и заграничных паспортов.
- Визитная карточка — извлекает текст и ключевые данные из визитных карточек.
Добавление соответствующего кода в предварительно созданное приложение для обработки счетов (под переменной key)
def recognize_invoice():

    invoiceUrl = "https://raw.githubusercontent.com/Azure-Samples/cognitive-services-REST-api-samples/master/curl/form-recognizer/sample-invoice.pdf"

    form_recognizer_client = FormRecognizerClient(
        endpoint=endpoint, credential=AzureKeyCredential(key)
    )

    poller = form_recognizer_client.begin_recognize_invoices_from_url(
        invoiceUrl, locale="en-US"
    )
    invoices = poller.result()

    for idx, invoice in enumerate(invoices):
        vendor_name = invoice.fields.get("VendorName")
        if vendor_name:
            print(
                "Vendor Name: {} has confidence: {}".format(
                    vendor_name.value, vendor_name.confidence
                )
            )
        vendor_address = invoice.fields.get("VendorAddress")
        if vendor_address:
            print(
                "Vendor Address: {} has confidence: {}".format(
                    vendor_address.value, vendor_address.confidence
                )
            )
        vendor_address_recipient = invoice.fields.get("VendorAddressRecipient")
        if vendor_address_recipient:
            print(
                "Vendor Address Recipient: {} has confidence: {}".format(
                    vendor_address_recipient.value, vendor_address_recipient.confidence
                )
            )
        customer_name = invoice.fields.get("CustomerName")
        if customer_name:
            print(
                "Customer Name: {} has confidence: {}".format(
                    customer_name.value, customer_name.confidence
                )
            )
        customer_id = invoice.fields.get("CustomerId")
        if customer_id:
            print(
                "Customer Id: {} has confidence: {}".format(
                    customer_id.value, customer_id.confidence
                )
            )
        customer_address = invoice.fields.get("CustomerAddress")
        if customer_address:
            print(
                "Customer Address: {} has confidence: {}".format(
                    customer_address.value, customer_address.confidence
                )
            )
        customer_address_recipient = invoice.fields.get("CustomerAddressRecipient")
        if customer_address_recipient:
            print(
                "Customer Address Recipient: {} has confidence: {}".format(
                    customer_address_recipient.value,
                    customer_address_recipient.confidence,
                )
            )
        invoice_id = invoice.fields.get("InvoiceId")
        if invoice_id:
            print(
                "Invoice Id: {} has confidence: {}".format(
                    invoice_id.value, invoice_id.confidence
                )
            )
        invoice_date = invoice.fields.get("InvoiceDate")
        if invoice_date:
            print(
                "Invoice Date: {} has confidence: {}".format(
                    invoice_date.value, invoice_date.confidence
                )
            )
        invoice_total = invoice.fields.get("InvoiceTotal")
        if invoice_total:
            print(
                "Invoice Total: {} has confidence: {}".format(
                    invoice_total.value, invoice_total.confidence
                )
            )
        due_date = invoice.fields.get("DueDate")
        if due_date:
            print(
                "Due Date: {} has confidence: {}".format(
                    due_date.value, due_date.confidence
                )
            )
        purchase_order = invoice.fields.get("PurchaseOrder")
        if purchase_order:
            print(
                "Purchase Order: {} has confidence: {}".format(
                    purchase_order.value, purchase_order.confidence
                )
            )
        billing_address = invoice.fields.get("BillingAddress")
        if billing_address:
            print(
                "Billing Address: {} has confidence: {}".format(
                    billing_address.value, billing_address.confidence
                )
            )
        billing_address_recipient = invoice.fields.get("BillingAddressRecipient")
        if billing_address_recipient:
            print(
                "Billing Address Recipient: {} has confidence: {}".format(
                    billing_address_recipient.value,
                    billing_address_recipient.confidence,
                )
            )
        shipping_address = invoice.fields.get("ShippingAddress")
        if shipping_address:
            print(
                "Shipping Address: {} has confidence: {}".format(
                    shipping_address.value, shipping_address.confidence
                )
            )
        shipping_address_recipient = invoice.fields.get("ShippingAddressRecipient")
        if shipping_address_recipient:
            print(
                "Shipping Address Recipient: {} has confidence: {}".format(
                    shipping_address_recipient.value,
                    shipping_address_recipient.confidence,
                )
            )
        print("Invoice items:")
        for idx, item in enumerate(invoice.fields.get("Items").value):
            item_description = item.value.get("Description")
            if item_description:
                print(
                    "......Description: {} has confidence: {}".format(
                        item_description.value, item_description.confidence
                    )
                )
            item_quantity = item.value.get("Quantity")
            if item_quantity:
                print(
                    "......Quantity: {} has confidence: {}".format(
                        item_quantity.value, item_quantity.confidence
                    )
                )
            unit = item.value.get("Unit")
            if unit:
                print(
                    "......Unit: {} has confidence: {}".format(
                        unit.value, unit.confidence
                    )
                )
            unit_price = item.value.get("UnitPrice")
            if unit_price:
                print(
                    "......Unit Price: {} has confidence: {}".format(
                        unit_price.value, unit_price.confidence
                    )
                )
            product_code = item.value.get("ProductCode")
            if product_code:
                print(
                    "......Product Code: {} has confidence: {}".format(
                        product_code.value, product_code.confidence
                    )
                )
            item_date = item.value.get("Date")
            if item_date:
                print(
                    "......Date: {} has confidence: {}".format(
                        item_date.value, item_date.confidence
                    )
                )
            tax = item.value.get("Tax")
            if tax:
                print(
                    "......Tax: {} has confidence: {}".format(tax.value, tax.confidence)
                )
            amount = item.value.get("Amount")
            if amount:
                print(
                    "......Amount: {} has confidence: {}".format(
                        amount.value, amount.confidence
                    )
                )
        subtotal = invoice.fields.get("SubTotal")
        if subtotal:
            print(
                "Subtotal: {} has confidence: {}".format(
                    subtotal.value, subtotal.confidence
                )
            )
        total_tax = invoice.fields.get("TotalTax")
        if total_tax:
            print(
                "Total Tax: {} has confidence: {}".format(
                    total_tax.value, total_tax.confidence
                )
            )
        previous_unpaid_balance = invoice.fields.get("PreviousUnpaidBalance")
        if previous_unpaid_balance:
            print(
                "Previous Unpaid Balance: {} has confidence: {}".format(
                    previous_unpaid_balance.value, previous_unpaid_balance.confidence
                )
            )
        amount_due = invoice.fields.get("AmountDue")
        if amount_due:
            print(
                "Amount Due: {} has confidence: {}".format(
                    amount_due.value, amount_due.confidence
                )
            )
        service_start_date = invoice.fields.get("ServiceStartDate")
        if service_start_date:
            print(
                "Service Start Date: {} has confidence: {}".format(
                    service_start_date.value, service_start_date.confidence
                )
            )
        service_end_date = invoice.fields.get("ServiceEndDate")
        if service_end_date:
            print(
                "Service End Date: {} has confidence: {}".format(
                    service_end_date.value, service_end_date.confidence
                )
            )
        service_address = invoice.fields.get("ServiceAddress")
        if service_address:
            print(
                "Service Address: {} has confidence: {}".format(
                    service_address.value, service_address.confidence
                )
            )
        service_address_recipient = invoice.fields.get("ServiceAddressRecipient")
        if service_address_recipient:
            print(
                "Service Address Recipient: {} has confidence: {}".format(
                    service_address_recipient.value,
                    service_address_recipient.confidence,
                )
            )
        remittance_address = invoice.fields.get("RemittanceAddress")
        if remittance_address:
            print(
                "Remittance Address: {} has confidence: {}".format(
                    remittance_address.value, remittance_address.confidence
                )
            )
        remittance_address_recipient = invoice.fields.get("RemittanceAddressRecipient")
        if remittance_address_recipient:
            print(
                "Remittance Address Recipient: {} has confidence: {}".format(
                    remittance_address_recipient.value,
                    remittance_address_recipient.confidence,
                )
            )


if __name__ == "__main__":
    recognize_invoice()
Запуск приложения
Перейдите в папку с файлом form_recognizer_quickstart.py
В окне терминала введите следующую команду:
python form_recognizer_quickstart.py
| Справочник по REST API | Аналитики документов Azure REST API |
В этом кратком руководстве вы используете следующие API для извлечения структурированных данных из форм и документов:
Необходимые компоненты
Подписка Azure — создайте бесплатную учетную запись.
Установленная программа cURL.
PowerShell версии 6.0 и выше или аналогичное приложение командной строки.
Служба ИИ Azure или ресурс аналитики документов. После получения подписки Azure создайте ресурс аналитики документов с одной службой или несколькими службами в портал Azure, чтобы получить ключ и конечную точку. Используйте бесплатную ценовую категорию (
F0), чтобы опробовать службу, а затем выполните обновление до платного уровня для рабочей среды.Совет
Создайте ресурс служб искусственного интеллекта Azure, если вы планируете получить доступ к нескольким службам ИИ Azure в рамках одной конечной точки или ключа. Только для доступа к аналитике документов создайте ресурс аналитики документов. Обратите внимание, что если вы планируете использовать проверку подлинности Microsoft Entra, вам потребуется один ресурс службы.
После развертывания ресурса выберите Перейти к ресурсу. Вам потребуется ключ и конечная точка из ресурса, создаваемого для подключения приложения к API аналитики документов. Вставьте ключ и конечную точку в код далее в кратком руководстве:
Выберите пример кода для копирования и вставки в приложение:
Внимание
Обязательно удалите ключ из кода, когда завершите работу, и ни в коем случае не публикуйте его в открытом доступе. Для рабочей среды используйте безопасный способ хранения и доступа к учетным данным, например Azure Key Vault. Дополнительные сведения см. в статье "Безопасность служб искусственного интеллекта Azure".
Практическое задание: модель макета
- В этом примере потребуется файл документа в URI. В этом кратком руководстве можно использовать наш пример документа .
- Замените
{endpoint}конечную точку, полученную подпиской Document Intelligence. - Замените
{key}ключом, скопированным на предыдущем шаге. - Замените
\"{your-document-url}примерОМ URL-адреса документа:
https://raw.githubusercontent.com/Azure-Samples/cognitive-services-REST-api-samples/master/curl/form-recognizer/sample-layout.pdf
Запросить
curl -v -i POST "https://{endpoint}/formrecognizer/v2.1/layout/analyze" -H "Content-Type: application/json" -H "Ocp-Apim-Subscription-Key: {key}" --data-ascii "{'urlSource': '{your-document-url}'}"
Operation-Location
Вы получите 202 (Success) ответ, содержащий заголовок Operation-Location . Значение этого заголовка содержит идентификатор результата, который можно использовать для запроса состояния асинхронной операции и получения результатов:
https://cognitiveservice/formrecognizer/v2.1/layout/analyzeResults/{resultId}.
В следующем примере такая часть URL-адреса, как строка после analyzeResults/, является идентификатором результата.
https://cognitiveservice/formrecognizer/v2/layout/analyzeResults/54f0b076-4e38-43e5-81bd-b85b8835fdfb
Получение результатов макета
После вызова API анализа макета вызовите API получения результатов анализа макета, чтобы получить состояние операции и извлеченных данных. Перед выполнением команды внесите следующие изменения:
- Замените
{endpoint}конечную точку, полученную подпиской Document Intelligence. - Замените
{key}ключом, скопированным на предыдущем шаге. - Замените
{resultId}идентификатором результата из предыдущего шага.
Запросить
curl -v -X GET "https://{endpoint}/formrecognizer/v2.1/layout/analyzeResults/{resultId}" -H "Ocp-Apim-Subscription-Key: {key}"
Просмотр результатов
Вы получаете 200 (success) ответ с содержимым JSON.
Ознакомьтесь со следующим изображением накладной и его соответствующими выходными данными в формате JSON.
- Узел
"readResults"содержит каждую строку текста с соответствующим расположением ограничивающего прямоугольника на странице. - Узел
selectionMarksотображает каждую отметку выделения (флажок или переключатель) и состояниеselectedилиunselected. - В разделе
"pageResults"содержатся извлеченные таблицы. Для каждой таблицы извлекаются текст, строка и индекс столбца, объединение строки и столбца, ограничивающий прямоугольник и т. д.
Текст ответа
Вы можете просмотреть полный пример выходных данных на сайте GitHub.
Попробуйте: предварительно созданная модель
- В этом примере мы проанализируем документ счета с помощью предварительно созданной модели. Для работы с этим кратким руководством можно использовать пример документа со счетом.
Выберите предварительно созданную модель
Вы можете использовать не только счета. Есть несколько предварительно созданных моделей, у каждой из которых собственный набор поддерживаемых полей. Модель, используемая для операции анализа, зависит от типа анализируемого документа. Ниже приведены готовые модели, поддерживаемые в настоящее время службой аналитики документов:
- Счет — извлекает текст, метки выбора, таблицы, поля и сведения о ключах из счетов.
- Квитанция — извлекает текст и ключевые данные из квитанций.
- ID document (Удостоверение) — извлекает текст и ключевые данные из водительских прав и заграничных паспортов.
- Визитная карточка — извлекает текст и ключевые данные из визитных карточек.
Перед выполнением команды внесите следующие изменения:
Замените
{endpoint}конечную точку, полученную подпиской Document Intelligence.Замените
{key}ключом, скопированным на предыдущем шаге.Замените
\"{your-document-url}URL-адресом примера счета.https://raw.githubusercontent.com/Azure-Samples/cognitive-services-REST-api-samples/master/curl/form-recognizer/sample-invoice.pdf
Запросить
curl -v -i POST https://{endpoint}/formrecognizer/v2.1/prebuilt/invoice/analyze" -H "Content-Type: application/json" -H "Ocp-Apim-Subscription-Key: {key}" --data-ascii "{'urlSource': '{your invoice URL}'}"
Operation-Location
Вы получите 202 (Success) ответ, содержащий заголовок Operation-Location . Значение этого заголовка содержит идентификатор результата, который можно использовать для запроса состояния асинхронной операции и получения результатов:
https://cognitiveservice/formrecognizer/v2.1/prebuilt/receipt/analyzeResults/{resultId}
В следующем примере такая часть URL-адреса, как строка после analyzeResults/, является идентификатором результата.
https://cognitiveservice/formrecognizer/v2.1/prebuilt/invoice/analyzeResults/54f0b076-4e38-43e5-81bd-b85b8835fdfb
Получение результатов по счету-фактуре
После вызова API анализа счета вызовите API получения результатов анализа счета, чтобы узнать о состоянии операции и извлеченных данных. Перед выполнением команды внесите следующие изменения:
- Замените
{endpoint}конечную точку, полученную ключом аналитики документов. Его можно найти на вкладке "Обзор ресурсов аналитики документов". - Замените
{resultId}идентификатором результата из предыдущего шага. - Замените
{key}собственным ключом.
Запросить
curl -v -X GET "https://{endpoint}/formrecognizer/v2.1/prebuilt/invoice/analyzeResults/{resultId}" -H "Ocp-Apim-Subscription-Key: {key}"
Изучите ответ.
Вы получаете ответ с выходными данными 200 (Success) JSON.
- Поле
"readResults"содержит каждую строку текста, извлеченную из счета. "pageResults"включает таблицы и метки выбора, извлеченные из счета.- Поле
"documentResults"содержит сведения о ключе и значении для наиболее релевантных частей счета.
См. документ Пример счета.
Текст ответа
Это, хорошо сделано!
Следующие шаги
Дополнительные возможности и расширенное качество модели см. в Студии аналитики документов.
Студия поддерживает любую модель, обученную с данными с метками версии 2.1.
Журналы изменений содержат подробные сведения о миграции с версии 3.1 на версию 4.0.