Создание первого приложения-контейнера Service Fabric в Linux
Чтобы запустить существующее приложение в контейнере Linux кластера Service Fabric не требуется вносить изменения в приложение. В этой статье описано создание образа Docker, содержащего веб-приложение Flask Python, и его развертывание в кластер Service Fabric. Кроме того, вы предоставите общий доступ к контейнерному приложению через реестр контейнеров Azure. Для работы с этой статьей необходимо знание основных понятий Docker. Чтобы ознакомиться с Docker, см. этот обзор Docker.
Примечание.
Эта статья касается среды разработки Linux. Среда выполнения кластера Service Fabric и среда выполнения Docker должны работать под управлением одной операционной системы. Контейнеры Linux нельзя запускать в кластере Windows.
Необходимые компоненты
Компьютер для разработки, на котором установлено ПО, перечисленное ниже.
Кластер Linux с тремя или более узлами.
Реестр контейнеров Azure. Создайте реестр контейнеров в своей подписке Azure.
Определение образа контейнера Docker
Создайте образ на основе образа Python из репозитория Docker Hub.
Определите образ Docker в файле Dockerfile. Файл Dockerfile содержит инструкции по настройке среды внутри контейнера, загрузке приложения, которое необходимо выполнить, и сопоставлению портов. Dockerfile — это входные данные для команды docker build, которая создает образ.
Создайте пустой каталог и файл Dockerfile (без расширения файла). Добавьте следующий код в Dockerfile и сохраните изменения:
# Use an official Python runtime as a base image
FROM python:2.7-slim

# Set the working directory to /app
WORKDIR /app

# Copy the current directory contents into the container at /app
ADD . /app

# Install any needed packages specified in requirements.txt
RUN pip install -r requirements.txt

# Make port 80 available outside this container
EXPOSE 80

# Define environment variable
ENV NAME World

# Run app.py when the container launches
CMD ["python", "app.py"]
Дополнительные сведения см. в справочнике по Dockerfile.
Создание базового веб-приложения
Создайте веб-приложение Flask, ожидающее передачи данных в порт 80, возвращающее строку Hello, World!. В том же каталоге создайте файл requirements.txt. Добавьте следующее и сохраните изменения:
Flask
Кроме того, создайте файл app.py и добавьте следующий фрагмент кода:
from flask import Flask

app = Flask(__name__)


@app.route("/")
def hello():

    return 'Hello World!'


if __name__ == "__main__":
    app.run(host='0.0.0.0', port=80)
Вхов в Docker и создание образа
Теперь создадим образ, который запускает нужное веб-приложение. При вытягивании общедоступных образов из Docker (например, python:2.7-slim в нашем Dockerfile) рекомендуется выполнять аутентификацию в учетной записи Docker Hub вместо выполнения анонимного запроса на вытягивание.
Примечание.
При частом выполнении анонимных запросов на вытягивание могут возникать ошибки Docker, аналогичные ERROR: toomanyrequests: Too Many Requests. или You have reached your pull rate limit. Чтобы предотвратить возникновение этих ошибок, выполняйте аутентификацию в Docker Hub. Дополнительные сведения см. в статье Управление общедоступным содержимым с помощью реестра контейнеров Azure.
Откройте окно PowerShell и перейдите в каталог, содержащий Dockerfile. Затем выполните следующие команды:
docker login
docker build -t helloworldapp .
Эта команда создает образ согласно инструкциям в Dockerfile, и присваивает образу имя helloworldapp (-t — добавление тега). Чтобы создать образ контейнера, необходимо скачать из Docker Hub базовый образ, к которому добавляется приложение.
После выполнения команды сборки выполните команду docker images, чтобы получить информацию о новом образе:
$ docker images

REPOSITORY                    TAG                 IMAGE ID            CREATED             SIZE
helloworldapp                 latest              86838648aab6        2 minutes ago       194 MB
Локальный запуск приложения
Убедитесь, что контейнерное приложение выполняется локально перед принудительной отправкой реестр контейнеров.
Запустите приложение, сопоставив порт 4000 компьютера с предоставленным портом 80 контейнера:
docker run -d -p 4000:80 --name my-web-site helloworldapp
Параметр name присваивает имя запущенному контейнеру (вместо идентификатора контейнера).
Подключитесь к запущенному контейнеру. Откройте в веб-браузере IP-адрес, возвращаемый через порт 4000, например http://localhost:4000". В браузере должен отобразиться заголовок "Hello World!"

Чтобы остановить контейнер, выполните следующую команду:
docker stop my-web-site
Удаление контейнера с компьютера для разработки:
docker rm my-web-site
Отправка образа в реестр контейнеров
Убедившись, что приложение запускается в Docker, отправьте образ в реестр в реестре контейнеров Azure.
Выполните команду docker login, чтобы войти в реестр контейнеров с помощью учетных данных реестра.
В следующем примере передается идентификатор и пароль субъекта-службы Microsoft Entra. Например, назначение субъекта-службы для реестра позволяет автоматизировать некоторые сценарии. Или вы можете входить, используя имя и пароль реестра.
docker login myregistry.azurecr.io -u xxxxxxxx-xxxx-xxxx-xxxx-xxxxxxxxxxxx -p myPassword
Следующая команда создает тег (псевдоним) образа с полным путем к вашему реестру. Чтобы избежать беспорядка в корне реестра, эта команда помещает образ в пространство имен samples.
docker tag helloworldapp myregistry.azurecr.io/samples/helloworldapp
Отправьте образ в реестр контейнеров:
docker push myregistry.azurecr.io/samples/helloworldapp
Упаковка образа Docker с помощью Yeoman
Пакет SDK Service Fabric для Linux включает в себя генератор Yeoman, который упрощает создание приложения и добавление образа контейнера. Воспользуемся Yeoman, чтобы создать приложение с одним контейнером Docker — SimpleContainerApp.
Чтобы создать приложение-контейнер Service Fabric, откройте окно терминала и выполните yo azuresfcontainer.
Присвойте имя приложению, например mycontainer, и службе приложения, например myservice.
В качестве имени образа предоставьте URL-адрес для образа контейнеров в реестре контейнеров (например, myregistry.azurecr.io/samples/helloworldapp).
Так как в образе определена точка входа рабочей нагрузки, вам не нужно явно указывать входные команды, выполняемые внутри контейнера, которые обеспечат выполнение контейнера после запуска.
Укажите число экземпляров — 1.
Укажите сопоставление портов в соответствующем формате. Для выполнения задач в этой статье необходимо указать 80:4000 для сопоставления портов. После этого все входящие запросы, поступающие в порт 4000 на хост-компьютере, будут перенаправляться в порт 80 в контейнере.

Настройка аутентификации в репозитории
Сведения о настройке различных типов аутентификации для загрузки образа контейнера см. в статье Проверка подлинности репозитория контейнеров.
Настройка режима изоляции
Выпуск среды выполнения 6.3 обеспечивает поддержку изоляции виртуальных машин для контейнеров Linux, поэтому поддерживаются два режима изоляции для контейнеров: изоляция процессов и изоляция Hyper-V. В режиме изоляции Hyper-V все контейнеры и узлы контейнера используют отдельные ядра. Режим изоляции Hyper-V реализуется с помощью Clear Containers. Режим изоляции кластеров Linux указывается в элементе ServicePackageContainerPolicy в файле манифеста приложения. Вы можете указать следующие режимы изоляции: process, hyperv и default. По умолчанию используется режим изоляции процессов. В указанном ниже фрагменте кода показано, как режим изоляции указывается в файле манифеста приложения.
<ServiceManifestImport>
    <ServiceManifestRef ServiceManifestName="MyServicePkg" ServiceManifestVersion="1.0.0"/>
      <Policies>
        <ServicePackageContainerPolicy Hostname="votefront" Isolation="hyperv">
          <PortBinding ContainerPort="80" EndpointRef="myServiceTypeEndpoint"/>
        </ServicePackageContainerPolicy>
    </Policies>
  </ServiceManifestImport>
Настройка управления ресурсами
Управление ресурсами позволяет ограничить ресурсы, которые контейнер может использовать на узле. Элемент ResourceGovernancePolicy, определяемый в манифесте приложения, позволяет объявить ограничения для ресурсов, доступных из пакета кода службы. Ограничения можно задать для следующих ресурсов: Memory, MemorySwap, CpuShares (относительный вес ЦП), MemoryReservationInMB, BlkioWeight (относительный вес BlockIO). В этом примере пакет службы Guest1Pkg получает одно ядро на узлах кластера, где он размещается. Ограничения по памяти абсолютны, так что пакет кода получает только 1024 МБ (и имеет соответствующие мягкие гарантии резервирования). Пакеты кода (контейнеры или процессы) не могут выделить больше памяти, чем задано ограничением, а при попытке сделать это возникнет проблема нехватки памяти. Чтобы принудительное ограничение ресурсов работало, для всех пакетов кода в пакете службы должны быть указаны ограничения по памяти.
<ServiceManifestImport>
  <ServiceManifestRef ServiceManifestName="MyServicePKg" ServiceManifestVersion="1.0.0" />
  <Policies>
    <ServicePackageResourceGovernancePolicy CpuCores="1"/>
    <ResourceGovernancePolicy CodePackageRef="Code" MemoryInMB="1024"  />
  </Policies>
</ServiceManifestImport>
Настройка инструкции HEALTHCHECK в Docker
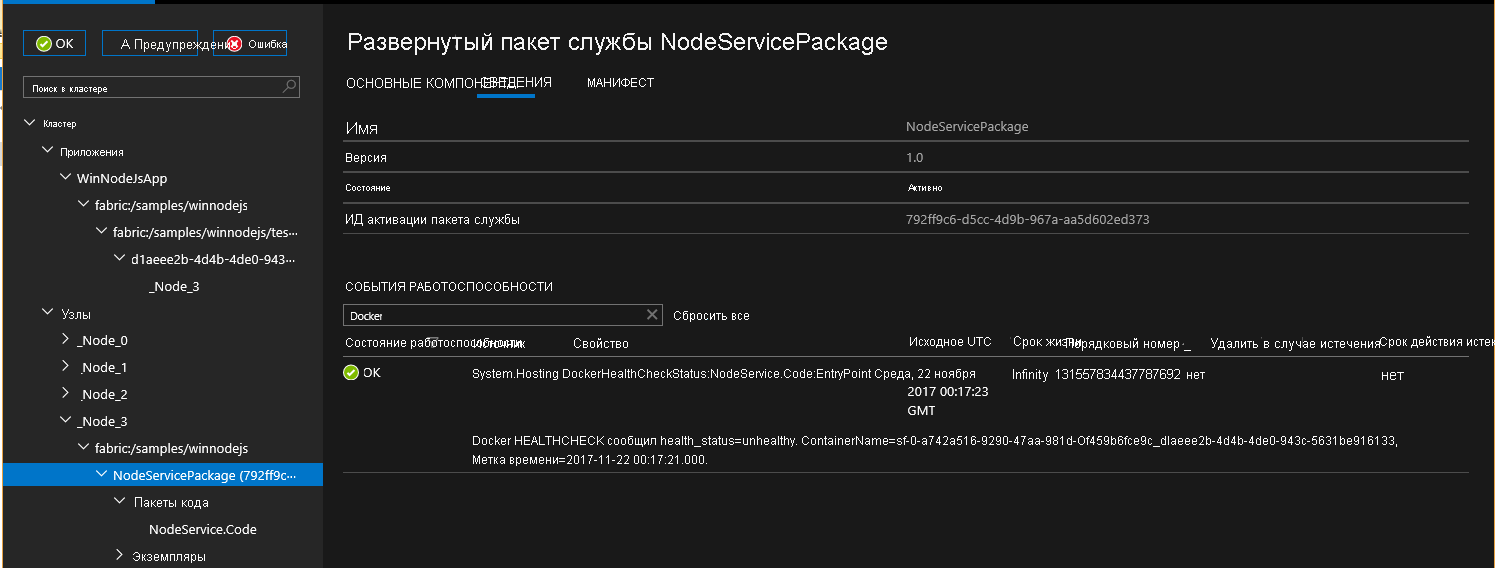
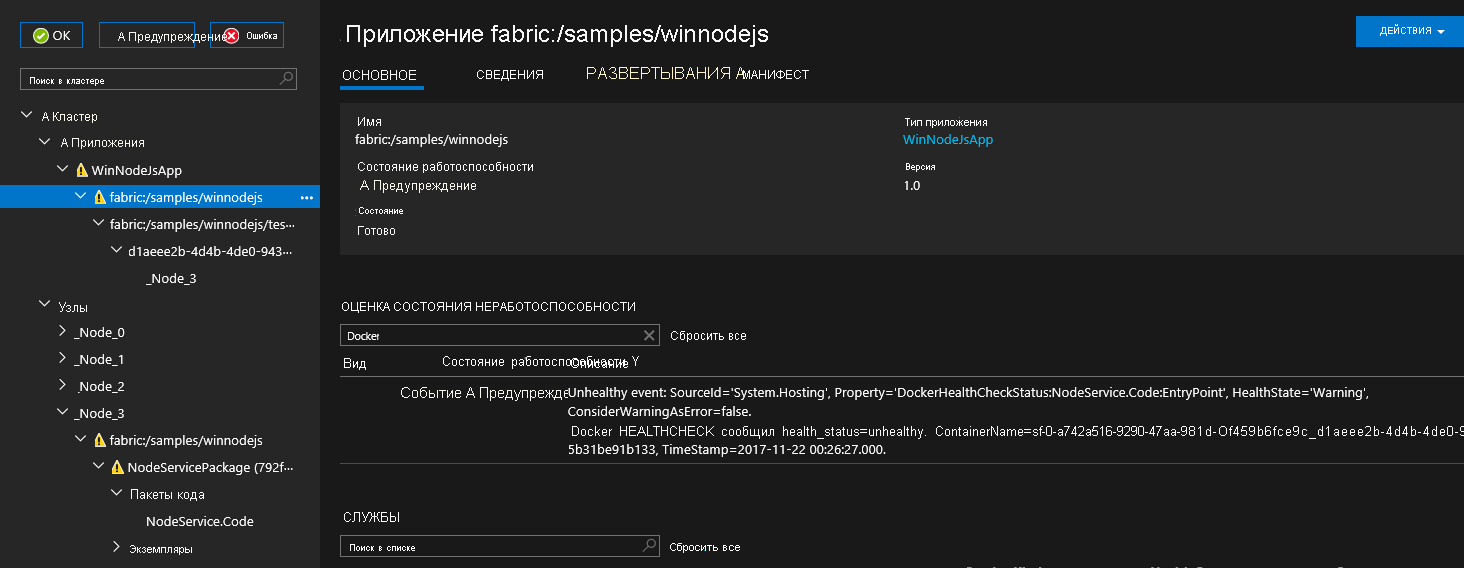
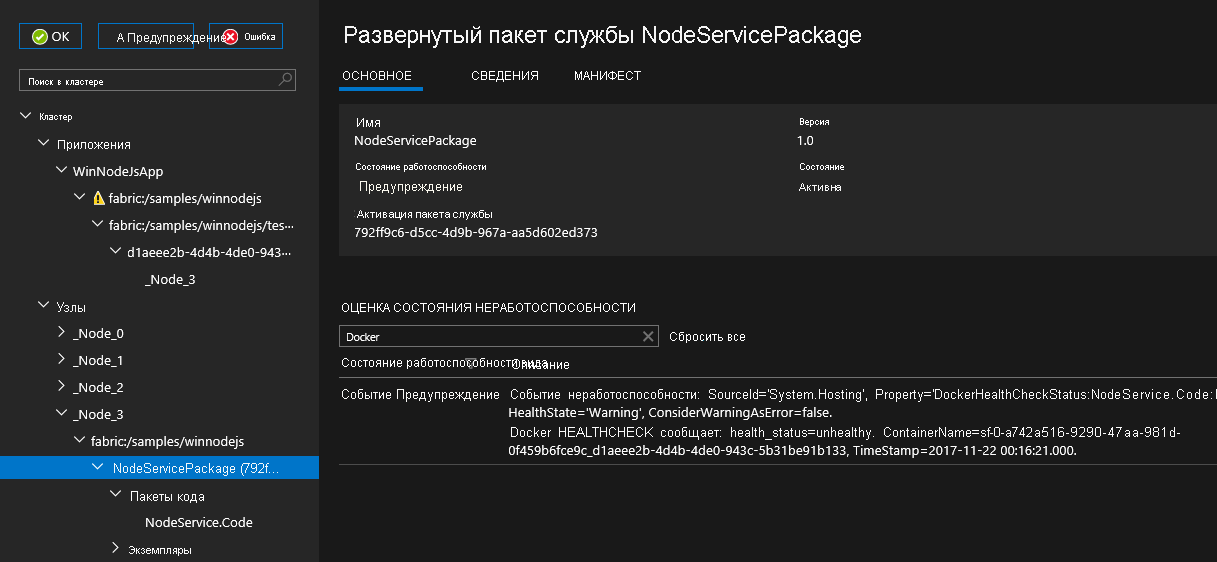
Начиная с версии 6.1 Service Fabric автоматически интегрирует события Docker HEALTHCHECK в отчеты о работоспособности системы. Это означает, что если в вашем контейнере включена инструкция HEALTHCHECK, то Service Fabric будет отправлять отчет о работоспособности при каждом изменении состояния контейнера согласно сведениям Docker. В Service Fabric Explorer будет отображаться состояние работоспособности ОК, если значение health_status равно healthy. Если же значение health_status равно unhealthy, отобразится предупреждение.
Начиная с последнего выпуска версии 6.4, вы можете указать, что оценки HEALTHCHECK в Docker должны выводиться как ошибки. При включении этого параметра будет отображаться состояние работоспособности OK, если значение health_status равно healthy. Если же значение health_status равно unhealthy, отобразится ОШИБКА.
В файле Dockerfile, который используется при создании образа контейнера, должна содержаться инструкция HEALTHCHECK, указывающая на фактическую проверку для отслеживания работоспособности контейнера.
Поведение инструкции HEALTHCHECK можно настроить для каждого контейнера, указав параметры HealthConfig в разделе ContainerHostPolicies в манифесте приложения.
<ServiceManifestImport>
    <ServiceManifestRef ServiceManifestName="ContainerServicePkg" ServiceManifestVersion="2.0.0" />
    <Policies>
      <ContainerHostPolicies CodePackageRef="Code">
        <HealthConfig IncludeDockerHealthStatusInSystemHealthReport="true"
		      RestartContainerOnUnhealthyDockerHealthStatus="false"
		      TreatContainerUnhealthyStatusAsError="false" />
      </ContainerHostPolicies>
    </Policies>
</ServiceManifestImport>
По умолчанию для IncludeDockerHealthStatusInSystemHealthReport задано значение true, для RestartContainerOnUnhealthyDockerHealthStatus задано значение false, а для TreatContainerUnhealthyStatusAsError — false.
Если для RestartContainerOnUnhealthyDockerHealthStatus задано значение true, контейнер, для которого несколько раз отображалось неработоспособное состояние, перезапускается (возможно, на других узлах).
Если для TreatContainerUnhealthyStatusAsError задано значение true, то ОШИБКА в отчетах о работоспособности отобразится, если значение health_status контейнера равно unhealthy.
Если вы хотите отключить интеграцию с HEALTHCHECK во всем кластере Service Fabric, задайте для EnableDockerHealthCheckIntegration значение false.
Развертывание приложения
Созданное приложение можно развернуть в локальном кластере с помощью интерфейса командной строки Service Fabric.
Подключитесь к удаленному кластеру Service Fabric.
sfctl cluster select --endpoint http://localhost:19080
С помощью скрипта установки, который включен в шаблоны https://github.com/Azure-Samples/service-fabric-containers/, скопируйте пакет приложения в хранилище образов кластера, зарегистрируйте тип приложения и создайте экземпляр приложения.
./install.sh
Откройте в браузере Service Fabric Explorer и перейдите по адресу http://localhost:19080/Explorer (если используется Vagrant в Mac OS X, замените localhost частным IP-адресом виртуальной машины). Разверните узел приложения. Вы увидите одну запись для типа приложения и еще одну — для первого экземпляра этого типа.
Подключитесь к запущенному контейнеру. Откройте в веб-браузере IP-адрес, возвращаемый через порт 4000, например http://localhost:4000". В браузере должен отобразиться заголовок "Hello World!"
Очистка
Для удаления экземпляра приложения из локального кластера разработки и отмены регистрации типа приложения используйте сценарий удаления, предоставленный в шаблоне.
./uninstall.sh
После передачи образа в реестр контейнеров можно удалить локальный образ с компьютера для разработки:
docker rmi helloworldapp
docker rmi myregistry.azurecr.io/samples/helloworldapp
Полные примеры манифестов службы и приложения Service Fabric
Ниже приведены полные коды манифестов службы и приложения, используемых в этой статье.
ServiceManifest.xml
<?xml version="1.0" encoding="utf-8"?>
<ServiceManifest Name="myservicePkg"
                 Version="1.0.0"
                 xmlns="http://schemas.microsoft.com/2011/01/fabric"
                 xmlns:xsd="https://www.w3.org/2001/XMLSchema"
                 xmlns:xsi="https://www.w3.org/2001/XMLSchema-instance">
  <ServiceTypes>
    <!-- This is the name of your ServiceType.
         The UseImplicitHost attribute indicates this is a guest service. -->
    <StatelessServiceType ServiceTypeName="myserviceType" UseImplicitHost="true" />
  </ServiceTypes>

  <!-- Code package is your service executable. -->
  <CodePackage Name="Code" Version="1.0.0">
    <EntryPoint>
      <!-- Follow this link for more information about deploying containers
      to Service Fabric: https://aka.ms/sfguestcontainers -->
      <ContainerHost>
        <ImageName>myregistry.azurecr.io/samples/helloworldapp</ImageName>
        <!-- Pass comma delimited commands to your container: dotnet, myproc.dll, 5" -->
        <!--Commands> dotnet, myproc.dll, 5 </Commands-->
        <Commands></Commands>
      </ContainerHost>
    </EntryPoint>
    <!-- Pass environment variables to your container: -->

    <EnvironmentVariables>
      <!--
      <EnvironmentVariable Name="VariableName" Value="VariableValue"/>
      -->
    </EnvironmentVariables>

  </CodePackage>

  <Resources>
    <Endpoints>
      <!-- This endpoint is used by the communication listener to obtain the port on which to
           listen. Please note that if your service is partitioned, this port is shared with
           replicas of different partitions that are placed in your code. -->
      <Endpoint Name="myServiceTypeEndpoint" UriScheme="http" Port="4000" Protocol="http"/>
    </Endpoints>
  </Resources>
</ServiceManifest>
ApplicationManifest.xml
<?xml version="1.0" encoding="utf-8"?>
<ApplicationManifest ApplicationTypeName="mycontainerType"
                     ApplicationTypeVersion="1.0.0"
                     xmlns="http://schemas.microsoft.com/2011/01/fabric"
                     xmlns:xsd="https://www.w3.org/2001/XMLSchema"
                     xmlns:xsi="https://www.w3.org/2001/XMLSchema-instance">
  <!-- Import the ServiceManifest from the ServicePackage. The ServiceManifestName and ServiceManifestVersion
       should match the Name and Version attributes of the ServiceManifest element defined in the
       ServiceManifest.xml file. -->
  <ServiceManifestImport>
    <ServiceManifestRef ServiceManifestName="myservicePkg" ServiceManifestVersion="1.0.0" />
    <ConfigOverrides />
    <Policies>
      <ContainerHostPolicies CodePackageRef="Code">
        <RepositoryCredentials AccountName="myregistry" Password="=P==/==/=8=/=+u4lyOB=+=nWzEeRfF=" PasswordEncrypted="false"/>
        <PortBinding ContainerPort="80" EndpointRef="myServiceTypeEndpoint"/>
      </ContainerHostPolicies>
    </Policies>
  </ServiceManifestImport>
  <DefaultServices>
    <!-- The section below creates instances of service types, when an instance of this
         application type is created. You can also create one or more instances of service type using the
         ServiceFabric PowerShell module.

         The attribute ServiceTypeName below must match the name defined in the imported ServiceManifest.xml file. -->
    <Service Name="myservice">
      <!-- On a local development cluster, set InstanceCount to 1. On a multi-node production
      cluster, set InstanceCount to -1 for the container service to run on every node in
      the cluster.
      -->
      <StatelessService ServiceTypeName="myserviceType" InstanceCount="1">
        <SingletonPartition />
      </StatelessService>
    </Service>
  </DefaultServices>
</ApplicationManifest>
Добавление дополнительных служб в существующее приложение
Чтобы добавить службу контейнеров в приложение, созданное с использованием yeoman, выполните следующие действия:
- Перейдите в корневой каталог существующего приложения. Например,
cd ~/YeomanSamples/MyApplication, еслиMyApplicationявляется приложением, созданным с помощью Yeoman. - Выполнить
yo azuresfcontainer:AddService
Настройка интервала времени перед принудительным завершением контейнера
Вы можете настроить интервал времени для среды выполнения перед удалением контейнера после начала удаления службы (или перехода на другой узел). При настройке интервала времени в контейнер отправляется команда docker stop <time in seconds>. Дополнительные сведения см. в статье docker stop (Остановка docker). Интервал времени ожидания указывается в разделе Hosting. В следующем фрагменте манифеста кластера показано, как задать интервал ожидания:
{
        "name": "Hosting",
        "parameters": [
          {
                "name": "ContainerDeactivationTimeout",
                "value" : "10"
          },
	      ...
        ]
}
Интервал времени по умолчанию установлен на 10 секунд. Так как эта конфигурация является динамической, файл конфигурации обновляет только кластер для которого обновляется время ожидания.
Настройка среды выполнения для удаления неиспользуемых образов контейнера
Можно настроить кластер Service Fabric для удаления неиспользуемых образов контейнера из узла. Эта конфигурация позволяет месту на диске перезаписываться, если на узле находится слишком много образов контейнера. Чтобы включить эту функцию, обновите раздел Hosting в манифесте кластера, как показано в следующем фрагменте кода:
{
        "name": "Hosting",
        "parameters": [
          {
                "name": "PruneContainerImages",
                "value": "True"
          },
          {
                "name": "ContainerImagesToSkip",
                "value": "mcr.microsoft.com/windows/servercore|mcr.microsoft.com/windows/nanoserver|mcr.microsoft.com/dotnet/framework/aspnet|..."
          }
          ...
          }
        ]
}
Образы, которые не должны удаляться, можно указать в параметре ContainerImagesToSkip.
Настройка времени загрузки образа контейнера
Среда выполнения Service Fabric выделяет 20 минут для скачивания и извлечения образов контейнеров. Этого достаточно для большинства образов контейнеров. В случае с большими образами или при медленном сетевом подключении, возможно, потребуется увеличить время ожидания перед прерыванием загрузки и извлечения образа. Это значение можно задать с помощью атрибута ContainerImageDownloadTimeout в разделе Hosting манифеста кластера, как показано в следующем фрагменте кода:
{
        "name": "Hosting",
        "parameters": [
          {
              "name": "ContainerImageDownloadTimeout",
              "value": "1200"
          }
        ]
}
Настройка политики хранения контейнера
Чтобы упростить процесс диагностики сбоев при запуске контейнеров, Service Fabric (версии 6.1 и выше) поддерживает хранение контейнеров, работа которых завершилась или при запуске которых произошел сбой. Эту политику можно настроить в файле ApplicationManifest.xml, как показано в следующем фрагменте кода:
<ContainerHostPolicies CodePackageRef="NodeService.Code" Isolation="process" ContainersRetentionCount="2" RunInteractive="true">
В атрибуте ContainersRetentionCount указывается число контейнеров, которые следует сохранить после сбоя. Если указано отрицательное значение, будут сохраняться все контейнеры после сбоя. Если значение ContainersRetentionCount не указано, контейнеры не будут сохраняться. Атрибут ContainersRetentionCount также поддерживает параметры приложения, поэтому пользователи могут указывать разные значения для тестовых и рабочих кластеров. Чтобы предотвратить перемещение службы контейнеров на другие узлы, при использовании этих функций используйте ограничения на размещение, указав для службы контейнеров конкретный узел. Удаление всех контейнеров, сохраненных с помощью этой функции, выполняется вручную.
Запуск управляющей программы Docker с пользовательскими аргументами
Используя среду выполнения Service Fabric версии 6.2 и выше, можно запустить управляющую программу Docker с пользовательскими аргументами. Если пользовательские аргументы указаны, Service Fabric не передает никакие другие аргументы модулю Docker, кроме аргумента --pidfile. Таким образом, не нужно передавать --pidfile в качестве аргумента. Кроме того, аргумент должен поддерживать прослушивание модулем Docker стандартного конвейера имен Windows (или сокета домена Unix в Linux), обеспечивая обмен данными между Service Fabric и управляющей программой. Пользовательские аргументы определяются в манифесте кластера в блоке Размещение раздела ContainerServiceArguments, как показано в следующем фрагменте:
{
        "name": "Hosting",
        "parameters": [
          {
            "name": "ContainerServiceArguments",
            "value": "-H localhost:1234 -H unix:///var/run/docker.sock"
          }
        ]
}
Следующие шаги
- Дополнительные сведения о запуске контейнеров в Service Fabric.
- Ознакомьтесь с руководством Развертывание приложения-контейнера .NET в Azure Service Fabric.
- Дополнительные сведения о жизненном цикле приложения Service Fabric.
- Извлечение примеров кода контейнера Service Fabric на GitHub.