Примечание.
Для доступа к этой странице требуется авторизация. Вы можете попробовать войти или изменить каталоги.
Для доступа к этой странице требуется авторизация. Вы можете попробовать изменить каталоги.
Важно!
Некоторые сведения относятся к предварительно выпущенному продукту, который может быть существенно изменен перед выпуском. Корпорация Майкрософт не дает никаких гарантий, явных или подразумеваемых, относительно предоставленных здесь сведений.
Коллекция средств создания агентов на сервере MCP Microsoft Sentinel позволяет разработчикам использовать естественный язык для создания агентов Security Copilot в интегрированной среде разработки, совместимой с MCP.
В этом руководстве вы узнаете, как:
Настройка и проверка подлинности на сервере MCP
Включение режима агента GitHub Copilot
Управление контекстом для средств MCP
Предварительные условия
Microsoft Sentinel поддержка средств MCP для создания агента Security Copilot доступна для следующих редакторов кода на основе ИИ:
Настройка и проверка подлинности на сервере MCP
Чтобы установить сервер MCP, сделайте следующее:
Запустите Visual Studio Code (VS Code).
Добавьте подключение сервера MCP в VS Code. Нажмите,
Ctrl + Shift + Pчтобы открыть палитру команд, а затем введитеMCP: Add server.
Выберите .
HTTP (HTTP or Server-Sent Events)
Введите следующий URL-адрес сервера и нажмите клавишу ВВОД. Этот URL-адрес учитывает регистр.
https://sentinel.microsoft.com/mcp/security-copilot-agent-creationВведите понятный идентификатор сервера.

Появится запрос доверия к серверу.
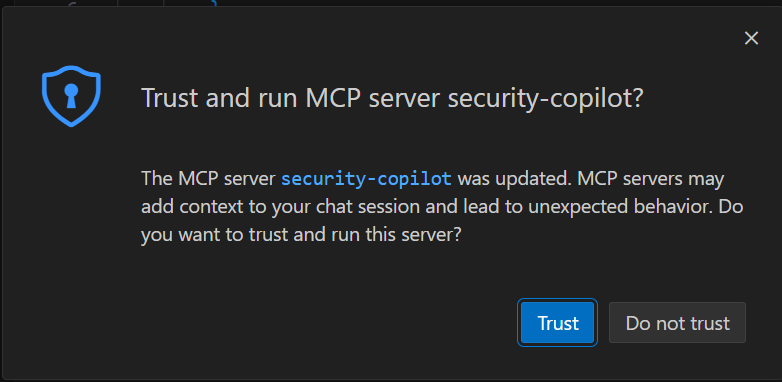
Выберите Разрешить при появлении запроса на проверку подлинности определения сервера.

Выберите, следует ли сделать сервер доступным во всех рабочих областях VS Code или только в текущей.

После проверки подлинности сервер запускает выполнение. Появится файл с именем
mcp.jsonи проверяется наличие конфигураций сервера MCP в рабочей области VS Code.


Включение режима агента GitHub Copilot
Чтобы включить режим агента GitHub Copilot в VS Code, выполните следующие действия:
Откройте меню >вид чата > VS Code Чат или нажмите кнопку
CRTL + ALT + I.Установите для чата режим агента.
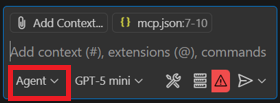
Щелкните значок инструментов на панели запросов.

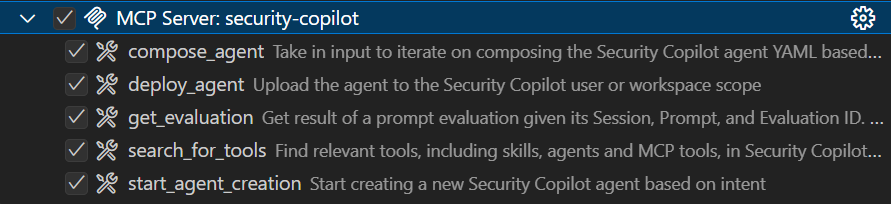
Список средств, используемых GitHub Copilot. Разверните строку для сервера MCP, который вы только что добавили, чтобы увидеть пять средств для создания агента:


Управление контекстом для средств MCP
Если вы предоставляете правильный контекст, вы можете получить помощь от искусственного интеллекта в VS Code для предоставления релевантных и точных ответов. Существует два варианта управления контекстом и обеспечения того, чтобы ИИ помощник использует средства MCP по назначению и с большей согласованности.
Для управления контекстом можно выбрать один из следующих вариантов:
Настройка пользовательских инструкций
Пользовательские инструкции позволяют определить общие рекомендации или правила в файле Markdown, чтобы описать, как следует выполнять задачи. Вместо того чтобы вручную включать контекст в каждый запрос чата, укажите пользовательские инструкции в файле Markdown, чтобы обеспечить согласованность ответов ИИ, которые соответствуют требованиям проекта.
Настраиваемые инструкции можно настроить для автоматического применения ко всем запросам чата или только к определенным файлам.
Использование файла пользовательских инструкций
Определите пользовательские инструкции в одном .github/copilot-instructions.md файле Markdown в корне рабочей области. VS Code автоматически применяет инструкции из этого файла ко всем запросам чата в этой рабочей области.
Чтобы использовать .github/copilot-instructions.md файл, сделайте следующее:
github.copilot.chat.codeGeneration.useInstructionFilesВключите параметр .Создайте
.github/copilot-instructions.mdфайл в корне рабочей области. При необходимости сначала создайте.githubкаталог.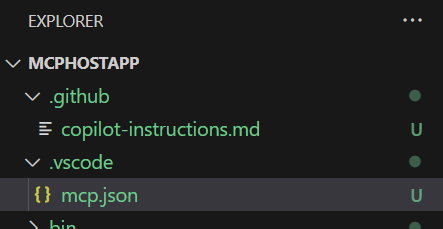
Опишите свои инструкции с помощью естественного языка и в формате Markdown.
Чтобы приступить к работе, скопируйте содержимое контекстного файла
scp-mcp-context.mdвcopilot-instructions.mdфайл. См. контекстный файл для инструментов MCP.

Добавление контекстного файла для инструментов MCP
Чтобы гарантировать, что помощник ИИ может использовать средства MCP по назначению и с большей согласованности, добавьте контекстный scp-mcp-context.md файл в интегрированную среду разработки. Убедитесь, что помощник ИИ ссылается на этот файл при запросе.
Добавьте файл контекста
scp-mcp-context.mdв VS Code или вставьте его непосредственно в рабочую область. Содержимое файла см. в разделе Контекстный файл для инструментов MCP. Рабочая область выглядит примерно так: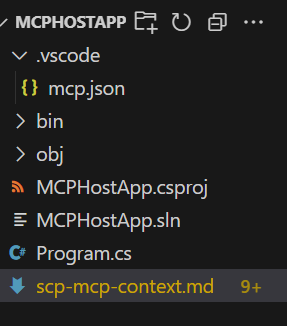
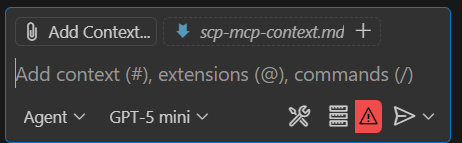
Выберите Добавить контекст в строке запроса и выберите файл контекста.


Пример контекстного файла для инструментов MCP
В следующем примере контекстного файла приведены инструкции, scp-mcp-context.mdкоторые помощник ИИ использует со средствами MCP. Скопируйте его для использования с реализацией краткого запуска MCP.
# MCP Tools Available for Agent Building
    1. **start_agent_creation**
        - **Purpose**: Creates a new Security Copilot session and starts the agent building process.
        - The userQuery input will be the user's problem statement (what they want the agent to do).
        - The output of the tool should be returned IN FULL WITHOUT EDITS.
        - The tool will return an initial agent YAML definition.
    2. **compose_agent**
        - **Purpose**: Continues the session and agent building process created by *start_agent_creation*. Outputs agent definition YAML or can ask clarifying questions to the user.
        - The sessionId input is obtained from the output of *start_agent_creation*
        - The existingDefinition input is optional. If an agent definition YAML has not been created yet, this should be blank (can be an empty string).
    3. **search_for_tools**
        - **Purpose: Discover relevant skills (tools) based on the user's query
        - This will create a new Security Copilot session, but it should not be included in the start_agent/continue_agent flow.
          - A user might want to know about Security Copilot skills they have access to without wanting to create an agent
          - The session ID created should NOT be reused in any capacity
    4. **get_evaluation**
        - **Purpose: Get the results of the evaluations triggered by each of the above tools. You MUST repeatedly activate this tool until the property of the result "state" is equal to "Completed" in order to get the fully processed result. The "state" may equal "Created" or "Running" but again, you must repeat the process until the state is "Completed". There is NO MAXIMUM amount of times you might call this tool in a row.
    5. **deploy_agent**
        - **Purpose: Deploy an agent to Security Copilot.
        - The user must provide the scope as either "User" or "Workspace".
        - Unless they already have an AGENT definition yaml provided, *start_agent_creation* must be run before to generate an agentDefinition
        - "agentSkillsetName" should be COPIED EXACTLY from the value of "Descriptor: Name:" in the agent definition YAML, including any special characters like ".". This will NOT work if the two do not match EXACTLY.
        - DO NOT use *get_evaluation* after this tool.

# Agent Building Execution Flow

## Step 1: Problem Statement Check
- If the user did **not** provide a problem statement, prompt them to do so.
- If the user **did** provide a problem statement, proceed to Step 2.

## Step 2: Start Agent Creation
- Use the `start_agent_creation` tool with `userQuery = <problem statement>`.
  - **DO NOT** include any quotation marks in the userQuery
- Then, use `get_evaluation` to retrieve the initial response.
  - **DO** repeatedly call `get_evaluation` until the `"state"` property of the result equals `"Completed"`.
  - **DO NOT** require the user to ask again to get the results.
  - **DO NOT** edit or reword the response content.

## Step 2.5: Output Handling
- **DO NOT** reformat, summarize, or describe the YAML output.
- **DO** return the YAML output **verbatim**.
- **DO** return the output in **AGENT FORMAT**.

## Step 3: Agent Refinement
- Ask the user if they would like to edit the agent or if they would like to deploy the agent. If they want to deploy, skip to **Step 4**.
- If the user wants to edit the agent definition:
  - If they respond with edits directly, use `compose_agent` with:
    - `sessionId` from `start_agent_creation`
    - `existingDefinition = <previous AGENT YAML>`
      - `\n` MUST be rewritten as `\\n`
    - `userQuery = <user’s new input>`
      - **DO NOT** include any quotation marks in the userQuery
  - If they attach a manually edited YAML file to the context, use the file content as `existingDefinition`.
    - **DO NOT** edit the file directly, you MUST use `compose_agent`
    - `\n` MUST be rewritten as `\\n`

## Step 4: Agent Deployment
- If the user asks to deploy the agent, use `deploy_agent`.
  - You **must confirm the scope**: either `"User"` or `"Workspace"`.
    - If not provided, ask the user to specify.
  - `agentSkillsetName` must **exactly match** the value of `Descriptor: Name:` in the YAML.
    - This includes any special characters.
  - Leave existing instances of `\n` inside `agentDefinition` as-is
- **DO NOT** run `get_evaluation` after deployment.
- **DO** include all of these things in the tool response to the user:
    1. Confirm successful deployment to the user
    2. Direct the user to the Security Copilot portal to test and view the agent with this link: https://securitycopilot.microsoft.com/agents
    3. Direct the user to read more on how to test their agent in Security Copilot with this link: https://learn.microsoft.com/en-us/copilot/security/developer/mcp-quickstart#test-agent

## Step 5: Further Agent Refinement and Redeployment
- After deployment, the user may still want to **edit the agent definition**.
  - If so, you must support calling `compose_agent` again.
  - Follow the same process as described in **Step 3**:
    - If the user asks for edits directly, use the previous AGENT YAML as `existingDefinition`.
    - If the user uploads a manually edited YAML file, use the file content as `existingDefinition`.
- The user may also want to **redeploy the agent** after making refinements.
  - You must run `deploy_agent` again using the updated YAML.
  - Ensure the `agentSkillsetName` matches **exactly** the value of `Descriptor: Name:` in the latest YAML, including any special characters.
  - Leave existing instances of `\n` inside `agentDefinition` as-is
  - Confirm the deployment scope: either `"User"` or `"Workspace"`.
    - If the scope is not provided, prompt the user to specify.
  - Do **not** run `get_evaluation` after deployment.
  - Confirm successful redeployment to the user.
- Alternatively, the user may want to **create a new agent**.
  - Restart the procedure from **Step 1**.
  - When using `start_agent_creation`, a new session ID will be created.
  - **DO** keep track of which session IDs correspond to which problem statements or agents so the user can return to previous sessions if needed.

## Additional Rules
- Only call `compose_agent` **after** the user has provided a response. Do not proceed automatically.
- Agent creation must remain **user-driven**. Do not initiate steps without explicit user input.
- Wait for the user to respond before continuing to the next step.
- Tool responses must be returned **directly to the user** in full.
  - Do **not** alter, reformat, summarize, or reword the content of any tool response.
  - This applies specifically to the `"result": "content"` field in the JSON returned by tool executions.
  - LEAVE OUT any "Grounding Notes"

## Error Handling
- If any tool call fails:
  - Inform the user of the failure.
  - If it is a client error, make an attempt to retry the tools, rewriting inputs based on the error message.
    - Example: If the error indicates invalid JSON characters, escape or remove those characters from the input and retry. Always attempt escaping first.
Дальнейшие действия
- Узнайте, как использовать средства MCP для создания агентов Security Copilot в VS Code. Дополнительные сведения см. в кратком руководстве MCP по созданию агентов Security Copilot.