Примечание.
Для доступа к этой странице требуется авторизация. Вы можете попробовать войти или изменить каталоги.
Для доступа к этой странице требуется авторизация. Вы можете попробовать изменить каталоги.
One of the most common scenarios for IoT devices is detection of environmental conditions. A variety of sensors are available to monitor temperature, humidity, barometric pressure, and more.
In this topic, you will use .NET to read environmental conditions from a sensor.
Предпосылки
- Компьютер на основе ARM (ARMv7 или более поздней версии) с одной платой (SBC)
- BME280 humidity/barometric pressure/temperature sensor breakout
- Jumper wires
- Хлебная доска (необязательно)
- Raspberry Pi GPIO breakout board (optional)
- Пакет SDK для .NET 8 или более поздней версии
Примечание.
В этом руководстве предполагается, что целевое устройство — Raspberry Pi. Однако это руководство можно использовать для любого SBC на основе Linux, который поддерживает .NET, например Orange Pi, ODROID и многое другое.
Это важно
There are many manufacturers of BME280 breakouts. Most designs are similar, and the manufacturer shouldn't make any difference to the functionality. This tutorial attempts to account for variations. Ensure your BME280 breakout includes an Inter-Integrated Circuit (I2C) interface.
Components like BME280 breakouts are often sold with unsoldered pin headers. If you're uncomfortable with soldering, look for a BME280 breakout board with a pre-soldered header or a different connector. If you want, consider learning how to solder! Here's a good beginner's guide to soldering.
Prepare the SBC
Убедитесь, что SBC настроен для поддержки следующих служб:
- SSH
- I2C
Для многих устройств дополнительная конфигурация не требуется. Для Raspberry Pi используйте raspi-config команду. Подробнее о raspi-config смотрите в документации Raspberry Pi.
Подготовка оборудования
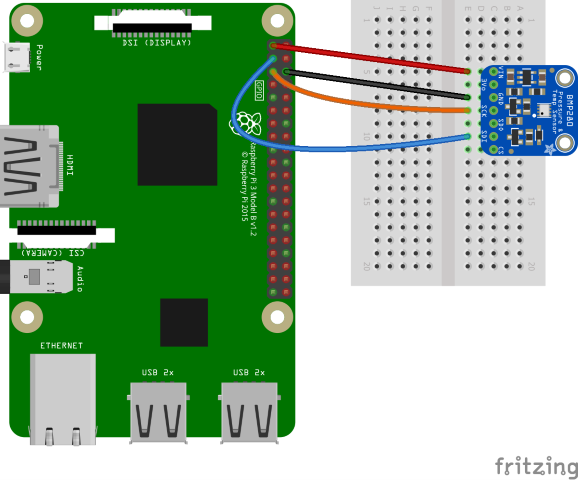
Используйте аппаратные компоненты для построения канала, как показано на следующей схеме:
The following are the connections from the Raspberry Pi to the BME280 breakout. Note that pin labels differ on various BME280 breakouts.
| Raspberry Pi | BME280 Breakout | Цвет |
|---|---|---|
| 3.3V | VIN/3V3 | red |
| Ground | GND | черный |
| SDA (GPIO 2) | SDI/SDA | blue |
| SCL (GPIO 3) | SCK/SCL | orange |
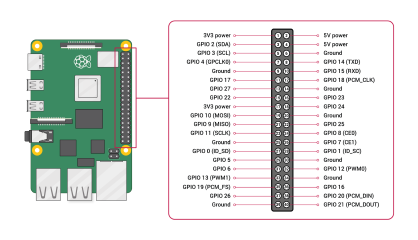
Refer to the following pinout diagram as needed:

Изображение любезно Raspberry Pi Foundation.
Подсказка
A GPIO breakout board in conjunction with a breadboard is recommended to streamline connections to the GPIO header.
Создание приложения
Выполните следующие действия в предпочтительной среде разработки:
Создайте консольное приложение .NET с помощью .NET CLI или Visual Studio. Name it SensorTutorial.
dotnet new console -o SensorTutorial
cd SensorTutorial
Добавьте в проект пакет Iot.Device.Bindings . Используйте .NET CLI из каталога проекта или Visual Studio.
dotnet add package Iot.Device.Bindings --version 3.2.0-*Замените содержимое файла Program.cs кодом, приведенным ниже.
using System;
using System.Device.I2c;
using System.Threading;
using Iot.Device.Bmxx80;
using Iot.Device.Bmxx80.PowerMode;

var i2cSettings = new I2cConnectionSettings(1, Bme280.DefaultI2cAddress);
using I2cDevice i2cDevice = I2cDevice.Create(i2cSettings);
using var bme280 = new Bme280(i2cDevice);

int measurementTime = bme280.GetMeasurementDuration();

while (true)
{
    Console.Clear();

    bme280.SetPowerMode(Bmx280PowerMode.Forced);
    Thread.Sleep(measurementTime);

    bme280.TryReadTemperature(out var tempValue);
    bme280.TryReadPressure(out var preValue);
    bme280.TryReadHumidity(out var humValue);
    bme280.TryReadAltitude(out var altValue);

    Console.WriteLine($"Temperature: {tempValue.DegreesCelsius:0.#}\u00B0C");
    Console.WriteLine($"Pressure: {preValue.Hectopascals:#.##} hPa");
    Console.WriteLine($"Relative humidity: {humValue.Percent:#.##}%");
    Console.WriteLine($"Estimated altitude: {altValue.Meters:#} m");

    Thread.Sleep(1000);
}
В предыдущем коде:
i2cSettingsis set to a new instance ofI2cConnectionSettings. The constructor sets thebusIdparameter to 1 and thedeviceAddressparameter toBme280.DefaultI2cAddress.Это важно
Some BME280 breakout manufacturers use the secondary address value. For those devices, use
Bme280.SecondaryI2cAddress.A using declaration creates an instance of
I2cDeviceby callingI2cDevice.Createand passing ini2cSettings. ThisI2cDevicerepresents the I2C bus. Объявлениеusingгарантирует, что объект удаляется, а аппаратные ресурсы освобождаются должным образом.Another
usingdeclaration creates an instance ofBme280to represent the sensor. TheI2cDeviceis passed in the constructor.The time required for the chip to take measurements with the chip's current (default) settings is retrieved by calling
GetMeasurementDuration.Цикл
whileвыполняется неограниченно. Каждая итерация:Очищает консоль.
Sets the power mode to
Bmx280PowerMode.Forced. This forces the chip to perform one measurement, store the results, and then sleep.Reads the values for temperature, pressure, humidity, and altitude.
Примечание.
Altitude is calculated by the device binding. This overload of
TryReadAltitudeuses mean sea level pressure to generate an estimate.Writes the current environmental conditions to the console.
Sleeps 1000 ms.
сборка приложения. При использовании .NET CLI выполните команду
dotnet build. Чтобы создать проект в Visual Studio, нажмите CTRL+SHIFT+B.Разверните приложение в SBC как автономное приложение. Инструкции см. в разделе "Развертывание приложений .NET в Raspberry Pi". Обязательно предоставьте исполняемому файлу разрешение на выполнение с помощью
chmod +x.Запустите приложение на Raspberry Pi, переключившись в каталог развертывания и запустив исполняемый файл.
./SensorTutorialObserve the sensor output in the console.
Terminate the program by pressing Ctrl+C.
Поздравляю! You've used I2C to read values from a temperature/humidity/barometric pressure sensor!
Получение исходного кода
Источник этого руководства доступен на сайте GitHub.

