Configure container image to execute deployments
In this article, you learn how to build custom Bicep container images to deploy your environment definitions in Azure Deployment Environments (ADE).
In this article, you learn how to build custom Terraform container images to deploy your environment definitions in Azure Deployment Environments (ADE). You learn how to configure a custom image to provision infrastructure using the Terraform Infrastructure-as-Code (IaC) framework.
In this article, you learn how to utilize Pulumi for deployments in Azure Deployment Environments (ADE). You learn how to use a sample image provided by Pulumi or how to configure a custom image to provision infrastructure using the Pulumi Infrastructure-as-Code (IaC) framework.
ADE supports an extensibility model that enables you to create custom images that you can use in your environment definitions. To use this extensibility model, create your own custom images and store them in a container registry like Azure Container Registry (ACR) or Docker Hub. You can then reference these images in your environment definitions to deploy your environments.
An environment definition comprises at least two files: a template file, like azuredeploy.json or main.bicep, and a manifest file named environment.yaml. ADE uses containers to deploy environment definitions.
The ADE team provides a selection of images to get you started, including a core image, and an Azure Resource Manager (ARM)-Bicep image. You can access these sample images in the Runner-Images folder.
An environment definition comprises at least two files: a template file, like main.tf, and a manifest file named environment.yaml. You use a container to deploy environment definition that uses Terraform.
An environment definition comprises at least two files: a Pulumi project file, Pulumi.yaml, and a manifest file named environment.yaml. It might also contain a user program written in your preferred programming language: C#, TypeScript, Python, etc. ADE uses containers to deploy environment definitions.
Prerequisites
- An Azure account with an active subscription. Create an account for free.
- Azure Deployment Environments set up in your Azure subscription.
- To set up ADE, follow the Quickstart: Configure Azure Deployment Environments.
Use container images with ADE
You can take one of the following approaches to use container images with ADE:
- Use a sample container image For simple scenarios, use the sample ARM-Bicep container image provided by ADE.
- Create a custom container image For more complex scenarios, create a custom container image that meets your specific requirements.
The main steps you'll follow when using a container image are:
- Choose the image type you want to use: a sample image or a custom image.
- If you use a custom image, you begin with a sample image and then customize it to fit your requirements.
- Build the image.
- Upload the image to a private registry or a public registry.
- Configure access to the registry.
- For a public registry, configure anonymous pull.
- For a private registry, give the DevCenter ACR permissions.
- Add your image location to the
runnerparameter in your environment definition - Deploy environments that use your custom image.
The first step in the process is to choose the type of image you want to use. Select the corresponding tab to see the process.
Use a sample container image
ADE supports ARM and Bicep without requiring any extra configuration. You can create an environment definition that deploys Azure resources for a deployment environment by adding the template files (like azuredeploy.json and environment.yaml) to your catalog. ADE then uses the sample ARM-Bicep container image to create the deployment environment.
In the environment.yaml file, the runner property specifies the location of the container image you want to use. To use the sample image published on the Microsoft Artifact Registry, use the respective identifiers runner.
The following example shows a runner that references the sample ARM-Bicep container image:
    name: WebApp
    version: 1.0.0
    summary: Azure Web App Environment
    description: Deploys a web app in Azure without a datastore
    runner: Bicep
    templatePath: azuredeploy.json
You can see the sample Bicep container image in the ADE sample repository under the Runner-Images folder for the ARM-Bicep image.
For more information about how to create environment definitions that use the ADE container images to deploy your Azure resources, see Add and configure an environment definition.
Use a sample container image provided by Pulumi
The Pulumi team provides a prebuilt image to get you started, which you can see in the Runner-Image folder. This image is publicly available at Pulumi's Docker Hub as pulumi/azure-deployment-environments, so you can use it directly from your ADE environment definitions.
Here's a sample environment.yaml file that utilizes the prebuilt image:
name: SampleDefinition
version: 1.0.0
summary: First Pulumi-Enabled Environment
description: Deploys a Storage Account with Pulumi
runner: pulumi/azure-deployment-environments:0.1.0
templatePath: Pulumi.yaml
You can find a few sample environment definitions in the Environments folder.
Build an image
You can build your image using the Docker CLI. Ensure the Docker Engine is installed on your computer. Then, navigate to the directory of your Dockerfile, and run the following command:
docker build . -t {YOUR_REGISTRY}.azurecr.io/{YOUR_REPOSITORY}:{YOUR_TAG}
For example, if you want to save your image under a repository within your registry named customImage, and upload with the tag version of 1.0.0, you would run:
docker build . -t {YOUR_REGISTRY}.azurecr.io/customImage:1.0.0
Make the custom image available to ADE
In order to use custom images, you need to store them in a container registry. You can use a public container registry or a private container registry. Azure Container Registry (ACR) is highly recommended, due to its tight integration with ADE, the image can be published without allowing public anonymous pull access. You must build your custom container image and push it to a container registry to make it available for use in ADE.
It's also possible to store the image in a different container registry such as Docker Hub, but in that case it needs to be publicly accessible.
Caution
Storing your container image in a registry with anonymous (unauthenticated) pull access makes it publicly accessible. Don't do that if your image contains any sensitive information. Instead, store it in Azure Container Registry (ACR) with anonymous pull access disabled.
To use a custom image stored in ACR, you need to ensure that ADE has appropriate permissions to access your image. When you create an ACR instance, it's secure by default and only allows authenticated users to gain access.
You can use Pulumi to create an Azure Container Registry and publish your image to it. Refer to the Provisioning/custom-image example for a self-contained Pulumi project that creates all the required resources in your Azure account.
Select the appropriate tab to learn more about each approach.
Use a private registry with secured access
By default, access to pull or push content from an Azure Container Registry is only available to authenticated users. You can further secure access to ACR by limiting access from certain networks and assigning specific roles.
To create an instance of ACR, which can be done through the Azure CLI, the Azure portal, PowerShell commands, and more, follow one of the quickstarts.
Limit network access
To secure network access to your ACR, you can limit access to your own networks, or disable public network access entirely. If you limit network access, you must enable the firewall exception Allow trusted Microsoft services to access this container registry.
To disable access from public networks:
Create an ACR instance or use an existing one.
In the Azure portal, go to the ACR that you want to configure.
On the left menu, under Settings, select Networking.
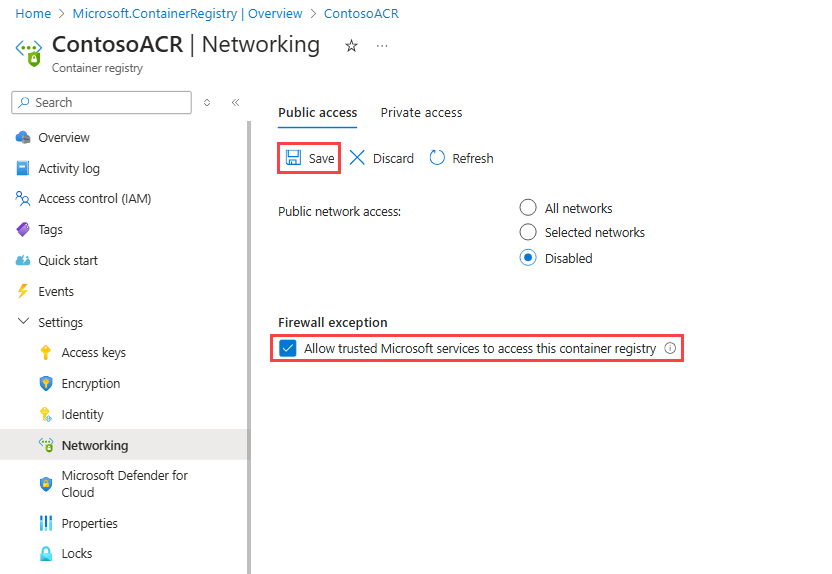
On the Networking page, on the Public access tab, under Public network access, select Disabled.
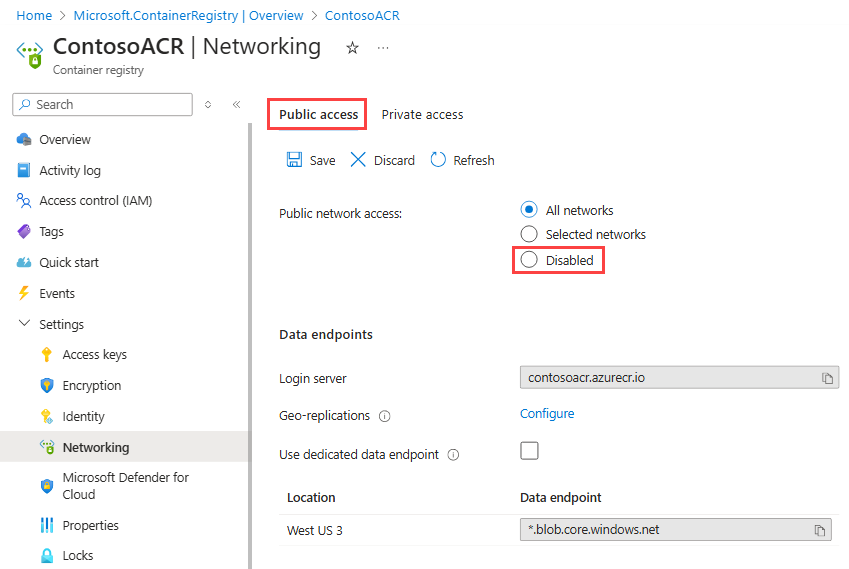
Under Firewall exception, check that Allow trusted Microsoft services to access this container registry is selected, and then select Save.
Assign the AcrPull role
Creating environments by using container images uses the ADE infrastructure, including projects and environment types. Each project has one or more project environment types, which need read access to the container image that defines the environment to be deployed. To access the images within your ACR securely, assign the AcrPull role to each project environment type.
To assign the AcrPull role to the Project Environment Type:
In the Azure portal, go to the ACR that you want to configure.
On the left menu, select Access Control (IAM).
Select Add > Add role assignment.
Assign the following role. For detailed steps, see Assign Azure roles using the Azure portal.
Setting Value Role Select AcrPull. Assign access to Select User, group, or service principal. Members Enter the name of the project environment type that needs to access the image in the container. The project environment type displays like the following example:
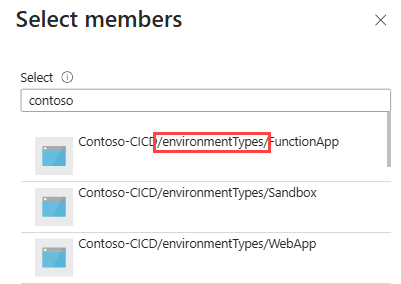
In this configuration, ADE uses the Managed Identity for the PET, whether system assigned or user assigned.
Tip
This role assignment has to be made for every project environment type. It can be automated through the Azure CLI.
When you're ready to push your image to your registry, run the following command:
docker push {YOUR_REGISTRY}.azurecr.io/{YOUR_IMAGE_LOCATION}:{YOUR_TAG}
Build a container image with a script
Rather than building your custom image and pushing it to a container registry yourself, you can use a script to build and push it to a specified container registry.
Microsoft provides a quickstart script to help you build your custom image and push it to a registry. The script builds your image and pushes it to a specified Azure Container Registry (ACR) under the repository ade and the tag latest.
To use the script, you must:
- Create a Dockerfile and scripts folder to support the ADE extensibility model.
- Supply a registry name and directory for your custom image.
- Have the Azure CLI and Docker Desktop installed and in your PATH variables.
- Have Docker Desktop running.
- Have permissions to push to the specified registry.
You can view the script here.
You can call the script using the following command in PowerShell:
.\quickstart-image-build.ps1 -Registry '{YOUR_REGISTRY}' -Directory '{DIRECTORY_TO_YOUR_IMAGE}'
Additionally, if you would like to push to a specific repository and tag name, you can run:
.\quickstart-image.build.ps1 -Registry '{YOUR_REGISTRY}' -Directory '{DIRECTORY_TO_YOUR_IMAGE}' -Repository '{YOUR_REPOSITORY}' -Tag '{YOUR_TAG}'
Connect the image to your environment definition
When authoring environment definitions to use your custom image in their deployment, edit the runner property on the manifest file (environment.yaml or manifest.yaml).
runner: "{YOUR_REGISTRY}.azurecr.io/{YOUR_REPOSITORY}:{YOUR_TAG}"
To learn more about how to create environment definitions that use the ADE container images to deploy your Azure resources, see Add and configure an environment definition.